Welcome to RennTech.org Community, Guest
There are many great features available to you once you register at RennTech.org
You are free to view posts here, but you must log in to reply to existing posts, or to start your own new topic. Like most online communities, there are costs involved to maintain a site like this - so we encourage our members to donate. All donations go to the costs operating and maintaining this site. We prefer that guests take part in our community and we offer a lot in return to those willing to join our corner of the Porsche world. This site is 99 percent member supported (less than 1 percent comes from advertising) - so please consider an annual donation to keep this site running.
Here are some of the features available - once you register at RennTech.org
- View Classified Ads
- DIY Tutorials
- Porsche TSB Listings (limited)
- VIN Decoder
- Special Offers
-
OBD II P-Codes - Paint Codes
- Registry
- Videos System
- View Reviews
- and get rid of this welcome message
It takes just a few minutes to register, and it's FREE
Contributing Members also get these additional benefits:
(you become a Contributing Member by donating money to the operation of this site)
- No ads - advertisements are removed
- Access the Contributors Only Forum
- Contributing Members Only Downloads
- Send attachments with PMs
- All image/file storage limits are substantially increased for all Contributing Members
- Option Codes Lookup
- VIN Option Lookups (limited)


shonuff
-
Posts
16 -
Joined
-
Last visited
-
Days Won
6
Recent Profile Visitors


shonuff's Achievements
Member (1/1)
14
Reputation
-
I only replaced the lower.
-
Yeah the compromise of a direct injection engine is they don't have the washing effect from fuel being injected upstream.
-
The fuel line is a flare fitting. It can be separated from the manifold and aligned into the flare first before the manifold is lined back up. I understand your frustration. The first time around is a royal PITA. If you had to do it again, I guarantee it would go much quicker. Sent from my iPhone using Tapatalk
-
The T25 screw is threads up as in you’re unscrewing it down towards the ground. Sent from my iPhone using Tapatalk
-
Mine is a 2009 3.6L V6. The black horizontal tube you're talking about sounds like the step where I said to remove the water hose bracket with a T25 torx bit. The bracket is a keyhole slot so once you remove the T25 screw you can slide the bracket towards the front of the car and release it. Once that is free the black tube moves out of the way giving you access to those triple square bolts.
-
You can kind of tilt the intake manifold towards the back firewall and free the fuel line after you’ve pivoted it up. It does take a little bit of wiggling/working it. It’s a flare fitting which looks like a cone that fits inside another cone. The fuel line flexes around a little which provides the resilience you need to pop it out. You can pull the line down a little with your hand to free the cone from the upper fitting. Sent from my iPhone using Tapatalk
-
If everything is unbolted, you should be able to pull the intake manifold up from the passenger side and pivot it up from the drivers side. Once its up a few inches you have a little bit of space to wiggle it free from the upper fuel rail nut.
-
Thanks, I get it. The first time I removed my intake manifold was for the same reason, failed PCV valve. I got a replacement diaphragm membrane for $20 and spent the whole night removing the intake manifold because there was no tutorial to follow. It was frustrating. I was slowly working my way around the engine trying to find all the mounting bolts and wiggling the intake manifold until it felt free. When I put it all back together I had a slow gas leak due to the fuel injector seals. Coming from the BMW world where there is a tutorial for everything, I decided to document the process this time around to make a tutorial. Hopefully this helps others in the future who need to replace their PCV valve. Sent from my iPhone using Tapatalk
-
Cayenne 3.6 V6 Intake Manifold Removal DIY This DIY tutorial covers how to remove the intake manifold on the 3.6L V6 Cayenne. Removing the intake manifold gives you access to several parts of the engine that you may need to service. Disclaimer: Perform at your own risk. This is for reference only, I am not responsible for any damage/injuries that may occur from this procedure. Please do not attempt if you are not comfortable with doing work on your car or working around the fuel system. Work in a well ventilated area as you w Author shonuff Category Cayenne (9PA, 9PA1) - Common Fixes and Repairs Submitted 03/09/2018 08:31 AM Updated 03/09/2018 10:00 AM
-
This DIY tutorial covers how to remove the intake manifold on the 3.6L V6 Cayenne. Removing the intake manifold gives you access to several parts of the engine that you may need to service. Disclaimer: Perform at your own risk. This is for reference only, I am not responsible for any damage/injuries that may occur from this procedure. Please do not attempt if you are not comfortable with doing work on your car or working around the fuel system. Work in a well ventilated area as you will be releasing a small amount of gas and fumes. Difficulty: 5/10 Estimated Time: ~2 hours If you’re getting a Durametric error code P0674, you likely have a bad PCV valve that needs to be replaced. An easy way to test a bad PCV valve is to unscrew the oil fill cap on the engine while it is idling. If you feel suction on the cap and/or the idle fluctuates once the cap is removed then your PCV valve is bad. The PCV valve is built into the valve cover so your options are to buy a whole new valve cover assembly (95510513500- ~$347) or buy just the PCV membrane (aftermarket $20-25) and replace it in your existing valve cover. To get access to the valve cover, you will need to follow this DIY article to remove the intake manifold first. Other reasons to remove the intake manifold are to service your fuel injectors or to make it much easier to replace the thermostat. The thermostat can be changed without removing the intake manifold (I did it twice), however you basically need to be a contortionist to reach the bolts to remove housing and you will scrape some knuckles along the way. Tools Needed: -Flathead screwdriver -Assortment of torx bits (T20, T25, T30, 6” long T30) -Pliers -Torque Wrench -3/8” ratchet set with various extensions and a universal joint -1 1/16” Deep socket -10mm Triple Square Spline Bit -Crescent Wrench -9/16” Open End Wrench -Dental pick Parts Needed: -Brake Booster Vacuum Hose- 95535557941 (your existing hose is probably brittle and will likely crack from removing it, I recommend getting a new one) -Lower Fuel Injector Seal Kit (3X) - 95511091000 (existing seals may be brittle and once you have removed the intake manifold, they may not seal properly upon reinstallation, I recommend getting new ones, need 3 sets) Procedure: First start by removing the plastic covers surrounding the engine. Using a flathead screwdriver, remove the quarter turn plastic trim fasteners. Rotate them in either direction by 90 degrees and pop them out. Be ready to catch them as sometimes they like to jump out. Next you will need to remove the 2 torx screws on either side of the engine cover with a T25 bit and the screw under the windshield washer reservoir cap with a T20 bit. Remove the oil fill cap and front engine cover by pulling straight up. They are held on by friction rings around a stud so pulling straight up will release it. Now that you have the covers removed, it’s time to remove the intake filter box and intake piping. Using your T25 torx bit, rotate the 2 screws until the dot on the screwhead lines up with the lower indication on the filter cover. Now gently use your pliers to pull them straight out. With your flathead screwdriver, pop up the two clips to release the filter housing. Pivot the filter house towards the passenger side of the car and remove it. Remove the engine air filter as well. Next, remove the wiring harness from the MAF sensor located in the middle of the intake piping. Loosen the clamp around the intake piping on the throttle body and gently work the intake piping back and forth until it releases from the throttle body. Remove the top bolt on the engine lift bracket and loosen the lower bolt with your M10 triple square bit. Then pivot the bracket towards the front of the car. Remove the bolt next to the throttle body with your M10 triple square bit. Then unplug the wire harness from the throttle body. Remove the top bolt from the bracket on the passenger side of the engine with your M10 triple square bit. Remove the vacuum lines from the intake manifold on the passenger side of the engine. One hose requires pliers to open the hose clamp, the other can be removed by hand if you squeeze the lock ring around the hose to release it. Next, from the passenger side, reach your hand around to the back side of the engine. There is a vacuum line that goes from the bottom surface of the intake manifold to the brake booster. You will need to pull the vacuum line fitting straight down to pop it out of the intake manifold. I don't have a good picture of it so here is a diagram of it. Pull down on the elbow fitting, not the hose. Also on the back side of the engine just behind the vacuum line you removed there is a bolt that needs to be removed using your M10 triple square bit. You are working blindly so locate the bolt first by feel and guide your bit to the bolt. Remove the 3 screws holding the actuator with a T25 torx bit. Slowly pull it straight out towards the front of the car. There is an actuator arm that attaches to a shaft on the passenger side of the part. Once you have enough clearance to reach your finger in there, you need to slide the arm off the shaft as you pull the entire actuator off. Then disconnect the vacuum hose from the actuator. Now pull the coolant hoses out of their holder in the intake manifold and push it towards the driver side of the car. There is a T25 torx screw that attaches this water hose bracket near the back of the intake manifold. The screw is facing up, so you need to use your T25 torx bit and get creative with removing that screw. I used a crescent wrench to turn the torx bit while holding the torx bit in place with my other hand. With the water hose bracket free, slide the water hose bracket towards the front of the car to release it from the intake manifold. This bracket has a keyhole slot that will release once it's slid forward. Remove the oil dipstick tube bracket with a T25 torx bit. Just push it out of the way once you remove the screw. With your long T30 torx bit, remove the bolt on the intake manifold that was under the actuator. Next, there are 3 blind holes on the driver side of the intake manifold. You need to use your long T30 torx bit to loosen the screws inside those holes. Those 3 screws are captive screws so they will not come out. There are 3 bolts below the intake runners. They need to be removed with your M10 triple square bit. This is where your universal joint will come in handy. The bolt near the rear of the engine required me to use my u-joint with various entensions to acess. At this point, you will hear gas leaking out. Since you have released the pressure from the lower fuel rail to the lower fuel injectors, the pressurized gas in the rail will leak out. Make sure you are working in a well ventilated area. From the driver side of the car, reach behind the engine to remove the wire harness from the fuel pressure sensor. Using your 1 1/16” deep socket, unscrew and remove the fuel pressure sensor. Using your 9/16” open wrench, unscrew the nut that connects the metal fuel line running from the lower fuel rail. The slimmer your wrench the better. My crescent wrench did not fit here. Now that the intake manifold is completely unbolted, you can start to wiggle it free. You will need to lift the manifold up from the passenger side and pivot it up towards the driver side. You will need to wiggle the lower fuel rail loose to release the metal fuel line you just unscrewed the nut from. It is a flare fitting that pushes into the upper fuel rail assembly. Be gentle here as you don’t want to bend the fuel rail. Once the metal fuel line is free from the upper assembly, you can remove the intake manifold as described above by lifting up from the passenger side first to pivot it off. At this point, you have access to the fuel injectors if you need to service them, the thermostat housing and the valve cover. Unbolting the valve cover is straight forward from here if you need to replace the PCV valve, etc. The fuel injector seal kit comes with a rubber o-ring, Teflon o-ring, Teflon sleeve and metal clip. At the bare minimum you should replace the rubber o-ring and Teflon o-ring. Use a dental pick to remove the old o-rings. These 2 parts are the wear surface when you remove/reinstall the intake manifold and are prone to fail if you re-use them. Trust me, I learned the hard way. To install the intake manifold, reverse the steps above. Take care in sliding the lower fuel rail back onto the lower fuel injectors and lining up the metal fuel line back into the flare fitting. I found it was easier to pull the lower fuel line out of the manifold to line the flare fitting up first, then pushing it into place in the intake manifold. You want to apply even pressure on the surface as you tighten all 7 of the bolts down on the driver side. Torque the 3 triple square bolts evenly to 6 ft lbs, torque angle 90 degrees, then a final torque of 22 ft lbs. The bolts holding the engine lift bracket are 17 ft lbs, the other triple square bolts holding the manifold on the head are 15 ft lbs. Once you get it all back together, turn the key to the ON then START position without your foot on the brake. This will run the fuel pumps to build pressure back up in the fuel rail. I removed the key and repeated 2-3 times to get the fuel pressure up. The first time you restart, it may take a couple seconds to fire up due to the fuel pressure needing to build back up. If you replaced your PCV valve, it may idle rough as the ECU needs to remap since it adapted to a leaking PCV valve over time. If you did not replace the fuel injector seals and smell gas/hear it leaking after shutting off the engine, then your seals failed and you need to repeat the procedure and replace those seals.
-
3.6 V6 coolant leak help
shonuff replied to shonuff's topic in 9PA, 9PA1 (Cayenne, Cayenne S, Cayenne Turbo, Cayenne Turbo S)
Interesting. When I did the cooling system refresh I replaced the water pump (front of engine) and thermostat (side of engine) so that confuses the hell out of me why they would call that a water pump thermostat housing if neither of those components are back there. Was it a fairly straight forward job? Doesn't look like I would have to remove much to get to it. I may take some pictures and make a DIY for the job. -
3.6 V6 coolant leak help
shonuff replied to shonuff's topic in 9PA, 9PA1 (Cayenne, Cayenne S, Cayenne Turbo, Cayenne Turbo S)
Thanks for the PN! Doesn't look very expensive, my local dealership has it for $26 and the o-ring is less than $2. I think the thermostat is on the back of the 3.2 V6 but for the 3.6 V6 the thermostat is on the side of the engine (driver side). I know this because I replaced it during my cooling system refresh at 90k miles. However, there does seem to be a housing for something back there, I'm just not sure what it is.. -
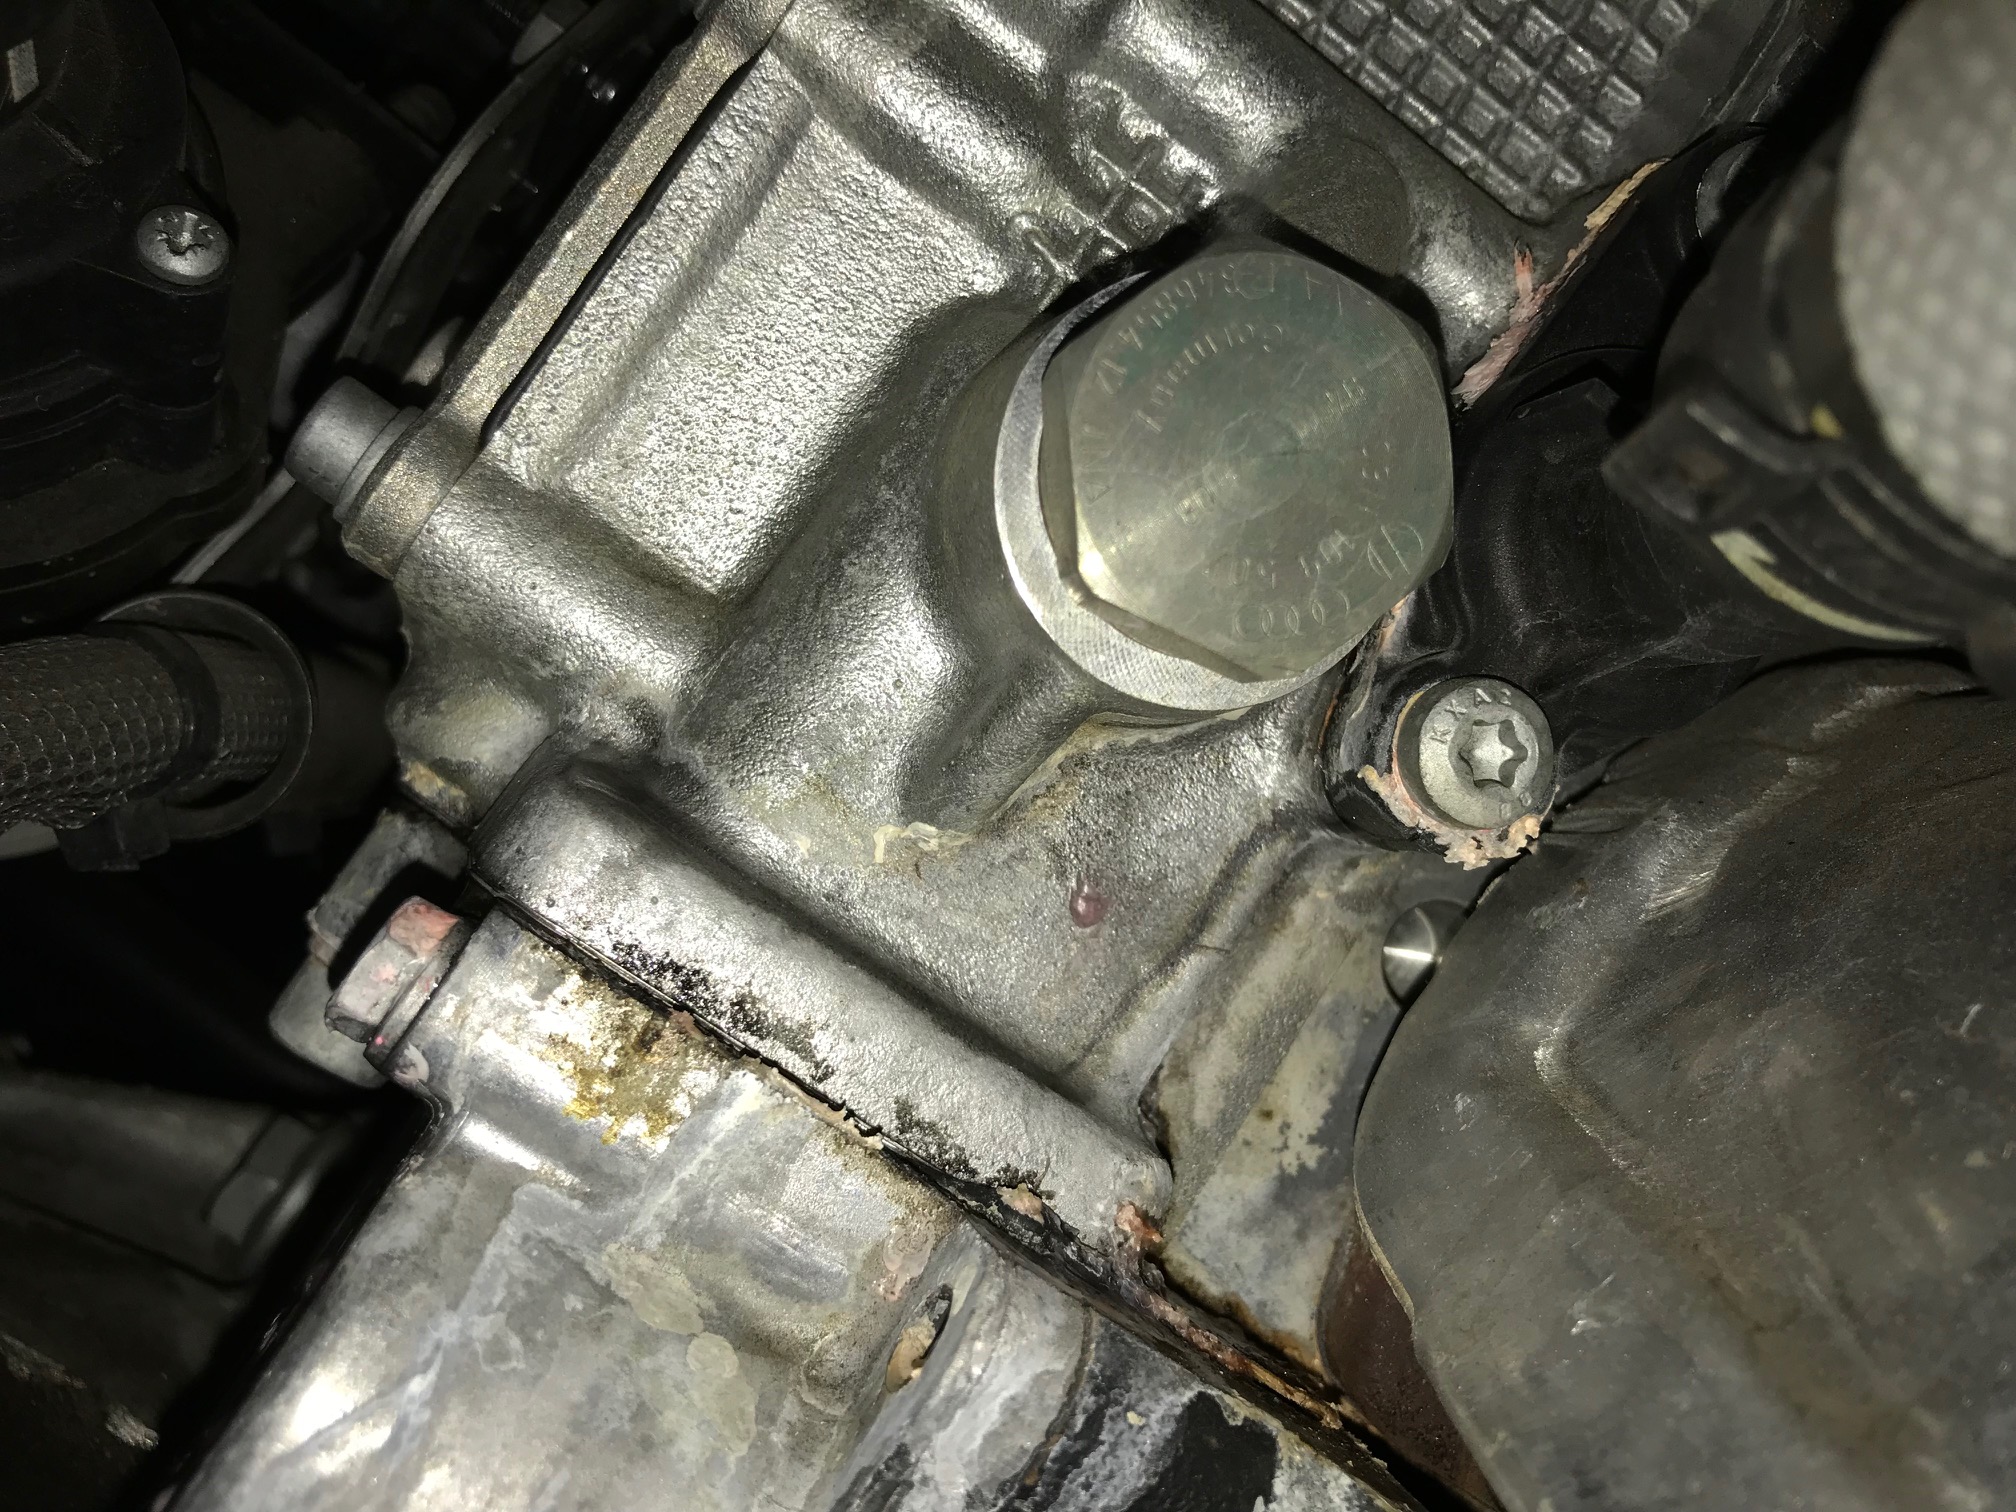
The common coolant pipe issue seems to only affect the V8 Cayenne's. I'm wondering if my coolant leak is a common problem too. I've been losing coolant on my 3.6 V6 Cayenne at a fairly slow rate compared to the other more common issue. I'm having to top it off about once every month or two. Last weekend I was changing the oil and started investigating the leak. It looks to be coming from a black plastic coolant hose fitting on the back of the engine, passenger side. Has anyone seen this problem before? I'm wondering if there is just a bad o-ring behind that fitting or if the whole part needs to be replaced. And if anyone knows the part number for this I would greatly appreciate that too! Thanks

-
Follow up post for anyone who has this problem in the future. I replaced the thermostat with a new one and fixed the issue. I confirmed it was a slow opening thermostat when I removed the old one and put it in a pot of boiling water with the new thermostat. The new thermostat opened as expected while the faulty one did not open until later. Both thermostats were bought from the Porsche dealership. Side note, the replacing of the thermostat on the 3.6L V6 is a PITA. It is in a hard to reach area with hoses and wire harnesses running in front of it guaranteeing that you will walk away with bloody knuckles.
-
I recently replaced the thermostat on my '09 Cayenne 3.6L V6 with a genuine Porsche thermostat along with water pump, belt, etc. Ever since I replaced it I've noticed that on the first start of the day, when the engine is bone cold, the water temp creeps past 1/2 mark and to the 3/4 mark sometimes before it settles back to 1/2 mark. Once it settles at the 1/2 mark it stays rock solid, no issues whatsoever in 100F ambient days in stop and go traffic. Did I get a bad thermostat? It feels like a slow opening thermostat to me. Sometimes I think its in my head and maybe it behaved this way before I replaced the thermostat but to be honest I never paid attention to it until I overhauled the cooling system. Has anyone else noticed this behavior or can confirm it is a lazy thermostat? Thanks


.jpg.82cb3003a2dcdf94c5d3c2a30489cbb0.jpg)