Welcome to RennTech.org Community, Guest
There are many great features available to you once you register at RennTech.org
You are free to view posts here, but you must log in to reply to existing posts, or to start your own new topic. Like most online communities, there are costs involved to maintain a site like this - so we encourage our members to subscribe or donate. All subscriptions and donations go to the costs operating and maintaining this site. We prefer that guests take part in our community and we offer a lot in return to those willing to join our corner of the Porsche world. This site is 99 percent member supported (less than 1 percent comes from advertising) - so please consider an annual subscription or donation to keep this site running.
Here are some of the features available - once you subscribe RennTech.org
- View Classified Ads
- DIY Tutorials
- Porsche TSB Listings (limited)
- VIN Decoder
- Special Offers
- Paint Codes
- Registry
- Videos System
- View Reviews
- and get rid of this welcome message
It takes just a few minutes to register, and it's quality Porsche information at a low cost.
Contributing Members also get these additional benefits:
(you become a Contributing Member by subscribing or donating money to the operation of this site)
- No ads - advertisements are removed
- Access the Contributors Only Forum
- Contributing Members Only Downloads
- Send attachments with PMs
- All image/file storage limits are substantially increased for all Contributing Members
- Option Codes Lookup
- VIN Option Lookups (limited)


creekman
-
Posts
474 -
Joined
-
Last visited
-
Days Won
1
Content Type
Profiles
Events
Forums
External Paint Colors
Downloads
Tutorials
Links Directory
Collections
Classifieds
Store
Everything posted by creekman
-
 I have a new house and I can't find any info in the owner's manual on how to cancel the old codes and reset a new code for the garage door operator. I see on newer cars that you press the two outside buttons until the light flashes, but that doesn't seem to work. Plus the owner's manual doesn't show the rear view mirror and the buttons... Thanks,
 -
Value of a running 996 motor?
creekman replied to Ryan...'s topic in 996 Series (Carrera, Carrera 4, Carrera 4S, Targa)
Creekman here: I sold my motor with all the accessories with 65,000 miles for $7,000. I tried to sell other parts, back seats, rear spoiler mechanism, engine room fans, etc. at give away prices without success. I wouldn't hinge your decision and project on what you'll get for the engine since you'll be a lot deeper into costs than what you'll get out of the Porsche engine, particularly with a 129K miles. However if money isn't the lyinch pin to your project, go for it... The car is breath taking to drive. I believe Renegade has made improvements to "how to" on working out a lot of the electrical issues since I built mine. -
Getting rear of 996 on stands
creekman replied to singhmrp's topic in 996 Series (Carrera, Carrera 4, Carrera 4S, Targa)
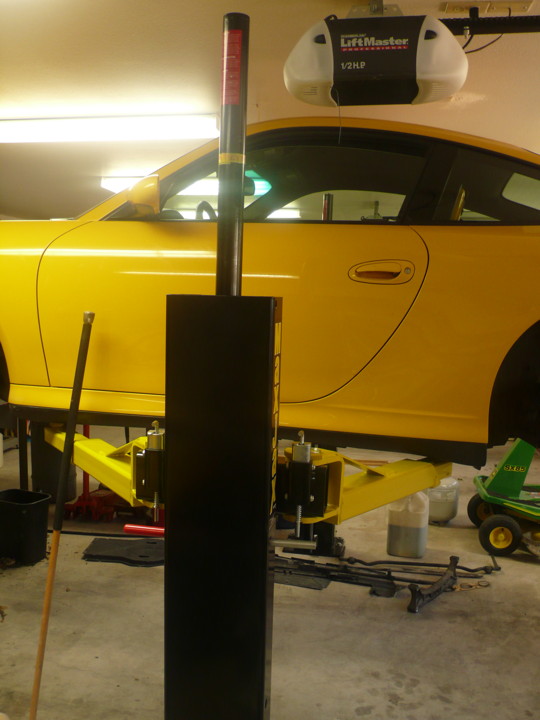
The MaxJax has 5 large bolts that screw into permanent anchors in the floor. As long as you have a 4" slab you're good to go. The feature is that you can remove the bolts and wheel the post out of the way when not in use. The post has wheels so it can be moved around without much effort. However I've never moved mine. I just park a little to the rear of the garage so the doors can swing full open without hitting the post. The install is pretty easy, you'll need a rotorhammer for drilling holes in the concrete. I've had my car up and down so many times I couldn't even count. It's great for cleaning wheels, oil changes, removing the belly pans, etc. I'll take more pixs and post. Also the MaxJax dealer was really helpful, I had the need to replace some parts and they sent it out without any questions. Nice people... If anyone ends up installing this lift I can give you some good advise on the install, I came up with some short cuts on the install. If you enjoy working on your car $2,000 for a $30,000 plus car isn't a deal breaker. I wouldn't leave home without it... I'm not a paid employee, but just a happy customer... :-) -
Getting rear of 996 on stands
creekman replied to singhmrp's topic in 996 Series (Carrera, Carrera 4, Carrera 4S, Targa)
I finally bit the bullet and bought a MaxJax 2 post lift that fits under my 8' garage ceiling. I sit on a BoneTail rolling chair and scoot around under the car. The MaxJax lift is good for 6,000 lbs so I feel safe and I don't have to worry about getting a jack under the car and having to rely on jack stands. I appreciate the cost of the lift is signficant, but your life is too. I bought my MaxJax lift from Costco on sale, $1,900, free delivery. You might ralionalize the cost by saving a couple hundred dollars an oil change at the dealer, plus have a lot more fun working on your car.
-
Disconnecting the air bag
creekman replied to myturbo's topic in 996 Series (Carrera, Carrera 4, Carrera 4S, Targa)
Some knowledgable soul should do a tech tip on how to release the 996 elelctrical connectors... I can't tell you between not knowing how to make the release and brittle plastic I've broken my share. -
My car is leaking
creekman replied to gcp's topic in 996 Series (Carrera, Carrera 4, Carrera 4S, Targa)
GCP... After taking Julie's good advise you might take a hose and water to specific areas of the roof, windshield, door glass, etc. to see if you can duplicate the water accumulation under the seat. Naturally you would start out with a dry floor. It appears that the water is coming in somewhere in the rear seat area, then draining down to the lower driver's seat pan. Do you get the water build up when parked or driving? -
I'm wondering if this guy has the complete code for the ECU... I have another issue that if someone had the factory code might solve for me. Would you post the link to this guy? Have you driven your car to see if there is any difference in performance or gas mileage, I'm thinking you might get into more trouble than it's worth... Thanks,
-
Airbag Code 20, 26, 28, 30.
creekman replied to cagleen's topic in 996 Series (Carrera, Carrera 4, Carrera 4S, Targa)
Is your driver's seat in or out of the car... If the seat is out that will throw a air bag code. -
C2 Air condition compressor
creekman replied to johnnewcomb62's topic in 996 Series (Carrera, Carrera 4, Carrera 4S, Targa)
Thanks... Ya that's me, old cars and old fart... I hope John gets his A/C sorted out, it shouldn't be that hard. -
C2 Air condition compressor
creekman replied to johnnewcomb62's topic in 996 Series (Carrera, Carrera 4, Carrera 4S, Targa)
Hi John, I'm no expert, but I'll tell you what little I know. Your temp switch or dial is attached to a capallary tube which is embedded between the cooling fins of your condenser. The end of the tube is sensitive to temperature changes which turns on and off the compressor. You can usually hear the compressor go on and off because the engine will change it's sound or sometimes RPM's. This is the way my old "84" Porsche was connected, if the capallary tube isn't placed right you can get condenser freeze up. The older Porsches would freeze up if you asked for too much cold for too long To get a better idea of what's going on with your A/C I would buy a cheap digital thermometer and place in the center vent. You'll be able to watch the temps go up (compressor shuts down), then the compressor comes back on and the vent temps will go down. It's a slow dance that you can watch. Also maybe the system is just low on Freon... I would go to a local A/C shop and have them evacuate the system to be sure you don't have any leaks, then charge it. I beleive your system will hold just a tad short of 2 lbs. of R34 freon. -
How about some pictures of that amazing console... Thanks,
-
I've used Lexol for years, but it always seems to leave a sticky finish. I just tried Pinnacle's Leather clean and conditioner, then used Maguire's Leather creme after the cleaning. The Pinnacile's leather clean was pricey, $49.00. I think there's a tenecey to just keeping using the conditioners without first cleaning the leather. The above process left a rich dull shine on my black leather.
-
996 Over heating problems
creekman replied to gary_cs's topic in 996 Series (Carrera, Carrera 4, Carrera 4S, Targa)
Ahsai's point is a good one, these systems will trap air unless you use a vacuum tool to fill the system. I recently changed some hoses, but the system still had a couple of gallons of coolant in the pipes and radiators. I used the vac tool to fill the remaining coolant and still had problems with air. Finally after several top offs the system got happy again. I know it's been mentioned, your condensers and radiators are clean? I'd change the expansion tank cap. What was the outside air temps and was it stop and go traffic? Have you checked your oil for any signs of coolant? -
Switched Power Rear of car
creekman replied to Rob Wilson's topic in 996 Series (Carrera, Carrera 4, Carrera 4S, Targa)
Rob, I just re-read your post, you're running your backup camera on wifi, mine is hard wired so my problem isn't the same as yours? -
Switched Power Rear of car
creekman replied to Rob Wilson's topic in 996 Series (Carrera, Carrera 4, Carrera 4S, Targa)
Interesting... I have the same problem, I'm connected to the reverse light as well. It takes too long for the backup screen to light up. However it seems like once the car has been in reverse the camera comes on much sooner if you put it in reverse a second time. Is that a problem with not enough electrical input or it just takes that long for the camera to initalize and work? I've asked the tech people at Crutchfield and they didn't have an answer other than that is SOP... If you're right that it needs better power I would be interested in what you find out. Thanks, -
I'm sure good advice... thanks.
-
Has anyone tried this radiator temp reduction product that's being advertised on some of the car TV programs? http://www.hyperlube.com/c3/Super-Coolant-c8.html
-
IMS Replacement
creekman replied to mdragon's topic in 996 Series (Carrera, Carrera 4, Carrera 4S, Targa)
Julie, I don't see either in your post or the estimate sheet what the miles are on your car. That might help the members respond with more accuracy. If missed it I apologize in advance. -
Use of Loctite 242: Advice Sought
creekman replied to Y2K911's topic in 996 Series (Carrera, Carrera 4, Carrera 4S, Targa)
In 2012 on my return from California to Texas I spent a non-scheduled night in Winslow,AZ. The idler bolt backed out and the belt came off, red lights on the dash, pulled over to the shoulder and got the cell phone out. I finally called 911, she put me in touch with a local tow service. The service asked me where I was, I told him I didn't know. He suggested seeing if there was a "mile marker"anywhere, as luck would have it there was one 100' behind my car. I was 12 miles West of Winslow. A nice young man with a flat bed arrived within 30 minutes and took me and the car to the local Chrysler dealer. One of the mechanics couldn't wait to get his hands on the car, within 15 minutes he had the bent bolt and pulley in hand. We overnighted the parts and I was on my way by 10:00 the next morning. The dealer treated me fair and I was ready for a $300 tow bill from the towing company, it was $87.00. If you're going to get stuck on the road, do it Winslow, AZ. Fairness still reins in some places. I believe the torque for the idler pulley is 50 ft/lb. I would also recommend following Wayne's suggestion of using Loctite. Google the Loctite data info. Also I've called Locktite techs, they were very helpful recommending a specific product for a specific need. Locktite has tons of products so it worth reviewing them for specific needs. -
Cracked tail light housings
creekman replied to Nehmaiz's topic in 996 Series (Carrera, Carrera 4, Carrera 4S, Targa)
Hey... Y2K, just reporting like it is... I hope I haven't cracked you up... :-) -
I'm more interested in knowing why you want to turn them off?
-
Radio Replacement Double DIN
creekman replied to greg0078's topic in 996 Series (Carrera, Carrera 4, Carrera 4S, Targa)
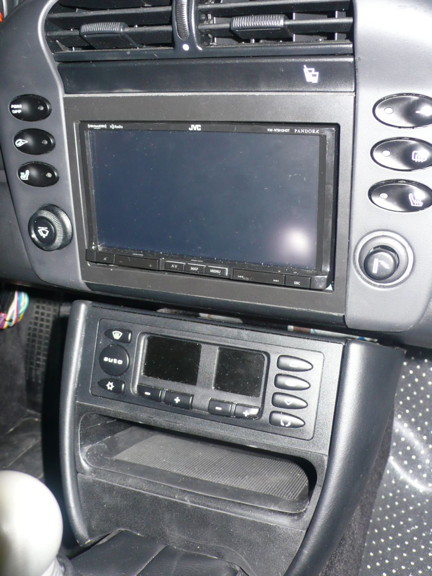
I installed about a year ago a JVC ( JVC KW-NT810HDT) nav, hands free phone, i-pod player, DVD, back up camera capabilities, etc. I liked the unit because it had a bigger screen. It's a touch screen, no knobs. Bigger screen, but some times it's hard to touch the screen at the right place if you're at speed. I would do the same thing again, it has a NavTec data base which isn't as good as the Garmin based units, at least in my mind. When I go cross country I'll take a hand held Garmin and often it has better information than the JVC unit. So far NavTec hasn't updated the datat base, only the firmware. I bought the JVC unit from Crutchfield, they're good to work with and have great customer support. The unit was $999.00.
-
Cracked tail light housings
creekman replied to Nehmaiz's topic in 996 Series (Carrera, Carrera 4, Carrera 4S, Targa)
Here's one thought when you re-install the tail light bodies, I think often that the mounting bracket under the tail light is not adjusted to the angle of the tail light body. Also the tendancy is to over tighten the Torx screws. Just tighten until the light body is stabilzed, it's not going anywhere... Also the tail light lens will crack, nearly looks like a factory line, but I think that is another reason why you can torque the tail light body by having the mounting bracket out of alignment and over tightening... No question that the tail light housing mounting tabs are under engineered... I can't begin to know how many plastic connections that I've broken working on the car. Porsche should do better on this... -
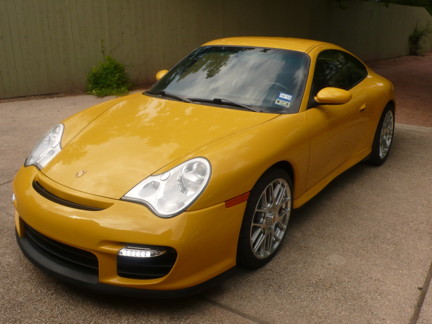
I've installed a GT2 bumper on my car, it protrudes further out and has 7/8" less ground clearance. My "84" 911 had structural frame parts under the front of the car that allowed for mounting skid plates, but there's nothing there on the 996. Has anyone come up with a solution to go up and down steep driveways without damaging the chin spoiler? Skid plates or an airbag system that would allow the raising of the car. Never hurts to ask, you never know where the next great idea will come from. Thanks,
-
First a little back ground… I’ve installed a LS3/480 HP V8 in my 2003 C4S. As part of the conversion I installed a custom 3rd radiator where Porsche had installed an oil radiator for the Tiptronic cars. I wanted to utilize the grill venting on the GT2 bumpers for better airflow for the 3rd radiator. On my last trip to California in Dec., 2014 I purchased an aftermarket 996 GT2 FiberGlass front bumper. I met with the owner of the company, I showed him my car and subsequently ordered a 996 GT2 bumper. The very limited instructions say you should take the bumper to a professional to make the install since there is some fitting to be done. I received the bumper in good order and started the fit and install. I might add that I worked my way through school in a body shop, plus I have more tools and equipment than a lot of shops. Anyway, I struggled with the fit, mostly the bumper lacked clearance under the radiators. I talked to the owner and he emphasized that there would be some fitting. So with that information I did some cutting on the bumper tray for clearance of radiator supports. Long story short after several other back and forths with the shop they finally agreed that they sold me the wrong bumper. The bumper that I got was for a narrow body car. They refunded some of the money for the bumper and since I had made cuts on the bumper he said just keep it. Anyone need a 996 GT2 bumper? My next stop was a search on the internet. I found a company that had modified a 997 GT2 bumper to fit the 996 head lights, what a great idea... This bumper was nearly twice as expensive, part of that extra cost was the factory grills and LED lights that I purchased with the bumper. I liked the fact the 997 GT2 bumper had LED lights and was a little more aggressive looking than the 996 GT2 bumper. After coming up short on the first bumper I had a long discussion with the owner of the company on the 997 bumper. I ordered it with the caveat that he would personally check the bumper out before shipping. You’ll see later that didn’t happen, welcome to the world of after-market Fiber Glass components. INSTALLATION: Before you can do a trial fit of the bumper to the car I would do the following: 1. Take a hand file and be sure that the trailing edge of the bumper returns at the wheel wells are to your satisfaction. I made sure there was an even flow to the edge as well as put a small radius on the inboard edge. Paint will stick to a radius edge better than a sharp one. 2. Next measure the opening between the plastic channel (this part is on the car directly in front/below the hood) where the top lip of the bumper will be inserted. The channel opening is fixed so you have to sand/grind down the bumper lip so it can be inserted into the channel. I took drills and tried several until the drill slipped into the channel, then used my Veneer Calipers to measure the drill diameter for the channel opening. Mine measured .190” plus. 3. Next I took a D8 sander and reduced the fiberglas lip to the .190" measurement. Don’t over do it since there won’t be a lot of fiberglas left, just sand the lip down enough so the lip will seat all the way into the channel. Be careful of the two mounting tabs, they are slightly protruding/sticking up so as you sand across the bumper lip to reduce the thickness you can take too much material off of the two tabs. All the sanding was done on the inside of the bumper. These tabs are where your first two mounting screws (flat head philips) will attach and will center your new bumper. You can adjust the hood clearance/gap by raising or lowering the plastic channel, the channel is held in place with 10mm nuts. 4. Next I sanded and leveled the two returns at the marker lights. Again, all the sanding was done on the inside of the bumper. These returns will slip into the groove created by the plastic bracket and the lower return of the fender sheet metal. Along those lines I would cover the fender from the head light back to the wheel well opening with blue/green masking tape. That will protect the paint during the install. These plastic brackets are adjustable, so take a 10mm socket and loosen the brackets so they’re as low as they will go for the first time. You can measure the thickness of the fiberglas returns to be sure they’re going to slip into the retaining channel. I would try and make the thickness of the fiberglass returns as consistent as possible. If you need to drop the plastic bracket further down you can elongate the mounting holes. I had to do that on the left side. Remember that the fiber glass layup is not always consistent so you want to sand/grind the back sides of these areas so your finished gap/lines between the fender and bumper are even. 5. This item might not be in order, but I would remove the forward fender liners before installing the bumper for the first time so you only have to worry about the fit of the bumper and not have any obstructions. Also you’ll see that the liners will need some work, this is due to the fact that the bottom of the bumper is too wide. 6. You’ll need to provide spacers at the forward recess of the marker light location. I turned two aluminum donuts, .441"O.D. X .190"I.D. X .126" tall. The reason for the spacers is to allow the front tabs of the marker light to slip over the fiberglass. You can use washers or tubing to do the same thing. The back of the marker light snaps into place. I might add that after riveting the lower plates (see later info on this) I ended up with taller spacers. See Pix No. 1. 7. If you want a tighter fit under the headlights, then you'll have to add some fiberglass/filler. I’m assuming the bumper is made with polyester resin so you could use strips of mat which would be easy to taper - or you could use a strong putty. If you have the sources, poly resin with milled fibers will also work. I used a product called U-Pol which is a Bondo type product, but has glass fibers. It worked easy, sanded easy, a great product. If you use some type of filler you should consider drilling small holes in the putty/filler area to help the filler adhesion – I’m sure you would do this without me mentioning it, but sand off the white primer finish on the bumper so you can make a good bond to the bumper… See Pixs No. 2, 3 and 4. I don’t understand if they modified the molds for the 996 why they didn’t come up with a better fit under the headlights… 8. Here’s the big issue with this bumper, the top of the bumper is dead on with it’s mounting holes, some where drilled, others had dimples where the holes would have to be drilled. But the bottom of the bumper is approximately 2” too wide so a closure strip will have to be added to the fender liners. Again, I don’t know why you make a custom bumper and the molds were not made to fit the car that it was made for. Further, I have 19” wheels with a bigger off-set than the factory 18’s. The bumper stuck out farther than my wheels, looked like a choo-choo cattle catcher. So I took a cut off wheel and made 3-5 slices on the bottom tray at the corners, then pulled the bumper together using wire attached at the marker light area mounting holes. I twisted the double wire with a screw driver until the cut joints at the bottom tray came together. I used JB Weld on the inside of the bumper to cement the joints together. I had planned to use aluminum .040” plates that later would be riveted to give the cut area reinforcement. I wouldn’t rely on the JB Weld for long term, in my case I used aluminum doublers, but you might consider laying in some additional Fiber Glass. See pix No. 5. 9. The bottom bumper tray will cover up several mounting points to the radiator supports, several other mounting locations as well as the fender liner. I have an aircraft tool that is used for locating blind holes, see pix No. 6. You can put two hack saw blades together to make your own locating tool. However I might add until you have every other fastening secured I would not drill any mounting holes in the bumper tray until that’s done. Ask me how I know… The bumper tray fits the bottom of the car, but there’s an approximate gap of 7/8" between the tray and the factory mounting points so you’ll need spacers. I machined spacers out of aluminum, I used a large diameter so I would spread the contact area. Also I used large S.S. fender washers under the screw heads. See pix No.7, 8 and 9. Regarding the 7/8” gap, the spacers takes care of the immediate problem of securing the bumper, but the downside is that it reduces the chin spoiler clearance from 6-7/8" on my factory Turbo bumper to 6” on the 997 GT2 bumper. Plus the 997 GT2 reworked bumper for the 996 overhangs further forward so your up and down driveway clearance will be dramatically reduced. In my case I have a 14% grade to my drive apron and the only way I can get the car to the street is to back out and have a spotter to tell me when to swing the front end just missing the curb return. I’ll have to re-do my drive approach to make using the car workable. Don’t get me wrong, I love the look of the bumper, the LED lights, it’s well made, much better than the first bumper, albeit a lot more expensive. I’m just passing on how to’s to prevent any any lost souls like me surprises. 10. Here’s the reinforcing plates that I used for the bumper tray cut areas. However I’ve extended the plates both to the rear and to the outside to cover open areas under the radiators that the factory bumper originally covered. Again the new bumper should have addressed that… See pix No. 10. 11. Here’s your last challenge, closing up the gap between the fender liner and the new bumper side fenders… Your biggest problem will be to heat and form the fender liner so the outside edge moves forward to tuck in behind the fender/bumper return. Right now the new bumper wheel arch is slightly forward of where the factory liner wants to be. I made a wood buck and heated the back side with my heat gun and formed the fender liner forward. All of this will be obvious to you once you get this far. I put the buck in the bench vise, then set the liner down over the buck once it was hot. You’ll have to hold the liner over the buck until it cools down. Here’s the wood buck that I band sawed out, very simple, but it worked like a charm. See pix No. 11 12. Depending on your needs and abilities you can leave the gap, use rubber or plastic to fill the liner gap. I chose to use .040” aluminum and riveted it to the fender liner… See pix No. 12 13. Here’s how I solved the tow eye bumper plug installation… See pix 13 and 14. 14. Regarding the radiator intake boots: Here’s the information that’s worth the price of admission if you’re going to do this bumper…The manufacture of the bumper doesn’t know, I only backed into this information by accident. 2 years ago I bought a new air intake boot since mine had a tear in it. The bumper company said that either you chop up your existing boot or go without and just let the air migrate through your grill and across your radiators willy-nilly. I cut away on my existing boot and it was a mess and fit the bumper poorly… I happen to look at the P/N on the boot and it began with a 997 P/N. I figured if a 997 boot fit the radiator on my C4S then all I had to do was to order the 997 GT2 boot. Sure enough it fit both the radiator and the GT2 bumper. I did have to snip a couple of places, but overall it was a good fit. See pix 15. 15. I connected the LED lights, took the one amber incandescent light in the LED body and turned that into a directional light. Also I completed the RennTech side marker light conversion to a directional light. I used a honey cone aluminum mesh that I fitted and installed behind the grill openings. I removed the grills for painting, then re-installed them, then attached the fitted grills (I had them powder painted) with hot glue. It would have been a lot better installing the grill mesh before installing the grills. I might add that I bought the Porsche factory grills and LED lights. Lastly, I used the factory rubber eye brows under the headlights, I cut off the mounting tabs and use the 1/2” 3M molding attachment tape to bond them to the bumper. Loren has already posted the schematic I used for connecting the LED lights. Most of this work is pretty generic to any after market bumper. Take your time, measure twice, cut once and you’ll be ok… There’s a lot of nuances that I haven’t gone into, if you have any specific question, feel free to PM me. Good luck, Pix No. 1 Pix No. 2 Pix No. 3 Pix No. 4 Pix No. 5 Pix No. 6 Pix No. 7 Pix No. 8 Pix No. 9 Pix No. 10 Pix No. 11 Pix No. 12 Pix No. 13 Pix No. 14 Pix No. 15