Welcome to RennTech.org Community, Guest
There are many great features available to you once you register at RennTech.org
You are free to view posts here, but you must log in to reply to existing posts, or to start your own new topic. Like most online communities, there are costs involved to maintain a site like this - so we encourage our members to donate. All donations go to the costs operating and maintaining this site. We prefer that guests take part in our community and we offer a lot in return to those willing to join our corner of the Porsche world. This site is 99 percent member supported (less than 1 percent comes from advertising) - so please consider an annual donation to keep this site running.
Here are some of the features available - once you register at RennTech.org
- View Classified Ads
- DIY Tutorials
- Porsche TSB Listings (limited)
- VIN Decoder
- Special Offers
-
OBD II P-Codes - Paint Codes
- Registry
- Videos System
- View Reviews
- and get rid of this welcome message
It takes just a few minutes to register, and it's FREE
Contributing Members also get these additional benefits:
(you become a Contributing Member by donating money to the operation of this site)
- No ads - advertisements are removed
- Access the Contributors Only Forum
- Contributing Members Only Downloads
- Send attachments with PMs
- All image/file storage limits are substantially increased for all Contributing Members
- Option Codes Lookup
- VIN Option Lookups (limited)


Hilux2400
-
Posts
458 -
Joined
-
Last visited
-
Days Won
1
Content Type
Profiles
Events
Forums
External Paint Colors
Downloads
Tutorials
Links Directory
Collections
Store
Everything posted by Hilux2400
-
Exhaust clamp removal
Hilux2400 replied to Hilux2400's topic in 996 Series (Carrera, Carrera 4, Carrera 4S, Targa)
Thanks for your reply. The bolts are the easy part. What about the sleeves? Did you split them with a grinder, or were you able to get them to slide? -
Exhaust clamp removal
Hilux2400 posted a topic in 996 Series (Carrera, Carrera 4, Carrera 4S, Targa)
996 2003 Carrera 2 3.6 How easy is it to move the exhaust sleeve clamps? Sometime soon I might have to take off my exhaust silencers (mufflers). To do so I will need to remove the sleeve clamp between the cat and the silencer. The sleeve clamp nuts were very corroded, but came off without shearing the bolts. I had been spraying them with penetrating oil for a few weeks and I have now replaced them with new copper plated nuts. It seems that the sleeve clamps have never been moved, though they are in good condition. Any tips on getting them moving? Heat perhaps? My experience of tackling sleeve clamps on other vehicles has generally resulted in destruction. As for the silencers, I will try and undo the three nuts on the silencer bracket. If the studs shear off, and the silencer can be re-used, I will weld in new studs. Thanks for reading. H -
As I said above, I fitted an Exide 85Ah battery with a CCA of 800 Amps. It replaced a Bosche 70Ah battery with a CCA of 640 Amps. It has made a noticeable difference by increasing the cranking speed. I decided to go for a CCA of 800 Amps in line with other recommendations on this thread. The auto shop checked my Bosche CCA640 Amp battery and said it was OK. However, having fitted the bigger battery it is clear to me that these vehicles need at least a CCA of 800 Amps to get a decent cranking speed and leave sufficient residual voltage to provide an ignition spark. H
-
The auto shop fitters were very careful with the changeover. Having connected the insulated crocodile clips to the jump points they then proceeded to disconnect the main battery. The +ve wire was insulated and held away from the battery by one fitter while the other changed the battery. The bridge supply carried a fuse (important). I had thought asking for the bridge supply to be put in via the pto socket, but a short on the main terminals could blow the pto fuse. I was impressed with the care taken by the auto elec shop. H
-
Since having my 996 I have not been entirely happy with the cranking speed, despite the vehicle being supplied to me in December 2012 with a new battery. This battery was a Bosche S3 70Ah with a CCA of 640Amps. It would not hold a reasonable charge for more than 5 days and frequently overnight without charge the residual voltage would drop to about 12.3 to 12.4v. Barely enough to start the vehicle. This Bosche battery was 278mm in length. After looking at various options I decided to change and have now fitted an Exide battery from my local Auto Elec firm. It is an 85Ah unit with a CCA of 800Amps. It is slightly longer than the Bosche battery at 315mm, but still fits the battery box. It comes with a 4 year guarantee and cost about £90. It is available on Ebay at about £77. This Exide battery with a potential CCA of 800Amps gives much higher cranking speed. I have yet to test its longevity without independent charging, but I am sure it will be better than the Bosche S3 70Ah fitted originally. When fitting the new battery I asked the fitter to plug in a secondary 12v supply to the jump start points to avoid any re-sets being needed. H
-
Wow! 20 hours labor for a AOS!
Hilux2400 replied to allenh5's topic in 996 Series (Carrera, Carrera 4, Carrera 4S, Targa)
I recently had my AOS replaced at my local village garage, which is very well set up for modern work. They are not experienced at doing Porsche cars but I have faith in the team there as they have done other work for me on different vehicles when I have been unable to do it myself. They charged me for 16 hours labour at £40 per hour (£640 total labour with no VAT). The reason for starting the work was to replace a holed coolant return alloy vent pipe. At the same time we replaced the coolant header tank, the coolant level sensor, all the coolant, the AOS, oil filler tube, put in a reconditioned Bosche alternator and replaced as many visible hose clips with worm drive clips as we could see. The car was available for collection when stated and throughout the work I was able to see what was happening and inspect the work in progress as the garage is walking distance from my home in Hereford UK. The person doing the work used guidance tutorials from this site which were very helpful and said he would be able to do it more quickly second time around.. All in a very satisfying job well done. I was very pleased. Despite the number of hours charged the overall cost was low. H -
I think you are right that it is on the same side (starboard) with all Carreras, but I only have experience of locating the cable with one RHD vehicle. Hence my confirmation to the OP that it is on the driver's side of his vehicle with a RHD car. H
-
For a UK car it's on the driver's side. Well that is where it is on my 996 Carrera RHD 2003. H
-
It helps if you the turn the wheel out. Turn the wheel to travel to the right. That will give you more space to get at the studs. You can prise them out with a long nosed pliers and then you can remove the plug. The best thing to use is a trim wedge. This is a plastic wedge with a central slot. Once you have found the wire it helps to press gently on the hood before giving the wire a tug. You might want to route the wire to a more accessible spot. With the headlight removed the wire can be seen and then you have a choice of alternative locations. Hope you find it. H
-
There's a range of figures in the handbook. I can tell you that on a standard bodied 996 (2003) without spacers at the back a 10" wheel with an offset of 65mm is OK, but with an offset of 47mm the tyre bead stands proud of the wheel arch and throws road muck over the bodywork. H
-
I have not had my 996 for very long, but I was aware of the potential IMS failure problem. One of the first things I did was to replace the standard sump drain plug with a magnetic drain plug and do an oil change within the first 1500 miles. I am pleased to say that that there were not any metal particles attaching to the magnet when I removed it. Even small fragments would have signified some sort of bearing break up likely to be from an IMS bearing. I hope it continues this way, but who knows. I would say that if you were told that were "magnetic aluminium flakes" in your oil the advice must have come from someone who doesn't really understand that aluminium is not attracted by a magnet. Most competent mechanics should know this fact. H
-
Coolant Hose Diagram
Hilux2400 replied to Hilux2400's topic in 996 Series (Carrera, Carrera 4, Carrera 4S, Targa)
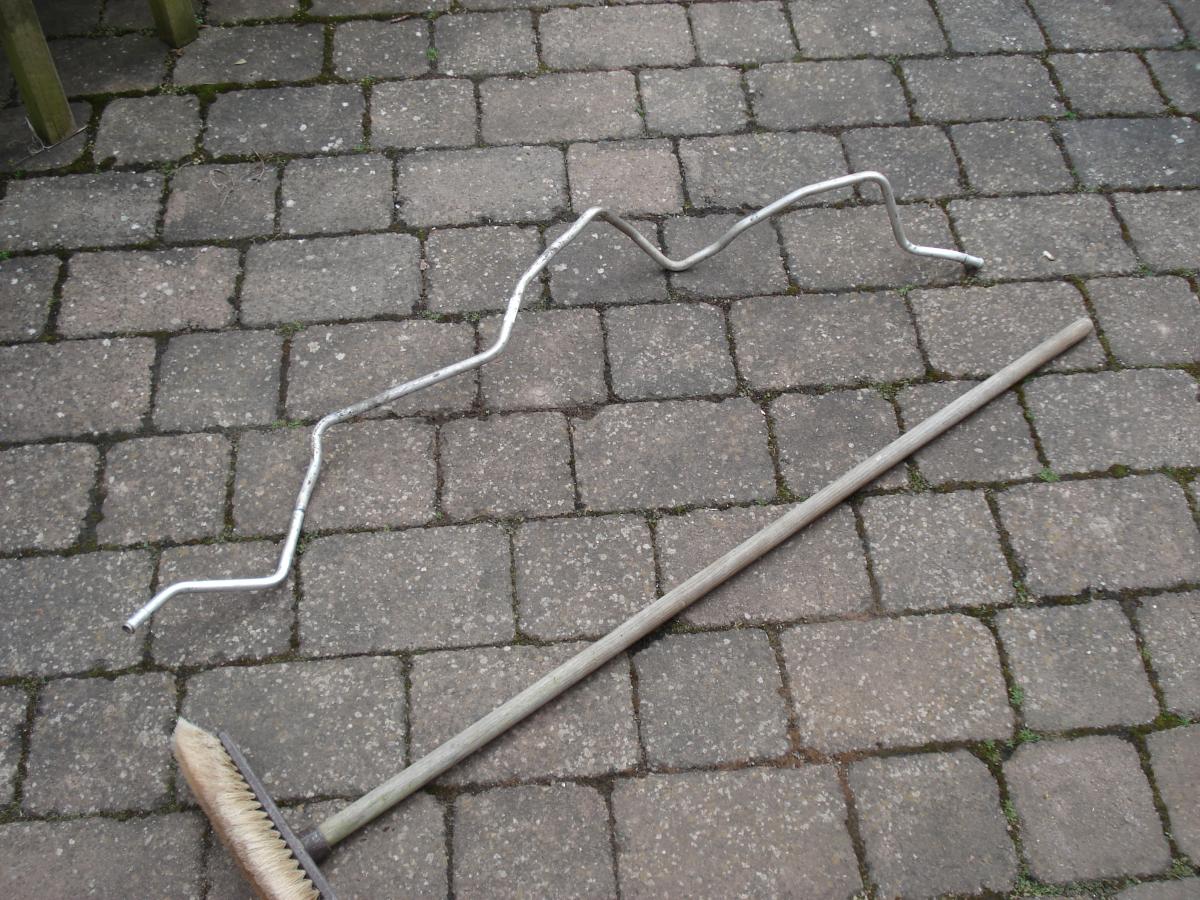
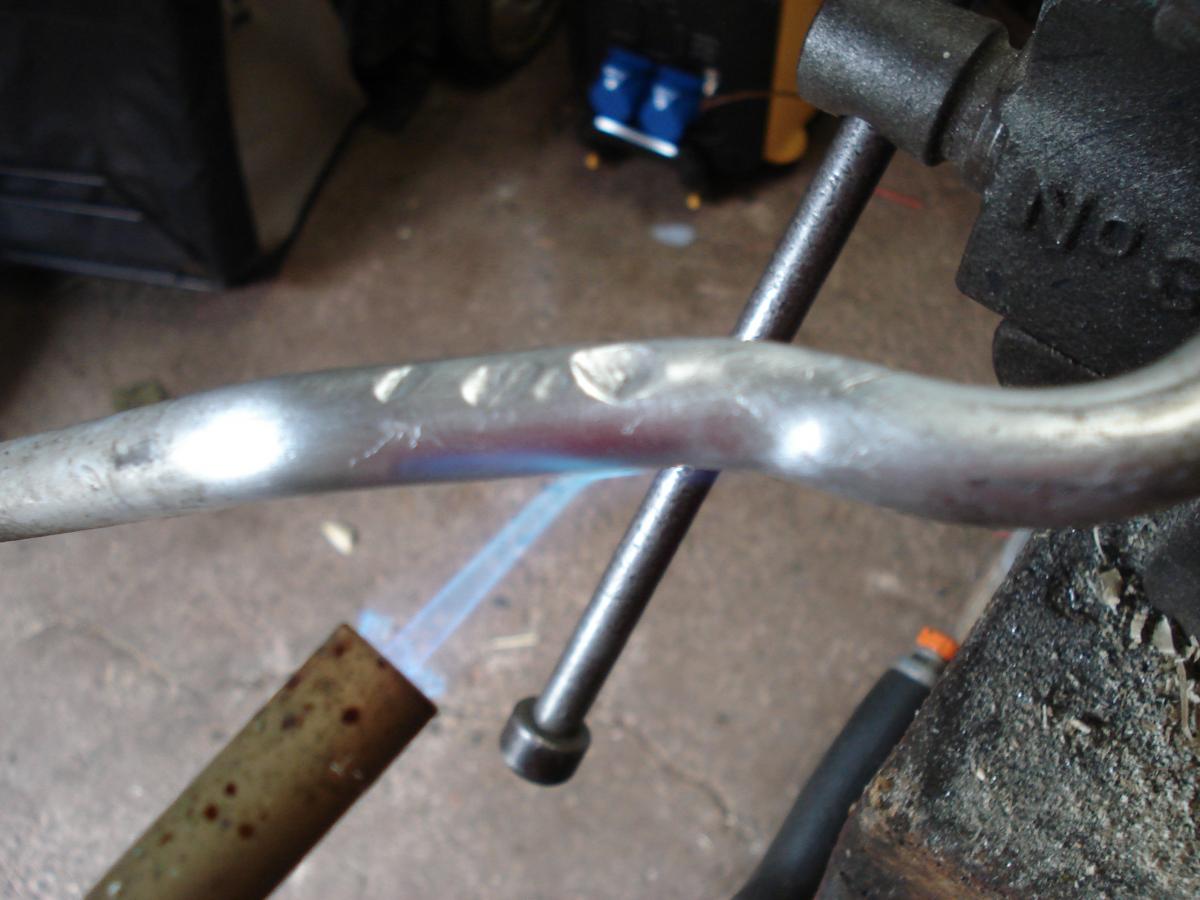
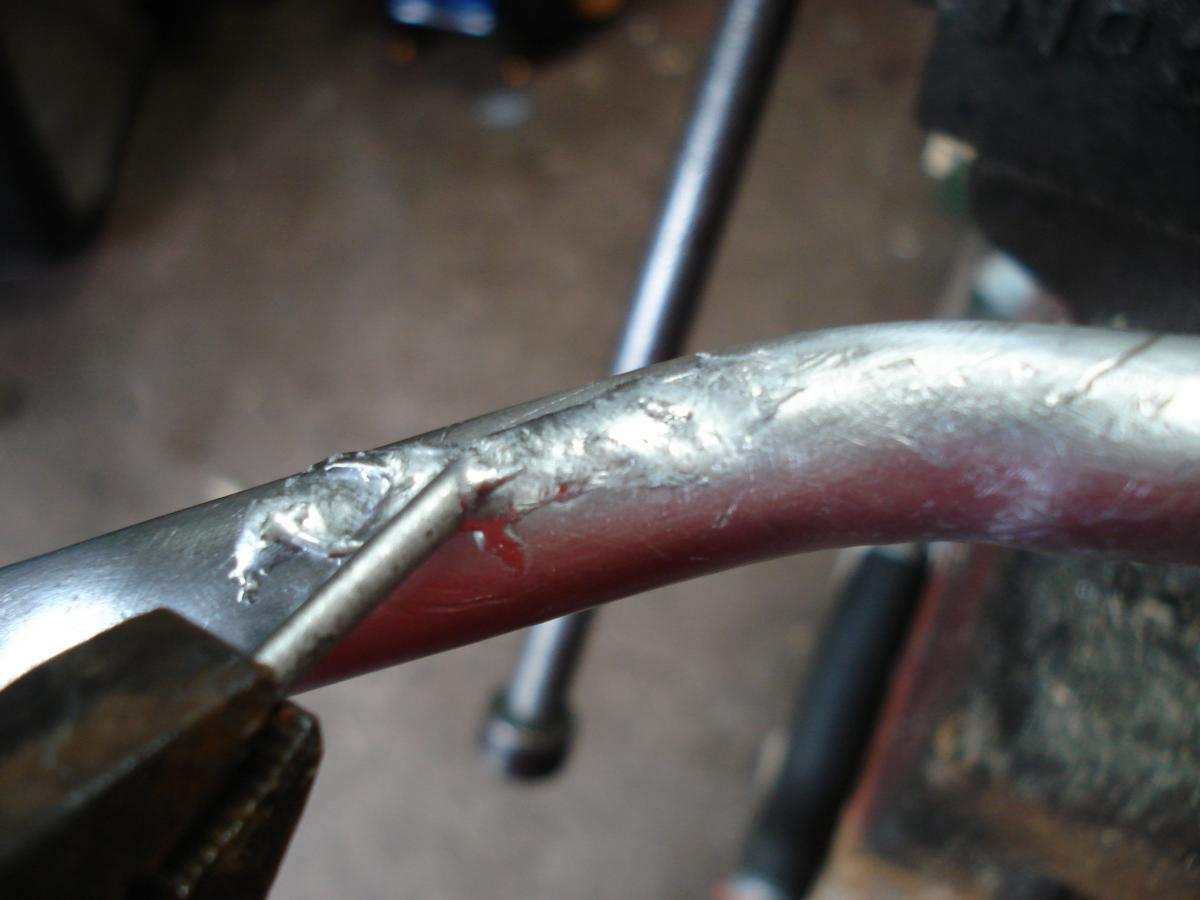
The pipe has now been replaced and it has been threaded through convoluted tube to avoid a second failure. I have attached a pic, with a broom as a reference. Despite replacing the item I had a go at a repair using Durafix. www.durafix.com It was both easy and successful and I did a pressure test afterwards to ensure that there was a seal. This is the first time I have used Durafix for a real repair job and it really is good. Thanks for all the help along the way. H
-
These things are great if you overfill the sump. However, removing the drain plug flushes things out. I use a large cat litter tray to catch the oil. They are quite good for this as they have ample capacity and low sides. H
-
Thank you for your swift reply. H
-
2003 Carrera 2 3.6 Coupe. Approximately how many hours work would be required to fit a replacement AOS including fitting a new coolant reservoir and oil filler hose at the same time? A coolant change would also be done at this time. Thanks H
-
Dead battery, can't unlock front trunk
Hilux2400 replied to ul146's topic in 986 Series (Boxster, Boxster S)
On my 996 it is possible to get to the cable through the right radiator vent. However, first the upper part of the rubber shroud has to be prised off to enable you get your hand into the void under the headlight tray. I have extended my cable with nylon rope to an easier location. H -
Double horn beep when unlocking car
Hilux2400 replied to Highlander's topic in 986 Series (Boxster, Boxster S)
Sorry, I was thinking about a different vehicle of mine. You are right there is only one bleep from an open glove box or centre box.H -
Double horn beep when unlocking car
Hilux2400 replied to Highlander's topic in 986 Series (Boxster, Boxster S)
What about the glove box and centre box as these too induce a double bleep?H -
Coolant Hose Diagram
Hilux2400 replied to Hilux2400's topic in 996 Series (Carrera, Carrera 4, Carrera 4S, Targa)
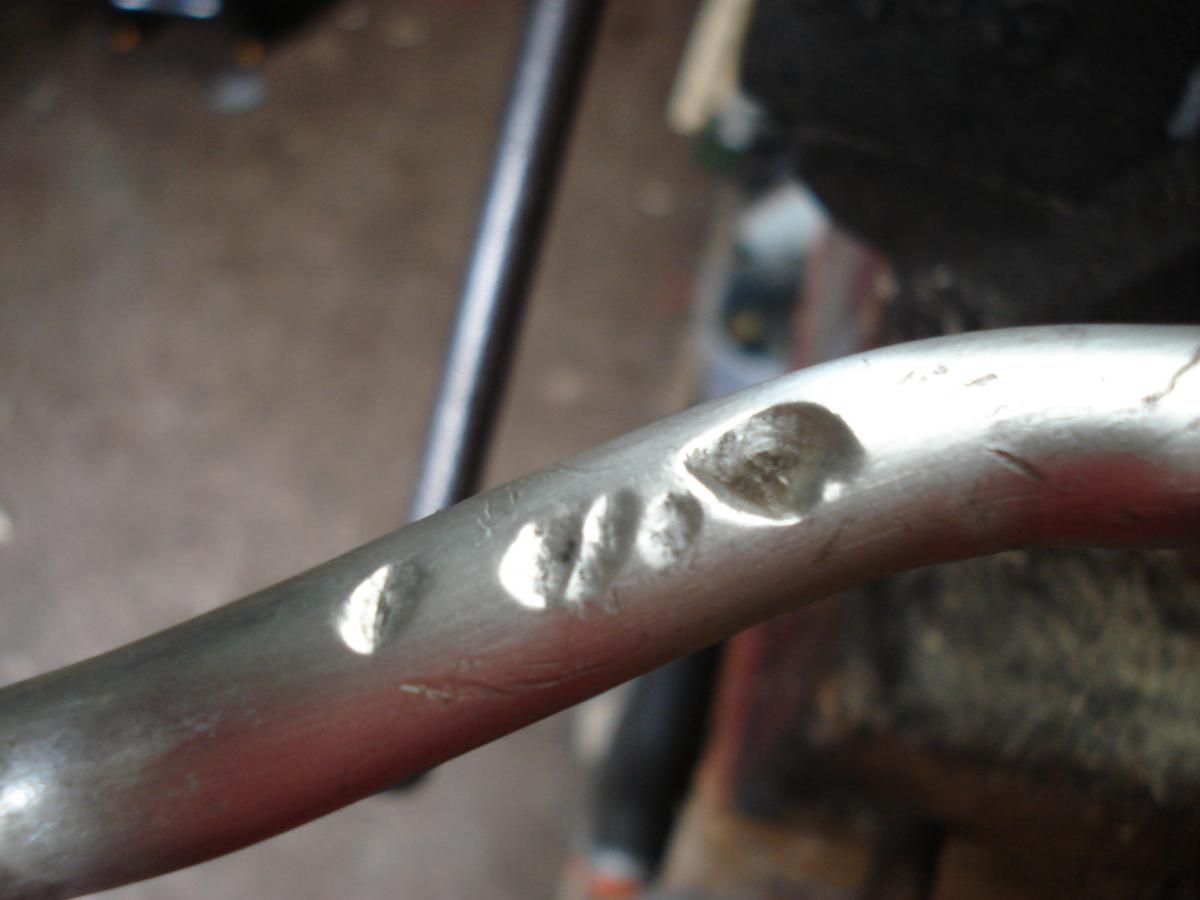
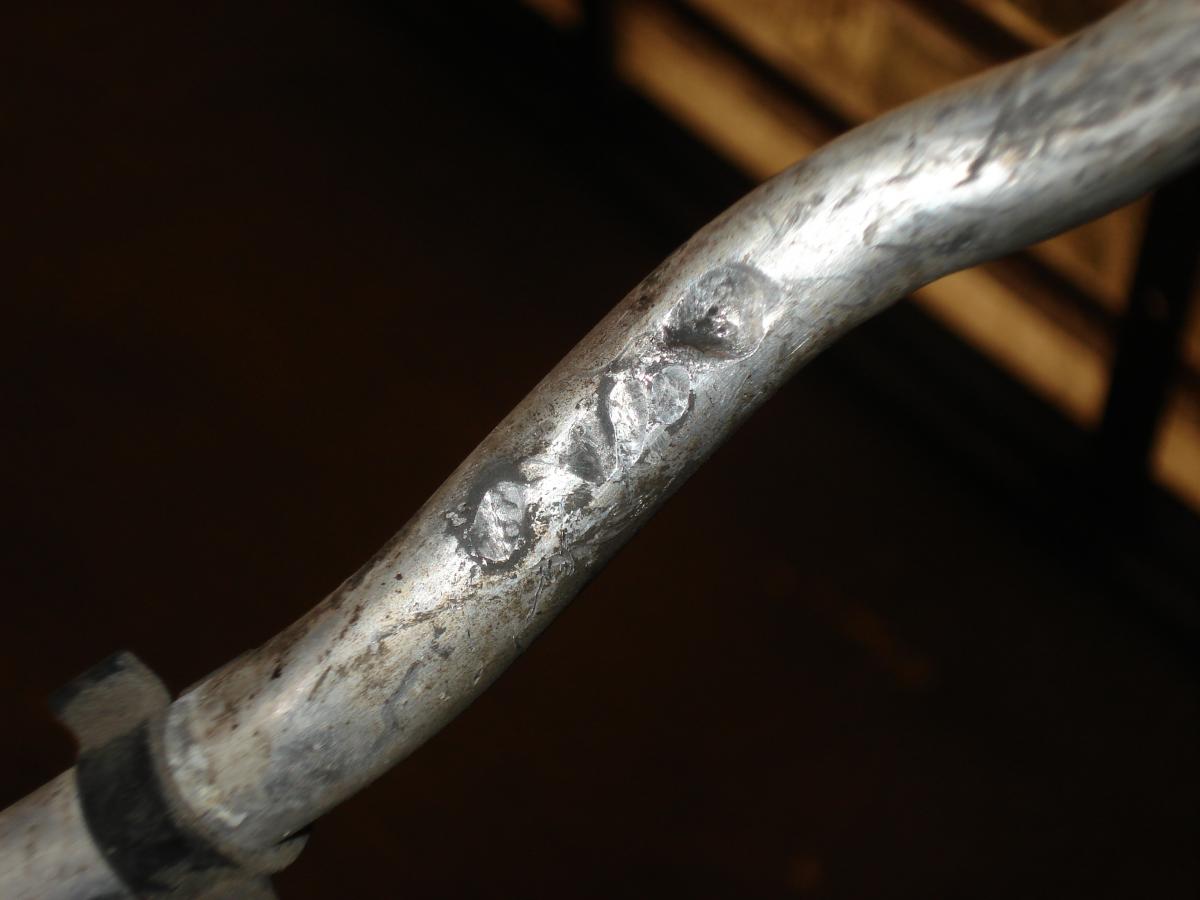
Well here it is and it's pipe No 13 in this diagram. http://www.autoatlanta.com/porsche-parts/996-99-05/105-05.php It's the aluminium vent pipe that returns to the header. I have attached a photograph of the hole where it has been rubbing against the clip near the block. Just waiting for the part and we are changing the AOS and coolant reservoir at the same time. H
-
Coolant Hose Diagram
Hilux2400 replied to Hilux2400's topic in 996 Series (Carrera, Carrera 4, Carrera 4S, Targa)
Logray Thanks for the reply and also to perryinva for the AOS advice. I have got my money on pipe "13" as "4" is a large diameter metal pipe. There are several variations of "13" and I think the later mod is a form of plastic so the dealership tells me. I will post some pictures soon. Thanks to everyone for the help and guidance. H -
Coolant Hose Diagram
Hilux2400 replied to Hilux2400's topic in 996 Series (Carrera, Carrera 4, Carrera 4S, Targa)
Well I have had a look with the car on the ramp and there is an worn part on a small diameter metal (about 15mm) pipe that rises towards the AOS. It has worn because it is in contact with a metal cable clip on its route up towards the AOS. The pipe will have to be replaced and now I am wondering which part it is. I suspect it's 996 106 225 54 which is a left side vent, but I am not sure. Any info would be useful. I have decided to replace the AOS while I am doing the work and also the coolant reservoir. It is impossible to gain access to this metal pipe, from which coolant is leaking, without taking quite a bit of stuff off the car. As I am doing this a new coolant reservoir, AOS and short AOS bellows seems sensible. I am lucky to have found this failure when it has just started to leak as it has the potential to empty the coolant system in a very short period. H -
Coolant Hose Diagram
Hilux2400 replied to Hilux2400's topic in 996 Series (Carrera, Carrera 4, Carrera 4S, Targa)
Thank you for the diagrams. I will know by tomorrow, but it seems that the leak is from this area and the diagram, I think, shows two coolant hoses at 12 &13. There also seems to be a coolant heat exchanger chamber on the top part of the AOS. Happy days H -
Coolant Hose Diagram
Hilux2400 replied to Hilux2400's topic in 996 Series (Carrera, Carrera 4, Carrera 4S, Targa)
I have found some decent diagrams here: http://www.autoatlanta.com/porsche-parts/996-99-05/porsche_911_parts.php I really should have looked a bit harder. It seems that the AOS does have coolant connections. Is this right? Is it possible to access these points without taking off the alternator and left side induction bank? I am just trying to anticipate the size of the task in front of me. H -
Coolant Hose Diagram
Hilux2400 replied to Hilux2400's topic in 996 Series (Carrera, Carrera 4, Carrera 4S, Targa)
Thanks for the swift replies. In line with your description of "back" and "front", the leak is at the back left of the engine (left when looking from the back of the vehicle). I believe it's a narrow bodied car - non turbo - 2 wheel drive. If it is in the area of the AOS, does the AOS have a water jacket and if it does it is prone to failure? H -
Could you please help in providing a link to a coolant hose layout for a 2003 996 Carrera 2 3.6. My workshop CD only has the Turbo diag for some reason. I am trying to find the source of a coolant leak. It's somewhere at the front of the engine (behind passenger seat RHD UK model) and fairly high up. It's not the coolant reservoir bottle or any of the hoses that connect to it. I don't think it's near the tiptronic heat exchanger but its somewhere towards the rear of this point after the pipes pass through the cross member and then rise into the engine. Coolant is dripping down over the inner lower suspension pivot point. I can't see the leak. I need to get the car on a ramp for a good look, which I will do tomorrow. I am just hoping I don't have to move anything major to get to the source. Thanks for reading. H