Welcome to RennTech.org Community, Guest
There are many great features available to you once you register at RennTech.org
You are free to view posts here, but you must log in to reply to existing posts, or to start your own new topic. Like most online communities, there are costs involved to maintain a site like this - so we encourage our members to subscribe or donate. All subscriptions and donations go to the costs operating and maintaining this site. We prefer that guests take part in our community and we offer a lot in return to those willing to join our corner of the Porsche world. This site is 99 percent member supported (less than 1 percent comes from advertising) - so please consider an annual subscription or donation to keep this site running.
Here are some of the features available - once you subscribe RennTech.org
- View Classified Ads
- DIY Tutorials
- Porsche TSB Listings (limited)
- VIN Decoder
- Special Offers
- Paint Codes
- Registry
- Videos System
- View Reviews
- and get rid of this welcome message
It takes just a few minutes to register, and it's quality Porsche information at a low cost.
Contributing Members also get these additional benefits:
(you become a Contributing Member by subscribing or donating money to the operation of this site)
- No ads - advertisements are removed
- Access the Contributors Only Forum
- Contributing Members Only Downloads
- Send attachments with PMs
- All image/file storage limits are substantially increased for all Contributing Members
- Option Codes Lookup
- VIN Option Lookups (limited)


Domiac
-
Posts
121 -
Joined
-
Last visited
Content Type
Profiles
Events
Forums
Exterior Paint Colors
Downloads
Tutorials
Links Directory
Collections
Classifieds
Store
Everything posted by Domiac
-
 While the engine is running, how could I diagnose if the cylinder ring is leaking? Could I feel the back pressure e.g. by removing air filter parts while running the engine on clean garage? I know I need to keep MAF working should I do that.. Of course the leak down test will give best results, but I'd like to understand if there is anything else I could do while the engine is running. Thanks!
 -
I'll change the spark plugs and coils between cyls #1 and #4. Also check for debris before putting plugs back. Both the plugs and coils are brand new but you never know. After that warm up the engine at least to 130F (Durametric oil temp) and then perform a leak down test for all cyls starting from #4. Getting back home to the land of genuine sauna and Santa Claus tonight, I should have some free time in a couple of days..
-
Should you wish to completely drain (or even flush) and refill your system, see my tip here: http://www.renntech.org/forums/topic/46584-how-to-drain-all-coolant-and-refill-with-a-simple-shop-vacuum/
-
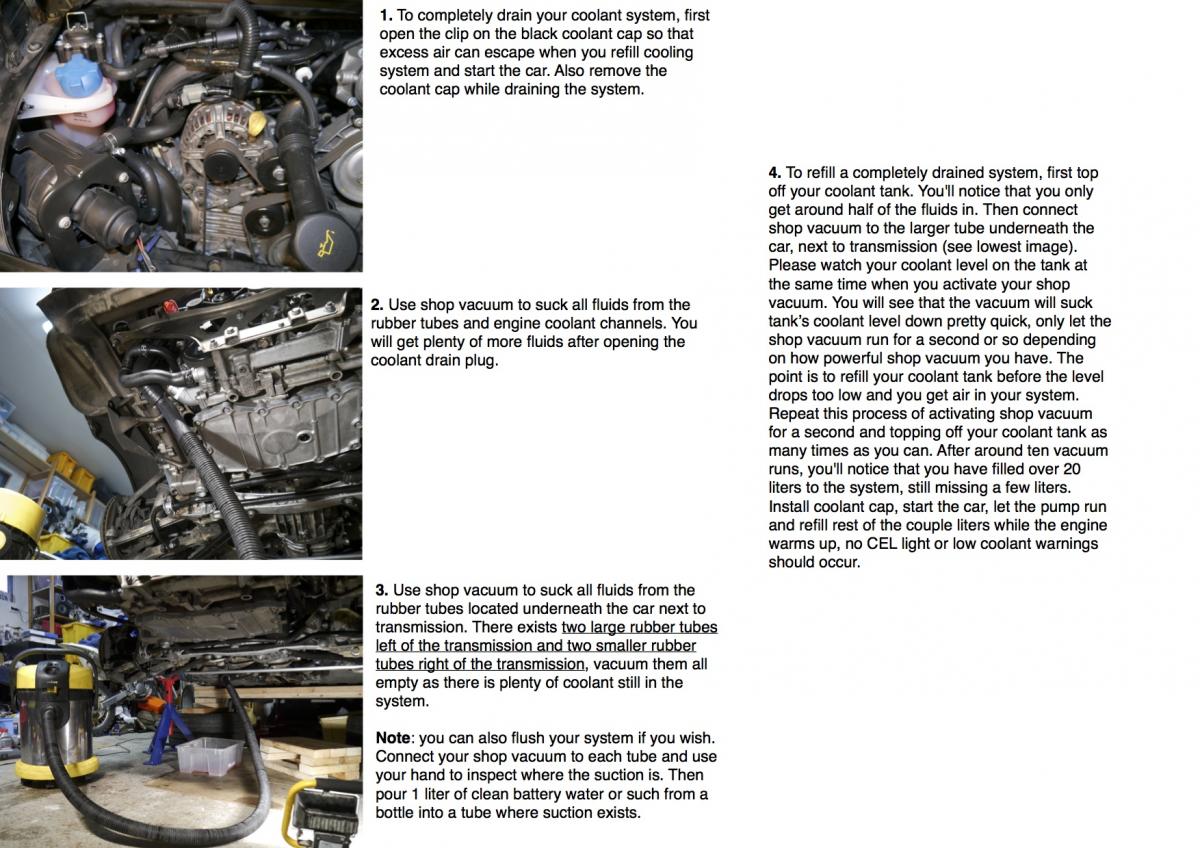
Here is a tip on how to completely flush / refill your cooling system using a simple shop vacuum. To drain your system, first open both large and small tubes underneath the car, next to transmission and then connect a shop vacuum to the tubes to completely empty the system. To flush your system, should you want to do it, connect your shop vacuum to each tube and use your hand to inspect where the suction is. Then pour 1 liter of clean battery water or such from a bottle into a tube where suction exists. Just make sure you do not suck any dirt or your gloves in the system. To refill a completely drained system, first top off your coolant tank. You'll notice that you only get around half of the fluids in. Then connect shop vacuum to the larger tube underneath the car, next to transmission. Please watch your coolant level on the tank at the same time when you first activate your shop vacuum. You will see that the vacuum will suck level down pretty quick, only let the shop vacuum run for a second or so depending on how powerful vacuum you have. The point is to refill your coolant tank before the level drops too low and you get air in your system. Repeat this process of activating shop vacuum for a second and topping off your coolant tank as many times as you can. After around ten vacuum runs, you'll notice that you have filled over 20 liters to the system, still missing a few liters. Then open the clip on the coolant cap to relieve pressure, start the car, let the pump run and refill rest of the couple liters slowly, no CEL light or low coolant warnings should occur. At least for me this trick worked fine and the whole process was easy.

-
Any ideas are appreciated on how to diagnose this a bit further and get tip what could be causing this, e.g. 1. some part might be loose or leaking (I did tear everything apart except engine itself and the heads) 2. intake valves 3. exhaust valves 4. cylinder ring / liner (I hope it is not this) I have a very good microscope with mirrors, it fits perfectly through my spark plug holes. I also have a cheap digital stethoscope and good leak down tester. I am considering warming up the engine again for 15 mins and performing a proper leak down test for bank 2. PS. My camshaft deviations changed from 1.53 and 2.58 to 0.42 and 1.97, however all values are without load between 700-4000 RPMs.
-
Spark plugs are properly torqued to 22 ft-lbs, always using torque wrench. During my 15 min test run (no load on the engine), Durametric showed 0 misfires. Even though I checked that plug seatings are clean on my heads, there is a possibility that some dirt is between a plug and my head. I'll put your idea to my work list (get bank 2 plugs out, clean plug area, put plugs back). It does not hurt to Some people think that I should simply ride it hard, it should fix the issue. My gut tells me that it is best to get for some ideas first from renntech.org. I am on a work trip in Germany but will get back after a week. Feel free to throw more ideas to my work list :-)
-
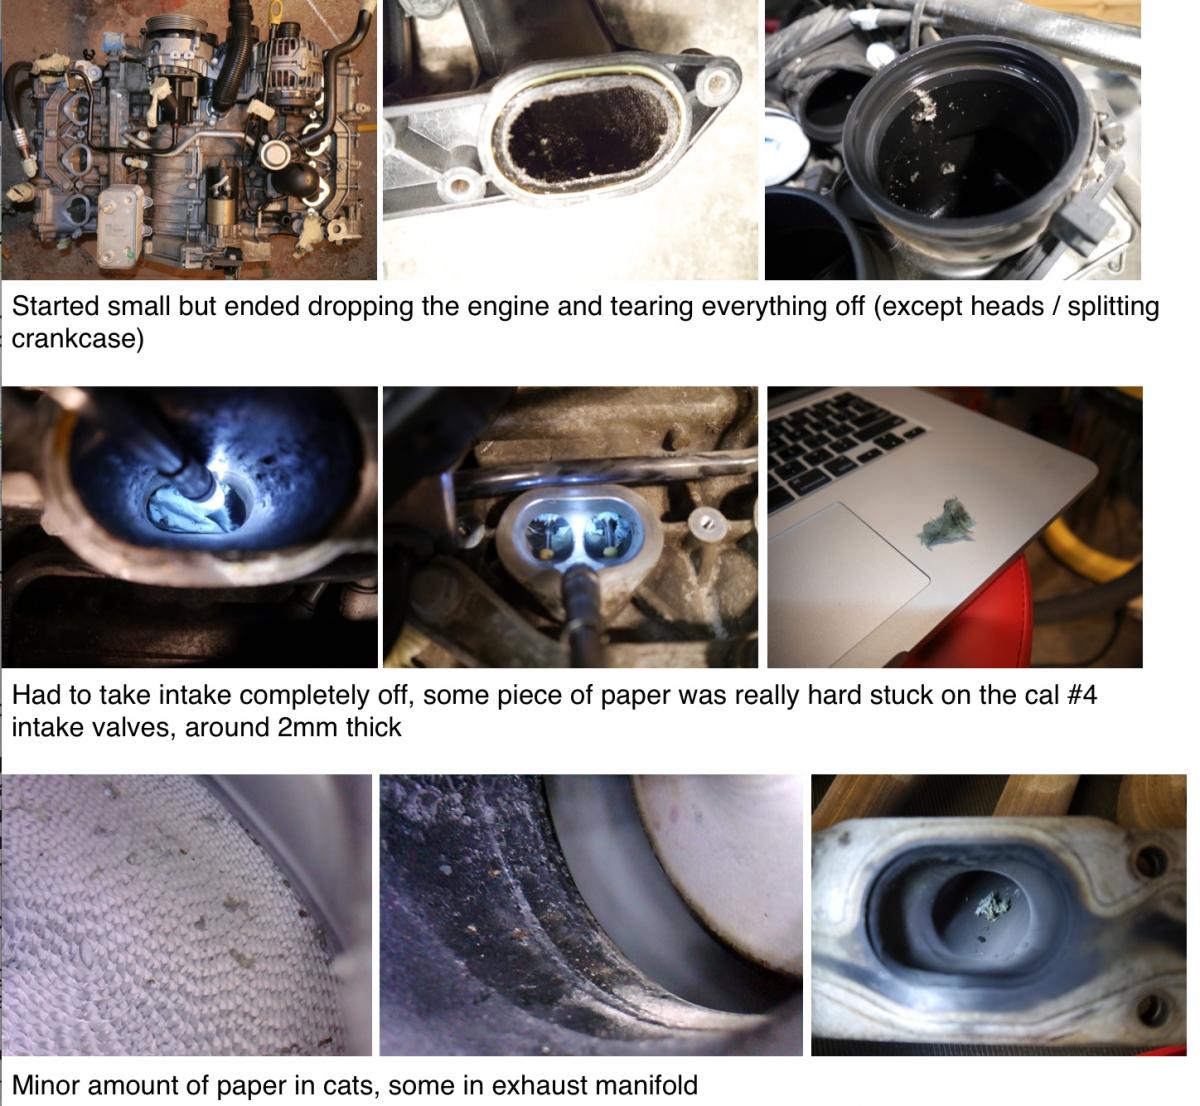
Engine and transmission is now back and it started like a champ! No error codes and almost all works as expected. Please see my video here: https://www.youtube.com/watch?v=YB8anKRDEk0 Really happy that I got it back together without issues, oil pressure came right to the top and once warm it held between 3-5. But here comes the catch. Once engine warmed a bit and I gave it some RPMs, knocking became more evident. Bank 2 as expected and I suspect it was Cylinder #4. Also #4 fuel injector was full of paper gunk which seemed to be easy to clean, microscoping all injectors gave me the impression that my cleanup was successfull but I really do not know for sure. Note that before start I tried to prime oil pressure without C4 fuse, spark plugs and coils by cranking 8 seconds, waiting for a while and cranking another 8 seconds. Seemed not to do anything in my case, oil pressure kept around 0.5 or so. Now the big question, if this would be your car, what would you do next? 1. Try to get rid of the gunk on bank 2 head by carefully driving it on a freeway? 2. Start it again and use car thethoscope to pinpoint where the knock comes? 3. Not start it again, take bank 2 head out and have the valves and seats machined? 4. Not start it again, take both banks out and have valves and seats machined? 5. Something else? Some background info follows.. Everything in the engine looked really clean, I even used a small USB microscope to inspect various places when IMS and chain tensioners were out. Also filter and oilpan was really clean. I have also done the following - engine + transmission washed (all elect. off) and protector sprayed - inspected / buffed flywheel, pressure plate, bearing, clutch disc - all fuel injectors "kind of cleaned" from outside with isopropyl alcohol - all tubes cleaned - all electrical connectors cleaned + protector sprayed - all intake parts cleaned - all exhaust + cat parts cleaned - all coolant hoses cleaned (vacuumed and rinsed with battery water) - all plastic parts serviced with silicone - pre o2 sensor tips gently brushed with toothbrush & isopropyl alcohol - oilpan + oil pickup cleaned - fixed small leak in cooling system (large tube) - new AOS + gaskets around the AOS system - new gaskets for exhaust + cats - new waterpump + gasket - new thermostat + housing - new RMS - new IMS + flange + bolts (upgraded to LN Engineering) - new chain tensioners (all three) - new engine mounts - new clutch line, kinked a bit during jacking (stupid me) - new oil cooler gaskets - new intake housing gaskets - new intake gaskets - new Throttle body gaskets - new magnetic oil plug + oil filter - new coils + sparkplugs - new brake fluid - new coolant - new coolant cap - new transmission oil - new engine oil and filter - new air filter - new power steering fluid - some misc small parts replaced - 20 liters of new gas, I guess tank contained max. 5 liters five month old gas PS. Completely drained my system out from coolant with my shop vacuum and I found a really nice trick to refill it without "burping" or air issues. When refilling your 23 liters back, use shop vacuum to suck the coolant in 1 second pulses (depending how strong vacuum you got), always filling coolant tank in between, worked like a charm and I got over 20 liters in the system! I'll post a separate thread with pics, again later once more pressing matters are taken care.
-
Here's some images from the engine compartment (engine out). These might be helpful: https://www.dropbox.com/sh/4quxijmjcunqobz/AABI1EBSMAdOgVQQMoIYm3Mfa I got tons of these, have to catalogue them and share them publicly.
-
Test run without exhaust
Domiac posted a topic in 996 Series (Carrera, Carrera 4, Carrera 4S, Targa)
A moment of truth .. I am finally about to perform a test run for my Carrera 4. I would like run my engine for five minutes without exhaust, can I do it safely? Would it affect my Durametric readings significantly? All other parts are connected, cats and o2 sensors included. My car has been unused in an ocean ship container and later on my garage on jack stands for five months now. I have performed various maintenance work including IMS upgrade, RMS, tensioners, AOS etc. People seem to have conflicting opinions should one prime oil pressure by cranking engine by pulling coils, spark plugs and C4 fuse out, I think I'm going to crank my engine such way for 8 secs before doing it for real. I'll soon post interesting video material of wrenching :-) -
Coolant problem
Domiac replied to etienne's topic in 996 Series (Carrera, Carrera 4, Carrera 4S, Targa)
Reading this thread last Friday - and the rather small but oh so important info from etienne - may have saved my whole week end, not to mention my engine... Why the part broke off just from me touching it while lightly washing the engine is a different question. I feel you, I broke my own connector by gently touching it with my hand while doing engine drop. -
Coolant problem
Domiac replied to etienne's topic in 996 Series (Carrera, Carrera 4, Carrera 4S, Targa)
I'd definitely change this part if I suspect that it is over 5 years old. Replacement is very easy and the cost is only few bucks. Make sure you get all the plastic bits out by lubricating the connector before you remove it. You can internally lubricate the contact point between the hose and the connector by using a screwdriver and gently stretching the hose, then apply silicon there 360 degrees. Finally just use pliers to pull pieces out. While working, tilt hose always down and finally vacuum the hose if you are really paranoid about the plastic bits :-) This part was the only thing that broke to my hands when I did my engine drop / install, quite fragile but still crucial part. My car is C4S, 10 years old, not sure if my part was original or not. -
One more pic..
-
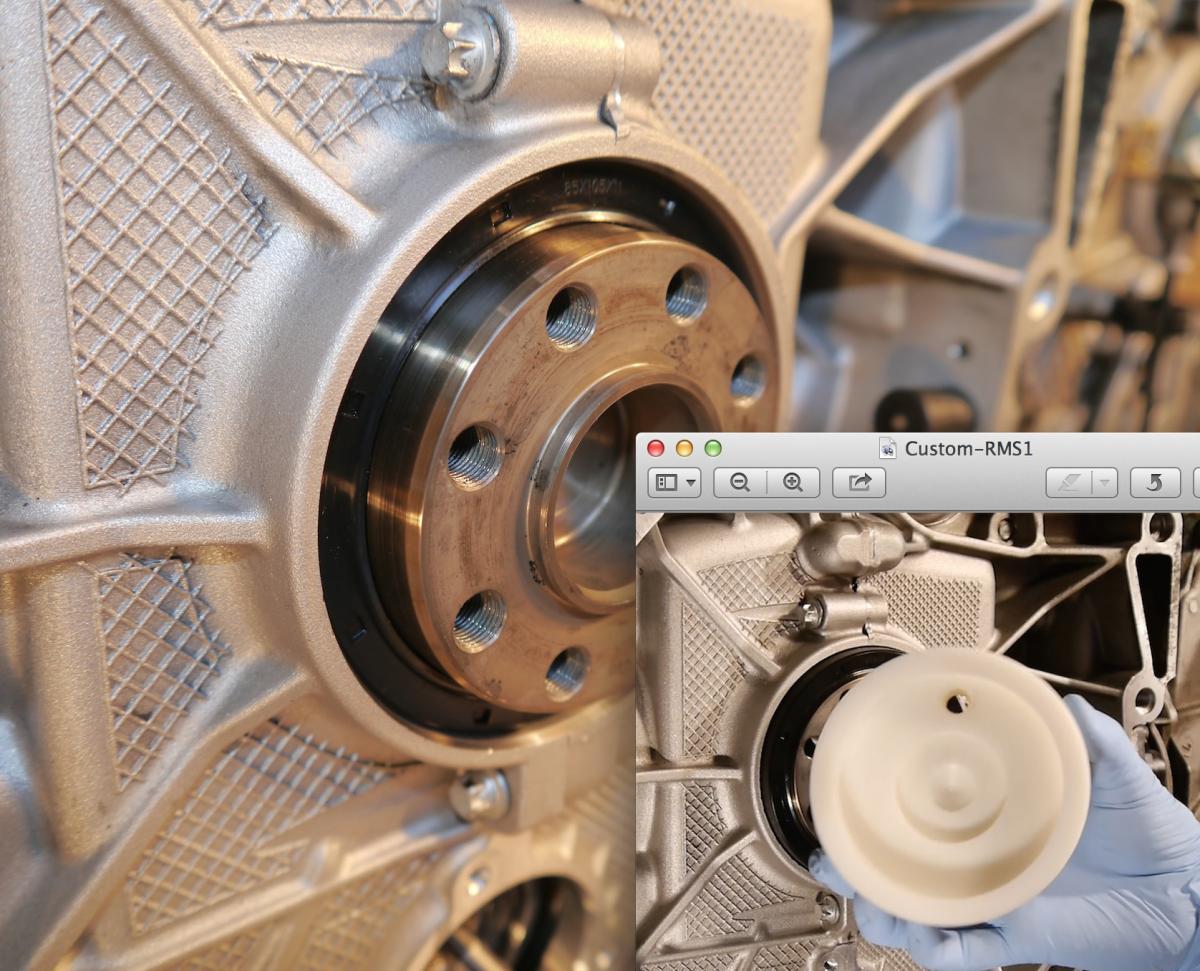
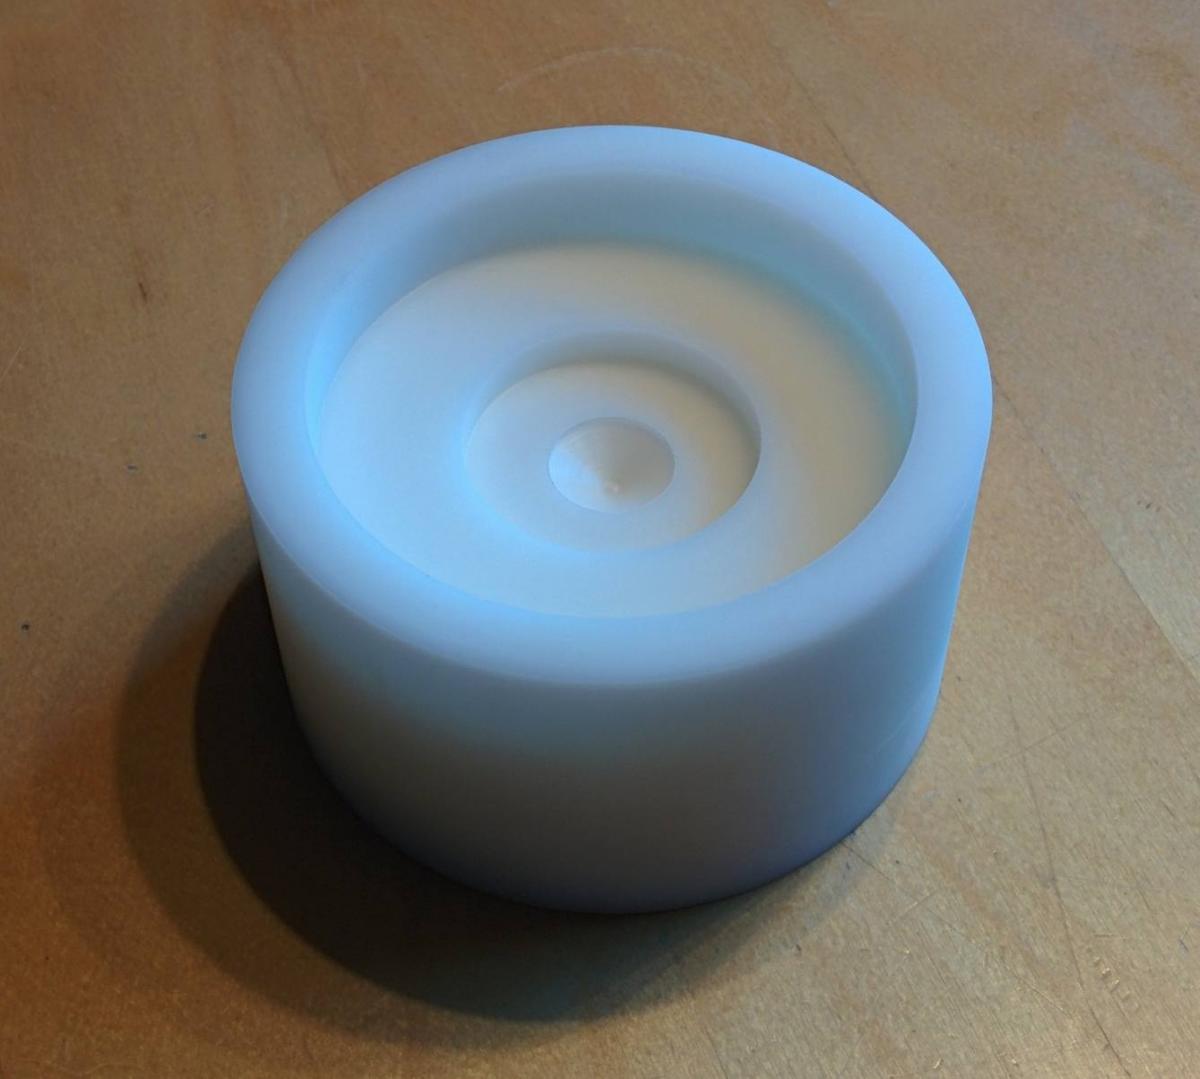
Gentlemen, I think I got it :cheers: Most of the seal is in 13mm depth, one corner of it is in 13.25mm, I hope <2% difference is OK. Took many measurements with my caliper. Used gloves and cleaned everything rigorously with isopropyl alcohol before I installed the seal. Will be fun to see if my installation actually works, will drop transmission next year again just for the fun of it (I want to check out my IMS installation too). A few tips if someone does anything similar. I'd suggest you keep things clean, it does not hurt to use gloves, and I think cleaning surfaces with isopropyl alcohol is a good thing. When you first push RMS to crank using your hand, try to set it as straight or equal depth as possible, it should be easier to tap it in right from the center of the tool. Stutzchris, I think you are tight, I am a roadie and JFP in PA kind of guys here are the true rock stars :notworthy: If anyone is interested of the measurements for this tool, send me a PM, but I still suggest that anyone located in the US should simply contact cheetah and save time. Thanks a lot guys!
-
You've lost me, please elaborate :beer:
-
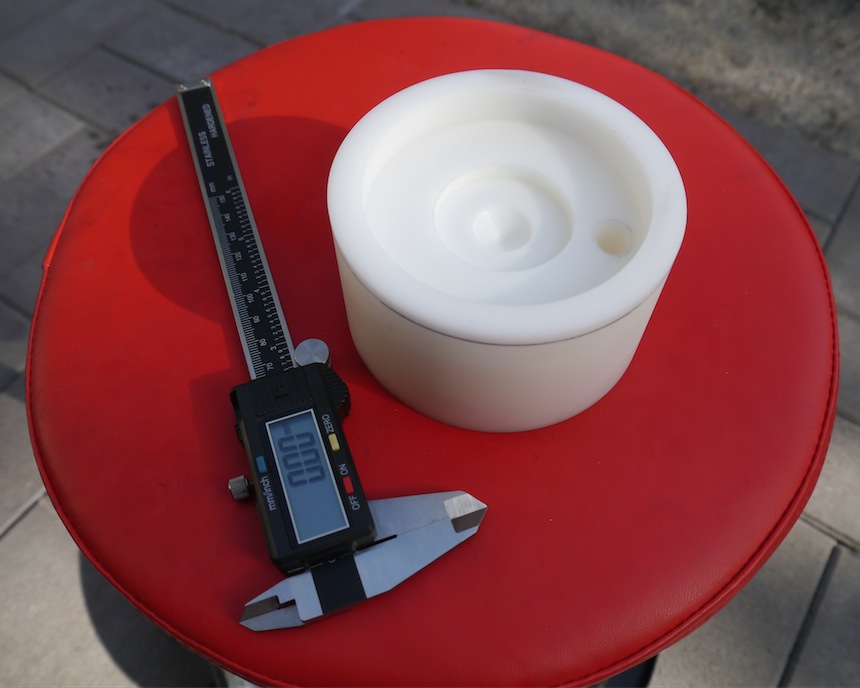
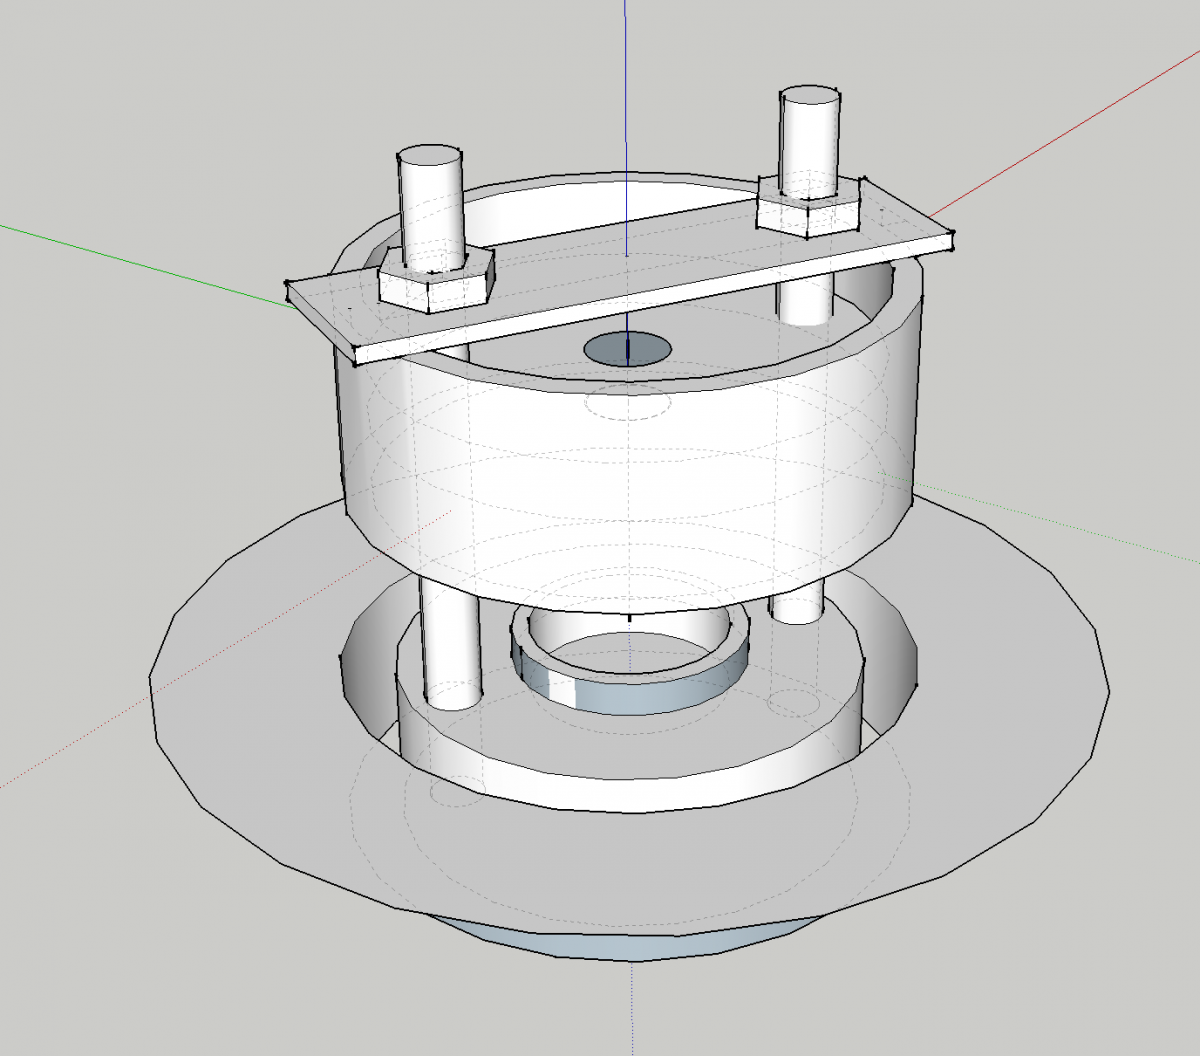
I ended up visiting a local shop, it had a gorgeous amount of various industry drills. It was a no brainer for the owner to drill a part based on the specs I gave him. Cost was $40. Made from nylon. I took the measurements with my digital caliper and surprisingly it feels almost perfect. I'll either tap it gently from the middle or drill largish bolt holes and "draw it in" with a larger plate on top of my custom tool. PS. If you live in the states, be sure to have a look on what http://www.renntech.org/forums/user/20799-cheetah/ has to offer. I'd have ordered his tool myself but shipping it to Europe is a pain.
-
I considered buying a similar tool but decided not to. I might be old school, but I think it is nice to feel the piston movement through a plastic or wooden stick when you are moving the crank. Also it is best to understand how crank pulley angles work and check the correct angle from the pulley too. Stock 996 crank pulley contains marks for every cylinders TDCs. My dilemma was not that much of finding TDC compression or TDC overlap, it was more of understanding which one, overlap vs compression, I should find before proceeding with my IMS upgrade :beer: In my case it was easy to understand overlap vs compression as I had exhaust and intake parts completely off, I could see the valves easily. If somebody for any reason needs to find out TDC overlap or compression, simply set cylinder to TDC and screw a hose to sparkplug hole. If it leaks already with very little amount of pressure (e.g. 10PSI), you are on TDC overlap and your exhaust valves are open. If it does not leak, then you are on TDC compression. A leak down tester would show a drastic difference between these two. Thanks!
-
Roger that. I am not going to proceed with further cleanup, I'll fire up the engine and let the heat do rest of the cleanup.
-
One last thing before I reinstall my engine. Is there a safe way to activate variocam manually when turning the crank manually with a ratchet? The rationality here is to get the intake valves open all the way up to 10mm, not just 2mm, so that I can perform a final cleanup for my intake valves. I know there is some crud on the valves and on the head and I could carefully remove some of it if I can get more clearance. Previously I noticed that if I tilt the engine 8 degrees, I can spray some clean oil inside the bore through spark plug hole and vacuum everything out from exhaust valves, it seemed to work really good and I could vacuum gunk out with the help of viscous oil. Notice, if the engine is tilted a bit, then the oil will flow towards the exhaust valves (instead of piston rings). Gravity is your friend here. When I'm done with more important things, I'll post a few (ridiculous) videos to youtube and more tips here about which tools I used for my cleanup, most likely they will offer a few laughs for the pros here :king:
-
I have seen this fabrication too. The trouble is that on Northern Europe, all the pipes are pretty big, like 110mm. I got bunch of friends on the Bay Area, CA, might need them to have a visit on Lowe's or such :-) It can be that I'll have a chat with a local metal or even a woodcrafting shop in order to produce two cylinders than can do the trick.
-
This has been covered before, but it can be done using a 4" diameter plastic pipe coupler (has a ridge half way down the inside that the old flywheel bolt heads can rest on, then tighten slowly in a crosswise pattern to pull it in evenly.) The trick to getting the new design PTFE seal to work where the older design did not is being absolutely scrupulously clean, not even finger prints on any parts, and no sealant of any kind. You also have to install it at an unusual depth, 13MM from the flywheel mating surface of the crank, not 14MM. Wonderful! I've considered to fabricate a tool like this (did a crude sketchup), which is a bit wider than 4" but still fits. Don't know how to thank you enough JFP!
-
Regarding possible the movement of the shaft + stud + nut, once you start the car after an IMS upgrade, I am starting to understand better why people put green wicking Loctite to the threads and Curil T under the nut.
-
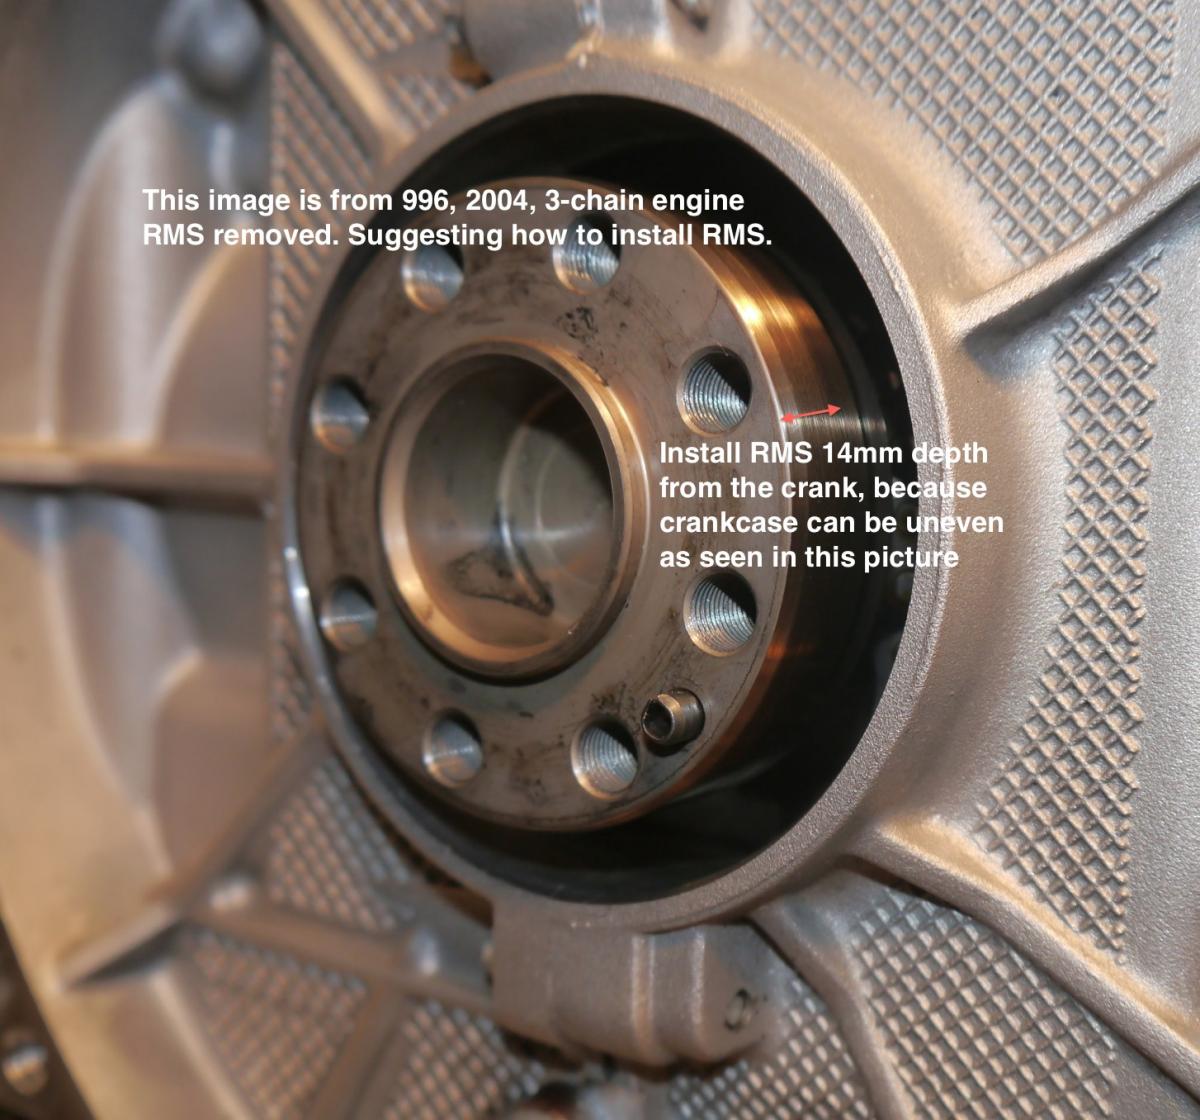
NOTICE: The correct depth is 13mm (not 14mm like stated in this message) from the crank as of April 16, 2014. Check update info from forums like renntech.org before installation. If one takes his time and is continuously taking measurements from multiple positions, is it reasonably possible to install RMS without the expensive special tools that Porsche pros use? These tools are hard to source with a reasonable price. And I cannot find a single person to do this job on my region. The closest Porsche mechanic is over 100 miles away and I'd not like to haul my engine on another car. Regarding the steps, I'd first clean my crankcase using Isopropyl Alcohol, use clean gloves and only touch the outer rim of new RMS when setting it to the crank. Then tap it gently cross wise pattern to the correct depth with a plastic cylinder part that matches the outer diameter of RMS, constantly taking measurements when expecting the reach of 14mm from crank. Also, should one put a touch of Curil T on the outer rim of RMS or simply let it be? I know some people do that. In any case the inner rim should be left alone. I have to tell this seems a bit strange why the RMS leaks so easily, usually these seals just work, and what it is with the fact that you cannot use lubricate at all as the seal works under the stress of oil constantly. Nevertheless, I'll follow the instructions and go in dry! Thank you!
-
I assume that once you crank the engine, IMS may move a bit back towards flywheel side and this also forces IMS bearing + stud + nut to move as they are all connected to each other components. Perhaps it is best to stop contemplating this too deeply. Thanks for the comments though!
-
This could be completely bogus and I am not going to do this, but feel free to wonder the following.. When you tap new bearing in, IMS moves slightly away from the flywheel side. After we torque IMSB stud nut on step 22, IMS cannot move back to its original position anymore. However, before step 22 when IMSB flange is secured but IMSB stud nut is still loose, why don't we reinstall tensioners and perhaps even remove cams + crank lock and rotate engine a few times to let IMS, chains and paddles settle better before continuing with the step 22? Once again, I do not suggest that anyone tries this, I am simply trying to learn something :lightbulb: It feels a bit strange to move IMS a bit (manually) and then secure it to such place. Can be that it is simply the price that one has to pay when doing bearing upgrades. You could do that, but it is not really necessary. First of all, the IMS shaft will relocate itself just fine all by itself when the engine starts to turn over for its first restart. Secondly, we normally flush out the hydraulic tensioner's if they are not being replaced, and then hand pump them in clean oil just prior to reinstalling them with new sealing washers, so they have some tension on them at first start. Third, we normally pull the fuel pump relay out (so that the car won't start), and then spin it over with the starter until it develops oil pressure, which also allows everything to settle. Then, after one more inspection for anything that was missed, put the relay back in and light the car off. Interesting. I was under the impression that IMS sprocket has a rigid connection to IMS which has a rigid connection to IMSB which has a rigid connection to IMSB stud which has a rigid connection to IMSB flange (because of the flange nut) which has a rigid connection to crankcase. It must be that something between, or some other component, moves. Yes, I've seen your and other people's instructions on how to clean and prime tensioners with new oil, reinstall with new washer. I also plan to build oil pressure by keeping the spark plugs and relay out when I crank the engine for 10 seconds, wait a few seconds and crank another 10 seconds before doing it for real. All these are on my TODO list. Thanks again for reminding though!
-
That looks fine. The entire IMS shaft can move back and forth a bit, so don't be overly concerned about that. This could be completely bogus and I am not going to do this, but feel free to wonder the following.. When you tap new bearing in, IMS moves slightly away from the flywheel side. After we torque IMSB stud nut on step 22, IMS cannot move back to its original position anymore. However, before step 22 when IMSB flange is secured but IMSB stud nut is still loose, why don't we reinstall tensioners and perhaps even remove cams + crank lock and rotate engine a few times to let IMS, chains and paddles settle better before continuing with the step 22? Once again, I do not suggest that anyone tries this, I am simply trying to learn something :lightbulb: It feels a bit strange to move IMS a bit (manually) and then secure it to such place. Can be that it is simply the price that one has to pay when doing bearing upgrades. A reminder of the steps involved here are (rev 18 jan 14): 20. "You are now ready to install the new hub flange. Inspect seal for damage as well as bore in the block for any imperfections that might cause the new seal or flange to leak. Take care not to damage o-ring located in new hub flange, using an o-ring lubricant on seal to facilitate easy installation. Once new flange is started, use three (3) M6X25 bolts, tightening in a star pattern slowly to draw in the new hub flange in." 21. "Once home, remove M6X25 bolts and replace with new micro-encapsulated bolts. Use flange sealant on bottom of head of the bolt. Torque specs 7.5 ft/lb (10 Nm)." 22. "The center bearing support 12 point nut can be installed and torqued to the factory spec (currently 7.5 ft/lb). Use flange sealant (Loctite 574 or Curil T) on bottom of head of the bolt and use wicking (green) Loctite on the exposed threads of the center bearing support/stud and 12 point nut. If the small o-ring is damaged or leaks, the use of flange and thread sealants should prevent a leak." 23. "Reinstall chain tensioners with new sealing rings and torque to the factory spec of 59 ft/lb."