Welcome to RennTech.org Community, Guest
There are many great features available to you once you register at RennTech.org
You are free to view posts here, but you must log in to reply to existing posts, or to start your own new topic. Like most online communities, there are costs involved to maintain a site like this - so we encourage our members to subscribe or donate. All subscriptions and donations go to the costs operating and maintaining this site. We prefer that guests take part in our community and we offer a lot in return to those willing to join our corner of the Porsche world. This site is 99 percent member supported (less than 1 percent comes from advertising) - so please consider an annual subscription or donation to keep this site running.
Here are some of the features available - once you subscribe RennTech.org
- View Classified Ads
- DIY Tutorials
- Porsche TSB Listings (limited)
- VIN Decoder
- Special Offers
- Paint Codes
- Registry
- Videos System
- View Reviews
- and get rid of this welcome message
It takes just a few minutes to register, and it's quality Porsche information at a low cost.
Contributing Members also get these additional benefits:
(you become a Contributing Member by subscribing or donating money to the operation of this site)
- No ads - advertisements are removed
- Access the Contributors Only Forum
- Contributing Members Only Downloads
- Send attachments with PMs
- All image/file storage limits are substantially increased for all Contributing Members
- Option Codes Lookup
- VIN Option Lookups (limited)


dphatch
-
Posts
233 -
Joined
-
Last visited
Content Type
Profiles
Events
Forums
Exterior Paint Colors
Downloads
Tutorials
Links Directory
Collections
Classifieds
Store
Everything posted by dphatch
-
Interior door latch problem
dphatch replied to dphatch's topic in 997-1 Series (Carrera, Carrera 4, Carrera 2S, Carrera 4S)
Should have soon a Google search. Found the most common cause to be the door lock pivot. ( Bad cable would not let me open the door or actuate the window so that was easy to rule out ) It appears this is a common part failure in these cars as they age. Repair requires a $20 part ( part number 997-555-381-03 for drivers door ) - maybe 20 minute job. Might be of interest to others. -
When I opened the drivers door ( 997.1) this morning while exiting the car I heard pop/snapping sound coming from the area of the door latch resulting in significant play in the actuation of the latch. I can open the door and the latch still actuates the window lowering function when entering and exiting the car but lots of play in the cable and latch does fully return to its normal position . Has anyone experienced this issue that can give me heads up what needs fixing behind the door card ?
-
Having TPMS issues
dphatch replied to dphatch's topic in 997-1 Series (Carrera, Carrera 4, Carrera 2S, Carrera 4S)
My question was about sensors in/around the wheel wells that detected the signal from the sensors in the wheel ? Or are the signals received by the control unit alone ? -
Having TPMS issues
dphatch replied to dphatch's topic in 997-1 Series (Carrera, Carrera 4, Carrera 2S, Carrera 4S)
Are there individual sensors in each wheel well that read the tpms and send data to the control unit ? or does the control unit receive and process those signals directly ? -
Can someone tell what system in a 997 reads the signals from the TPMS sensor in each wheel ? I'm getting readings only from passenger side wheels. Could be sensors are bad but summer wheel set ( just switched over to winter set ) exhibited same issue. Could be that all eight sensors are dying at once but might suggest something else is amiss. Just need to know what the "something else" might be.
-
DIY tune up
dphatch replied to PetrolAppraiser's topic in 997-1 Series (Carrera, Carrera 4, Carrera 2S, Carrera 4S)
+1 to this one. As for tools, best bet would be to read a few of the DIY's on plug/coil pack replacement as they offer helpful hints and tips and often reference tools required. The more you work on these cars the more tools you will need as basic tools won't get you to many of the places Porsche put stuff in the engine bay of a 997. -
As others have already mentioned, I vote for coils being worn out given the age of the car. If you can jack up the back of the car and remove the rear wheels it is possible to get a good at the coil packs with a good light source and a mechanics mirror. You're looking for cracks in plastic casing and/or clear epoxy sealant on the face of the coil used to weather proof it. Once moisture is able to enter the coil pack they are toast.
-
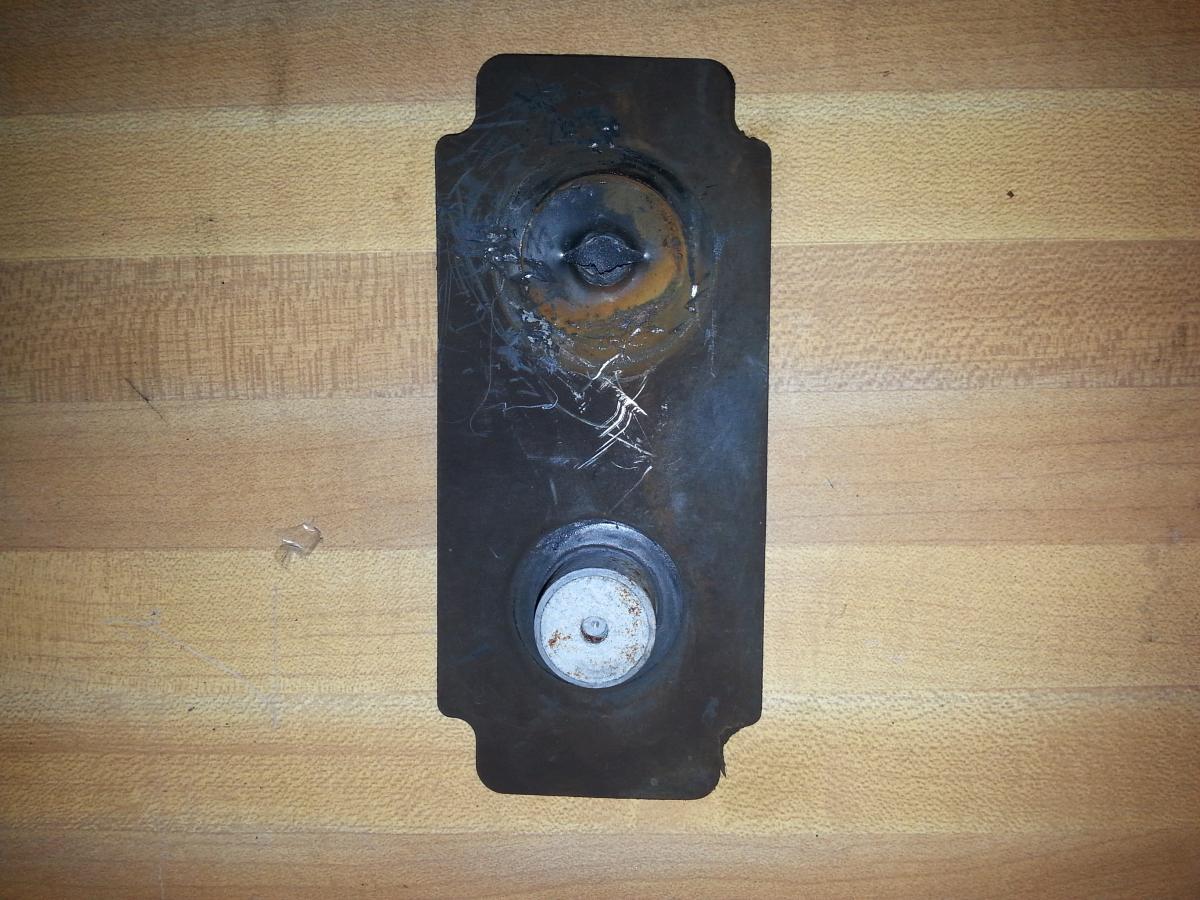
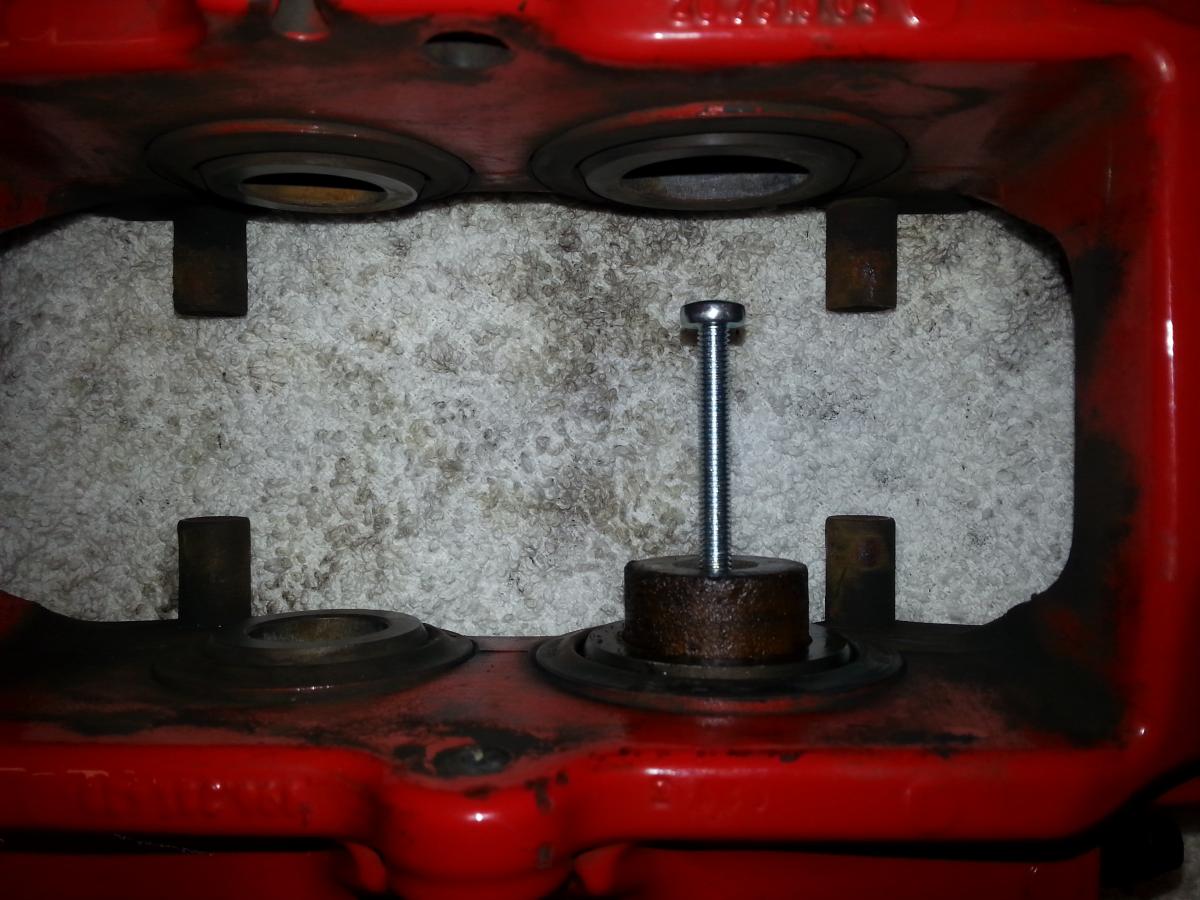
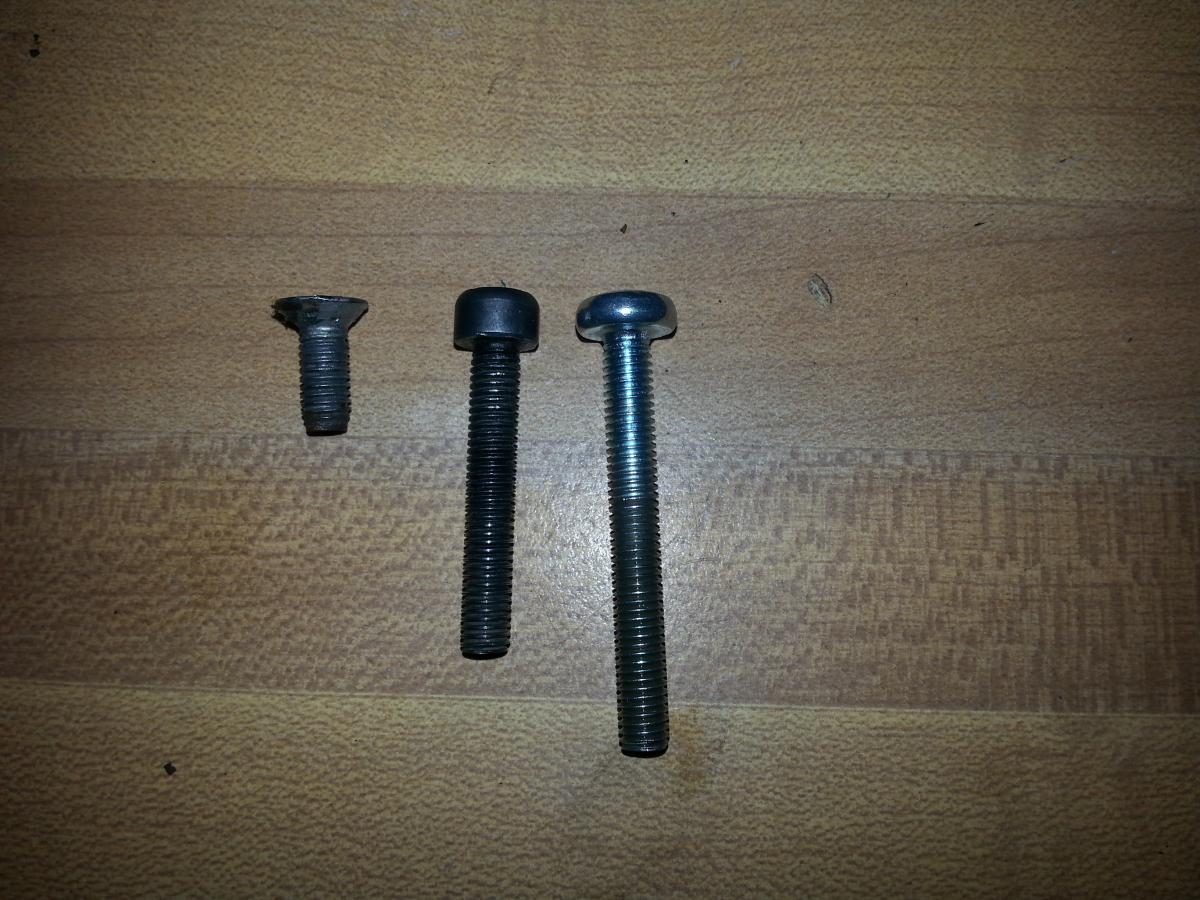
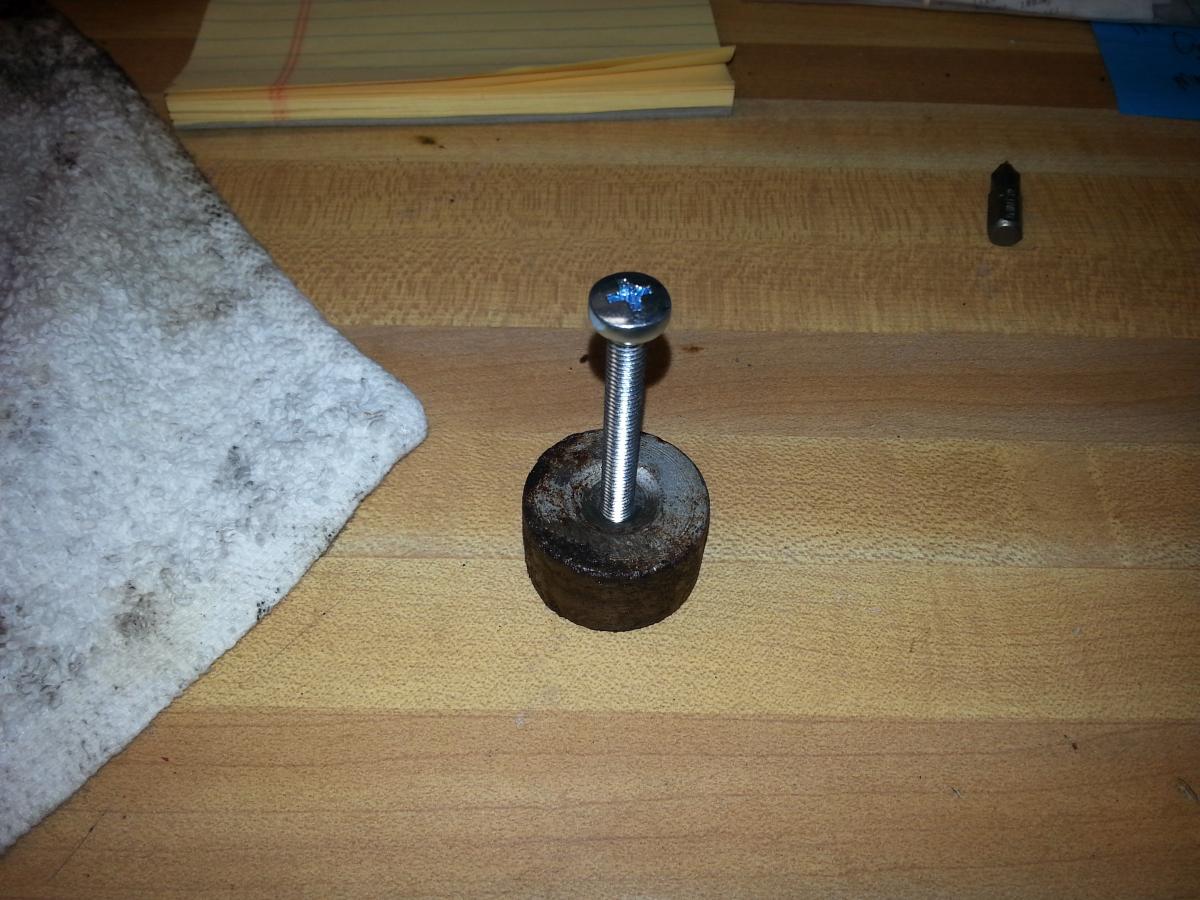
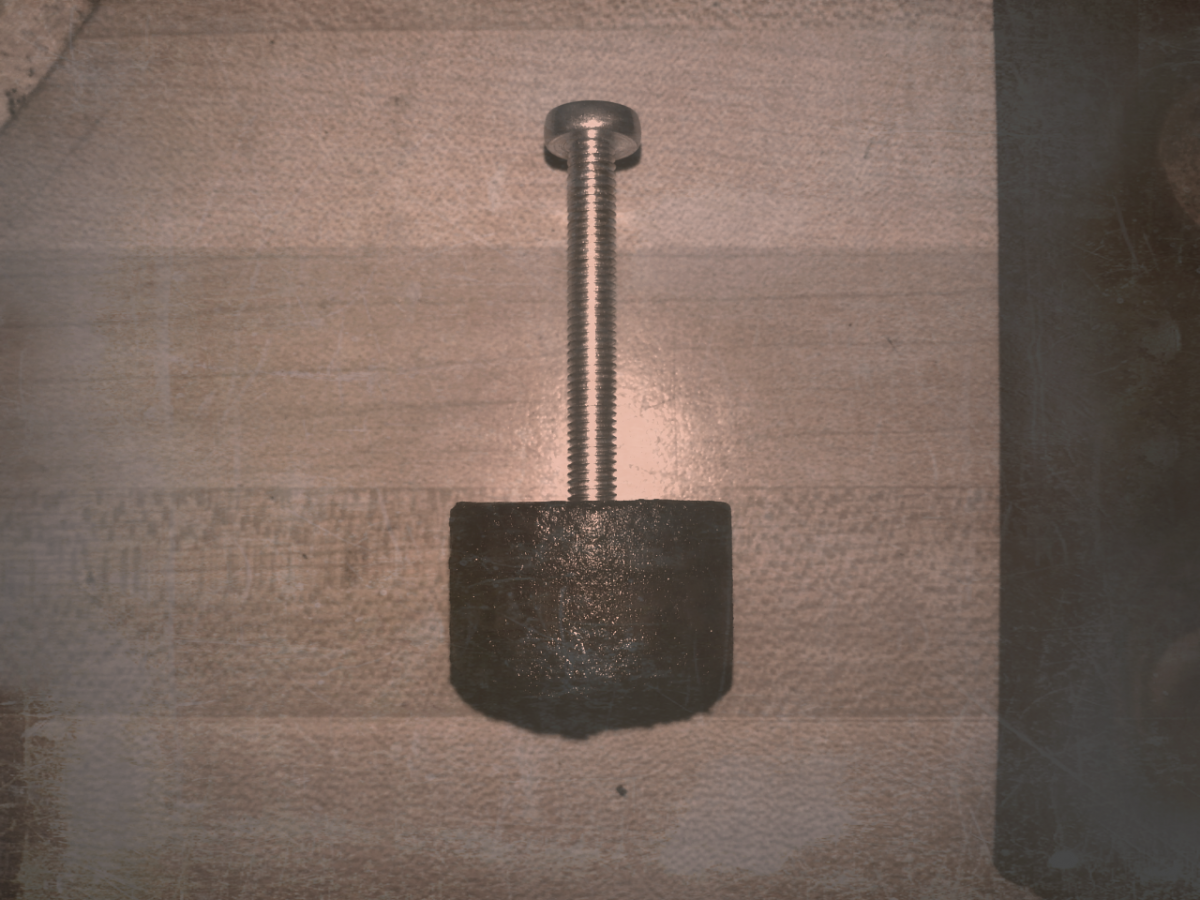
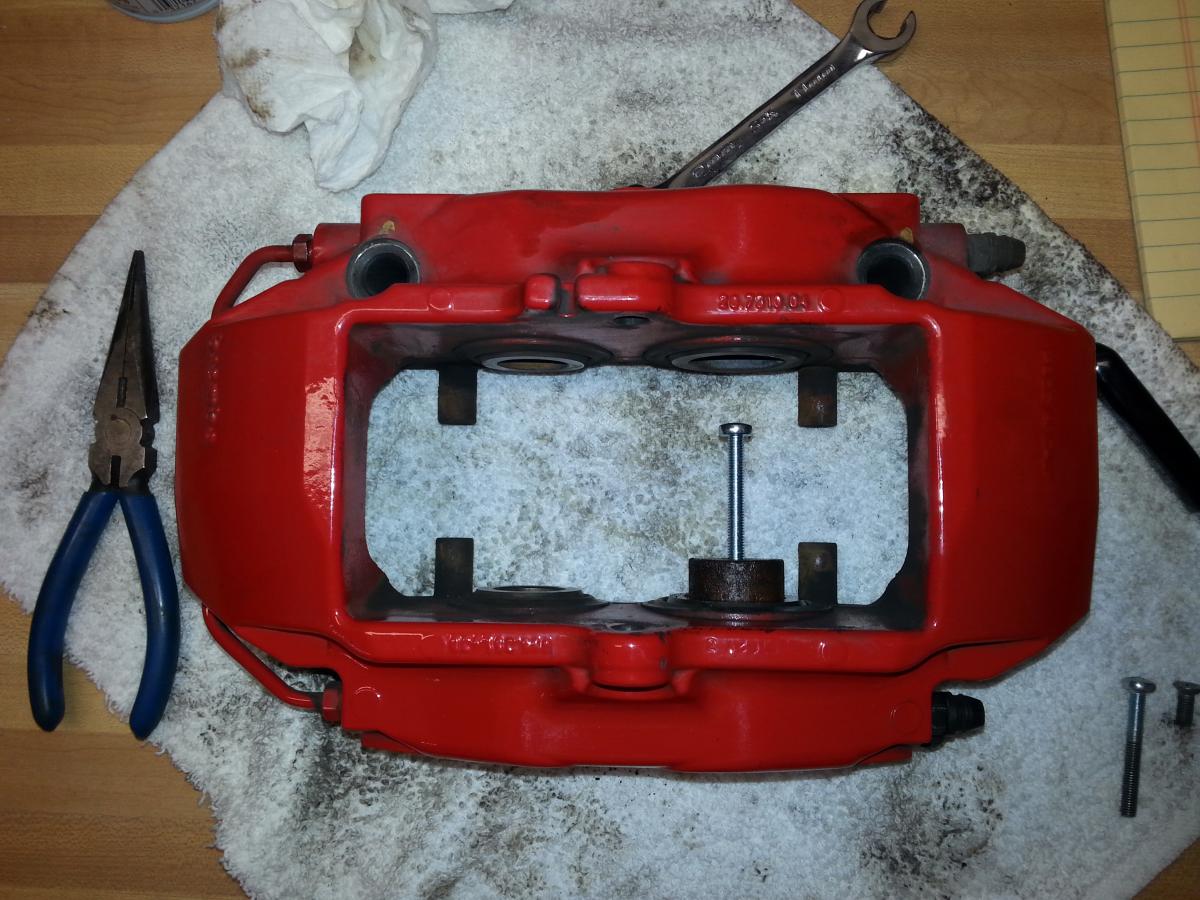
While servicing the front brakes on my '07 C4S one of the weights on only one of the damper pads got stuck in the piston and broke away from the pad backing. What follows is the process I used to remove it with always enjoyed pictures. I posted this because I could not find anything similar anywhere else. Having used the "how to's..." from this site and others many times I just wanted to offer a little payback if I could. The bad news, as shown in the above pic, is the pad damper with the missing weight which was securely entombed in the piston. Damper weights are held in place on the damper pad itself by a screw which was still attached to the weight after I removed the damper itself and easily removed ( in my case ) from the weight. Good news is that the threads in weight go all the way through to the back side of the weight. I suspect this is deliberate to allow for removal should they get stuck. had the corrosion extended to the screw soaking all in PB Blaster would have been my next step. Here's a pic of the screws I used to press the weight out of the piston. First screw was holding the weight to the damper, second and third were a 1-1/2 " cap screw and 1-3/4 " phillips head I had on hand. All screws have the same thread dimensions to insure a secure fit and allow for a plan "B" approach in the event plan "A" did not work. First thing I did was soak the piston and weight in PB Blaster. To facilitate same I removed the caliper to allow PBB to sock in better and more fully dissolve the corrosion keeping the weight from coming out. After 3-4 hours of soaking I inserted the shorter cap screw into the threaded hole in the center of the weight and screwed it in until I hit the bottom of the piston. ( Cap screws are preferable to phillips heads as they allow you to apply more direct torque to screw without stripping the head ) I proceeded gradually tightening the screw for a couple of 1/4 turns to determine if the PPB had had sufficient time to loosen the corrosions hold on the weight. Once I saw evidence of the movement in the weight I proceeded to run the cap screw all the way flush to the top of weight and then replaced it with the longer screw visible in the picture to force the weight all the way out. Note you do not need to remove the caliper to access the weight this way if it just needs gentle coaxing. However, the rotor would need to be removed in that case at which point it seems worthwhile to just remove the caliper. And success. Next step take some emery cloth to the inside bore of the all pistons to clean out the crud and eliminate a future recurrence of this time absorbing issue.

-
Replacing the thermostat that comes with the new housing is the more cost effective approach given the cost of the tool required to install the thermo into the old housing. If you are you are going to r/r the water pump you should use this opportunity given time-already-spent on the water pump and coolant to replace the thermostat at the same time.
-
If it was the AOS there will be evidence of oil in the intake runners just aft of the intake plenum. As removal of the intake plenum is needed in order to access the AOS you won't be wasting any time should you find a good deal of oil in the intake tube. AOS can be replaced without dropping the engine and there is a very good DIY on the process on one of the Porsche boards. I replaced the AOS myself and while time consuming it's not impossible. Google it and you will find it. It is essentially the same process as replacing a failed alternator/battery cable ( with a few extra steps ) which I would highly recommend doing at the same time should you decide to replace the AOS.
-
I got a question for you guys. OEM tire sizes for my car 235-35-19 and 305-30-19 . Diameter of these is 25.5 " and 26.3 " respectively. Now given the obvious concern over rolling diameter of the tires on C4S and the impact of too much variation in front-to-back tire diameter on the drive train why not use a 235-40-19 on the front which at 26.4" and nearly identical to the rears 26.3 ? Tires in question are Michelin Pilot Super Sports.
-
I don't see any reason why they wouldn't work so if you have exhausted the recyclers these could be your only option. However, If I recall correctly certain years of the 996 ( I think it was the last two years but not sure ) came standard with the hardtop standard which is why there are so many 996 tops available. Many buyers declined the top which was why Porsche stop offering them as a standard item. However all of the 996 cars where fitted with the locks regardless of whether or not the car was ordered or came with the hard top. With that said they should be available from Porsche dismantlers if you can get them to pull them from the car. Mounting bolts are available at any hardware store so if you could get a dismantler to remove them you could readily source the bolts if they didn't want to both keeping track of the. As for the lock type receivers above, at the price I'm not sure how much cheaper than the newer screw type locks conversion would be. The screw type locks minimize the rattles that were apparent in the first and second iterations of the lock down type lugs that these mounts are designed to fit. By the way, the ebay locks will work with versions 1 and 2 of the lugs as thre only change to version 2 was the addition of a plastic sleeve on the end of the lug to added to reduce the rattles owners complained about.
-
Side light code reset
dphatch replied to dphatch's topic in 997-1 Series (Carrera, Carrera 4, Carrera 2S, Carrera 4S)
As a follow up. I removed the fog light housing to address the parking light issue and found both bulbs had failed. Prior to the reinstall, I checked and cleaned all the connection points on both harness and the bulbs and bulb holders themselves. I replaced the bulbs with the same blue 5 watt wedge type bulbs and reinstalled both housings. I further disconnected the negative battery terminal and clean both the terminal and the lug prior to reconnection. I started the car and checked for alerts which did not return, As this issue started with a side light alert and ended with a parking light alert I can only conclude it was a weird coincidence that both sets of bulbs failed within a very narrow time window. My thanks to both jl-c and Doug_ for your help. -
997S noise above 4000 RPM
dphatch replied to bigscotia10's topic in 997-1 Series (Carrera, Carrera 4, Carrera 2S, Carrera 4S)
Could be one or more the bearings in one or more of the pulleys or an alternator bearing. Need to remove air filter housing and the serpentine belt and spin each of the pulleys and listen. Not unusual for these bearings to go. You can get the whole set from SunCoast or Sunset for acouple hundred bucks. Replace the belt while your at it regardless of your determination of it's condition. $ 30 parts aren't worth trying to get a few extra miles out of. -
Side light code reset
dphatch replied to dphatch's topic in 997-1 Series (Carrera, Carrera 4, Carrera 2S, Carrera 4S)
So your referring to connections that attach to the light fixtures themselves. Was thinking by harness you meant the main harness connection for the all of the front bumper electrics. Any fault recorded at the harness ends would need to be traced back along the harness to its origin ? This would require removal of the passenger side wheel well liner as this is where the main harness enters the bumper. Is it possible that a loose connection at the main harness might be causing the problem ? Issue started after I removed the side lights and fog light housings. I did not remove the headlights. Could be that the connection at the main harness end is problem.I'll start at the connections to the lights and work my way over to the main connector. -
Side light code reset
dphatch replied to dphatch's topic in 997-1 Series (Carrera, Carrera 4, Carrera 2S, Carrera 4S)
As luck would have it, problem was not corrected after replacing the bulbs for the side marker lights and the parking lights which are in with the fog lamps. Short tested all modules with Durametric after resetting the coeds that were showing and everything came back clear. Now both left and right parking lights show to be needing attention so I'm back to the ground issue. Where exactly is the front harness you're referring to ? -
Side light code reset
dphatch replied to dphatch's topic in 997-1 Series (Carrera, Carrera 4, Carrera 2S, Carrera 4S)
As an update, I acted upon Doug_B-928's advise by just replacing the clear side lights ( I'd installed years ago) on both sides with the original orange ones and the original bulbs and believe-it-or-not the error went away. Now, not that I didn't trust Doug but, when I was a lad, a side marker bulb either worked or it didn't. There where no fancy computer gadgets to foretell of the impending death of a side light bulb ( let alone the exact location of same). I am more than a little amazed at these cars sometimes as to how sophisticated, maybe overly sophisticated is a better way to put it, these cars are. At any rate, problem solved, new bulbs on order. I use the clear silver tipped bulbs that glow orange the originals of which have lasted over 6 years. Thanks for the help. -
Side light code reset
dphatch replied to dphatch's topic in 997-1 Series (Carrera, Carrera 4, Carrera 2S, Carrera 4S)
Will try both suggestions. Regarding checking for ground jl-c, it would help me if you could be more specific regarding which contact wire to check. As the side light body is all plastic and the bumper is as well, where in that harness is the circuit being grounded ? As I removed both side lights and fog/turn signal lights I will remove and recheck all the connects and wiring looms but will try bulb on the side indicated as the most expedient fix first. -
Dash indicates need to check left front side light. All lights, side lights include, are functioning normally. Removed left side light, checked connections and reinstalled. reset code with durametric but dash still shows error for side light. Any thoughts on next steps ?
-
my front fender is 'loose'
dphatch replied to porsche356's topic in 997-1 Series (Carrera, Carrera 4, Carrera 2S, Carrera 4S)
I would suggest removing the inner fender liner. Best way to do that is the jack up the car on that side, remove the wheel, and the few screws and plastic nuts the hold it in place. I am guessing ( because while I have had the inner fender liner off several times I never looked to see how the fender was attached ) there are 1 or more screws or speed nuts missing at the bottom most corner of the fender where your red circle is. There are no fewer than 22 speed nuts and screws that attach the fender to the chassis. I don't think that one missing attachment (screw/speed nut ) would cause a great deal of slack in the fender at that point. Removing the fender liner would be the only way to get to the attachment points. -
For what it is worth, when I reinstalled my coolant tank I found that holding the tank nearly level while positioning it to bypass the obstructions at the top and bottom of the engine bay made it easier for me to get it into position. As you say the bracket that holds the tank in place can not be replaced after the tank is in position. I held the tank as close to the top bracket as I could and angled the back end of the tank toward the fender wall. I held tank was as parallel to the ground as I could given the various obstructions. (Holding the tank at an upward or downward angle and trying to install it would not allow me to get it into the engine bay no matter how a twisted the tank. )
-
TPS do not register
dphatch replied to baker_g's topic in 997-1 Series (Carrera, Carrera 4, Carrera 2S, Carrera 4S)
Are you sure the frequency was 433 Mhz ? Installer should be able to verify what kind on sensors where installed. Hook it up to a Dura metric and see if it will recognize the sensors and then Get a reading on the battery life remaining of each sensor. If the y won't read sensors are not the correct type. -
Am thinking you've already discovered this but, the short version of the instructions called for soaking the piston, then using the air to pop it out, not the other way round. So if you method didn't work try the methods suggested by JFP and .
-
Things I would look at if it's not just a cold engine warming up. My car stumbles a little when cold so if that's all it is not to worry. If the car isn't hesitating when you accelerate not sure you have any problem. Beyond that you might try cleaning the MAF with a can of MAF cleaner and clean it. .... I use the CRC stuff. Computer....disconnect negative battery cable for 2 minutes and reconnect. (reboots the cars computer).....I suspect a little cleaning and/or battery disconnect will solve your problem it you really have one. There are some good DIY's on the MAF removal and cleaning procedure so if you have never done it I suggest you read them. .
-
Mobil 1
dphatch replied to Bk4205's topic in 997-1 Series (Carrera, Carrera 4, Carrera 2S, Carrera 4S)
Ty Hard to eat that price. Very! Yuck! LOL!! Typing on an IPad is an itch !!!!