Welcome to RennTech.org Community, Guest
There are many great features available to you once you register at RennTech.org
You are free to view posts here, but you must log in to reply to existing posts, or to start your own new topic. Like most online communities, there are costs involved to maintain a site like this - so we encourage our members to subscribe or donate. All subscriptions and donations go to the costs operating and maintaining this site. We prefer that guests take part in our community and we offer a lot in return to those willing to join our corner of the Porsche world. This site is 99 percent member supported (less than 1 percent comes from advertising) - so please consider an annual subscription or donation to keep this site running.
Here are some of the features available - once you subscribe RennTech.org
- View Classified Ads
- DIY Tutorials
- Porsche TSB Listings (limited)
- VIN Decoder
- Special Offers
- Paint Codes
- Registry
- Videos System
- View Reviews
- and get rid of this welcome message
It takes just a few minutes to register, and it's quality Porsche information at a low cost.
Contributing Members also get these additional benefits:
(you become a Contributing Member by subscribing or donating money to the operation of this site)
- No ads - advertisements are removed
- Access the Contributors Only Forum
- Contributing Members Only Downloads
- Send attachments with PMs
- All image/file storage limits are substantially increased for all Contributing Members
- Option Codes Lookup
- VIN Option Lookups (limited)

-0001-0001.png.112c13ee97acfad0cb1e70d195cc9a0e.png)
Loren
-
Posts
37,850 -
Joined
-
Days Won
638
Content Type
Profiles
Events
Forums
External Paint Colors
Downloads
Tutorials
Links Directory
Collections
Classifieds
Store
Everything posted by Loren
-
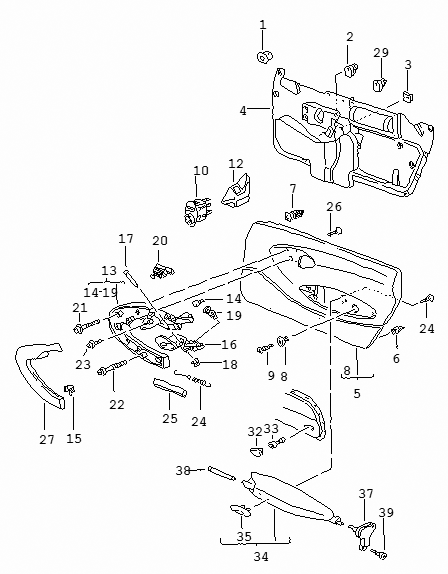
996 555 081 02 A18 Lining Black Leatherette - retail $383.05
-
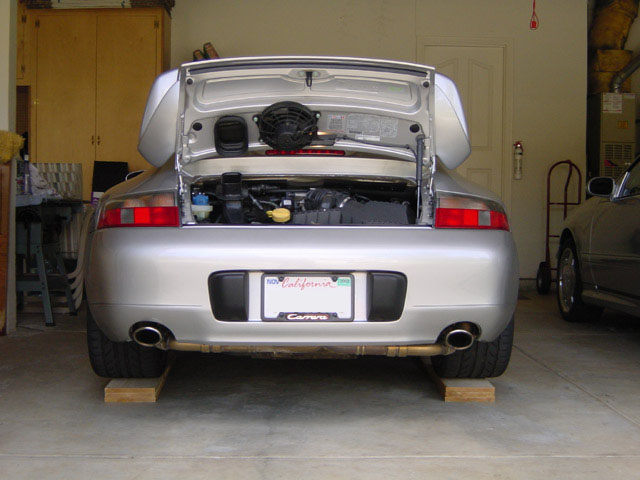
I drove on the boards (backed on in this pic). The bottom board is about 6 inches longer than middle board which is about 6 inches longer that the top board. So there is a stair steep effect.
-
MY and color please? and you want leatherette not leather right?
-
-0001-0001.thumb.png.17f5bb25bf8ec261a17c21e6321c8492.png)
How to remove rear seat back?
Loren replied to colonel's topic in 996 Series (Carrera, Carrera 4, Carrera 4S, Targa)
Well, you could. The rear side panels will need to come off to get to the belt bolts and in the end the belt (slotted) trim will still be there. I'd say 30 minutes to an hour if you have the right tools (and don't drop the front screw into the side of the chassis). ;) -
How to remove rear seat back?
Loren replied to colonel's topic in 996 Series (Carrera, Carrera 4, Carrera 4S, Targa)
Same way, mine just slides off towards the bottom. -
1. Yes, if it corrects itself within a period of time. 2. We would need the fault codes in order further diagnose the error and potential problem area.
-
Yes, you can measure the resistance they should all be the same. One (or more) that much higher or lower indicates a problem.
-
Anyone that has a cap with the part number ending in 00 should the cap regardless. It WILL leak.
-
Wheel Lugs
Loren replied to m4ttc's topic in 9PA, 9PA1 (Cayenne, Cayenne S, Cayenne Turbo, Cayenne Turbo S)
Yes. Same bolts. -
Easy to DIY fit replacement front lip spoiler ?
Loren replied to RoShamBo's topic in 996 TT, 996 TT S, 996 GT2
If you car is not lowered it should only take a few minutes. Also if the plastic screws are sheared off then you might have to poke and pry them out. Still I think less than 30 minutes. I think you should buy new fasteners. -
996-555-122-04-ESZ is leatherette not leather.
-
996 gearbox C2 Cab 1998 6 speed
Loren replied to Darren996's topic in 996 Series (Carrera, Carrera 4, Carrera 4S, Targa)
The GT3 gearbox is different (type G96.90, G96.93, G96.96) from the standard Carrera's (types G96.00, G96.01, G96.30, and G96.31). Also, I think you can replace gear sets in a GT3 gearbox but they don't list all parts in the gearbox. -
Dell, I think Porsche only sells the whole door panel - so a part number may not help. Another option would be to find a good upholstery shop to see if they can replace just the one panel.
-
1. Potential fault P0740 causes are: - ATF level not OK - check ATF supply - Torque converter clutch worn. - check torque converter - Mechanical damage to pressure regulator 4. - check pressure regulator 4 (hydraulic) - Open circuit, short circuit to ground, short circuit - check electrical triggering to pressure regulator 4 to B+. - Hydraulic control unit - check for sticking valves. 2. Not all pcodes cause a CEL light. If the speedo signal problem is ABS related then you may have an ABS code. Unfortunately Porsche has not shared those codes with many companies so ABS can not be read with scan tools other than a PST2 or PIWIS. Your car can also generate code for Body faults - B code, C drivetrain faults - C codes, and U faults - for undefined (by SAE) faults. Porsche only publishes P codes. Some independent shops have invested in PST2 tools so perhaps one could read your full code faults for you (for a nominal fee). Either way you should try to identify and fix the P040 cause - which could be as simple as low ATF level.
-
996 555 592 00 C51 is #27 - Correct. Porsche only sells the whole door panel (from what I see in the parts list). ETD is the leather color code for a Graphite Grey Leather door panel.
-
No, not according to the parts list. Cup cars have carbon fiber doors, front hood and rear wing.
-

-
That part number is for the door handle only (sorry Porsche had bad naming in the parts list). If you want the rest of the door panel it would be (for a MY2000 Cab): 996 555 121 05 ETD Graphite Grey Leather - Door Panel (Left) 996 555 122 05 ETD Graphite Grey Leather - Door Panel (Right)
-
How to remove rear seat back?
Loren replied to colonel's topic in 996 Series (Carrera, Carrera 4, Carrera 4S, Targa)
Yup, it just snaps off. -
The part number is for the door panel lining - but it needs a color code to be complete. I'll sent you a PM with instructions.
-
Spare tire question
Loren replied to jnx's topic in 997-1 Series (Carrera, Carrera 4, Carrera 2S, Carrera 4S)
There are 4 different emergency wheels for 996's depending on year and model. My guess is that some are based on trunk area and some are based on body type (i.ae. C4S vs. coupe). There are no specs in the parts list for wheel size - but then these are not meant to go more than 50 miles. I don't see any reason why one would not work. -
The is a complete wheel set. I do not know if it includes tires or not.
-
For oil changes you don't even need ramps. I use 2 x 10s - three per side. More than enough clearance.
-
TWC= Three Way Catalytic Converter. These codes means that what is going on is damaging to the catalytic converter (flashing CEL) and the car should not be driven. Potential causes for this are: - wrong, fouled or faulty spark plugs - bad spark plug connectors - loose or broken spark coils - valve lifters (if chattering) - camshaft control (on that bank) - Variocam not switching over properly A scan tool should be connected looking for other codes. As well you should check to see if the adaptation values in area 1 differ in bank 1 and bank 2 (e.g. TRA=0.02/TRA2=0.27), the adaptation values for area 2 are generally normal.
-
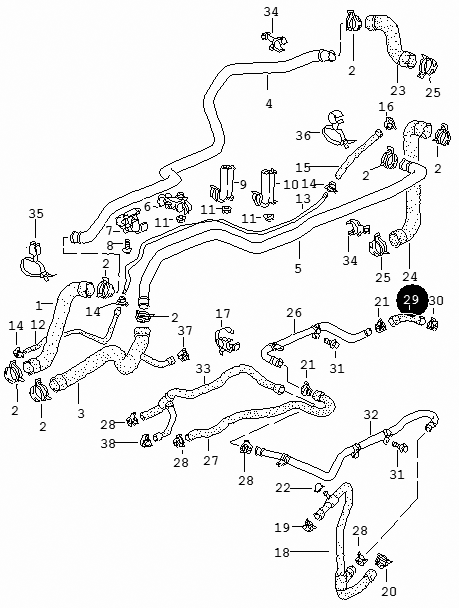
Coolant hose. The parts list says to use a newer 996 106 233 55 instead (if available).