Welcome to RennTech.org Community, Guest
There are many great features available to you once you register at RennTech.org
You are free to view posts here, but you must log in to reply to existing posts, or to start your own new topic. Like most online communities, there are costs involved to maintain a site like this - so we encourage our members to subscribe or donate. All subscriptions and donations go to the costs operating and maintaining this site. We prefer that guests take part in our community and we offer a lot in return to those willing to join our corner of the Porsche world. This site is 99 percent member supported (less than 1 percent comes from advertising) - so please consider an annual subscription or donation to keep this site running.
Here are some of the features available - once you subscribe RennTech.org
- View Classified Ads
- DIY Tutorials
- Porsche TSB Listings (limited)
- VIN Decoder
- Special Offers
- Paint Codes
- Registry
- Videos System
- View Reviews
- and get rid of this welcome message
It takes just a few minutes to register, and it's quality Porsche information at a low cost.
Contributing Members also get these additional benefits:
(you become a Contributing Member by subscribing or donating money to the operation of this site)
- No ads - advertisements are removed
- Access the Contributors Only Forum
- Contributing Members Only Downloads
- Send attachments with PMs
- All image/file storage limits are substantially increased for all Contributing Members
- Option Codes Lookup
- VIN Option Lookups (limited)


nwGTS
-
Posts
12 -
Joined
-
Last visited
About nwGTS

nwGTS's Achievements
Member (1/1)
0
Reputation
-
Hey there Bruce. Thanks for the info. It's interesting that yours is a 20mm. Since my initial post I grabbed a 21mm socket, undid the PASM cable, fed it through the socket and the 21mm fits snugly to the front top nut. I can't get to the rears yet but I assume like everyone else mentions that they are 19mm. I've also heard a plumbers wrench will do the trick on that slotted washer. I may just spring for the slotting tool but the cheapest I've seen it it $140. We'll see. Just so I'm clear, you used the tie rod puller to break the rear LCA ball joint from the hub? Is that what you're saying? I had planned on that and have a ball joint separator (screw kind.. not fork) but had not heard anyone else mention anything about pulling another one of the control arms needing a puller.
-
Anybody know the size of the top nut on the Front AND Rear struts for a 997.2 GTS 6MT w/ PASM? I need to buy the open sockets to remove the top nuts for a lowering spring install and can only find 997.1 non PASM info.
-
Loren, Just checking again to see if you have a wiring diagram (or screenshot from PIWIS) for the steering control module and accompanying modules (indicator, cruise, et al) on a 997.2 2012 GTS.
-
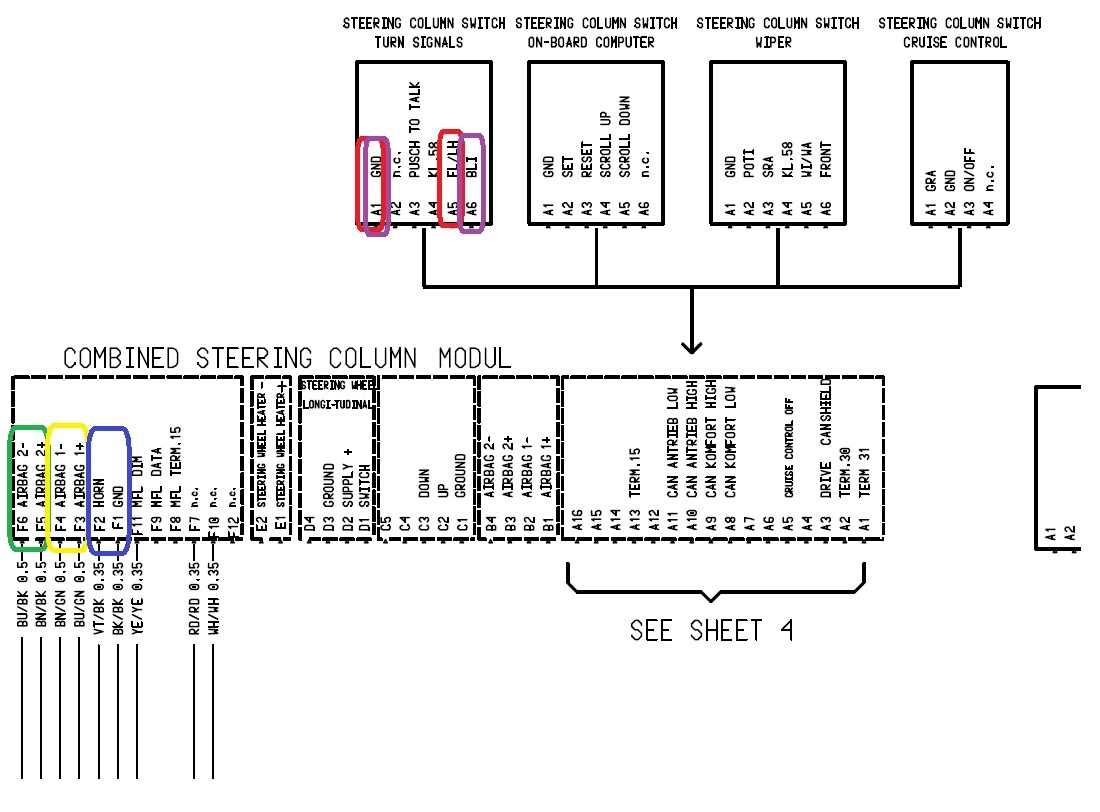
Just wanted to state that the above wiring diagram is for a 997.1. The wire coloring is VERY different for a 997.2. There is also a seemingly random ground (black) wire within the airbag and horn wiring harness that connects to F8 but I do not know what this may be for. F7-F12 are otherwise unoccupied on a 997.2 6MT steering wheel wiring harness clockspring connector. Unfortunately in the 997.2 the wiring harness is built INTO the steering wheel cover and cannot be removed without also removing the trim on your steering wheel which I was not comfortable risking damage to the wheel by doing.
-
Here is the diagram in question. I've highlighted the terminals for the following: 1) Low speed steering wheel airbag for jumping with a 2.8ohm .5W resistor 2) High speed steering wheel airbag for jumping with a 2.8ohm .5W resistor 3) Horn for wiring to steering wheel 4) High beam flash for wiring to steering wheel 5) Direction Indicators for wiring to steering wheel I'm still figuring out the relay that differentiates left from light indicator and will post that once I have it.

-
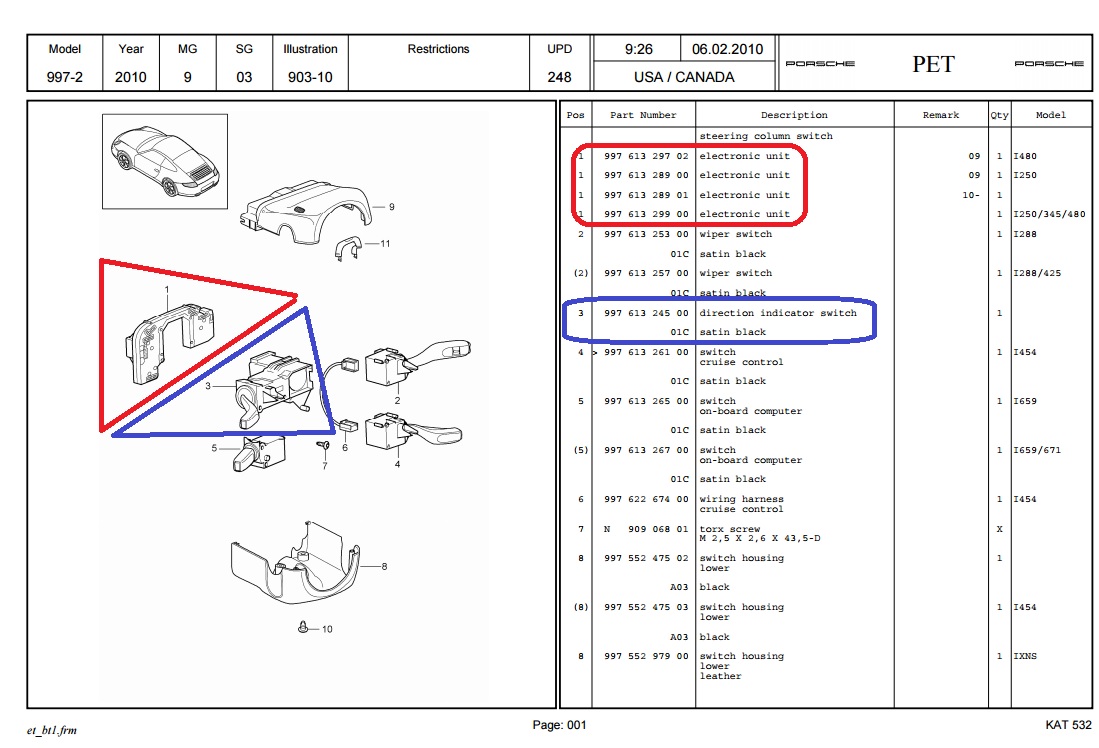
I am wiring indicators, horn and brights (for flash) to an OMP steering wheel hub with buttons to my 2012 997.2 GTS. I need the wire diagram of the indicators and brights on the steering column so I know which wires to tap (horn is done already). Does anyone have this diagram or know where I can find it? Edit: Looks like i need the wire diagram for these two specific parts,1 and 3 in the embedded image. 3 is the switch would probably be the one I want. 1 is the control unit and would be helpful to have but redundant if I have 3 and I probably need 3 anyway in order to test any wiring done on 1.
-
Happy to. Done. :)
-
I'll add late to this thread that I have a 2012 GTS RWD/6-speed manual w/ PASM (NOT SPASM) and do have the LSD. PO nailed the options on this car when he specd it. I would prefer it a bit lower and stiffer TBH. The front end really washes away when accelerating through sweepers. I'm adjusting that with some new bits myself, but in the future I would recommend cars with SPASM and the included LSD.
-
Hi all, Does anyone have the torque settings for the suspension bits on the 997.2? Bits to carrier, bits to body, bits to cross member, bits to bits.. including the sway/stabilizer bars? I'm replacing stabilizer, control arms, tie rods, springs, toe arms etc and need to know how much muscle to put on them. Thanks!
-
Are the suspension torque specs for the 997.2 any different than the 997.1? If so, can you provide those specs or a link to where I can find those? (i could not find 997.2 specs in my search)
-
Okay, I'll use that. Thanks, Loren.
-
My 2012 997.2 Carrera GTS rear deck lid badging was stolen and I'm replacing it I found almost all of Loren's previous 997.x badge position posts but none seem to be the GTS versions: http://www.renntech.org/forums/topic/6434-997-rear-logo-placement/ http://www.renntech.org/forums/topic/28474-gt3911carrera-rear-badge-placement/ Does anyone have the position guide or TSB for the GTS?