Welcome to RennTech.org Community, Guest
There are many great features available to you once you register at RennTech.org
You are free to view posts here, but you must log in to reply to existing posts, or to start your own new topic. Like most online communities, there are costs involved to maintain a site like this - so we encourage our members to subscribe or donate. All subscriptions and donations go to the costs operating and maintaining this site. We prefer that guests take part in our community and we offer a lot in return to those willing to join our corner of the Porsche world. This site is 99 percent member supported (less than 1 percent comes from advertising) - so please consider an annual subscription or donation to keep this site running.
Here are some of the features available - once you subscribe RennTech.org
- View Classified Ads
- DIY Tutorials
- Porsche TSB Listings (limited)
- VIN Decoder
- Special Offers
- Paint Codes
- Registry
- Videos System
- View Reviews
- and get rid of this welcome message
It takes just a few minutes to register, and it's quality Porsche information at a low cost.
Contributing Members also get these additional benefits:
(you become a Contributing Member by subscribing or donating money to the operation of this site)
- No ads - advertisements are removed
- Access the Contributors Only Forum
- Contributing Members Only Downloads
- Send attachments with PMs
- All image/file storage limits are substantially increased for all Contributing Members
- Option Codes Lookup
- VIN Option Lookups (limited)


dpatel710
-
Posts
61 -
Joined
-
Last visited
-
Days Won
1
Content Type
Profiles
Events
Forums
Exterior Paint Colors
Downloads
Tutorials
Links Directory
Collections
Classifieds
Store
Everything posted by dpatel710
-
My CTT is creeping up towards the 200k mark and the front end is due for a refresh. While I plan on having the P!G parked, I was thinking about taking care of the rear too but have some questions. What are the indications for taking care of the bushings and what not back there? Also, while looking on pelican parts, the only bushing I found for the rears is 955-341-588 for the rear lower outer. In their write up, it looks like there are three sets of bushings (two on the arm and one in the wheel carrier) that need to be replaced? I searched but have only been able to find the complete arms, does anyone have part #s for these bushings? https://www.pelicanparts.com/techarticles/Porsche-Cayenne/88-SUSPEN-Rear_Control_Arm_Replacement/88-SUSPEN-Rear_Control_Arm_Replacement.htm For anyone that has BTDT - is it worth the time to pick up a press and do these or just drop them off to a machine shop? Thanks!
-
I added Lucas oil heavy duty oil stabilizer to my front diff and it really quieted down the whining it was making - not really applicable though since you have metal in the oil.
-
Update: JB weld failed due to the temperature in that area. After doing some digging, I found a replacement bushing so that replacement of the shifter cable can be avoided. https://www.bushingfix.com/porsche-cayenne-shift-cable-bushing-repair-kit/
-
Resolved: Sent the ecu back to the vendor for a reflash. The 05 had a newer version of the software which didn't pick up the brake signal from the brake switch. They transferred the software from my old ecu and the car is running again.
-
Jfp, do you have any details on the procedure? With vag-com, I am able to do more than durametric. I am going to call the shop that worked on the ecu today and see if they are able to help. Worst case, I’ll call the dealer and explain the situation. Unfortunately, their customer service is not very good which is why I went an alternate route for the ecu. They are the only/closest dealer and it is a 2 hour tow to the location. Thank you for the help.
-
My old ecu from my 04 CTT bricked and I ordered an ecu from an 05 CTT and had it "cloned" to match my vehicle. The ecu communicates with vag-com/durametric and has no error codes but I am unable to start the car as it says "press brake pedal". I checked the brake switch itself, the relay under the driver's seat, and the wiring harness under the driver's side carpet. The brake lights work when I push the pedal. After finding nothing wrong, I continued to search the forums more. I found that 05's and up use a different brake input than the 04's. (post #54 in the following link). In short, the 04 uses a switch and 05+ use a CAN input from the PSM module. https://rennlist.com/forums/porsche-cayenne-forum/476209-help-engine-not-starting-ecu-4.html Is it possible to recode the ECU or PSM to get the two to talk to each other for the brake pedal signal?
-
ECU Replacement Help
dpatel710 replied to dpatel710's topic in 9PA, 9PA1 (Cayenne, Cayenne S, Cayenne Turbo, Cayenne Turbo S)
Would it be possible to post the pinout for the ecu connectors? I would like to check for power to the ecu to rule out wiring problems. I'm not much for electrical diagnosis but using the material I have, it looks like I should check pins A3, 21, and 23 for possible power? 171016130452.pdf -
ECU Replacement Help
dpatel710 replied to dpatel710's topic in 9PA, 9PA1 (Cayenne, Cayenne S, Cayenne Turbo, Cayenne Turbo S)
Thank you for the replies. Would this be something the dealership can do? Or a tuning company? I live in a rural area so I would like to be able to take the ecu's somewhere rather than tow the suv. -
Hi All, The P!G has had a rough few months. Yesterday, while driving home, it cut out at an intersection and would not turn over. I walked over to the parking lot it was in and did some troubleshooting today. The car will not turn over, displays "foot on the brake", and gave the psm error when it died. With vag-com, I am unable to communicate with the engine but am able to access other units. I checked the trans and the error it returned was no communication with the ecu. From here, I checked all the ecu/psm related fuses as well as the ecu under the hood. The unit itself was dry and the connections had no oxidation or rust, so I am guessing it fried on the inside. Also, with the ignition on, the radiator fans start running. When swapping out the ecu, is there anything particular I need to look out for? I have coding ability with vag-com but am unsure if there are any specific porsche only parameters which may need to be coded. TIA!
-
Solved. The multifunction switch was fine but I installed the new one as a part of the troubleshooting process. The problem was a result of the plastic sleeve within the shifter cable separating from the body, causing the cable to fall off the transmission pin. Thus, when moving the shifter in the car, the trans stayed in gear and didn't match the shifter - triggering limp mode. It is possible to access the F125 from the bottom of the car without removing the drive shaft or heat shield as the factory manual states. I simply bent the heat shield back enough to have room to work with a 10mm wrench. The switch is is straight forward. When the shaft is vertical, the transmission is in neutral. I am going to try jb weld to repair the shifter cable sleeve so that it will stay on.
-
Thanks Lewisweller! That's one of the only posts I have been able to find in regards to the F125. This switch was a common failure point for my old Audi so I'm going to try the swap this weekend. The factory repair manual procedure doesn't look too bad but I won't know for sure until I get in there.
-
It rained today and when I parked the Cayenne at my apartment, the dreaded "PRND" light up and it prompted to move the gear selector to P or N. The actual gear selector moves fine and displays the light next to whichever gear it is in. Pulled the codes with vag-com and it came back with - 00293 - Multi-function Switch (F125) 008 - Implausible Signal Has anyone here had experience with replacing the F125 multifunction switch? If so, would it be doable in a parking lot/have any tips for its replacement?
-
A/C Flap Actuator
dpatel710 replied to seafeye's topic in 9PA, 9PA1 (Cayenne, Cayenne S, Cayenne Turbo, Cayenne Turbo S)
Yes, the servos can be replaced without removing the dash. You will have to go from underneath the driver's side dashboard and remove all the electronics in the way. Not bad, just time-consuming. VW/Audi parts should work but I'd recommend ordering a set of 957 motors and doing all of them. It's cheap enough (<$100) and not something you want to do again. -
PO did the pumps on my p!g around 130k miles. I am interested to see what the general consensus is so I can plan to PM them later on.
-
Thanks for the pics Mr. Haney. I'm still fighting with myself as to whether or not I want to tackle this job. I had a lot of vibration on my pig when I purchased it. After a good road force balancing, driveshaft/flex disk, and plugs+coils it is much smoother but still has vibration at idle and coming to a stop.
-
Woah! Motor mounts would be good to do with the motor out. Anyone know if its possible to do with the motor in and using an engine bar like for the non turbo V8? Mine need to be replaced but if its a motor out deal, I'll wait until I have to.
-
A/C Flap Actuator
dpatel710 replied to seafeye's topic in 9PA, 9PA1 (Cayenne, Cayenne S, Cayenne Turbo, Cayenne Turbo S)
Thanks! Surprisingly, no electronic trouble. I remembered to unplug the battery after I disconnected kessy and the car wouldn't stop beeping, doh! After connecting everything, it took a couple of key turns for things to sync up but fired up fine. Air suspension and traction light were on (happens everytime I disconnect the battery) but after a minute of driving, all was back to normal. -
A/C Flap Actuator
dpatel710 replied to seafeye's topic in 9PA, 9PA1 (Cayenne, Cayenne S, Cayenne Turbo, Cayenne Turbo S)
According to the earlier post, the servo motor you are looking for is 7L0-907-511-AH front, center right vent flap. I cannot confirm this as I only had one center vent flap. And yes, I was able to replace the defrost flap motor without pulling the dashboard. In my post above, the tray with 3 motors had the defrost flap motor. I was able to access this one after removing the lower tray with the 2 motors. -
A/C Flap Actuator
dpatel710 replied to seafeye's topic in 9PA, 9PA1 (Cayenne, Cayenne S, Cayenne Turbo, Cayenne Turbo S)
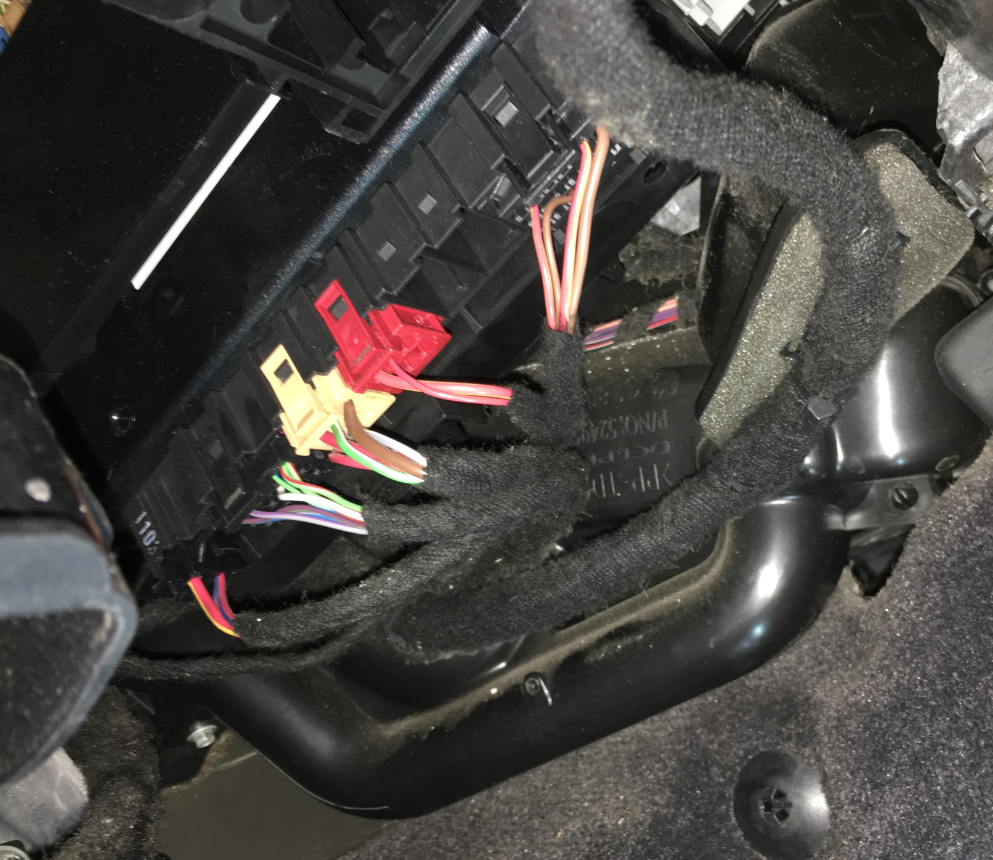
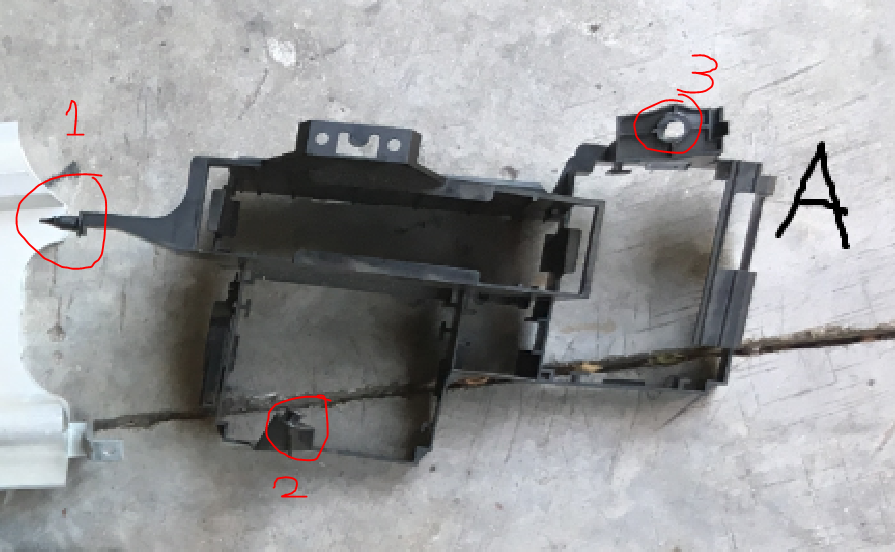
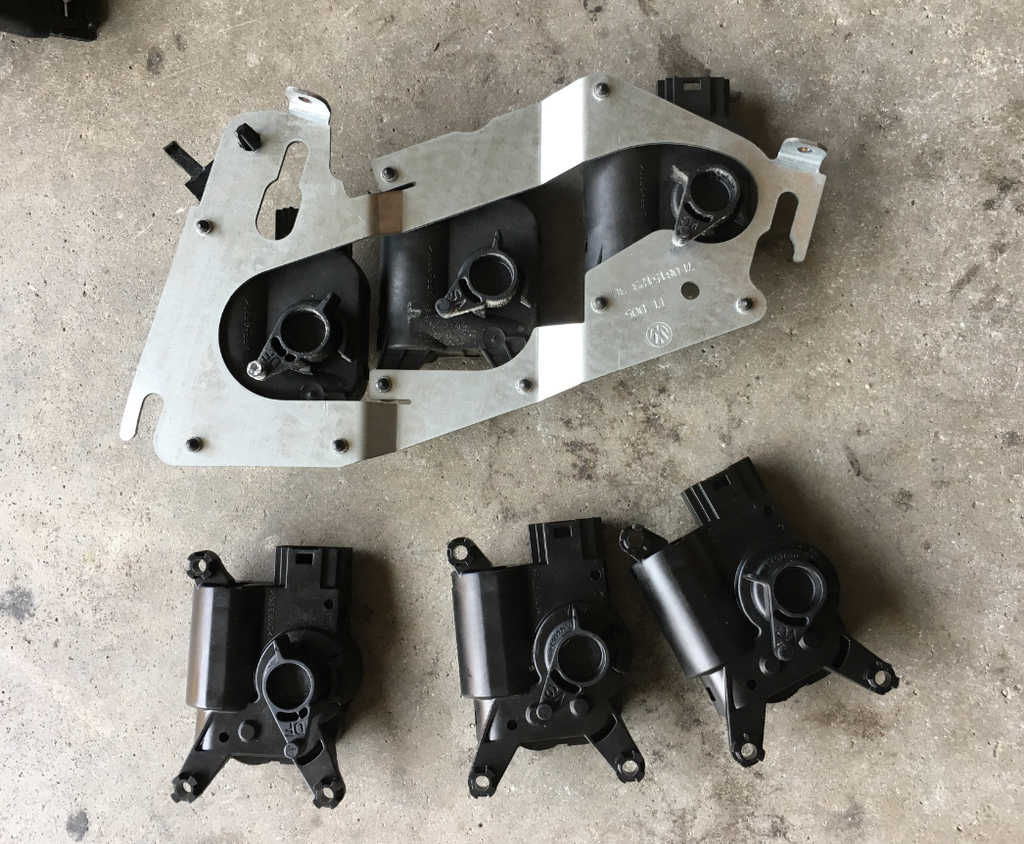
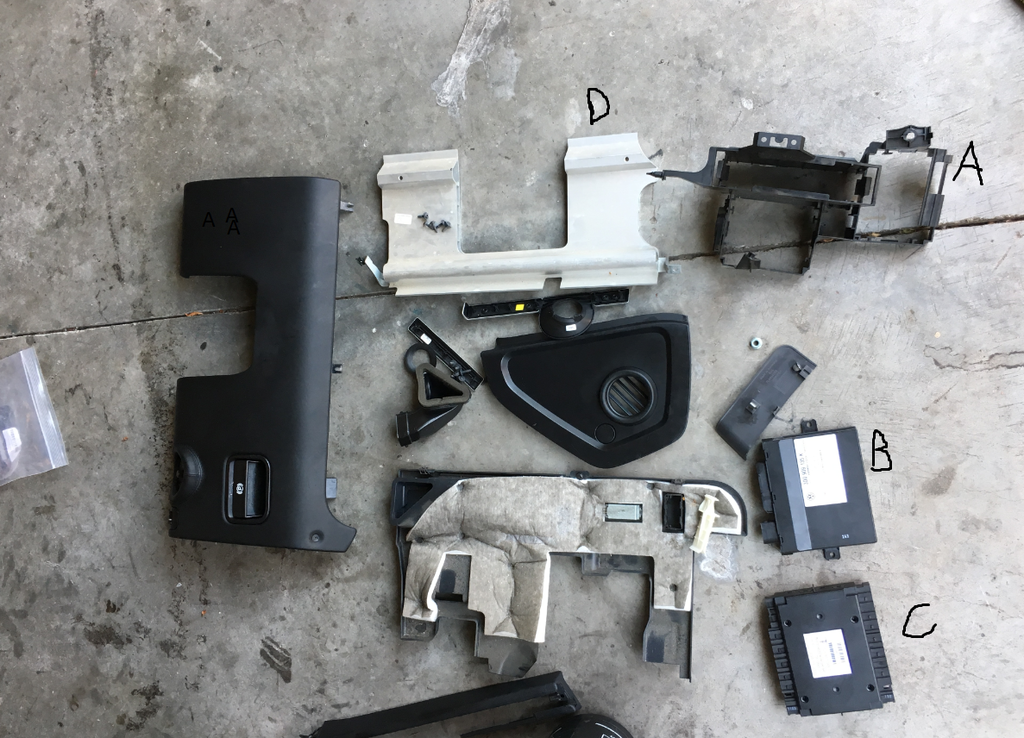
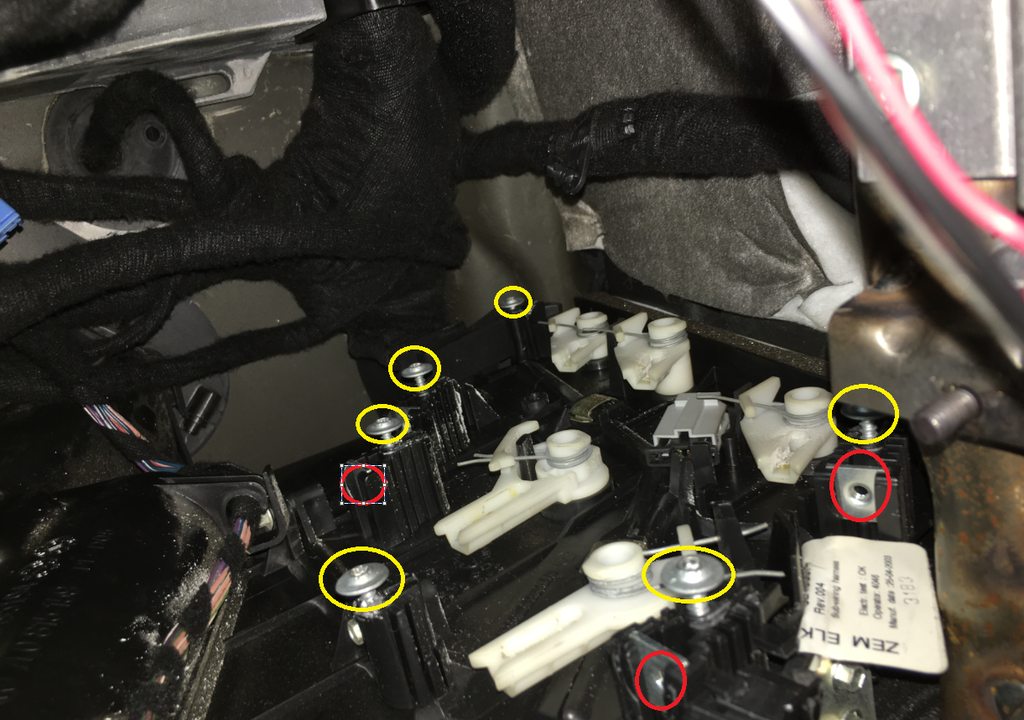
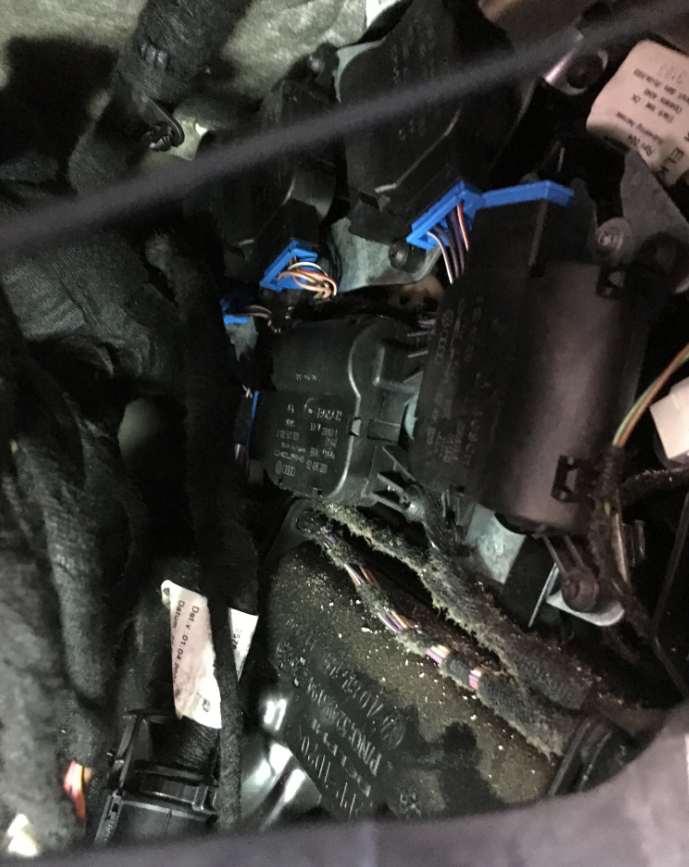
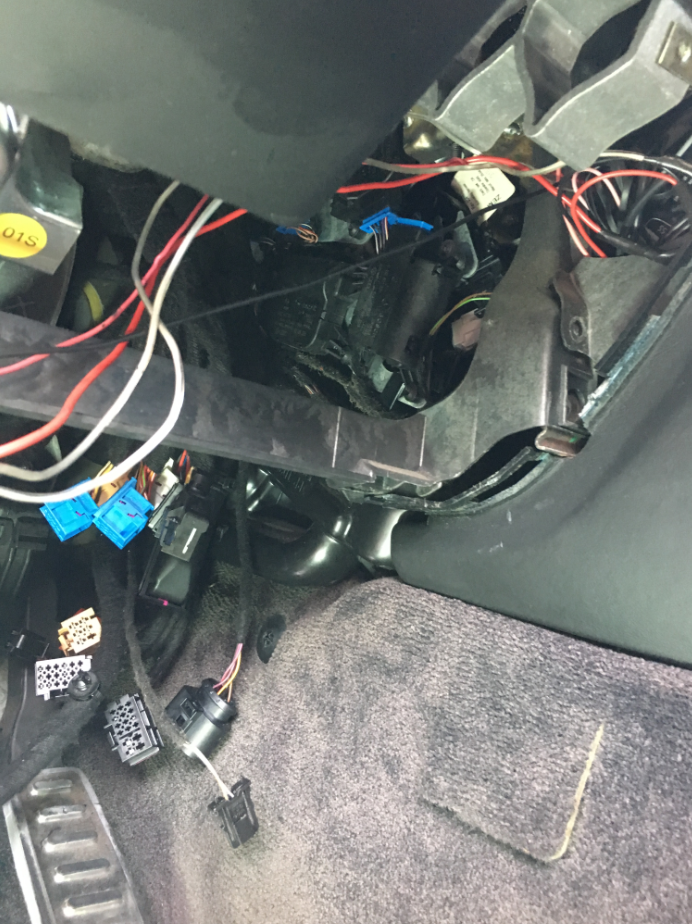
Finally had a chance to get around to swapping out the servo motors. It wasn’t too bad following the service manual. Took me about 5hrs but I work slowly. The following post has the service manual instructions in it. The passenger side was simple. Remove belt line trim and remove the glove box, then you have access to the two servo motors. One on the a/c box for the passenger mixer temperature motor. Then one under the blower for fresh air. The driver’s side was a little more involved but after removing all of the bits, there was plenty of room to work with. I set the motors to service position with VCDS and then disconnected the battery. I took off the belt line trim, removed the knee panel, and removed the lower panel. I also removed the metal knee panel to gain access to the area behind it. Per Rod's tips, do not remove the cover off the heater core. It is unnecessary (not to mention the screw location is inaccessible). I then followed the manual instructions and removed everything from the plastic carrier. Removed the two relay boards, the electrical box with a bunch of plugs, and kessy. With all of these out, I then removed the plastic carrier/housing that held everything in place. There is one nut near the steering wheel and it also clips on here. On the opposite side, there is a circle bit of plastic that hooks into the metal about midway behind the steering wheel. Then at the back, there is a portion that goes into the firewall. Once this piece is free, it can be jimmied out and placed to the side. This gives plenty of room to access the servo motors. Be sure to remember to plug in the small connector on the back of the plastic carrier housing to the buzzer (?) when reassembling. I swapped out the motors and used the battery to move the new motors into the service position. Pins 5 and 6 are the ones to use for powering and moving the arm to "service position" which is parallel with the guides. The servos have lettering on them to indicate the position (DF – defrost, VS- vent side, VC – vent center). I used this to match the new motors to the old ones. Installing the trays, I squeezed my fingers in between the tray and servo to check that it slid into the flap properly. Plugged everything in just to test that the flaps work. Once this was verified, I put everything back on and had a beer! Some pics and notes below: All the pieces to remove. A – plastic carrier. B – Kessy. C – electrical box. D – metal knee panel. The plastic carrier/housing for all the electronics. 1 - the part that goes into the firewall. 2 - Where it hooks into the metal bracket midway behind the steering wheel. 3 - location of the 10mm nut. Everything removed + Access to the motors. Tray with old and new motors. The yellow circles are the screws to loosen which help align and hold the trays. The red circles (4 total, one not pictured) are the fasteners which must be removed to slide the trays off. Bottom of black box to reference. Top of black box for reference.
-
I had this happen intermittently. Door would lock sometimes, sometimes it wouldnt. Then, on the other rear door, the handle would not work to release the lock. Replaced both lock actuators and have been fine since. Takes a couple hours on the first door, second door was much easier once you get the hang of it. Remove door card, disconnect cable from exterior door handle, remove all the screws on the door skin, remove the big triple square bolts from the left and right side of doors, and then the inner door frame/skin slides out from the body panel. http://www.ebay.com/itm/05-Cayenne-Turbo-Porsche-955-L-REAR-DOOR-Lock-Latch-ACTUATOR-7L0839015C-160-149-/272438447102?hash=item3f6e98cbfe:g:8TgAAOSwXeJYHSNi&vxp=mtr
-
A/C Flap Actuator
dpatel710 replied to seafeye's topic in 9PA, 9PA1 (Cayenne, Cayenne S, Cayenne Turbo, Cayenne Turbo S)
The dash removal actually doesn't look too bad from the manual. Lots of trim bits to pop off which may prove nasty with 14 year old plastics. Not sure if I can link to this here? If not, mods please delete. Pages 9611 - 9620 http://workshop-manuals.com/porsche/cayenne_(9pa)/v6-3.2l/instrument_panel_gauges_and_warning_indicators/dashboard/instrument_panel/component_information/service_and_repair/removing_and_installing_dashboard_cover_on_the_drivers_side/page_9611/ -
A/C Flap Actuator
dpatel710 replied to seafeye's topic in 9PA, 9PA1 (Cayenne, Cayenne S, Cayenne Turbo, Cayenne Turbo S)
Thanks lewisweller! Great resource. These are the drains I cleared when I purchased the vehicle. My floors look dry and the drains are still clear. For the scuttle/firewall drains, I pulled the rubber nipple out when I had the wheel liners out. It helps let water flow out even when debris builds up there. I did order the servo motors off ebay per rods suggestion. Searched for "cayenne ac box motors." Got a set out of a 957 with 2 zone a/c. 7 motors total: side vent, center vent, defrost, footwell, driver mixer, passenger mixer, and fresh air servos. Will try to replace the driver's side 5 motors from under the dashboard by sliding the tray out and report back. -
A/C Flap Actuator
dpatel710 replied to seafeye's topic in 9PA, 9PA1 (Cayenne, Cayenne S, Cayenne Turbo, Cayenne Turbo S)
This is excellent news! How was it sliding the plate out from the left side? Honestly, getting the plate out of the right side was such a PITA that I was going into this with the mindset to pull the dash. -
A/C Flap Actuator
dpatel710 replied to seafeye's topic in 9PA, 9PA1 (Cayenne, Cayenne S, Cayenne Turbo, Cayenne Turbo S)
Thanks for the tips! The battery was replaced less than a year ago. I haven't tested it for voltage but haven't had any other strange things that usually accompany battery problems. It's more like the motors just slowly died one by one till I got stuck with only the defrost vent open. They worked intermittently until they failed. From what I searched, it seems to be a common problem on early 955s and I have the associated clicking noises from the dash to go with it. I did try unplugging/reseating the connections at the back of the hvac control panel to no avail. Can you point me to the water collecting areas to check? I did clear all the drains when I purchased the car so I did not think to check this. -
A/C Flap Actuator
dpatel710 replied to seafeye's topic in 9PA, 9PA1 (Cayenne, Cayenne S, Cayenne Turbo, Cayenne Turbo S)
Alright guys, I think I am being dense here but forgive me as I've had my head in a finance book the past day or so. My P!G went from all air blowing out of the center vents (which was fine with me) to all air blowing out of the defroster. I was able to get by one time by performing the service position/adaption with VCDS to reset it. Now, it is once again stuck on defrost and the trick did not work. Soooo, I plan on pulling the dashboard out and replacing the motors. I have searched but did not come up with conclusive evidence on which motors/how many my car has. It is an 04 CTT with standard 2 zone a/c. I did pop the worm gear back in place once for the passenger side mixer by just pulling the glove box. When I did so, I only saw one motor on the passenger side. Most diagrams I see show 4(?!) motors for this side, hence my reaching out to the collective wisdom for how many motors are actually in my car. Can anyone help me out? I plan on ordering ALL the motors by end of the week and pulling the dash as I do not want to have to go back in and replace them again. Here are the error codes - 6 Faults Found: 02100 - Footwell Flap Motor (V261) 000 - - - Intermittent 02101 - Side Vent Motor (V262) 000 - - 00657 - Positioning Motor for Central Vents (V102) 000 - - 00710 - Defroster Flap Positioning Motor (V107) 000 - - - Intermittent 02193 - Supply Voltage for Regulator for Fresh Air Blower 010 - Open or Short to Plus 01592 - Air Quality Sensor (G238) 010 - Open or Short to Plus And link to the dash removal procedure for anyone that comes along searching behind me. It is for a touareg but should be applicable. http://www.clubtouareg.com/forums/f73/hvac-flap-motor-replacement-dash-removal-185361.html#/topics/185361?page=2&_k=d1c0hx Thanks!
.PNG.a95d35e392ee181a5016257631f9255d.PNG)