Welcome to RennTech.org Community, Guest
There are many great features available to you once you register at RennTech.org
You are free to view posts here, but you must log in to reply to existing posts, or to start your own new topic. Like most online communities, there are costs involved to maintain a site like this - so we encourage our members to subscribe or donate. All subscriptions and donations go to the costs operating and maintaining this site. We prefer that guests take part in our community and we offer a lot in return to those willing to join our corner of the Porsche world. This site is 99 percent member supported (less than 1 percent comes from advertising) - so please consider an annual subscription or donation to keep this site running.
Here are some of the features available - once you subscribe RennTech.org
- View Classified Ads
- DIY Tutorials
- Porsche TSB Listings (limited)
- VIN Decoder
- Special Offers
- Paint Codes
- Registry
- Videos System
- View Reviews
- and get rid of this welcome message
It takes just a few minutes to register, and it's quality Porsche information at a low cost.
Contributing Members also get these additional benefits:
(you become a Contributing Member by subscribing or donating money to the operation of this site)
- No ads - advertisements are removed
- Access the Contributors Only Forum
- Contributing Members Only Downloads
- Send attachments with PMs
- All image/file storage limits are substantially increased for all Contributing Members
- Option Codes Lookup
- VIN Option Lookups (limited)


vza
-
Posts
474 -
Joined
-
Last visited
-
Days Won
1
Content Type
Profiles
Events
Forums
External Paint Colors
Downloads
Tutorials
Links Directory
Collections
Classifieds
Store
Everything posted by vza
-
Oh...ok thanks V
-
Measure the width from the mount bolt to mount bolt on the rail? thanks v
-
Anyone know if I can get 2015 Cayman Seats into a 99 Boxster Base?? Thanks V
-
Yes ,codes returned after the new transistor but I inadvertently removed the PC board eyelets when removing the old transistor. I got the eyelets back in and checked continuity but you never know. In any case if the light doesn't light then there's no current getting to the actuator.v
-
Well the solenoid is new(replaced) so its the actuator if not an electrical issue. Thanks for the input Ahsai, I will go ahead and check w lightbulb. v
-
Well that didn't work. Seems like the car was less sluggish.Thru cel half hr into the drive... same p1539 and others. So for the light bulb test to check the current to actuator. I have an old solenoid I can clip the connecter off attach a 5w 12v bulb(is it pos or neg specific or doesn't it matter). Then plug it into the wire side coming from dme and see if it lights. Is there a threshold as to when it lights (ie 2000 rpms)...do I drive the car or just Rev it. Can I check both sides with same connecter? thanks v
-
Yes I can do it with my OBDII Light software.
-
OK I'll replace the transistor and see if the CEL goes away forever. Fingers crossed...Thanks again V
-
OK ....resistor not needed thats what I thought. ....so replace with the 373...you think that was the problem....would that allow the actuator not to engage ?? Thanks again for your input ....big help. Vince
-
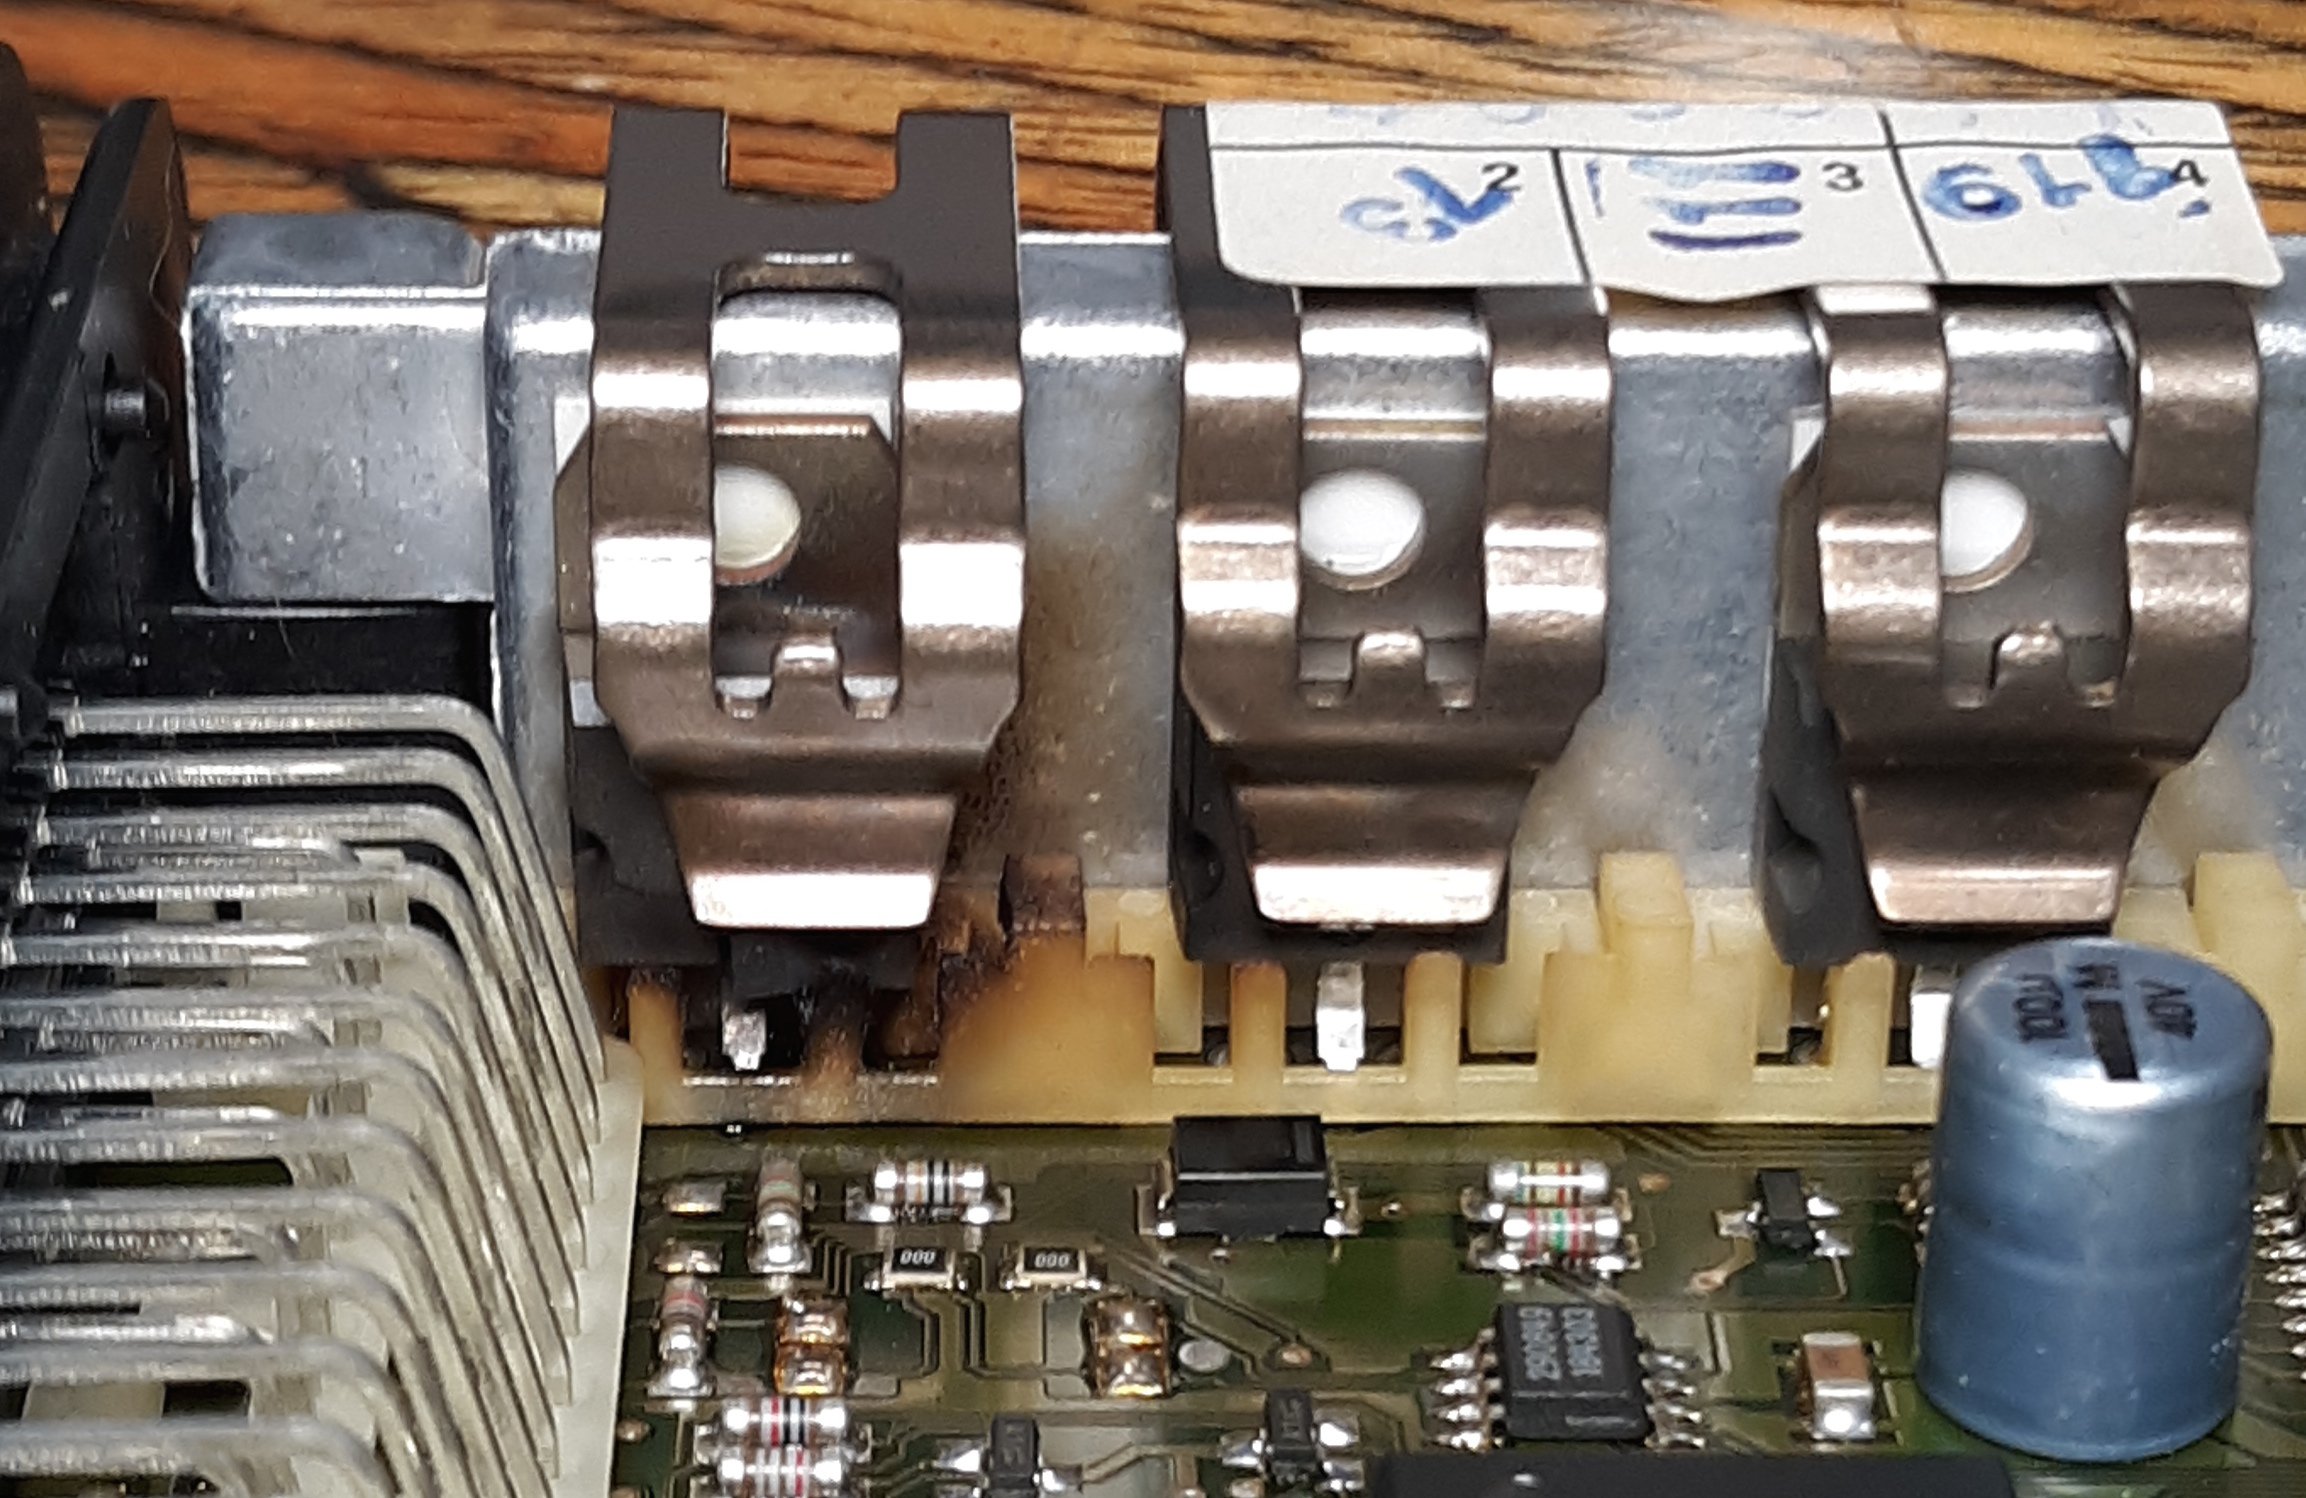
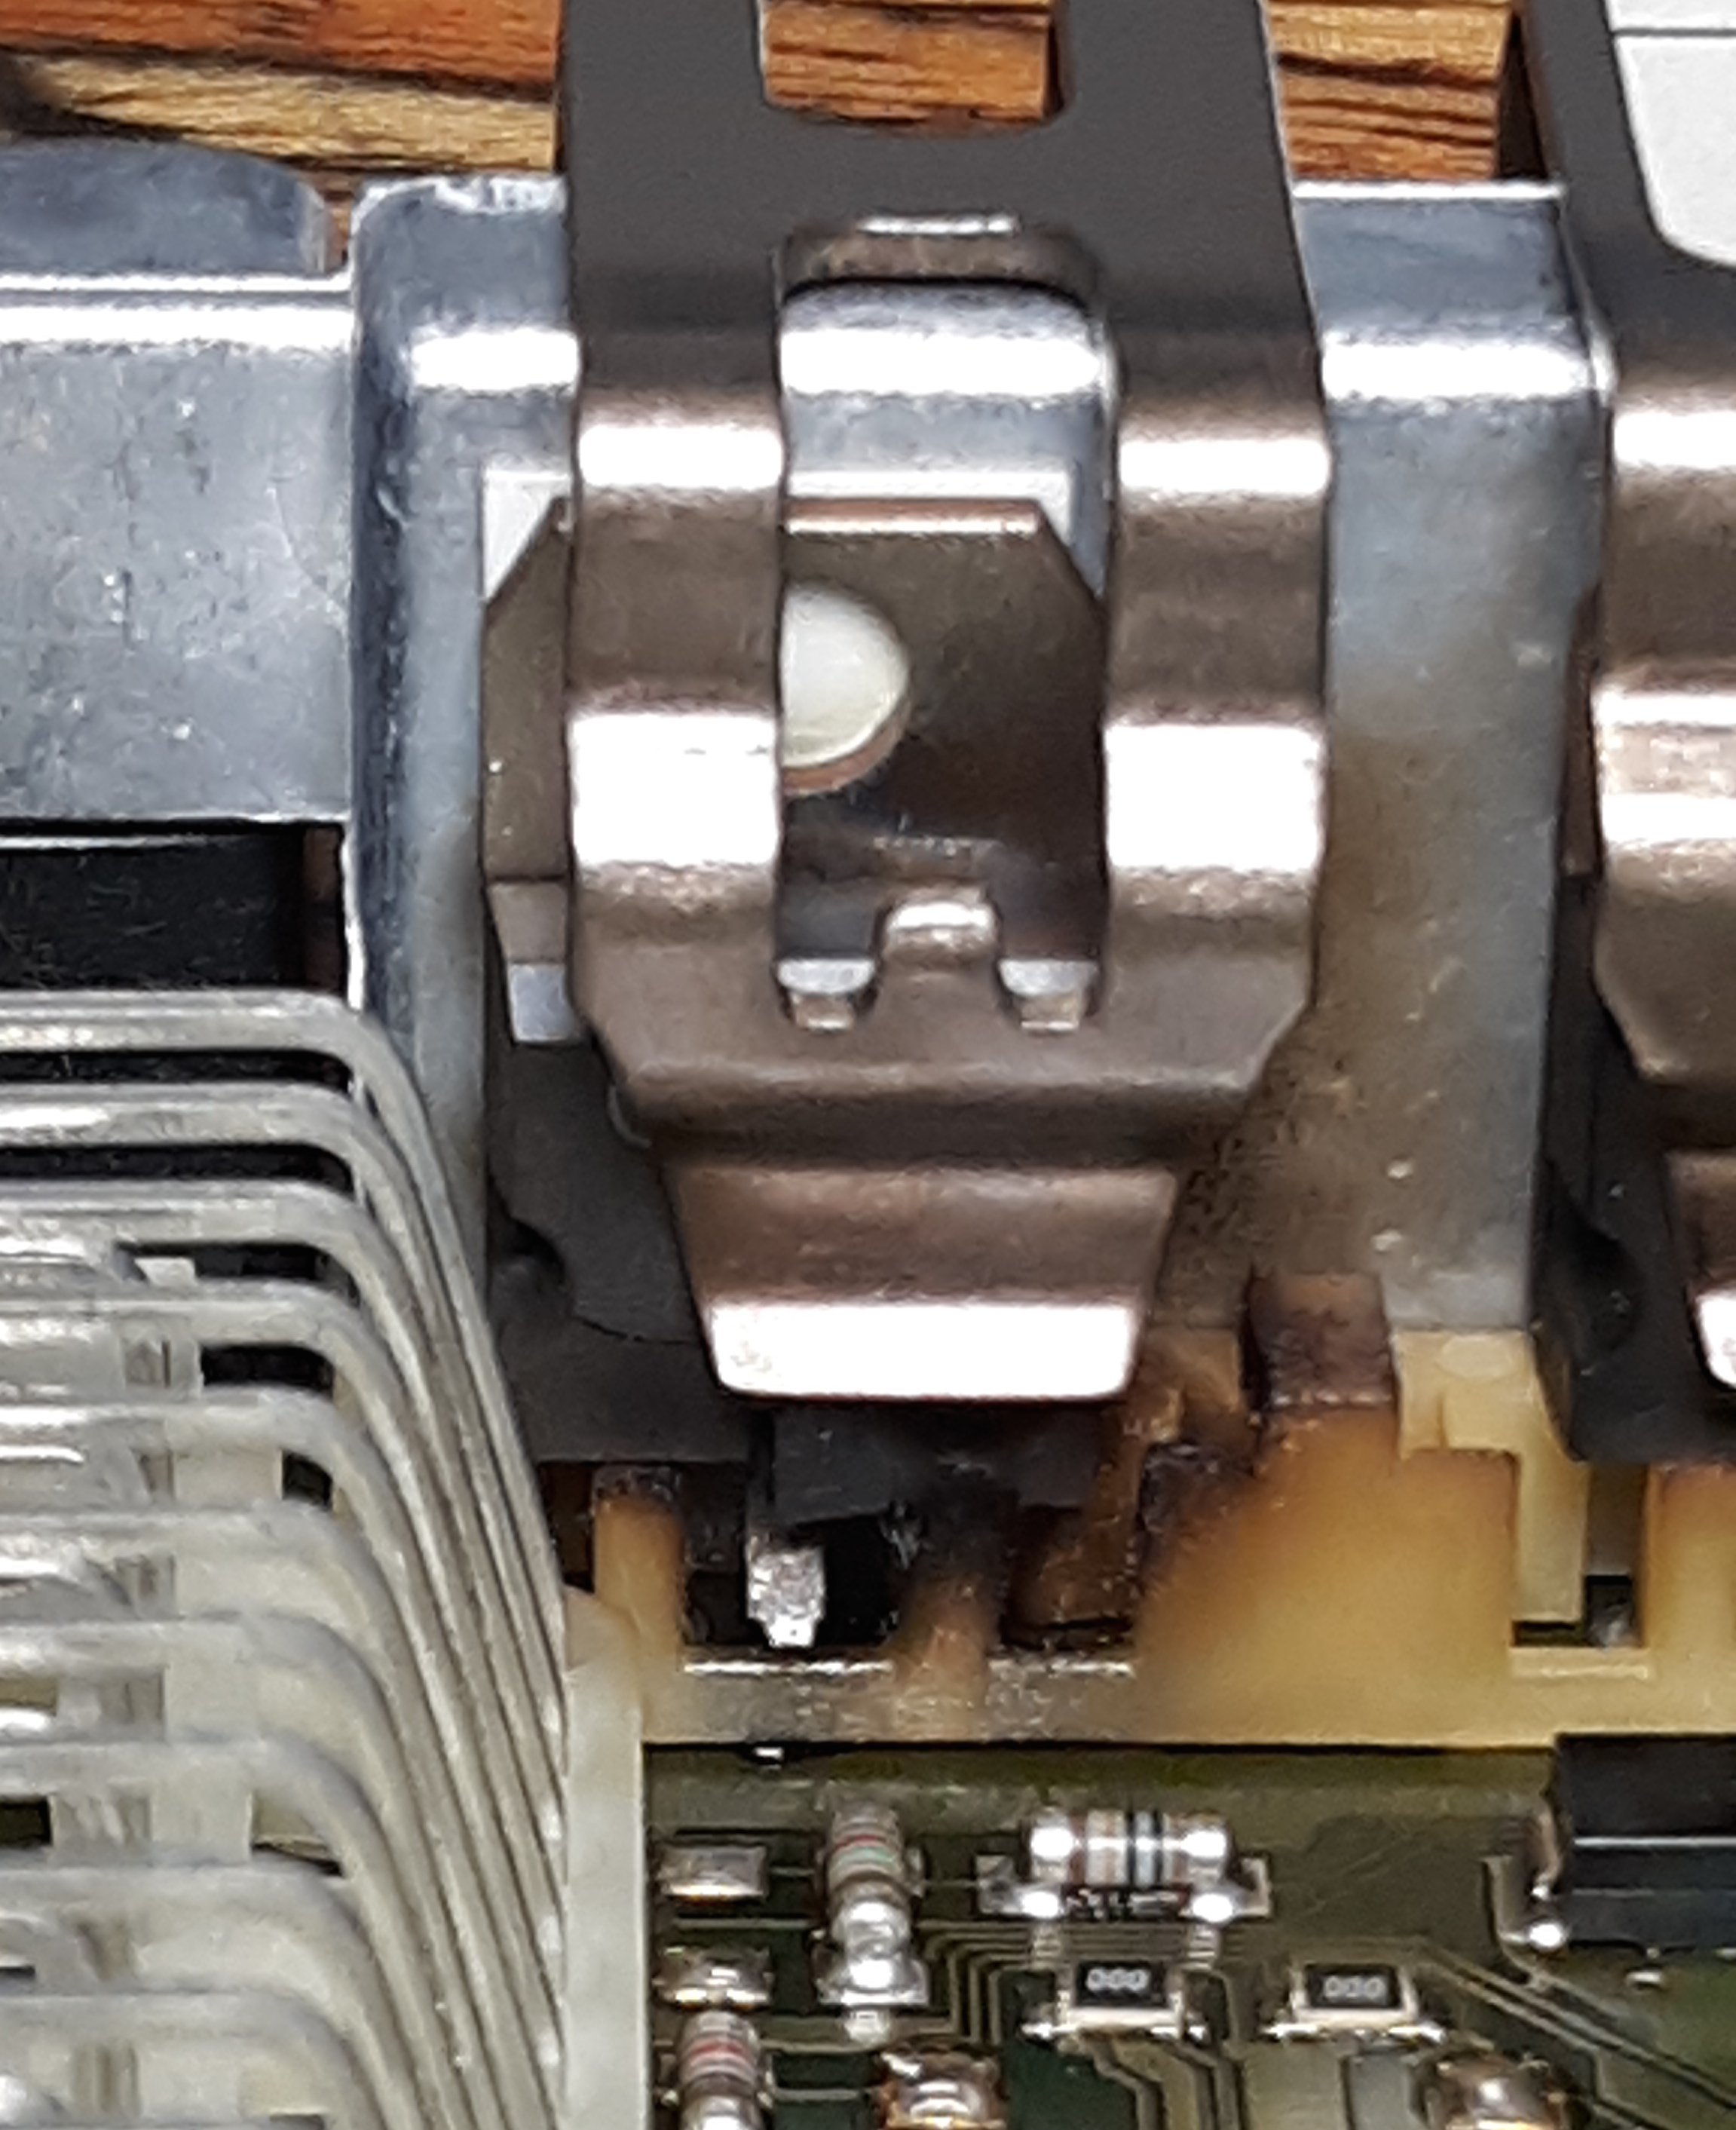
Numbers on the transistor 30046 44313.1 any other numbers are burnt and cannot be read useless the chip next to it is the same and can be used as reference. V
-
Bosch BIP373 Coil Driver Mod Kit from DIYAUTOTUNE is the part I need? It comes with a resistor but not too sure if I would use it. Thanks....looking forward to resolving this. V
-
here's another pic.

-
Lo and behold. Well I opened up my DME and found an obvious fried Transistor, would this be the root of my problem? Hopefully!! There was another thread with the replacement part number can't seem to find it. Any help as to where to purchase the replacement transistor would be appreciated. I'll post another pic. Thanks V
-
OK Thanks Ahsai.....very helpful. V
-
OK Thanks....I just don't have a durametric....unfortunately!
-
Viewed other threads and pix of burnt components in the DME....pretty obvious. Is there any harm in unplugging the DME and taking a look see inside? Is it a transistor or resistor that's in question?
-
Well I believe he said the solenoid was firing.....not too sure how he would know. If there is no active ground in the plug are you just going to ground on any part of the car to see 12v? How would you test the ground coming from DME inside the plug(connecter)? Would there be a visual inside the DME (burnt/char or smell?) Well I know its not the solenoid its new, just wondering about the transistor....that would be an easy fix rather than pulling the cam cover. Is it common for these transitors to go?? V
-
Ok...so if there is power at the actuator as the indie said.... there is no doubt its a bad actuator correct? Not the dme or solenoid(solenoid was replaced already). Want to be sure before I start tearing it all down again.
-
I actually just replaced the solenoid ....not the actuator. Brought it to indie said the actuator is getting power but NOT activating or moving. So I will assume its the actuator??
-
Hmm....so start tracing??
-
99 Boxster Base...After new Bank 2 solenoid/MAF/AOS/Battery/Plugs/Actuator Ramps both banks,I'm right where I started CEL P1539 and some misfire codes here and there...Brought to indie....said bent valves/actuator or timing....bailed on me....car is now at another indie. Any thoughts....car actually runs and sounds well with a little lacking in pickup. Any thoughts??
-
Ok, I rewired my headlamp harnesses and all my lights/ fog lights are working as they should. So new headlamp switch is not needed. I did notice the color or intensity is different between my 2 xenon low beams. I read that 1 may not be level with the other. Is this true seems to make sense being if I look into the beams at different angles they both look the same color. thanks v
-
99 boxster base..When turning on the fog lamps the manual says to pull the knob to the 1st position for the fronts and 2nd position for the rear. Is the knob supposed to remain in the pulled out position, mine returns back to the normal position so essentially my fog lights only stay on when holding the knob...Just confirming I need a new lamp switch thanks v
-
Dome Light Micro Switch
vza replied to vza's topic in 986 Boxster Convertible Top Issues and Solutions
Hmm...maybe I'll glue a thin piece of rubber on the face of the switch instead of. buying a switch...thanks v -
99 Boxster Base. Both windows don't roll all the way up unless I shim a small piece of rubber between the 'hook' and the latch. Am I correct to replace the micro switch located in the dome light? It only works with a shim .....if I push it with my finger it doesn't work either. Thanks V