Welcome to RennTech.org Community, Guest
There are many great features available to you once you register at RennTech.org
You are free to view posts here, but you must log in to reply to existing posts, or to start your own new topic. Like most online communities, there are costs involved to maintain a site like this - so we encourage our members to donate. All donations go to the costs operating and maintaining this site. We prefer that guests take part in our community and we offer a lot in return to those willing to join our corner of the Porsche world. This site is 99 percent member supported (less than 1 percent comes from advertising) - so please consider an annual donation to keep this site running.
Here are some of the features available - once you register at RennTech.org
- View Classified Ads
- DIY Tutorials
- Porsche TSB Listings (limited)
- VIN Decoder
- Special Offers
-
OBD II P-Codes - Paint Codes
- Registry
- Videos System
- View Reviews
- and get rid of this welcome message
It takes just a few minutes to register, and it's FREE
Contributing Members also get these additional benefits:
(you become a Contributing Member by donating money to the operation of this site)
- No ads - advertisements are removed
- Access the Contributors Only Forum
- Contributing Members Only Downloads
- Send attachments with PMs
- All image/file storage limits are substantially increased for all Contributing Members
- Option Codes Lookup
- VIN Option Lookups (limited)


acao
-
Posts
22 -
Joined
-
Last visited
Content Type
Profiles
Events
Forums
External Paint Colors
Downloads
Tutorials
Links Directory
Collections
Store
Everything posted by acao
-
I had this problem for 3 years. It came to a head a few months ago when I was stranded twice in one day, need a good samaritan jump each time. Get it fixed. The dealer fixed mine for around $1000 and said the cable was pretty toasted. It's not alot of money compared to the possibility of being stranded somewhere without notice. Do you work? Have planes to catch? Does your family rely on you to pick up dinner on the way home? Do you drive with clients? See patients or go to court? Once you get it fixed, you'll be amazed at the peace of mind that comes with taking for granted that your car will start every time.
-
How do I disable the rear trunk light? At the track in the summer, I like to leave the rear trunk ajar between runs to help the heat leave. But, I don't like the light drawing power unnecessarily.
-
I have no idea how you did this. I had to remove the wheels and mufflers, and still cursed alot. At 40k, I had 1 coil with a cracked housing. It was originally at the rear driver's side. There's a brilliantly placed drain pipe that exits right above the coil there. I didn't have a spare ready so I moved it to the forward driver's side position so I could change it out more easily when it arrived. 1. Did those plugs and coils go 80k or did you have a change previously? 2. Did you notice any performance change?
-
Limited Slip Differential
acao replied to Monster Boxster's topic in 986 Series (Boxster, Boxster S)
Check out this month's issue of Excellence. They install an LSD into a 944. The particulars will obviously be different because its a different car, but the article is a good place to get an general overview of the process. If vaguely recall reading that factory LSD was either a 996 option, or available on the GT3's version of the same transmission. The parts catalog should show it. -
Oil Change Questions
acao replied to arthur6's topic in 997-1 Series (Carrera, Carrera 4, Carrera 2S, Carrera 4S)
[deleted per Loren's suggestion] -
Oil Change Questions
acao replied to arthur6's topic in 997-1 Series (Carrera, Carrera 4, Carrera 2S, Carrera 4S)
I believe it's totally not worth it to do an oil change at the dealership. Or at a quick lube place. If you think they're torquing every fastern to spec, think again. If you think they're putting exactly the fractional amount oil in, instead of overfilling to the next even liter, think again. If you think that they're inspecting everything on the service checklist, think again. You have one car to do, and you've marked off the whole afternoon. The more they can do, the more money they make. And oil changes aren't done by the most experienced tech in the shop either. 1. Download the service checklist from here. 2. Go to Harbor Freight, and for less than $150 you can get a jack, chocks, jack stands, metric sockets, a hex socket, a torque wrench, an oil filter wrench, and a 15 qt oil drain pan. 3. Go to an auto parts store and buy 10 qts of oil, for about $60. 4. Get online and buy the oil filter and crush ring. While you're at it, get a charcoal cabin filter and an engine air filter too, all for about $100. 5. Buy the Durametric for $250. 6. Do the oil change and change your filters yourself. Take your time, bring your computer to the garage or print the instructions. 7. While there, check things out. Get to know and appreciate the car. Leaks are easy to spot because they're shiny and moist where everything else is matte, dry, and dusty. All told, you've paid about $560 for the first service. You only buy the tools once. The next one will cost you only $160 in consummables. The last dealer quote I got for a 20k service was $750. Even the first DIY results in a financial win. It's not like if I had the dealer do it, I'd be any better off. You better believe I be on the ground retorquing everything and making sure they didn't cross thread things. Upgrade campaigns can be done during warranty work or for harder stuff. With my pair-of-catcher's-mitts sized hands, I've given up on bleeding the clutch, so I'll pay for that. When the suspension arm bushings go, I'll probably pay for that too. Ditto for engine mount, or clutch replacement. The frequency of that type of work, coupled with the difficulty, do not justify the cost or storage space for the tools. But, I've saved more than enough money doing my own oil changes and brakes to shell out every once in a while. -
Switched Fuse?
acao replied to ENK1's topic in 997-1 Series (Carrera, Carrera 4, Carrera 2S, Carrera 4S)
Either blade on the fuse is hot. Ground goes to the chassis. Aft of the fuse box is a suitable nut for the ground. If you lack either tiptronic or the rear wiper, those fuse slots will do. -
Clutch bleed
acao replied to acao's topic in 997-1 Series (Carrera, Carrera 4, Carrera 2S, Carrera 4S)
I don't know what it is either. I tried reaching through the wheel well, approaching it from underneath, and nada. I don't exactly have short or fat arms either. I can certainly reach deep enough to touch the transmission housing, but it's that stretch upward that is giving me fits. Maybe next time. -
Clutch bleed
acao replied to acao's topic in 997-1 Series (Carrera, Carrera 4, Carrera 2S, Carrera 4S)
Yep, all wheels were off. I even had the plastic undertray off. Not initially, but because when I pulled the rubber bleed valve cover off, I dropped it and it landed on the tray. -
If anybody has any tips on how to bleed the clutch, I'd love to hear them. This past weekend, I flushed the brakes. Easy enough. Under the car, I could only just touch the clutch bleeder valve. After numerous tries of snaking my hand up either side of the coily thingy, I managed to get the drain tube onto the nozzle. But, once there, I could not get a wrench up there to turn. No room. It is my Excalibur. If Excalibur were embedded in a rock that I envision falling on my head. All the other brake lines gave up clear, bubble free fluid. I figure I'm not a horrible human for hoping I can get the clutch bled one out of every two times. On other notes from this weekend, I put the rear end on jackstands by raising the car via the rear subframe member. I lowered the car using the squarish castings where the engine halves meet. My car has not assploded as some predicted. I also replaced my locking lug bolts with regular ones. Come steal my factory wheels if you want, but I'll take that chance to get settled on 19mm sockets and not being stranded when the key cracks.
-
Looks just like mine, except I've got the clear markers and uncolored crests. Nice, enjoy.
-
Previous tire experience: Bridgestone RE010 (MX-5) Dunlop SP9000 (MX-5) Michelin Pilot Sport (M Coupe) Yokohama ES100 (M Coupe) Michelin Pilot Sport Rib (986S) Michelin Pilot Sport 2 (986S) Continental ContiSportContact 2 (997) The Conti's were on the inner wear bars at the rear, and had about 2/32" above the bar left on front. They tracked and handled well, but were very loud and very harsh. More than expected even for their state of wear. It's pretty consistent with what I've read. I've never driven Goodyear, but have heard very good things about the GS-D3 from drivers I believe. First impression, these Goodyears are quiet. Really quiet. The sidewalls seem responsive, yet very comfortable. In terms of ride comfort, they're alot like the Micheline PS2. Head-to-head with the PS2, the Goodyear weighs 1-2 lbs more per tire, but has 1/32" more tread (10/32 vs 11/32). Load capacity, heat, and contact patch sizes are the same. The Goodyear has a higher tire wear rating, but I have read that comparing this rating across brands is meaningless. N.B., the Tire Rack has a photo of the tread on these tires. It doesn't look anything like mine. For an accurate picture of the tread pattern, go to Goodyear's web site. So far, so good. The caveat is that it's always unfair to compare a new tire to a worn one. ANY new tire is going to feel alot better than a worn one. I'll update as time goes by and I put some DE laps on them.
-
This would bring me closer to shelling out for the NAV installation kit.
-
I did not take any pictures. The steps that are unique to mine don't really lend themselves to pictures (i.e. crimping RJ-11 ends). There's no "fork in the road" moment for a picture to resolve. There are lots of pictures of the fuse box area in other threads.
-
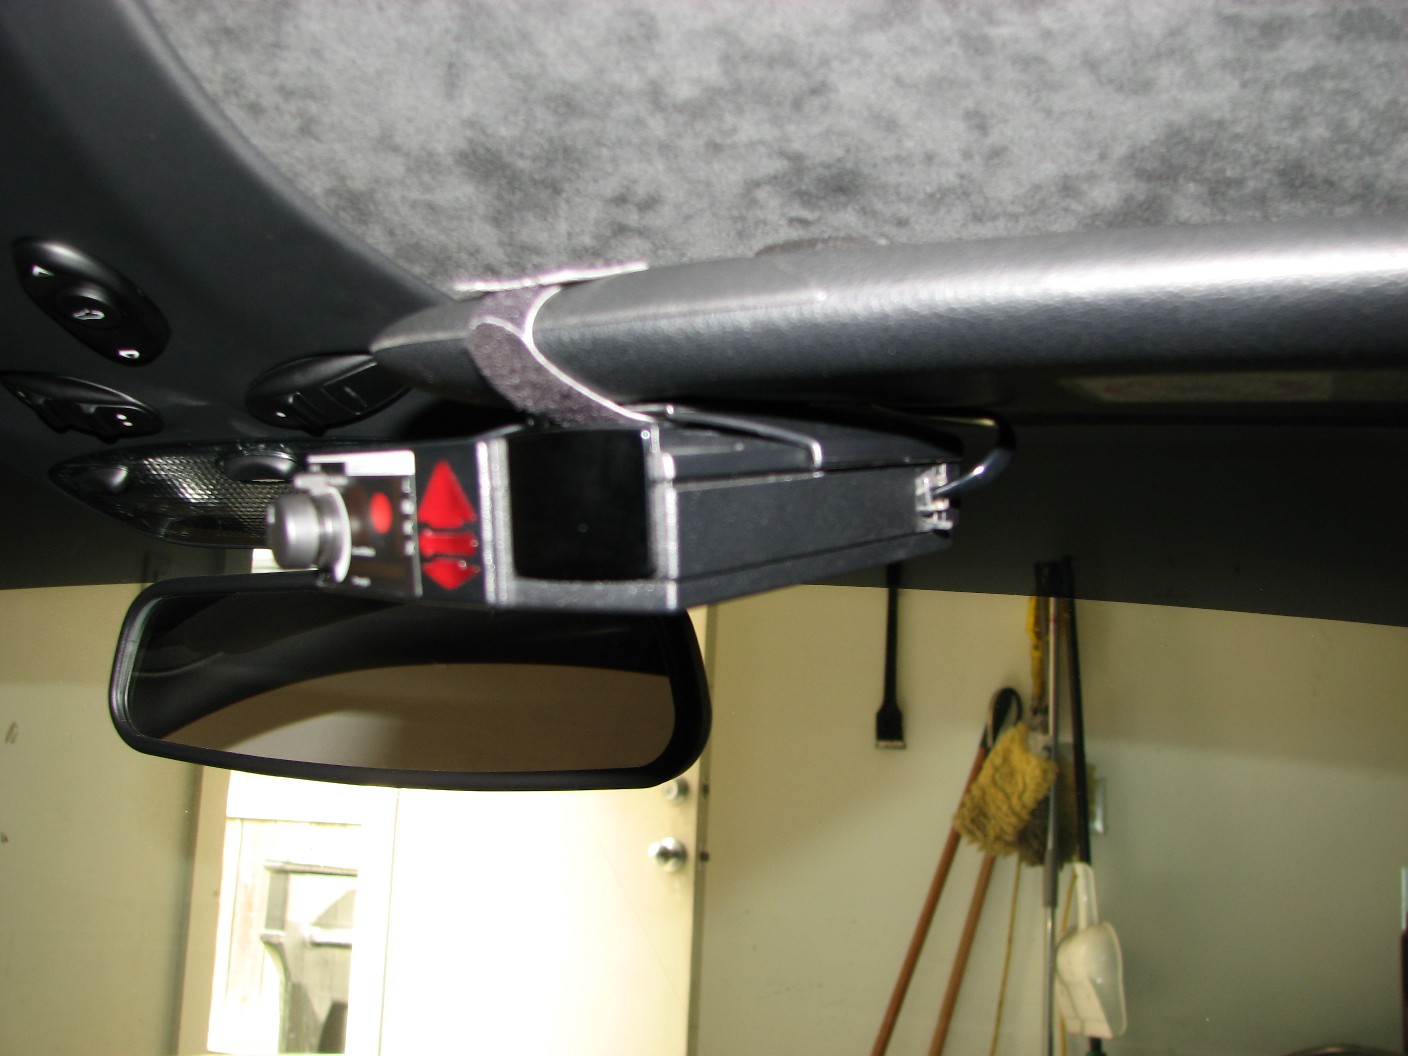
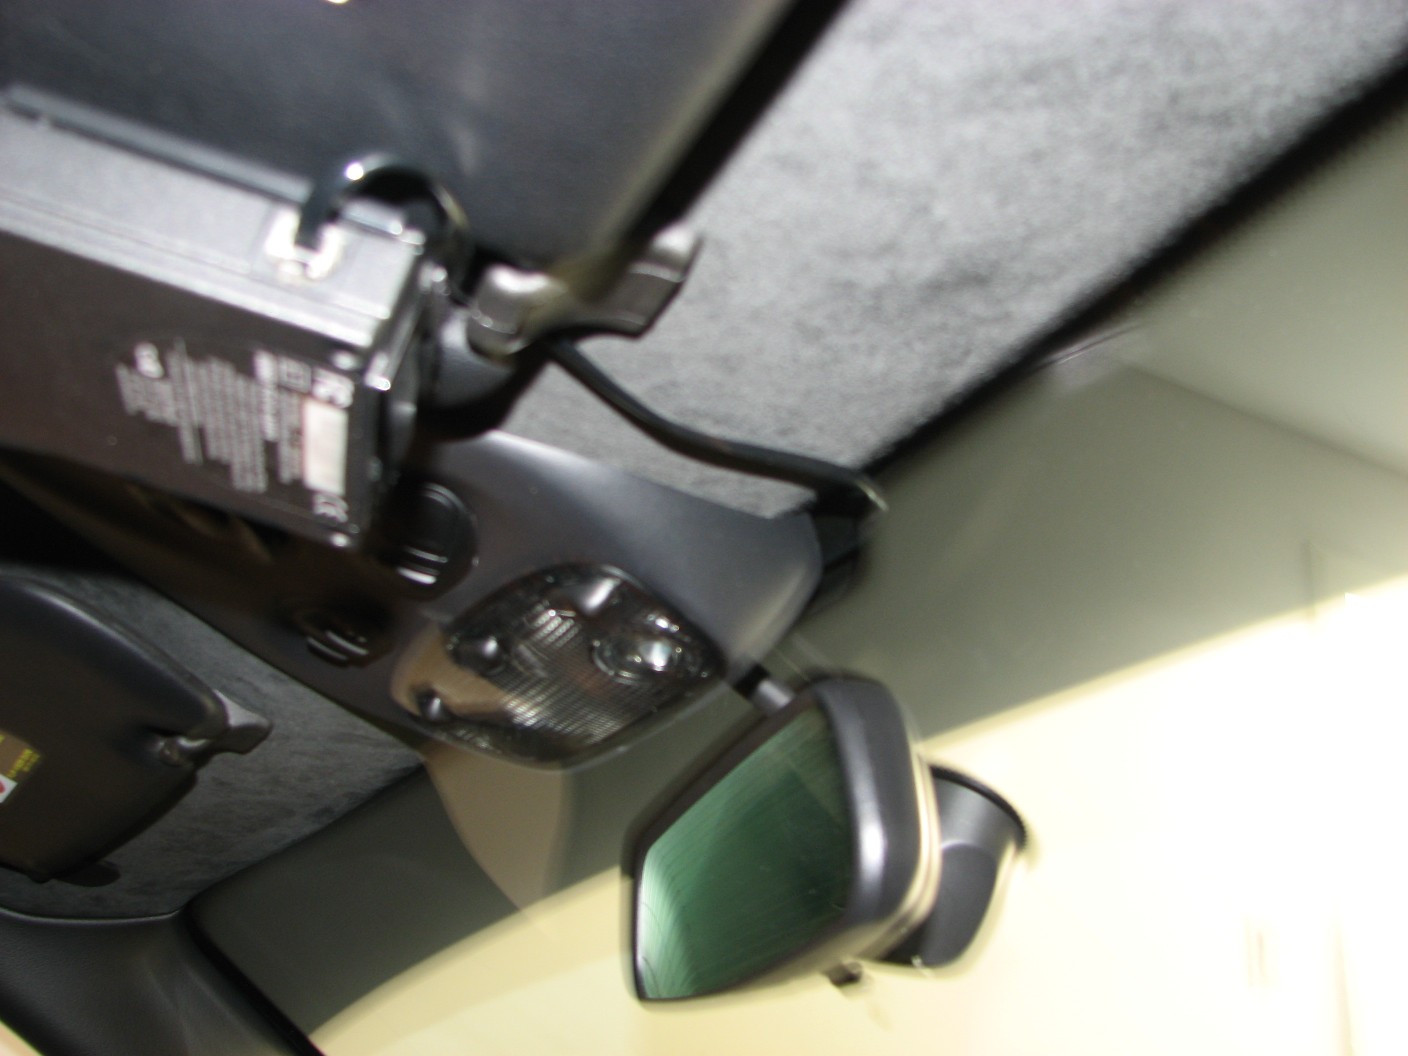
Project: Hardwire a Valentine 1 radar detector into my 997 coupe. Why another method? In principal, it's the same as many fine others on this and other boards. In fact, I drew from those heavily, and adapted to my needs. One of my goals was to minimize soldering. I'm adequate at it, but it's not something I wanted to do while crammed in my car, in a hot garage. I wanted to minimize connections. Every connection is a potential point of failure, so I wanted to KISS, Occam's razor, avoid Murphy's law, etc. I wanted to do minimize tapping into wires. I'd rather solder than tap, and I'd rather avoid altering existing harnesses at all. I wanted to hide as much cable as possible. That's the whole point, right? Supplies: 12'+ of telephone cord (Radio Shack) RJ-11 ends (Radio Shack) Add-a-Fuse ($8 at Pep Boys, I could not find them at O'Reilly's, and Autozone was out of stock) Wire stripper/crimper, suitable for 24 gauge (Radio Shack) In lieu of a wire stripper/crimper, use a hobby knife (everywhere) and pliers RJ-11 crimper Velcro strapping Valentine 1 kit Optional: Valentine 1 hardwire adapter Valentine 1 remote concealed unite Time: 1 hr The mount Remove the metal bracket from the Valentine 1 visor mount. Use the velcro strapping to affix the remaining visor mount to the passenger's visor, feeding the strap through the visor's clip hole. Why the visor mount? Because I hate suction cup mounts, everything about them. I hate the way the unit bounces around, I hate suction cup marks, and I hate being able to see the mount from the outside. If its your personal preference, the use it. The wiring instructions are the same. Why not use the unadulterated visor mount? That metal bracket is too big. It's more bracket than necessary, and it pushes the visor down a little. The velcro strap is secure, low profile, and low visibility. With the radar mounted to the visor, it can't be seen from a person standing outside the car. The outsider has to crouch to window height. Once you've got the mount done, remove the detector to give yourself more room to work. Why the passenger side? Because 100% of the time, there's a driver in the car. That means 100% of the time, my head is in the way. There's less occasion for a passenger, so it's less obstructed there. My personal driving cocoon is less obstructed too. I can still use my visor, and in an accident, my head is not headed toward that angular Valentine. It's also harder for a gendarme to see when he's peering in the driver's side window. Running wire Snip one end off the telephone cord. Feed the cord between the rain sensor post and the windscreen glass from driver's side to passenger's side. There's a gap, but not enough for the wire with an end on it. Only the uncrimped wire will fit. Run the wire through the clip hole in the passenger visor from top to bottom. This is a good anchor for the wire. Feed enough wire to plug into the detector, plus a little extra for slack and because sometimes, the RJ-11 wire doesn't crimp well the first time. Now that you've got your endpoint laid out, tuck the wire into the roofliner until you get to the driver's a-pillar. Grab the a-pillar and pull toward you. Hard. Harder. It's held in with metal friction brackets, it'll be fine. Once the a-pillar is pulled out enough, tuck the wire under the a-pillar, and feed it out to the weatherstripping. This takes some dexterity, and I had to work at it for about 10 minutes to get it to feed. Some installations routed the wire from underneath the roofliner, outside the a-pillar, and back under the weatherstripping. That's ugly. Doing it underneath the a-pillar hides that wire. Using a wooden or plastic spatula, and your fingers, run the wire down the weatherstripping down to the fuse box. It's pretty easy except by the air vent, where it takes a little more persuasion to fit in, but it'll go. Remove the fuse panel cover. Unscrew the three screws holding the fuse panel carpeting. Remove the carpeting. Feed the end of the wire into the exposed fuse area. Connections Now that you've got enough wire routed, crimp an RJ-11 end onto the detector side. Note the two middle wires. One's positive and one's ground. Back down to the fuse box end, strip the telephone wire so that the corresponding hot and ground ends are exposed. Crimp the hot end onto the Add-a-Circuit where provided. Telephone wire is very thin, so strip alot off and twist the wire onto itself to get some thickness. Tie the ground end to the 10mm nut in the fuse area. It's the only one there. Put a fuse in the Add-a-Circuit, and plug it into a spare slot. I used C1. You are substantially done. Turn the car on (engine on), and see if the radar works. Engine off = radar off. If something's amiss, check your crimps, and check that the detector is actually dialed to the on position. Optional remote concealed unit Route another segment of telephone cord from the fuse box area to wherever you want the remote concealed unit. Instead of wiring directly into the Add-a-fuse and chassis nut, wire the Valentine hardwire adapter into the Add-a-fuse and chassis nut. Put an RJ-11 end onto the fuse box side of the wire, and plug in. Crimp the remote concealed unit wires and plug in. I opted against the remote concealed unit because I wasn't happy with any locations. Down in the storage tray is too low. If I'm speeding, I don't need to be looking down by the shifter. I wasn't too plussed with it by the driver's a-pillar either. I don't want it near the gauge cluster or atop the steering column because I don't want any indicator lights obstructed. Basically, I didn't have a good place for it, and I don't need it. I can see it fine with a glance to my 1 o'clock position. In the end, I have a total of 6" of wire showing at the radar end, no solders, no taps, and only one wire-to-wire connection. I've made zero alterations to any trim part or panel, and zero alterations to wiring harnesses. Many thanks to those who posted before me.
-
Limited Slip Differential
acao replied to Monster Boxster's topic in 986 Series (Boxster, Boxster S)
Is there an application for the 3.2S? -
How to access dash rattle and squeaky top support?
acao replied to acao's topic in 986 Series (Boxster, Boxster S)
Here's the progress, and it's bizarre: While riding in the passenger seat, I noticed that the sound is actually coming from behind the driver, not in front. For some reason, sitting in the driver's seat, it sounds like its coming from there. Knowing this, I paid a little more attention to the sound, and it does seem to come from behind my left shoulder blade. The good news is that it's not the dash. The bad news is that there's plenty of sniffing to do around there. But, getting to the guts underneath the top area is alot easier than getting inside the dash. This probably doesn't help your knee bolster problem because yours is actually loose. -
1. I have a light metallic rattle coming from the lower left dash area that occurs on sharp road imperfections. I want to get at the area underneath the dash to see if any rivets or welds are popped. I've tried being upside down in the footwell, but can't see much. Is there another way of getting at it without disassembling the whole dash? If I have to, I can disassemble the dash when my wife goes out of town and I can spread the project over a few days without losing transportation. 2. Squeaky top noise that I can reproduce by pressing down at the top of the (glass) rear window, right around the bar. Scritch, scritch, scritch. Can this be lubed? With what and how to access? Thanks.
-
Haven't done it and don't think it's a hot idea. 1. Both wheels are driven, and its an open differential (torque goes to wheel with less grip). 2. Different rotating masses bring to mind all sorts of problems. For starters, unbalanced braking (the heavier wheel will take more effort to slow down from the same speed), the heavier wheel will demand more from the suspension such that the heavier side will not be as responsive to rebound/jounce, the tires will not likely wear evenly (asking more from the tire mounted on the heavier wheel), cornering will be direction specific (heavier mass will be inboard on some turns, outboard on others, outboard mass is harder to control).
-
Homelink hardwire help
acao replied to acao's topic in 996 Series (Carrera, Carrera 4, Carrera 4S, Targa)
Thanks. I'm not very visual, so I'm going to have to translate that into a table for my understanding. -
I've purchased a Homelink transmitter, intending to connect it to the cigarette lighter for power and to a 996 targa top switch to operate my gate and garage door. The cigarette power connector is always hot. A picture of the business end of the Homelink switch is attached. My electrical aptitude, on a scale of 1 to 10, is "Amish", so I want to run some things by other experts. 1. The Homelink device has obvious + and - power connectors (not shown), so I guess I'm supposed to solder wires to those connectors and tap into the corresponding wires on the cigarette connector. 2. The conductor running across the bottom of each switch in the picture is negative? So, I only need one solder to any negative point and connect the other end to the negative on the dash switch (center single prong on the switch). 3. The conductors running across to each switch individually must be positive? So I need to solder a wire to a positive on the Homelink button and connect to one of the dual center prongs on the dash switch? Repeat for each door? Each switch has two vertical center prongs, so each side of the rocker will operate a separate door? 4. I need to tap in the switch illumination to another illuminated switch? 5. Any tips on soldering in the vicinity of this ribbon connectors? I've checked out Loren's post and his Homelink doesn't look much like mine. Nonetheless, I think the concept is captured. I've also checked itzkrib's post, and some of it is inapposite because of the hotwire vs. battery. Thanks.