Welcome to RennTech.org Community, Guest
There are many great features available to you once you register at RennTech.org
You are free to view posts here, but you must log in to reply to existing posts, or to start your own new topic. Like most online communities, there are costs involved to maintain a site like this - so we encourage our members to subscribe or donate. All subscriptions and donations go to the costs operating and maintaining this site. We prefer that guests take part in our community and we offer a lot in return to those willing to join our corner of the Porsche world. This site is 99 percent member supported (less than 1 percent comes from advertising) - so please consider an annual subscription or donation to keep this site running.
Here are some of the features available - once you subscribe RennTech.org
- View Classified Ads
- DIY Tutorials
- Porsche TSB Listings (limited)
- VIN Decoder
- Special Offers
- Paint Codes
- Registry
- Videos System
- View Reviews
- and get rid of this welcome message
It takes just a few minutes to register, and it's quality Porsche information at a low cost.
Contributing Members also get these additional benefits:
(you become a Contributing Member by subscribing or donating money to the operation of this site)
- No ads - advertisements are removed
- Access the Contributors Only Forum
- Contributing Members Only Downloads
- Send attachments with PMs
- All image/file storage limits are substantially increased for all Contributing Members
- Option Codes Lookup
- VIN Option Lookups (limited)


PAULSPEED
-
Posts
1,406 -
Joined
-
Last visited
-
Days Won
1
Content Type
Profiles
Events
Forums
Exterior Paint Colors
Downloads
Tutorials
Links Directory
Collections
Classifieds
Store
Everything posted by PAULSPEED
-
Do The Bushings on the Sway Bar Get Lubed?
PAULSPEED replied to The Beanster's topic in 997 TT, 997 GT2
I used some vaseline. Works good. Paul -
I have 325 on the rear and the 5mm spacers and they don't rub. Paul
-
Front shock absorbers
PAULSPEED replied to Bianx's topic in 997-1 Series (Carrera, Carrera 4, Carrera 2S, Carrera 4S)
I have never compressed a spring but I know it is dangerous. Be careful with your fingers. Do not rush yourself. Good luck. Paul -
buy new gear case
PAULSPEED replied to therosi's topic in 996 Series (Carrera, Carrera 4, Carrera 4S, Targa)
You know everything Loren. Looks like he needs to talk to our friend. RFM from Belgium France. He must know where to get used parts in Europe. Paul -
Front shock absorbers
PAULSPEED replied to Bianx's topic in 997-1 Series (Carrera, Carrera 4, Carrera 2S, Carrera 4S)
Here is how it is done on the 996 side. http://www.renntech.org/forums/tutorials/article/88-row-m030-sport-suspension-install/ ROW means the rest of the world. Paul -
buy new gear case
PAULSPEED replied to therosi's topic in 996 Series (Carrera, Carrera 4, Carrera 4S, Targa)
This place showed a 996 transmission last night on the TV. Here is there link. http://www.ladismantler.com/ Paul -
Front shock absorbers
PAULSPEED replied to Bianx's topic in 997-1 Series (Carrera, Carrera 4, Carrera 2S, Carrera 4S)
I would also do a search in the 996 section. Paul -
Front shock absorbers
PAULSPEED replied to Bianx's topic in 997-1 Series (Carrera, Carrera 4, Carrera 2S, Carrera 4S)
Here is a good diy on a older Porsche. The overall work is still the same on the newer cars. http://p-car.com/diy/sus/ Paul -
Rear Camber Adjust
PAULSPEED replied to tedban's topic in 997-1 Series (Carrera, Carrera 4, Carrera 2S, Carrera 4S)
I am one of those nuts who added shims in the lower a-arms to increase the camber more. Yes I go thru alot of tires. Paul -
Your right again!!! The camber is what help reduce the push I had. Paul
-
Getting a track alingment will help with the push. Need to add as much castor as you can. The tires will wear out on the inside but the car will not push as much. Paul
-
I saw some dimensions once but they were metric. You can lite tape it and then stand back about 10 feet. Paul
-
Removing the side plates first should help let you see what else to take off. Paul
-
They peal off real easy. I would put some painters tape down first to align the letters. Paul
-
This part? Paul

-
Here is the location on the Porsche site. The only date I found was 08/09. http://www.porsche.com/all/media/pdf/Owners_Manual_Turbo_PCNA.pdf Paul
-
source for bulletin on center lock greasing etc
PAULSPEED replied to skl's topic in 997-2 GT3, GT3 RS
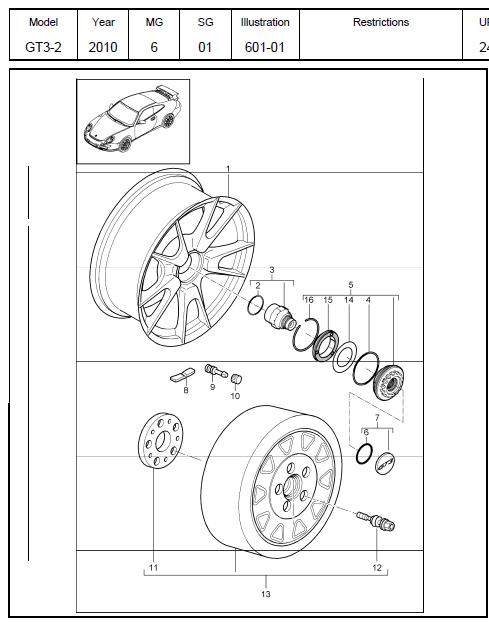
It is held in with a circle clip. Part 16 in the picture is the clip. You might need a bent sharp ice pick to get it out. Paul
-
Trailer Wiring Harness
PAULSPEED replied to FishManGary's topic in 997-1 Series (Carrera, Carrera 4, Carrera 2S, Carrera 4S)
Trailer lighting is pretty simple. Just tap into the brake lights. Trailer companies sell a crimper that crimps the trailer light and the brake light at the same time. No need to splice wires. Paul -
air vent rattle
PAULSPEED replied to john Allan's topic in 997-1 Series (Carrera, Carrera 4, Carrera 2S, Carrera 4S)
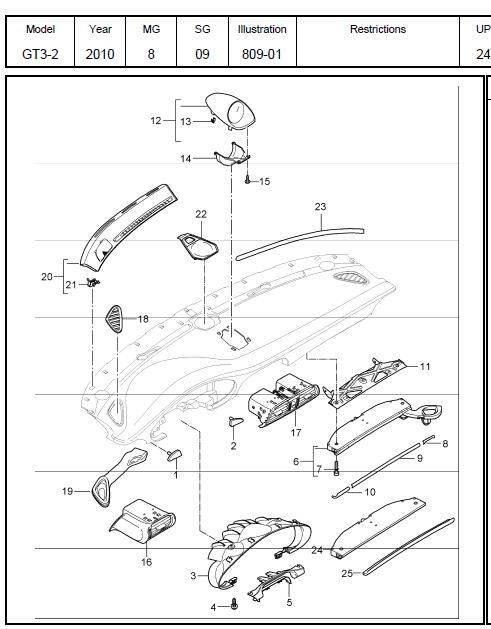
I think he is talking about part number 18. It looks more in the shape of a triangle. Paul -
It is a San Francisco car. All he can hit is manhole covers and driveways. Wonder how many there are in San Francisco? Paul
-
Your pads look gone. I would buy new pads and see if they look strange. Most calipers are held on with two big bolts. Remove the caliper and pads, spread the opening and install the new pads. You might solve your blue and white clips once the brakes are removed. Paul
-
air vent rattle
PAULSPEED replied to john Allan's topic in 997-1 Series (Carrera, Carrera 4, Carrera 2S, Carrera 4S)
Looks like it pries out. You can always buy a new one from sunset imports. Then you will learn where to pry. Here is a picture. Paul
-
Removing Window Switches
PAULSPEED replied to David4315's topic in 997-1 Series (Carrera, Carrera 4, Carrera 2S, Carrera 4S)
Here is how you remove the door trim. http://www.renntech.org/forums/index.php?/tutorials/article/7-door-micro-switch/ Paul -
Look at a close up of the two bumpers. The head lights are somewhat different. You would need to buy a new bumper and do some bodywork to get the bumper to fit. Even then the parts may not line up just right. I suggest you buy a car with the lights. Paul
-
Somebody did the switch with the rear lights. You need to buy some module when you buy the rear lights. Search is your best friend. Paul