Welcome to RennTech.org Community, Guest
There are many great features available to you once you register at RennTech.org
You are free to view posts here, but you must log in to reply to existing posts, or to start your own new topic. Like most online communities, there are costs involved to maintain a site like this - so we encourage our members to subscribe or donate. All subscriptions and donations go to the costs operating and maintaining this site. We prefer that guests take part in our community and we offer a lot in return to those willing to join our corner of the Porsche world. This site is 99 percent member supported (less than 1 percent comes from advertising) - so please consider an annual subscription or donation to keep this site running.
Here are some of the features available - once you subscribe RennTech.org
- View Classified Ads
- DIY Tutorials
- Porsche TSB Listings (limited)
- VIN Decoder
- Special Offers
- Paint Codes
- Registry
- Videos System
- View Reviews
- and get rid of this welcome message
It takes just a few minutes to register, and it's quality Porsche information at a low cost.
Contributing Members also get these additional benefits:
(you become a Contributing Member by subscribing or donating money to the operation of this site)
- No ads - advertisements are removed
- Access the Contributors Only Forum
- Contributing Members Only Downloads
- Send attachments with PMs
- All image/file storage limits are substantially increased for all Contributing Members
- Option Codes Lookup
- VIN Option Lookups (limited)


Boxsterfahrer
-
Posts
22 -
Joined
-
Last visited
About Boxsterfahrer

Boxsterfahrer's Achievements
Member (1/1)
1
Reputation
-
Loren, Thanks for the quick reply! I think I saw that mentioned as well, any chance you could direct me to a post that addresses tightening that swaybar? -Ben I had what sounds like this and i spent months or diagnosing it. The noise is worse in the summer and is noticable over cobbles, concrete surfaces and drain covers but no speed bumps or potholes. For me i simply took off the Rear Control Arm and applied this fix: http://www.renntech.org/forums/index.php?showtopic=20681 its been fine ever since apart from the odd rumble, but i can live with that. When you take the arm off it feels fine so dont be suprised. Real easy to take off as well so do both sides. Hope it helps. I am Boxsterfahrer and this repair lasted for about 6 month for me but eventually I had to spring for 2 control arms and replaced them myself. No more clunk from the rear of my 2003 Boxster S.
-
Clunking Noise From the back of the car
Boxsterfahrer replied to 0Bosxter0's topic in 986 Series (Boxster, Boxster S)
Boxsterfahrer, Can you ID the part that you replaced, ive heard "control arm" used interchangeably with a few different parts of the rear suspension... In the attached picture is it the one circled in blue (labeled 1) or the one circled in red (labeled 2)?? I think you are referring to the blue circled part, thats actually the piece that I originally thought was the culprit. It seems like its a fairly straightforward part to replace, did you change this out yourself or have the dealership do it? -Ben Picture you have is of the front suspension. Here is the rear. I believe Boxsterfahrer is referring to number 8. It is the one where you have to remove the plastic fender cover to see where it attaches. Tight squeeze up in there. ericinboca, Thats the item I originally thought was the trouble maker. Like you mentioned ill look a little closer into the swaybar and double check all the bushings for cracks/splits. If none of that works then thats the first part ill replace! Thanks again gentlemen! -Ben Yes, it is item #8 and I can almost guaranty that replacing these will get rid of your noise. I fixed mine temporarily by peening the bushing ( described in a previous thread ) but it lasted for only 6 month and then reared it's ugly head again. I did read that thread, I considered trying that myself but I really don't want to have take that sucker off more times than I actually need to! I have found a few local junkyards that are selling the rear control arm for around $150... But i'm a little wary of buying this piece used... Check out vertex automotive (google them) - they often have new and rebuilt parts - would be a littl e more than salvage, but rebuilt will be better than salvage and cheaper than new. I have no affiliation with vertex - probably others that can provide too, but I know of this one. I would be creful regarding any used control arms since you can NOT check the bushings without actually installing them in the car and test driving the vehicle. There is no perceptiple play even in the control arms that are making the noice. That is why I purchased new from Sunset Imports. -
Clunking Noise From the back of the car
Boxsterfahrer replied to 0Bosxter0's topic in 986 Series (Boxster, Boxster S)
Boxsterfahrer, Can you ID the part that you replaced, ive heard "control arm" used interchangeably with a few different parts of the rear suspension... In the attached picture is it the one circled in blue (labeled 1) or the one circled in red (labeled 2)?? I think you are referring to the blue circled part, thats actually the piece that I originally thought was the culprit. It seems like its a fairly straightforward part to replace, did you change this out yourself or have the dealership do it? -Ben Picture you have is of the front suspension. Here is the rear. I believe Boxsterfahrer is referring to number 8. It is the one where you have to remove the plastic fender cover to see where it attaches. Tight squeeze up in there. ericinboca, Thats the item I originally thought was the trouble maker. Like you mentioned ill look a little closer into the swaybar and double check all the bushings for cracks/splits. If none of that works then thats the first part ill replace! Thanks again gentlemen! -Ben Yes, it is item #8 and I can almost guaranty that replacing these will get rid of your noise. I fixed mine temporarily by peening the bushing ( described in a previous thread ) but it lasted for only 6 month and then reared it's ugly head again. -
Clunking Noise From the back of the car
Boxsterfahrer replied to 0Bosxter0's topic in 986 Series (Boxster, Boxster S)
My money is on the rear control arm that attaches to the body behind the driver and passenger seat. I had the same clunking noise when traveling at low speed up to 30 MPH from the rear, sounding like something was loose in the trunk. Replaced both control arms and the noise is gone. Not a cheap item about $ 628.00 for both of them. You wont be able to feel any play in the bushing but it is sill bad. BTW my car had only 40K miles on it. Hope this helps. -
I bet that you have a coolant leak. Check your coolant level!!
-
I figured it out myself but it was already to late. One must remove the chain tensioner on the back right side leading from the IMS to the cam shaft as well as the chain tensioner from the crank shaft to the IMS. Most importantly do NOT under any circumstance turn the crank when the chain tensioners are removed or when the IMS Beraing cover is removed. With the chain tensioners removed, the bearing cover can easyly removed and the condition of the bearing checked. Reinstallation of the cover will the also be easy. Total time involved should be less than 1 hour. Just be aware that any mistake might cost you about $ 3,000.00. :angry:
-
My DIY Nightmare. My Boxster is a 2003 S with 40 k miles on the odometer. During my last drive I noticed a change in the clutch actuation. The pedal pressure changed during a downshift to about halve the force required before and the engagement point moved from about 1” from the floor to close to the top. When moving the pedal from disengagement to engagement I also noticed a rough travel. The rough travel disappeared when the engine was shut off and the clutch activated. After analyzing all possible scenarios, I concluded that the pressure plate spring must be at fault. I purchased a clutch kit from Sunset Imports and also new bolts for the flywheel. After I removed the transmission in my garage I was proud that my conclusion was spot on, since about half of the pressure plate’s finger springs were collapsed. Since there was almost no oil visible from the RMS I decided to remove the flywheel anyway and replace the RMS with the newest version to ensure that a future leak might be prevented. The IMS housing was right in front of me and because of the bad reports about IMS bearing failures; I felt that inspecting the bearing was a prudent choice, adding at most and hour of labor to the task. I removed the bearing holder after loosening the chain tensioner for the chain from the crankshaft to the IMS. I was the able to rotate the bearing and also check for looseness or axial play. The bearing was perfect!! Now it gets UGLY real fast. The IMS was slightly off center to the right side and I was unable to get the bearing holder back in to place. The Bently Manual had absolutely no information to offer. I thought that by turning the crank slightly I might take the tension off the IMS to let it be centered and allow me to replace the cover. I just turned the crank about 15 degrees in the normal direction of travel when I heard and felt a sickening click as if the chain from crank to IMS jumped a tooth. I removed the spark plugs to check if the engine could be turned over without interference from the valves and found that a turn of only 120 degrees was possible before the piston contacted a valve. I knew my goose was cooked. What was about 3 hours of labor left to complete the clutch job now turned in to a major nightmare. I was truly disgusted with my stupidity and after two sleepless nights made the phone call to my Independent Repair Shop, Marque Motors in Portland Oregon, telling the owner Kurt Leipzig that a true basket case was on its way. A retiming of the cam shafts seemed in order and required the removal of the engine. The front engine mount and CV boots were found to have tears and were replaced along with a set of new spark plugs. Brake fluid and coolant also were changed. Marque Motors did an outstanding job of rescuing my Boxster engine. The lesson learned is best expressed by one of Clint Eastwood’s phrases from Magnum Force: “A man's got to know his limitations”. This experience was costly but I consider myself lucky, at least the car did not fall off the jack stands and crush me. Future DIY will be carefully evaluated prior to starting the project.
-
Ignition lock housing or ignition switch?
Boxsterfahrer replied to cbbepop's topic in 986 Series (Boxster, Boxster S)
Just had the same problem on my 2003 Boxster S. Ignition key difficult to remove. Had new switch on hand and installed same in about 30 minutes. All is well again. Opened old switch to check what was reason for failure and determined that the plastic housing has a portrusion that is ankering the start position return spring. This ankering point was broken off therby returning the Ignition switch only partly and cousing various problems. The switch contacts are pristine. I installed a 2/56 allen bolt thru the plastic top to act as the spring stop and I am sure that this switch will last. However since it is so easy to replace the switch I ordered 2 new items for $ 25.00 including freight from AutoPartsWarehouse.com to cover any eventuality. -
Rumbling rear suspension
Boxsterfahrer replied to thumpers's topic in 986 Boxster Suspension, Brakes, and Wheels
To remove the lower control arm #8 remove only bolt #10 and #15. If you remove bolt #12 you will need a realingnment. -
Rumbling rear suspension
Boxsterfahrer replied to thumpers's topic in 986 Boxster Suspension, Brakes, and Wheels
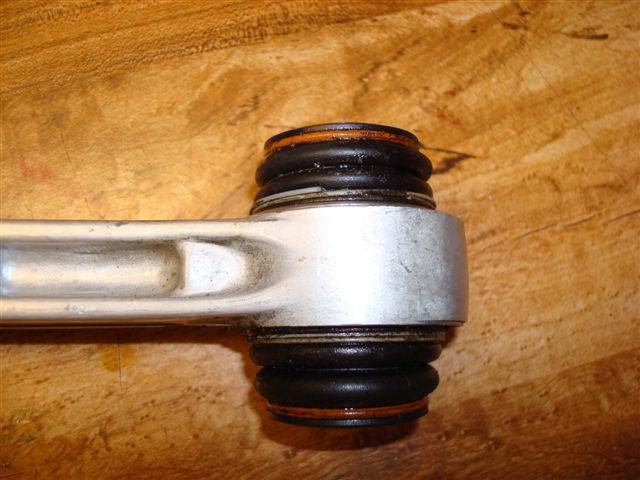
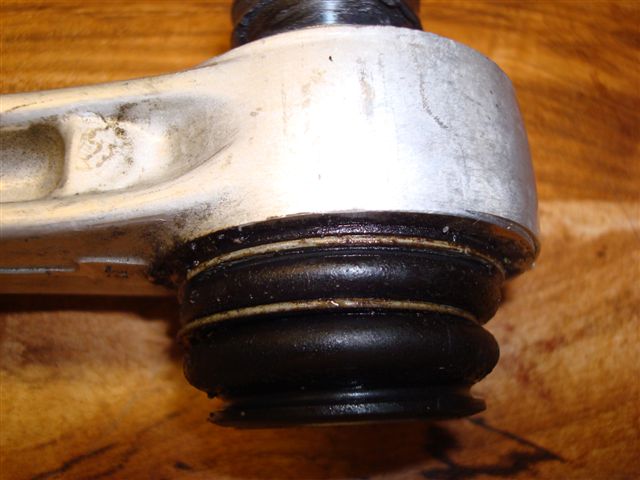
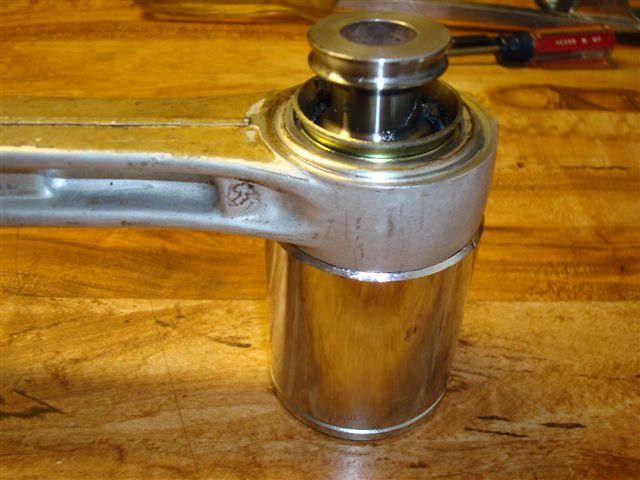
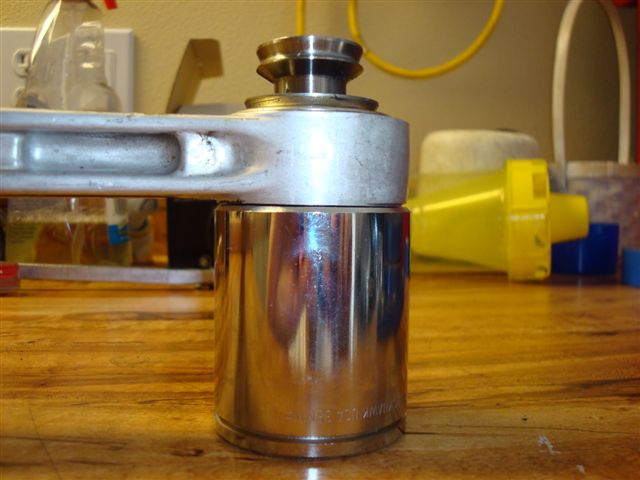
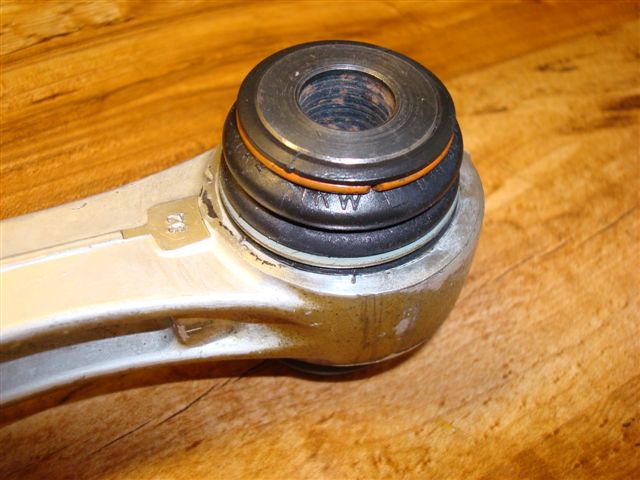
I know of no sure way to test the control arm other than to measure the side play of the teflon or nylon insert. I tried it on my left rear control arm and found about 0.005" of side play under haevy pushing. The best way to check is to do the repair, reinstall and listen if there is an improvement. See the pictures of the repair dated 9-19-08. My two repairs have been successful and saved me about $600.00 in parts alone. -
Rumbling rear suspension
Boxsterfahrer replied to thumpers's topic in 986 Boxster Suspension, Brakes, and Wheels
] I just completed the repair of my left rear control arm ( item #8 on parts fich) . The right one was done about 6 month ago and now no more noice from the rear. Pictures of the repair are attached for your review attachment=14025:Control_Arm_001.jpg]
-
Boxster Control Arm Repair
Boxsterfahrer replied to Boxsterfahrer's topic in 986 Boxster Suspension, Brakes, and Wheels
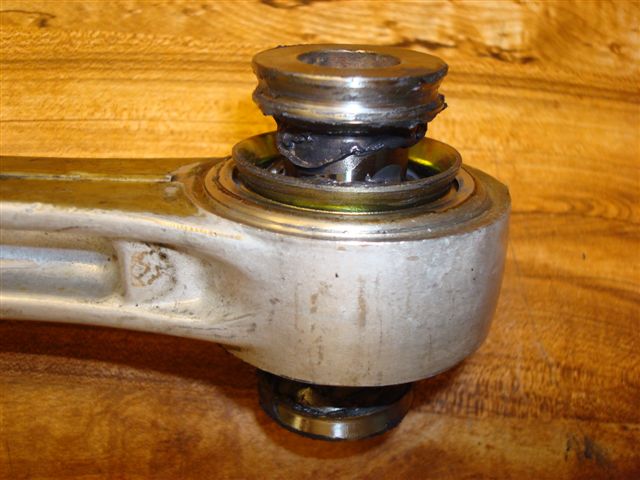
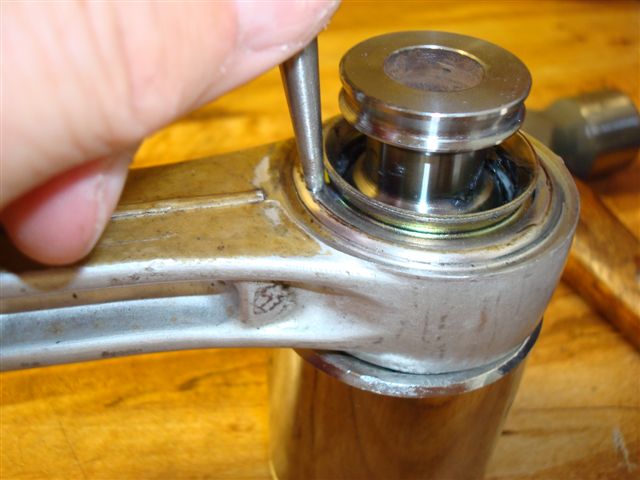
Answer1: Yes, remove the plastic rock shield for easy access. Answer2: Steel keeper for top and bottom rubber gaitor. Try to separate the steel keeper and hold one end in the groove and then unwind the remaining spring while getting it in the groove. The ring is basically built like a Slinky that is tightly compressed. A second person might be able to assost you or just use a saftey wire wound around the gator groove to hold it in place. -
Boxster Control Arm Repair
Boxsterfahrer replied to Boxsterfahrer's topic in 986 Boxster Suspension, Brakes, and Wheels
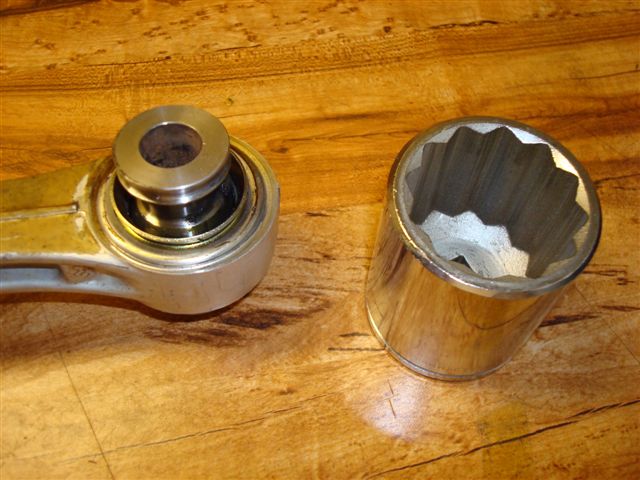
You need to use a socket wrench and an extension and insert the socket from the bottom up. You may need to use a open or 12 point wrench to hold the nut on the upper side, although on my car that was not needed since the nut was captive and did not turn. -
Boxster Control Arm Repair
Boxsterfahrer replied to Boxsterfahrer's topic in 986 Boxster Suspension, Brakes, and Wheels
Remove the rear wheel. Then remove the Trailing Arm ( item 8 in the parts fiche ) by removing one M 14x 1.5 Nut and M14x1.5X75 mm bolt close to the wheel carrier and the second bolt M14x1.5x90 mm fastening the control arm to the car body. The nut in the upper part is fixed and the bolt can be removed by using a socket from the bottom. Then simply remove the Trailing Arm and repair per my instruction. Install by installing the bolt at the car body first and then use a 2nd jack to raise the wheel carrier to make the insertion of the 2nd bolt by the wheel carrier easier. Both bolts should be torqued to 118 ft-lb. Good luck and let us know how it works for you. Your wheel alignment should be ok. -
Boxster Control Arm Repair
Boxsterfahrer replied to Boxsterfahrer's topic in 986 Boxster Suspension, Brakes, and Wheels
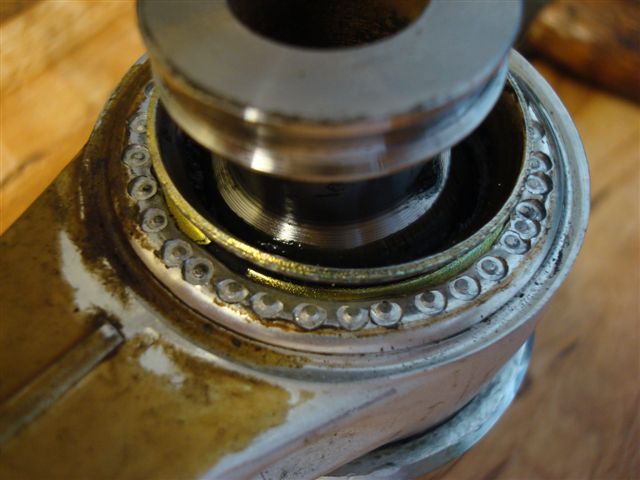
The rubber seal was in perfect condition and I believe that the problem is a less then perfect crimp leading to some slight radial play.