Welcome to RennTech.org Community, Guest
There are many great features available to you once you register at RennTech.org
You are free to view posts here, but you must log in to reply to existing posts, or to start your own new topic. Like most online communities, there are costs involved to maintain a site like this - so we encourage our members to donate. All donations go to the costs operating and maintaining this site. We prefer that guests take part in our community and we offer a lot in return to those willing to join our corner of the Porsche world. This site is 99 percent member supported (less than 1 percent comes from advertising) - so please consider an annual donation to keep this site running.
Here are some of the features available - once you register at RennTech.org
- View Classified Ads
- DIY Tutorials
- Porsche TSB Listings (limited)
- VIN Decoder
- Special Offers
-
OBD II P-Codes - Paint Codes
- Registry
- Videos System
- View Reviews
- and get rid of this welcome message
It takes just a few minutes to register, and it's FREE
Contributing Members also get these additional benefits:
(you become a Contributing Member by donating money to the operation of this site)
- No ads - advertisements are removed
- Access the Contributors Only Forum
- Contributing Members Only Downloads
- Send attachments with PMs
- All image/file storage limits are substantially increased for all Contributing Members
- Option Codes Lookup
- VIN Option Lookups (limited)

Hobbes
-
Posts
129 -
Joined
-
Last visited
-
Days Won
2
Content Type
Profiles
Events
Forums
External Paint Colors
Downloads
Tutorials
Links Directory
Collections
Classifieds
Store
Everything posted by Hobbes
-
 I decided to go with the HID conversion on my 2000 996. The conversion was fairly easy. I thought I would share it with the community. HID_DIY.pdf - Ken
 -
Agreed. They have to justify the $$$. Thing is with these tips, unless you are on the ground looking up at the exhaust,y you won't even see them.
-
I got my set of 3.6 mufflers today. They came off of a 997. I took a look at the exhaust tips and noticed they had 'vents' on the inside. I was wondering what these things do, if anything. If they are cosmetic, great, otherwise any info would be appreciated. Thanks, Ken :renntech:

-
Spark plug, normal or other issue?
Hobbes replied to Hobbes's topic in 996 Series (Carrera, Carrera 4, Carrera 4S, Targa)
Thanks for the feedback. This is my DD. I've made several roadtrips in the 150-250 mile range here in the southwest (lots of long straight stretches on the interstate), but because I tend to drive a little faster I wanted to make sure the plug wear is consistent with 'normal' for the car. Some with triple digit speeds - I mean within the speed limit :) . All is good. A local "german & japanese" shop told me my original Beru plugs were good for about 100K miles. I have not doubt I could have continued with what I had, but it gave me peace of mind to change them. Ken -
Juankimalo, Loren pointed me in your direction about modding the 997 3.6s for a 996. I bought a set of 997 over the past weeknd, which should be here by this coming weekend. I will also be doing the MKII mod. Father-in-law has a welder so I'll save some extra $$ on the weld. The MkII mod sound is incredible thanks to listening to some of the post on youtube. I'm sure the real deal sounds much better than any recording will produce. Do you know if the 997 3.6L MK II mod sounds any different (+/-) than 996 3.6L MK II. Either way, I'm sold on doing it, but I was just curious. Other than what you posted here, are there any other 'lessons learned' in doing this mod? Thanks, Ken
-
Spark plug, normal or other issue?
Hobbes replied to Hobbes's topic in 996 Series (Carrera, Carrera 4, Carrera 4S, Targa)
Thanks for the spark plug guide. All six plugs looked like the one in the picture. All plugs were tight, but easy to get out. The rusty brown on the threads did raise an eyebrow. None of the rubber tubes were cracked. Unfortunately, the previous owner did not keep any records of maintenance or any other work done on the car. The work I am doing is based on what i read form Renntech and other owners. I do appreciate the help. Regards, Ken -
I just finished replacing my spark plugs with the Porsche recommended Beru Ultra, 14FGR-6KQU, Porsche Part number 999.170.207.91. It was relatively easy to do following the DIY. After looking at the plugs, I noticed they were a bit dirty and the electrodes were a bit worn. My guess is the plugs are the original factory plugs when the car was built. My car is a 2000 C2 996 with 66000 miles Replaced MAF about two months ago (Clutch/RMS too) :D I'm getting about 22 mpg HWY - about normal. From the picture, is this normal or is there another issue I might need to be concerned with? Side by side Thanks, Ken
-
Painting brake calipers
Hobbes replied to Fluke996's topic in 996 Series (Carrera, Carrera 4, Carrera 4S, Targa)
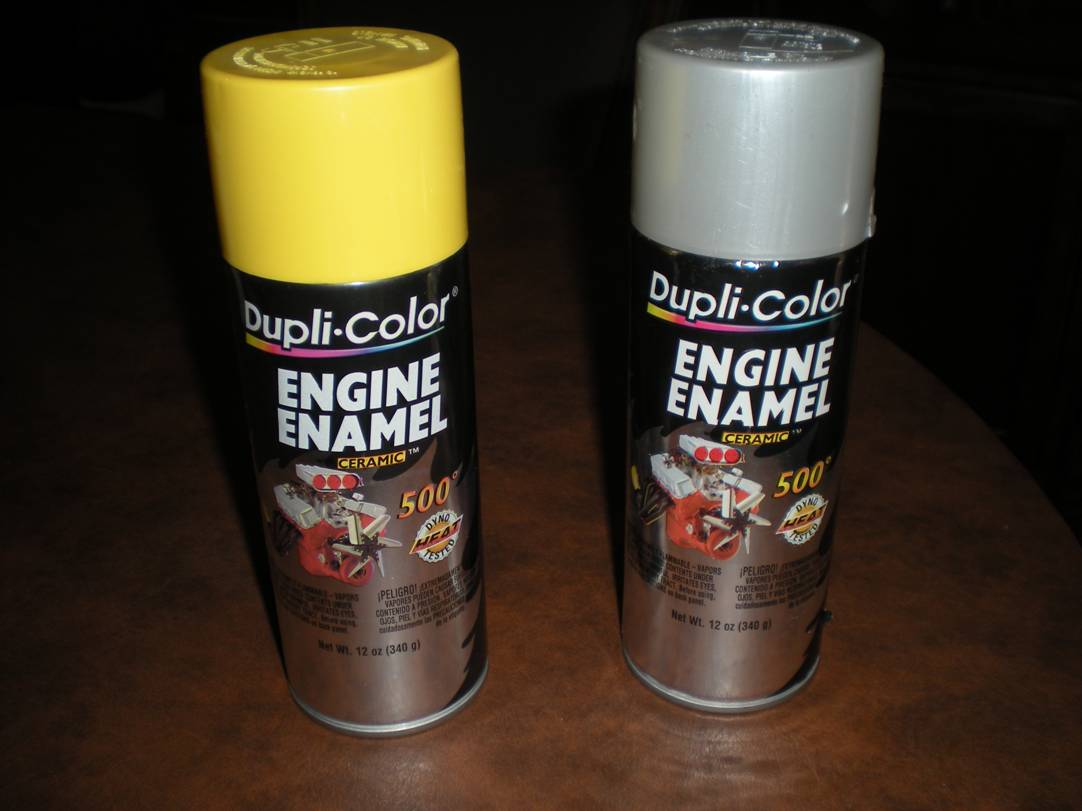
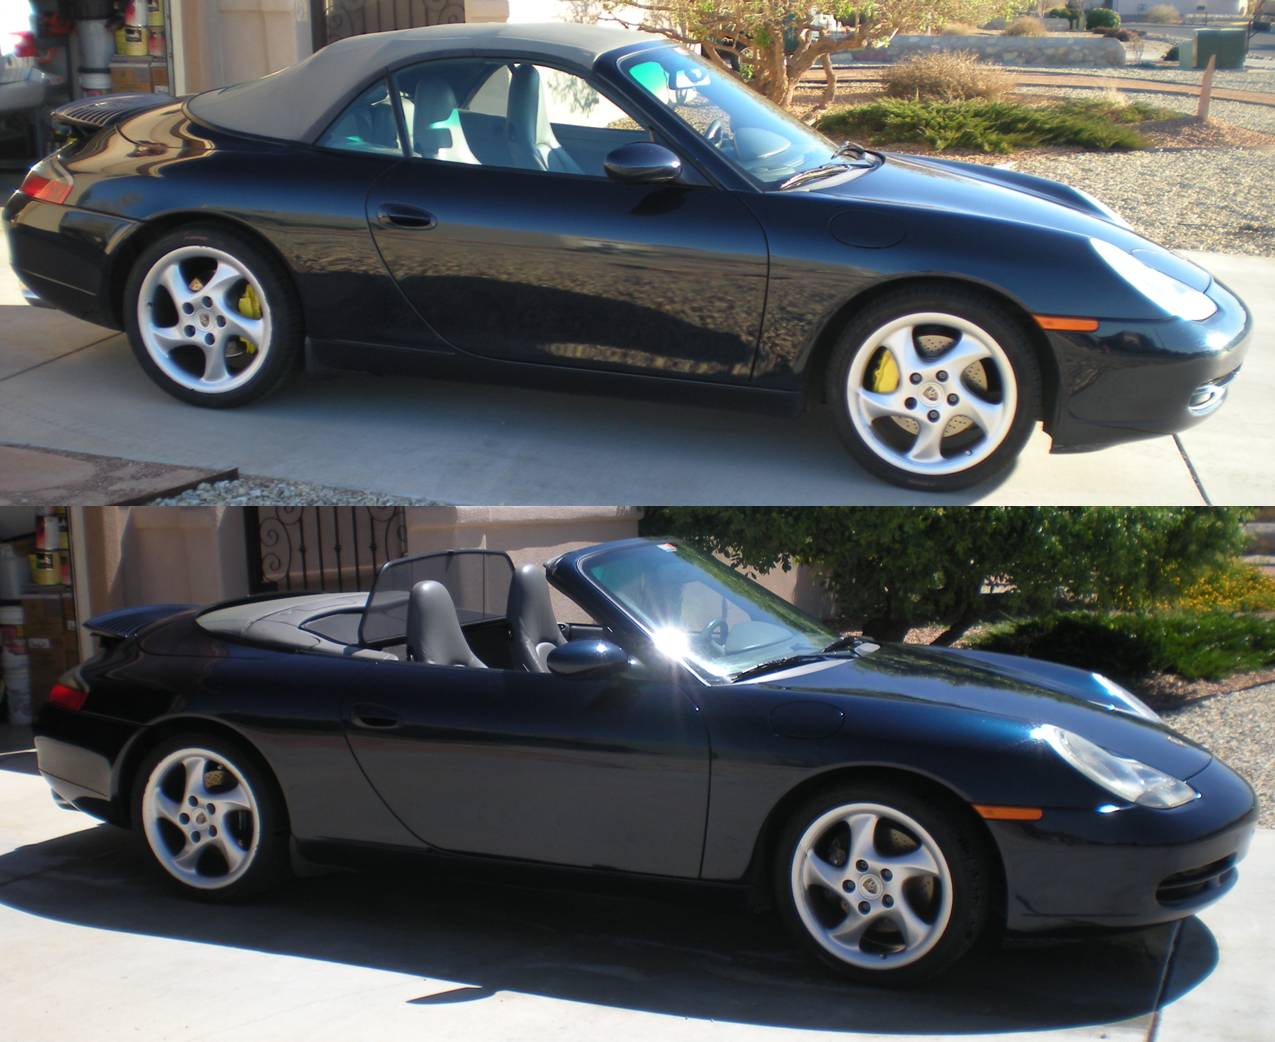
After reading and doing some research, I decided to paint my calipers from black to a nice sharp yellow. Buying yellow calipers are pretty costly, and my current calipers are still pretty good. The task was pretty easy and done in a few hours. I thought I would share the before and after pictures. One thing to note, I recently replaced my front rotors, which were not painted. I slapped them on the car and in a couple of short months, they were rusted. So anyone who buys unpainted rotors, I highly recommend either getting them already painted, or buy a high-heat / caliper paint (or caliper paint kit @$38) and paint them yourself. Here are a couple of before and after pictures. The PORSCHE lettering on the calipers were sanded off to allow for a more smooth surface. I ordered a set of decals from Ebay for less than $10. When they get here, they'll be added. The final product on the car. I chose the yellow as a nice contrast to the blue and my wife didn't care for the red. You can definitely see the yellow over the black. :drive: Ken
-
Wheel key help
Hobbes replied to Hobbes's topic in 996 Series (Carrera, Carrera 4, Carrera 4S, Targa)
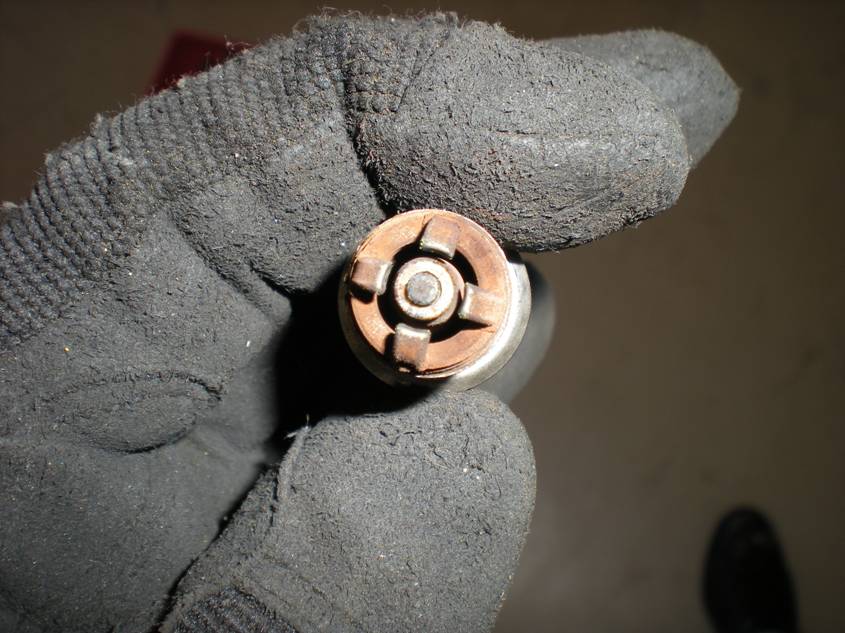
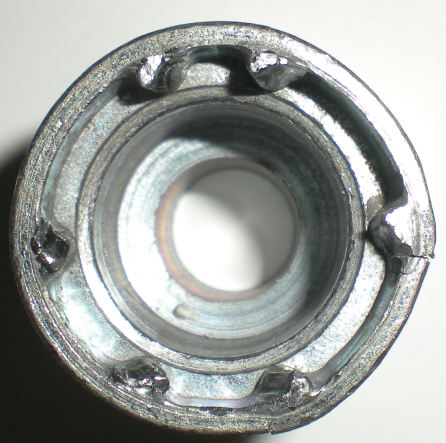
Looks like I'm taking a trip to Albuquerque or Tucson to get new locks and a couple of keys. All of this started because I wanted to repaint my calipers. I recently replaced my rear tires and the tire place tightened the bolts just a little to tight. When I tried to remove the lock bolt, I stripped my key. So the lesson learned here is have them hand tighten the bolts and put the air tools to the side. Ken -
Wheel key help
Hobbes replied to Hobbes's topic in 996 Series (Carrera, Carrera 4, Carrera 4S, Targa)
I appreciate the help with this. I checked for the key number card and I did not find one. I am the second owner so I'm sure the original owner discarded the info. I checked the option panel under the hood and there the only number I could not account for as an option code is: 680-3839. I checked all the local Autozones, Checkers, Pepboys, etc in the area and none of them could help. I also checked the local tire places and none have the keys. Pepboys could remove them, but they wanted $39.95 per tire to remove the key nut. I don't agree with extortion. My best course of action is probably to find any way possible to remove the bolts and then replace them with a new set and key. -
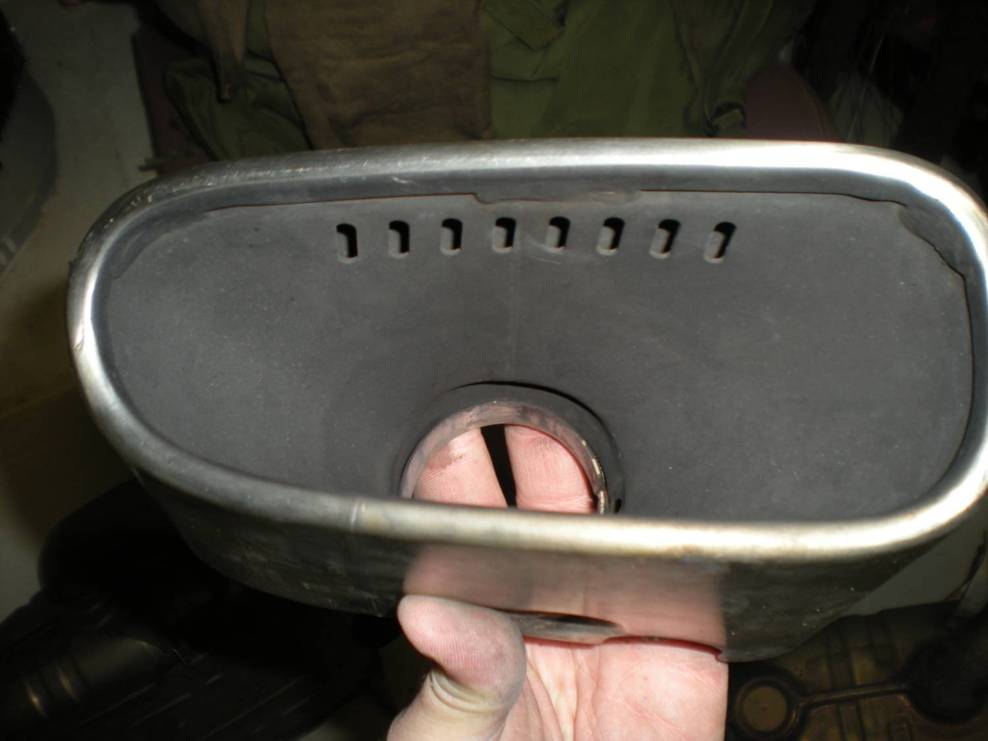
I was in the process of removing my wheel using the wheel key (anti-theft wheel nut) and I ended up stripping the key itself. Short of having to drive 3 and a half hours to the closets Porsche dealer, is there anyone that can offer some assistance in helping me resolve my problem? Either having an 'extra' key on hand that I could buy or offer an alternative solution to get the bolts out? I am the second owner of this car and I guess the first owner decided to throw away the key number so I can't call Porsche and re-order another key. I've included a picture that may help. 2000 Porsche 996 with 18" inch factory rims. Thanks. Ken
-
MAF Sensor Causing CEL?
Hobbes replied to Lee Quave's topic in 996 Series (Carrera, Carrera 4, Carrera 4S, Targa)
I had a CEL. I checked for faults with durametric and found I had a P1128 - 02 Sensor bank 1. I cleared the fault and cleaned my MAF. No more CEL. But when I read the actual values and compared them to the tables above, I found something that doesn't come close to the numbers. Hot film MAF Spec. rpm Adaption range 2 (FRA) bank 1 Adaption range 1 (RKAT) bank 1 Mass air flow sensor 14 700 1.02 -2.72 1.27 14 700 1.02 -2.72 1.27 14 700 1.02 -2.72 1.26 14 700 1.02 -2.72 1.27 14 700 1.02 -2.72 1.27 14 700 1.02 -2.72 1.25 14 700 1.02 -2.72 1.27 14 700 1.02 -2.72 1.27 14 700 1.02 -2.72 1.26 14 700 1.02 -2.72 1.26 My MAF sensor reading did change with an increase of RPMS, not significant (1.28/1.31). Anyone know what may cause these types of reading from the numbers i provided? 2000 996, 3.4 Thanks. -
Oil Leak, RMS issue?
Hobbes replied to Hobbes's topic in 996 Series (Carrera, Carrera 4, Carrera 4S, Targa)
I appreciate the feedback. I haven't heard any wierd noises or anything unusal while driving. I'll keep an eye on it. -
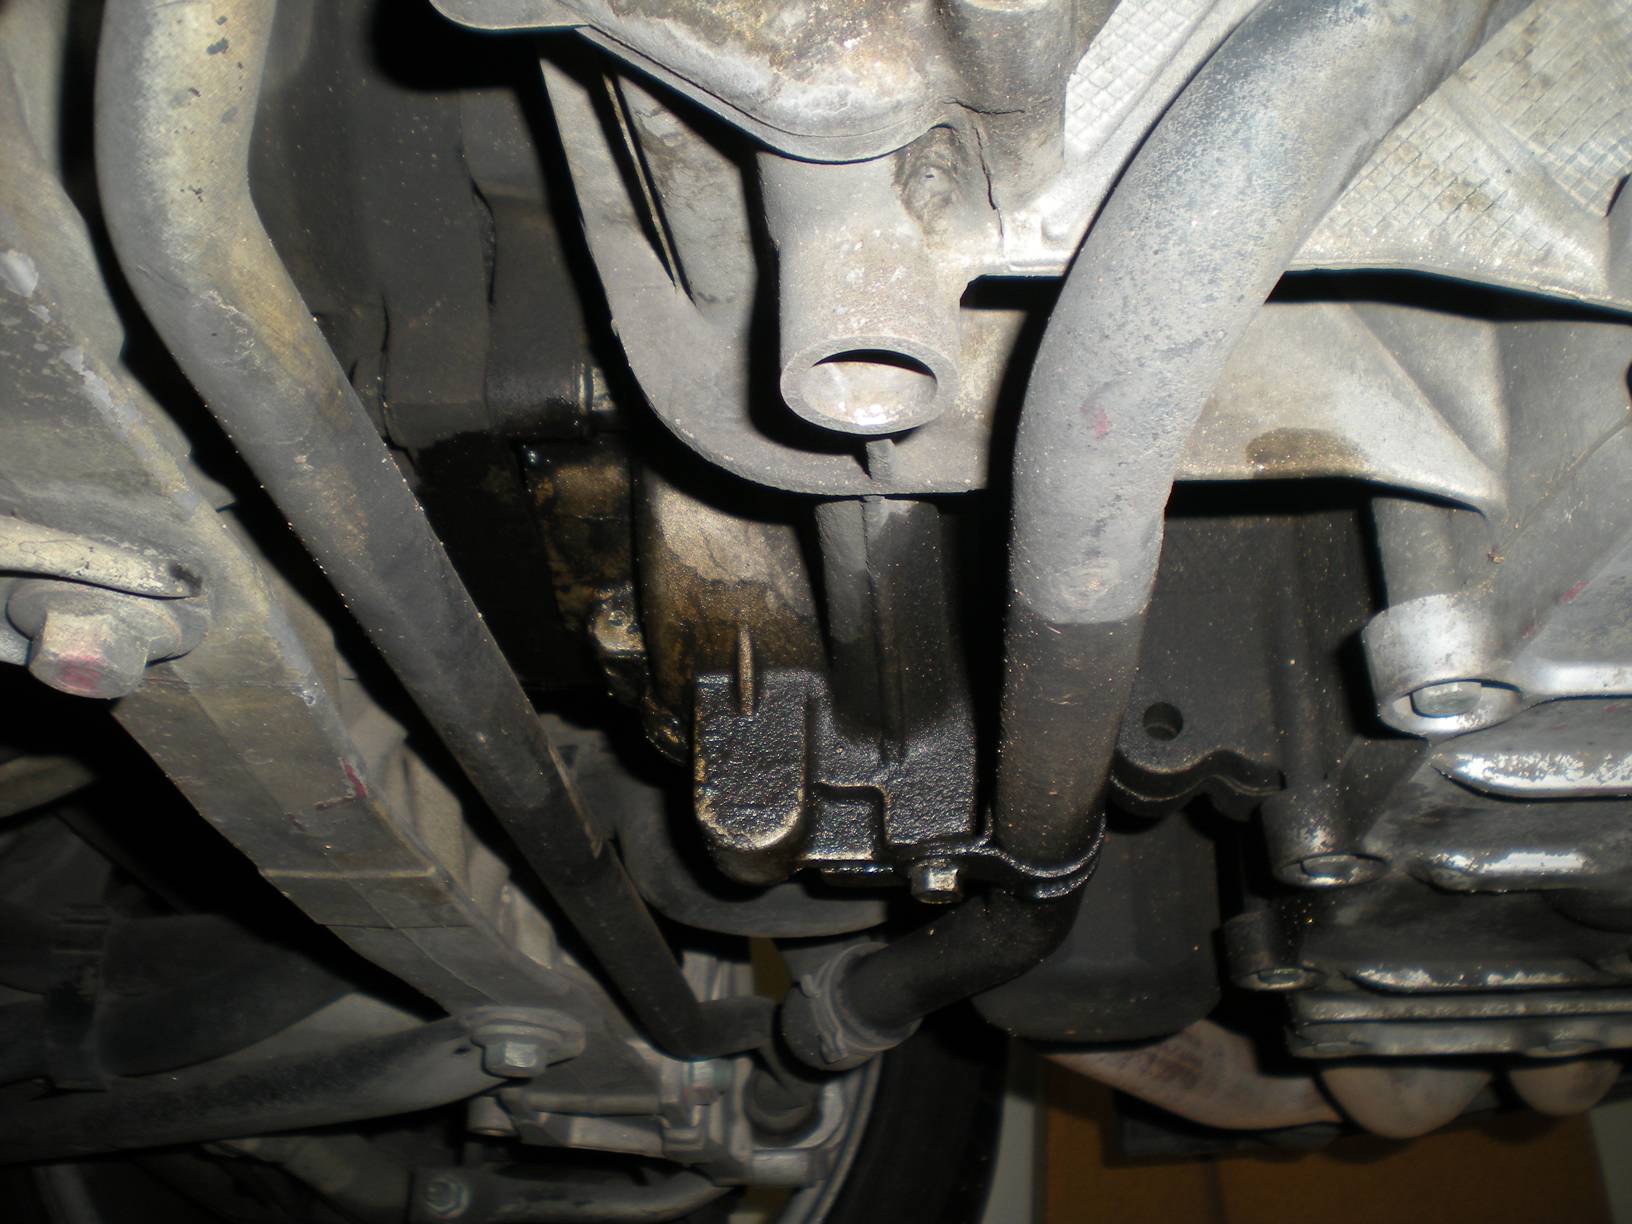
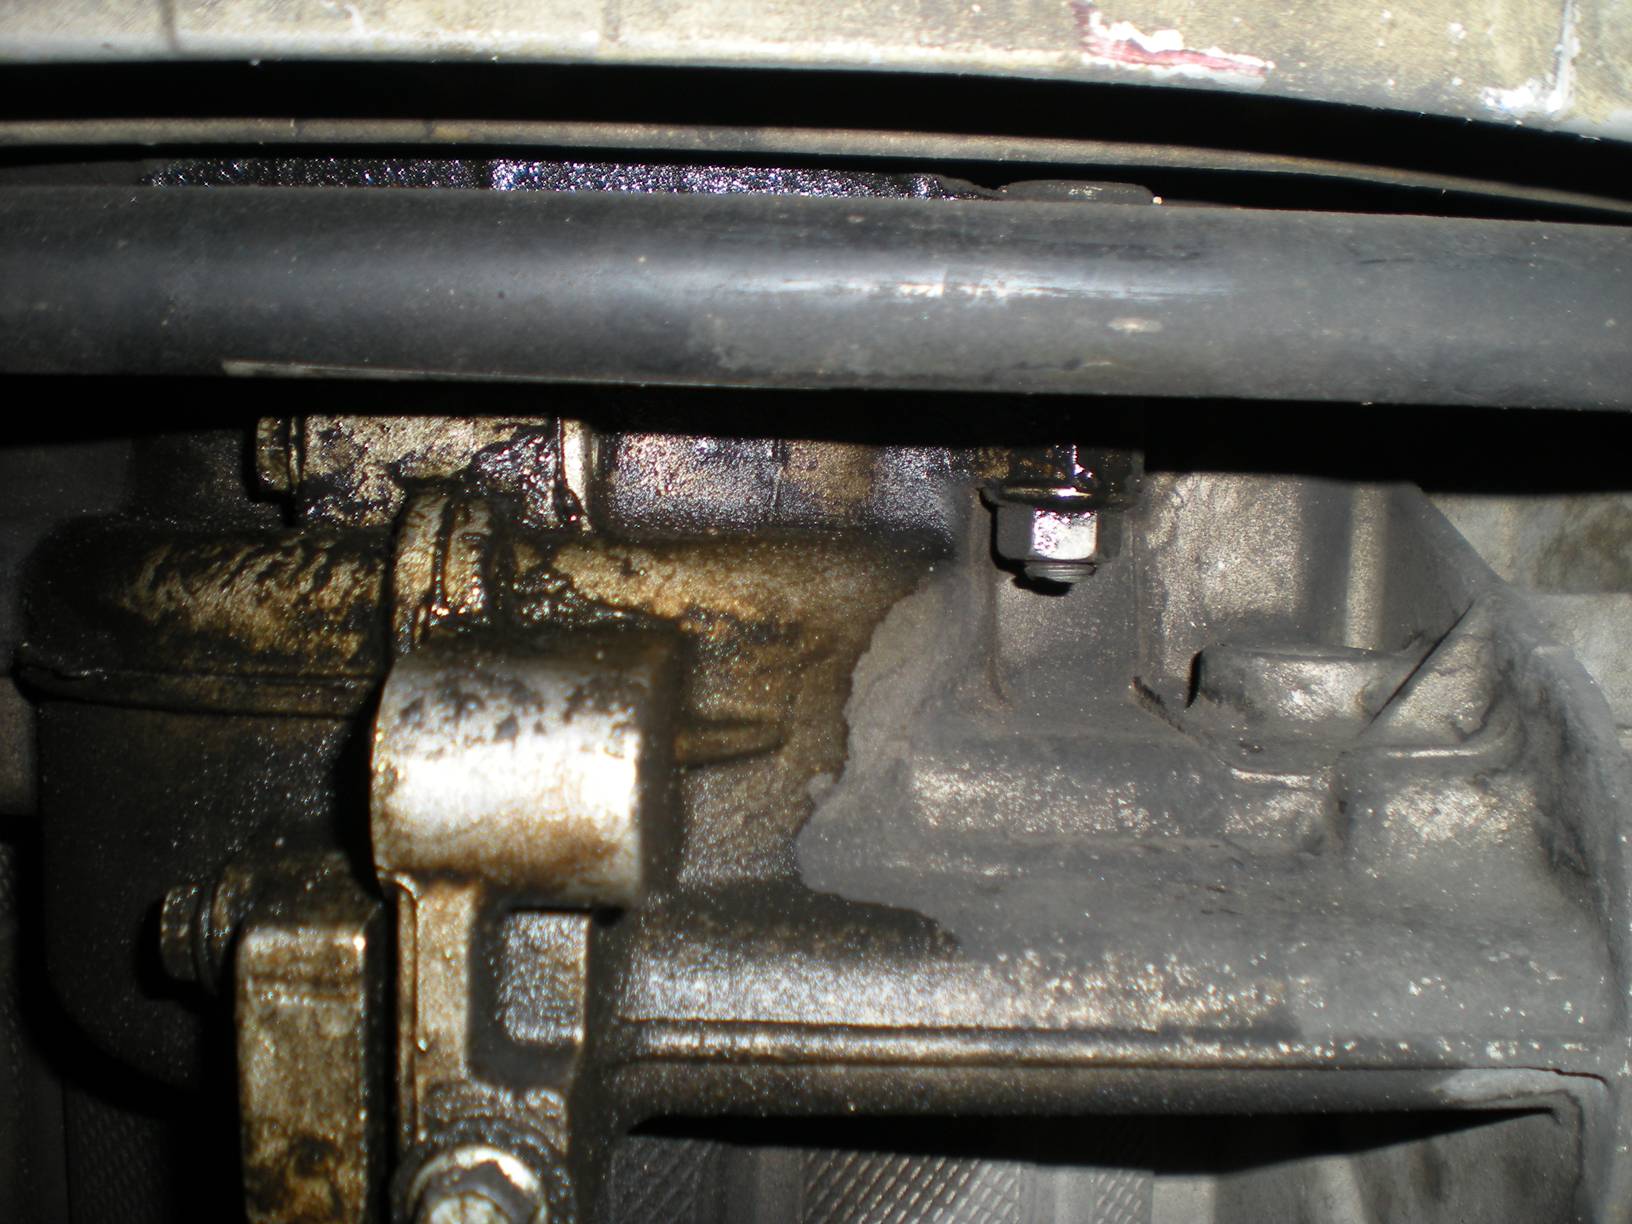
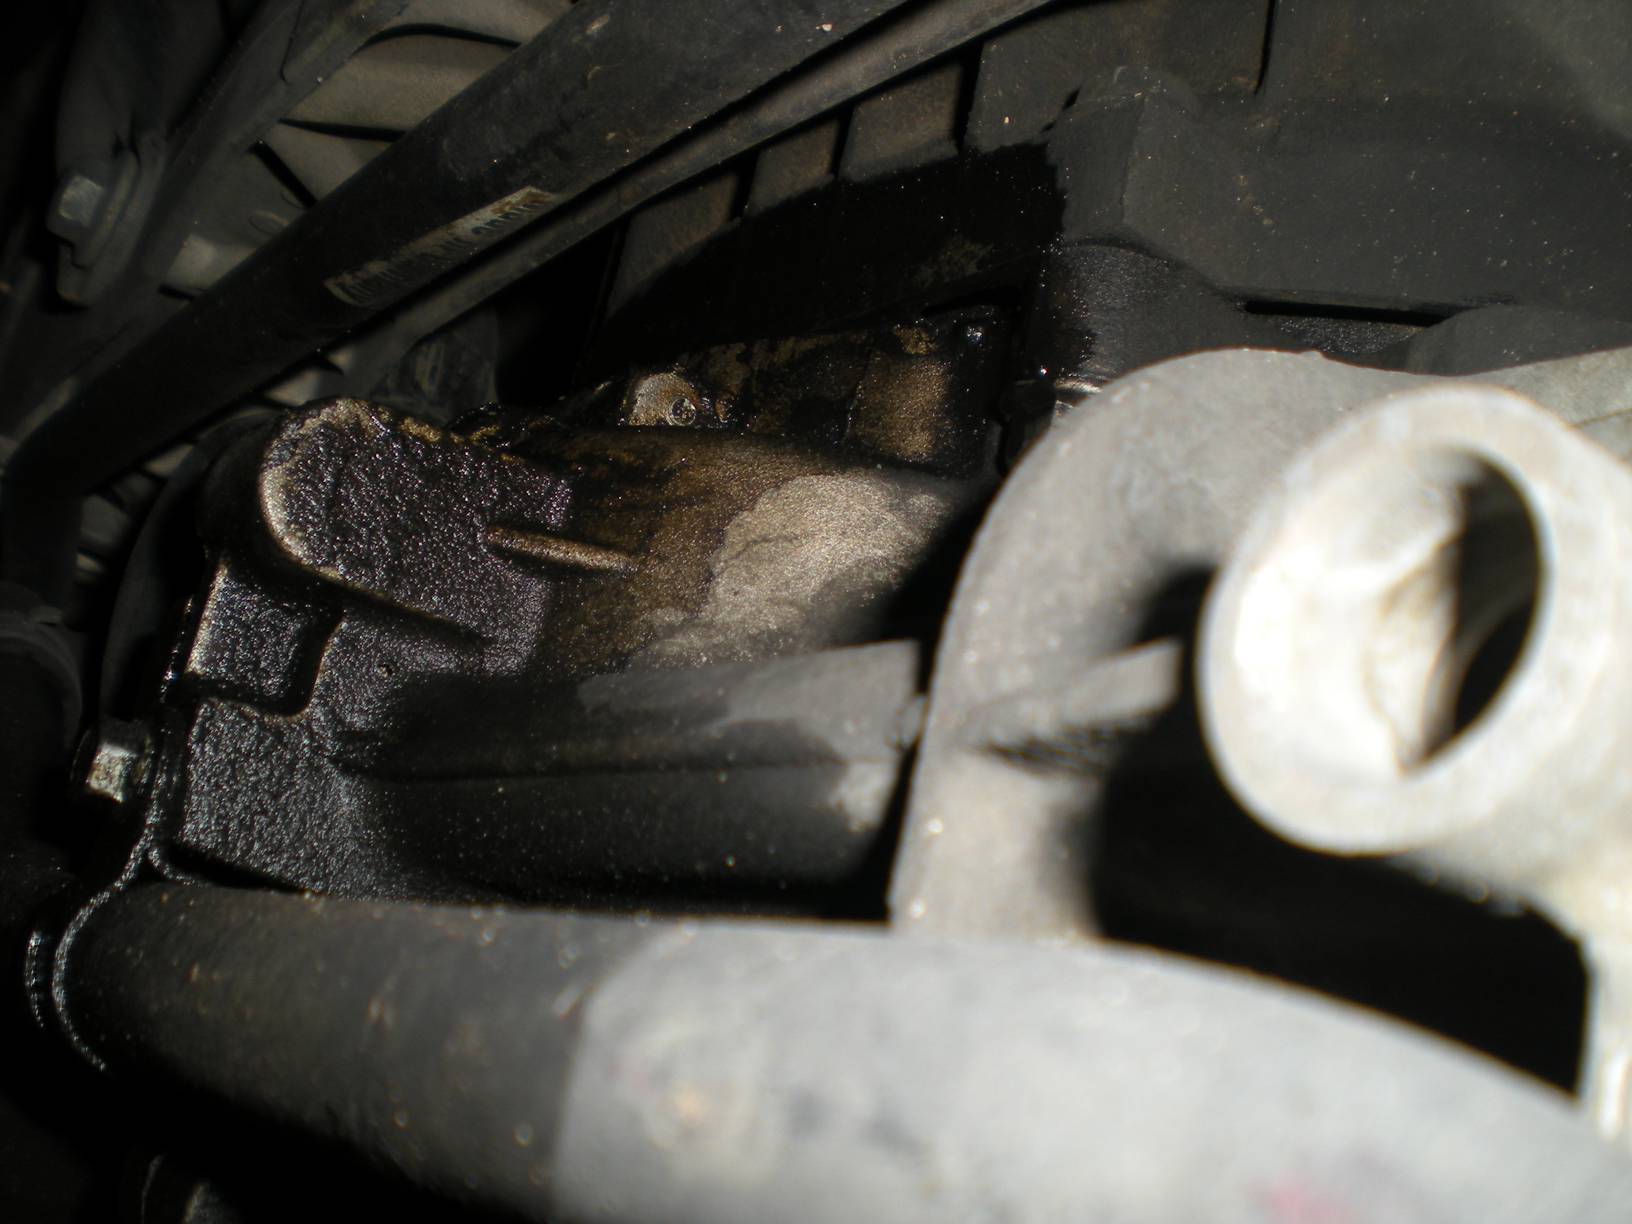
I found an oil leak on the garage floor. After reading much of the forum regarding RMS issues, I may be falling victim to the same. I took some pictures of the leak. Could some of the experts take a look and see if these are representative of the RMS problem or if it may be another issue. 2000 996, 3.4L C2 Much appreciated.
-
Brake Pad Change Instructions
Hobbes replied to Loren's topic in DIY Articles - Carrera (996) - Maintenance
My Brake Wear warning light came on and I wanted to tackle the task of replacing my brakes. I was reading the DIY and it stated I needed "2 sets 996 612 365 00 Front and Rear Wear Sensors" Before I purchase anything, I want to make sure I get the right stuff and quantity. 1. Is there a difference between the front and rear sensor? 2. Do I need a total of four for the entire job or is it two per wheel for a total of eight pieces? Thanks, Ken -
Sirius + iPod + Becker CDR 220
Hobbes replied to Hobbes's topic in DIY Articles - Carrera (996) - Mods
Sorry for the late response, but yes, this does work with the Becker 220. -
Sirius + iPod + Becker CDR 220
Hobbes replied to Hobbes's topic in DIY Articles - Carrera (996) - Mods
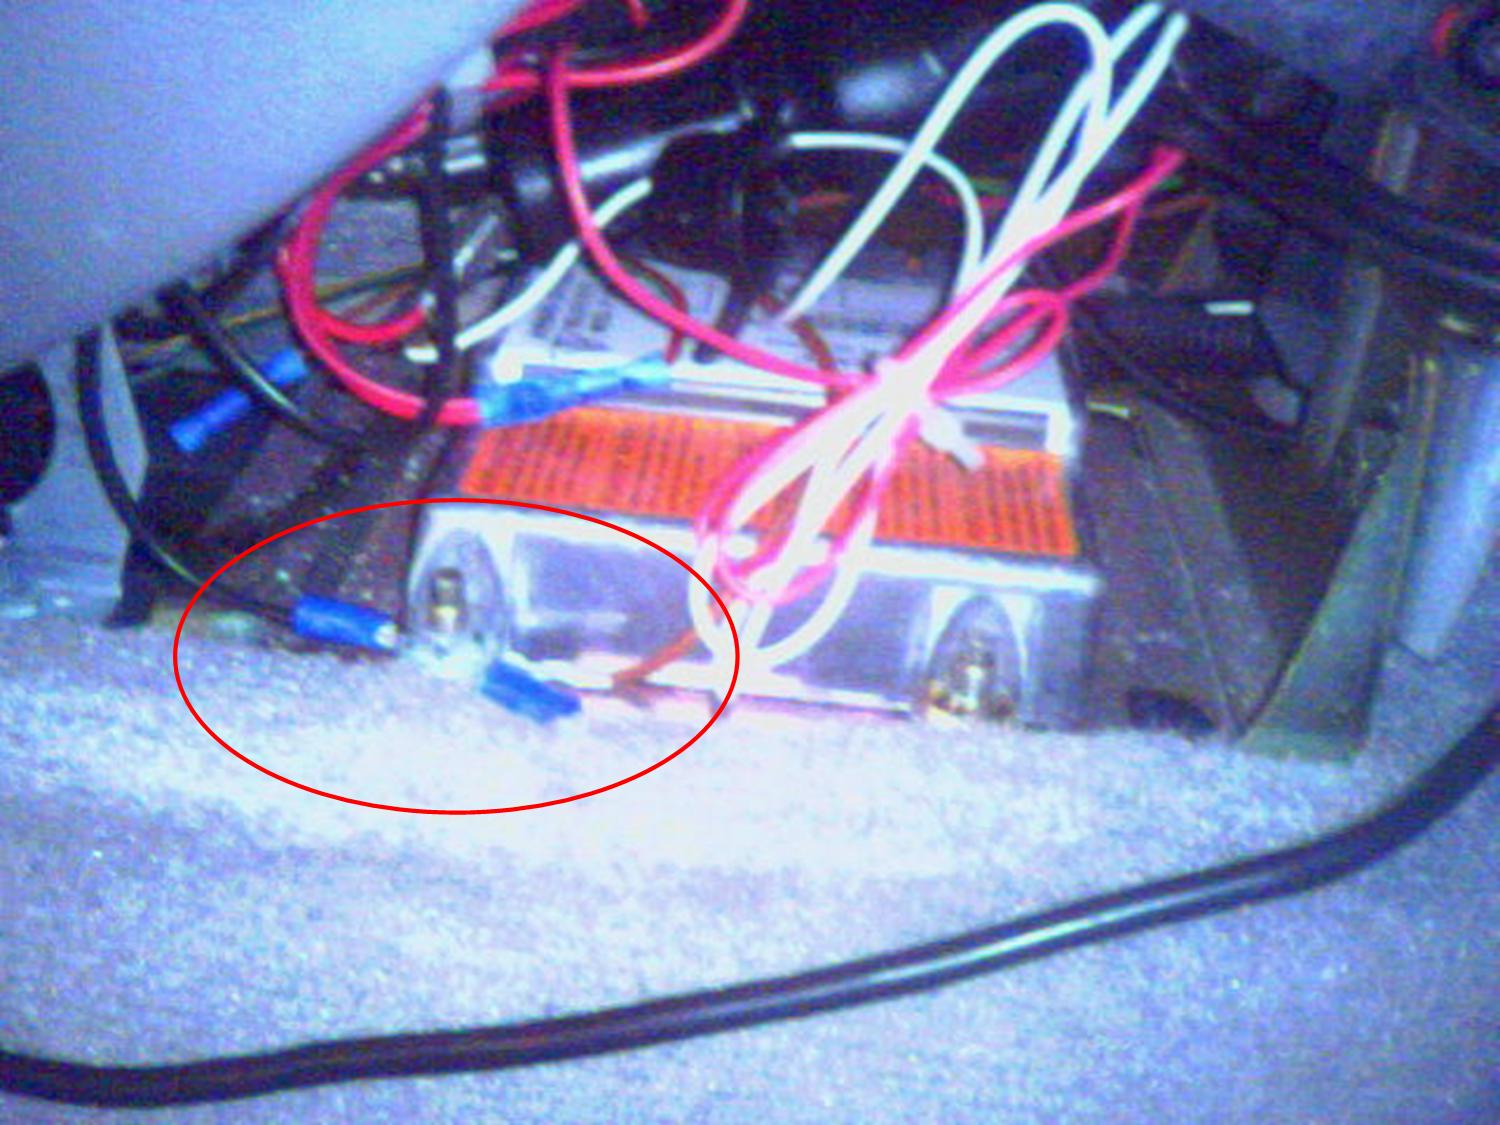
Mike, I did not use/splice the ground from the phone connector. I connected the grounds directly to the grounding bolt seen in the picture. I included a couple of pictures to show which ground option I used. Ken
-
DIY – Sirius Starmate 3 and iPod Nano Installation Sorry for the poor image quality. My camcorder decided to drink some mouthwash on my last trip rendering it inop. I had to use my cell phone to take the pictures. Knowing that, I wanted to pass along a DIY job to show how I integrated my iPod and Sirius radio together with my Becker CDR-220. I do not have a factory CD changer with my Porsche, so I was able to use the “Aux-in” on the back of the radio. I purchased a PIE BLAU/8-3NPUT multi-audio + iPod Charging Adapter Cable (Product ID: BLAU/8-3NPUT) from myradiostore.com for $29.99. PIE Blaupunkt 8-Pin to RCA, 3.5mm Plug or iPod Adapter BLAU/8-3NPUT. I purchased a fused cigarette lighter socket from Radio Shack that will tap power from the telephone power connector. The cigarette lighter adapter from the Sirius radio will plug into the cigarette lighter socket. $7.99 +12 volts unswitched (red/green) – power source for adapter and cigarette lighter socket. +12 volts switched (green/black) – did not use. Ground (brown) – ground for adapter and cigarette lighter socket. Telephone Mute Signal (yellow/black wire) – did not use. Now I had all the power needed to run the radio(s), I needed a smart way to mount the Sirius radio. The Starmate 3 came with vent and suction cup mounts, but using these would mean wires being exposed in the driver’s compartment. To me (and my wife) this is an eye sore. After some thinking, I thought it would be great to place the radio where the 5-CD holder is located in the center console. I did some exploration and realized the actual CD holders can be removed from the frame where it is housed. Now that I had my spot, I needed a way to mount the Sirius receiver to the car that would hide all the wires. One challenge I encountered was making a stable mounting platform that would sit snuggly into the CD holder, but have holes that would allow me to pass the wires through it. Here was my solution: I used a smooth, hard wood for my mounting platform. The interior of my Porsche is gray. I searched my garage and found some gray primer paint which coincidently matches my interior color, almost. Once I painted the mount, I pushed the mount into the mount housing which matches pretty closely. I do not have the best power tools available which is why there is a gap between the frame and the mount. I had re-done this so that mount is flush to the frame. (I didn’t get any pictures of this, but the dimensions I gave above will fit the frame snuggly.) The easy part was finished. Next I had to figure out a way to mount the antennae and route my wires through the firewall. Instead of going through the painstaking process of fishing my antennae wire through the fire wall, I find an alternate solution. I’m not sure what this is called, but there is a cover on the right hand side of the trunk compartment that leads from the trunk area to the interior of the car. I read different options as to where to place the antennae, but I did some testing and I decided to place the magnetic antennae on my windshield wiper housing. I zip tied the wire to hold it in place as seen above. Now that all the wires were run and my power for the radio connected, I fished the wires through the hole for the Sirius radio. I used some heavy duty Velcro on the mount and the back of the Sirius receiver to hold the receiver in place. I know this is not a perfect solution and can probably be done more professionally, but this technique and procedure worked for me. I hope this helps some of you out there. What is not shown here is the wire for my iPod. The iPod cable is fished along the right side under the molding. The iPod sits in the storage compartment under the Sirius. I will make a mount in the future so the thing doesn’t flop around. A couple of things to note: There is there is minor hissing in the speakers. However, there is more hissing when I use the iPod. Not so much when I use the Sirius. I will be buying a ground-loop isolator to fix this in the future. Also, when the iPod is plugged in and I am using the Sirius, the sound was not as loud. I unplugged the iPod and I noticed the Sirius volume was louder.
-
Sirius + iPod + Becker CDR 220 DIY – Sirius Starmate 3 and iPod Nano Installation Sorry for the poor image quality. My camcorder decided to drink some mouthwash on my last trip rendering it inop. I had to use my cell phone to take the pictures. Knowing that, I wanted to pass along a DIY job to show how I integrated my iPod and Sirius radio together with my Becker CDR-220. I do not have a factory CD changer with my Porsche, so I was able to use the “Aux-in” on the back of the radio. I purchased a PIE BLAU/8-3NPUT multi-au Author Hobbes Category Carrera (996) - Mods Submitted 12/14/2007 01:59 PM Updated 03/11/2017 06:24 AM
-
Door Closed Sensor
Hobbes replied to WeekendWonder's topic in 996 Series (Carrera, Carrera 4, Carrera 4S, Targa)
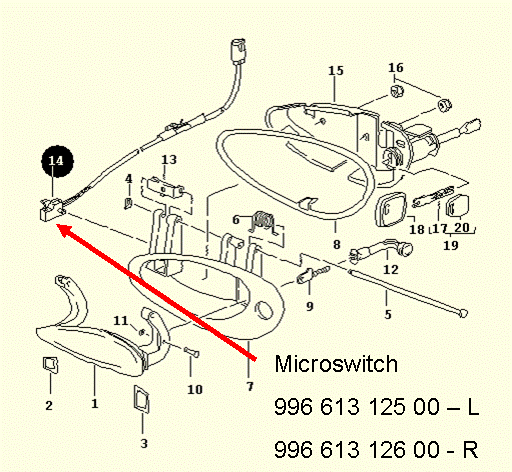
Ken: Thanks for taking the time to post the fix. For future reference, which one of the microswitches was not "snapped" into place? Regards, Maurice. Maurice, Sorry about that. I did not take any pictures of the switch or work (learning point for next time). However, this switch is the one just behind the interior door handle. As I pulled the panel off, the switch was connected right behind the door handle. In lieu of my crude explanation, I'll take some pictures and get them posted here. Regards, Ken I got a picture that might help identify the switch
-
Door Closed Sensor
Hobbes replied to WeekendWonder's topic in 996 Series (Carrera, Carrera 4, Carrera 4S, Targa)
Where are you located? Perhaps there is a board member near you with a PST2 or PIWIS tester. I am located in Las Cruces, NM, about 50 miles north of El Paso, TX. I was able to fix this myself. Apparently, the previous owner had removed the passenger door panel and the microswitch was not 'snapped' into place when he put it all back together. This caused the entire microswitch to push away as I opened the door. Since it wasn't snapped, there was nothing pushing the tiny switch itself. I snapped it back into place and viola. Everything worked again. My interior door lock switch works. My passenger window closes all the way when I shut the door. Lastly, my interior lights go out after 30 seconds and/or when I start the car. Ken Ken: Thanks for taking the time to post the fix. For future reference, which one of the microswitches was not "snapped" into place? Regards, Maurice. Maurice, Sorry about that. I did not take any pictures of the switch or work (learning point for next time). However, this switch is the one just behind the interior door handle. As I pulled the panel off, the switch was connected right behind the door handle. In lieu of my crude explanation, I'll take some pictures and get them posted here. Regards, Ken -
Door Closed Sensor
Hobbes replied to WeekendWonder's topic in 996 Series (Carrera, Carrera 4, Carrera 4S, Targa)
Where are you located? Perhaps there is a board member near you with a PST2 or PIWIS tester. I am located in Las Cruces, NM, about 50 miles north of El Paso, TX. I was able to fix this myself. Apparently, the previous owner had removed the passenger door panel and the microswitch was not 'snapped' into place when he put it all back together. This caused the entire microswitch to push away as I opened the door. Since it wasn't snapped, there was nothing pushing the tiny switch itself. I snapped it back into lace and viola. Everything worked again. My interior door lock switch works. My passenger window closes all the way when I shut the door. Lastly, my interior lights go out after 30 seconds and/or when I start the car. Ken -
Diagnostic Tool for both BMW and Porsche?
Hobbes replied to Hobbes's topic in Diagnostics, Tips and Diagnostic Tools
Loren, Thanks for the quick response. Looks like this is the piece I need for both the Porsche and BMW. The price dwarfs the other options. Much appreciated, Ken -
I was looking at the durametric package forh my '00 996 Cab C2, but naturally, Durametric does not cover BMW's. I have a '03 BMW X5. I'm curious if anyone in the forum has a recommendation for a diagnostic tool for both BMW and Porsche. Many Thanks, Ken
-
Try 3287 or 3285 Loren, 3287 worked perfectly. Many thanks!! Ken