Welcome to RennTech.org Community, Guest
There are many great features available to you once you register at RennTech.org
You are free to view posts here, but you must log in to reply to existing posts, or to start your own new topic. Like most online communities, there are costs involved to maintain a site like this - so we encourage our members to subscribe or donate. All subscriptions and donations go to the costs operating and maintaining this site. We prefer that guests take part in our community and we offer a lot in return to those willing to join our corner of the Porsche world. This site is 99 percent member supported (less than 1 percent comes from advertising) - so please consider an annual subscription or donation to keep this site running.
Here are some of the features available - once you subscribe RennTech.org
- View Classified Ads
- DIY Tutorials
- Porsche TSB Listings (limited)
- VIN Decoder
- Special Offers
- Paint Codes
- Registry
- Videos System
- View Reviews
- and get rid of this welcome message
It takes just a few minutes to register, and it's quality Porsche information at a low cost.
Contributing Members also get these additional benefits:
(you become a Contributing Member by subscribing or donating money to the operation of this site)
- No ads - advertisements are removed
- Access the Contributors Only Forum
- Contributing Members Only Downloads
- Send attachments with PMs
- All image/file storage limits are substantially increased for all Contributing Members
- Option Codes Lookup
- VIN Option Lookups (limited)


MarkC
-
Posts
25 -
Joined
-
Last visited
Content Type
Profiles
Events
Forums
Exterior Paint Colors
Downloads
Tutorials
Links Directory
Collections
Classifieds
Store
Everything posted by MarkC
-
inner tie rod removal tool
MarkC replied to Shrek's topic in 996 Series (Carrera, Carrera 4, Carrera 4S, Targa)
I replaced inner/outer 4 weeks ago (including tuning forks and coffin arms) on my 2000 C2. I bought the offset oetiker clamp tool for the boot clamps (https://www.amazon.com/gp/product/B0080J1200/ref=ppx_yo_dt_b_asin_title_o01_s00?ie=UTF8&th=1; Lisle 30600) from Amazon, but borrowed the tie rod tool (and I tend to buy the tools as well - own compressor, impact, etc... from previous jobs). Rick Hutton You Tube shows the EverTough brand (from O'Reillys) works, while I used the OEMTools brand version (from Autozone). Realize your location creates other challenges. I have a 1995 Honda Del Sol to do in a few weeks and I'm still borrowing this particular product. One thing I did differently from the videos, was put the rubber band around the steering rack before putting the inner tie rod on - think it make the task simpler. Oher than that I followed Rick and Mike from FCPEuro. Good Luck, Mark -
How to identify steering rack?
MarkC replied to Mike Blaszczak's topic in 996 Series Part Number Requests
OK found it (-06 for me). For others looking, to add to Mike's comment the # is on the top of the unit towards the back (presume my earlier post is a serial #). I could not get a phone in there to see anything beyond the 996-347 digits (even a small old iPhone 4). In the end used a flexible extendible mirror with a couple of Harbor Freight flashlights. I'm on a pair of stands only 14" up. Probably easier if you have a lift (just getting the angles and positioning. Thx Mark -
How to identify steering rack?
MarkC replied to Mike Blaszczak's topic in 996 Series Part Number Requests
Is the part # a sticker or an embossed/etched #? I can see a # but it does not look like a Porsche part. Mine shows "149G212A412". The steering box shows TRW embossed on it, but that # is the only thing i can see through a small gap between the chassis brace and the front wheel well. Am I looking in the wrong place - took 5 videos but cannot see anything else. thx Mark -
headlight replacement- Boxster=996?
MarkC replied to Aturcotte's topic in 996 Series (Carrera, Carrera 4, Carrera 4S, Targa)
UK members, regarding MOT. Do the 986 lights on a 996 pass the MOT? Looking to bring my LHD 996 over and I see used 986 lights considerably cheaper than 996. Plus will the MOT accept the earlier 'orange' front lights, or do the units have to be the same year as originally fitted? Thx Mark -
Similar problem with my MY2000. First key failed last summer, 2nd key in December. Both still started the car and manually locked/unlocked. Fob lights flash once, no longer flicker even after battery replacement and polarity swapping. Finally bought a new fob from PorscheParts.US for $160 delivered and found local indy to program for $68. Probably should have bought 2 keys at the same time as programming appears to be a flat fee with most the places I talked to.
-
Alternator Voltage
MarkC replied to MarkC's topic in 996 Series (Carrera, Carrera 4, Carrera 4S, Targa)
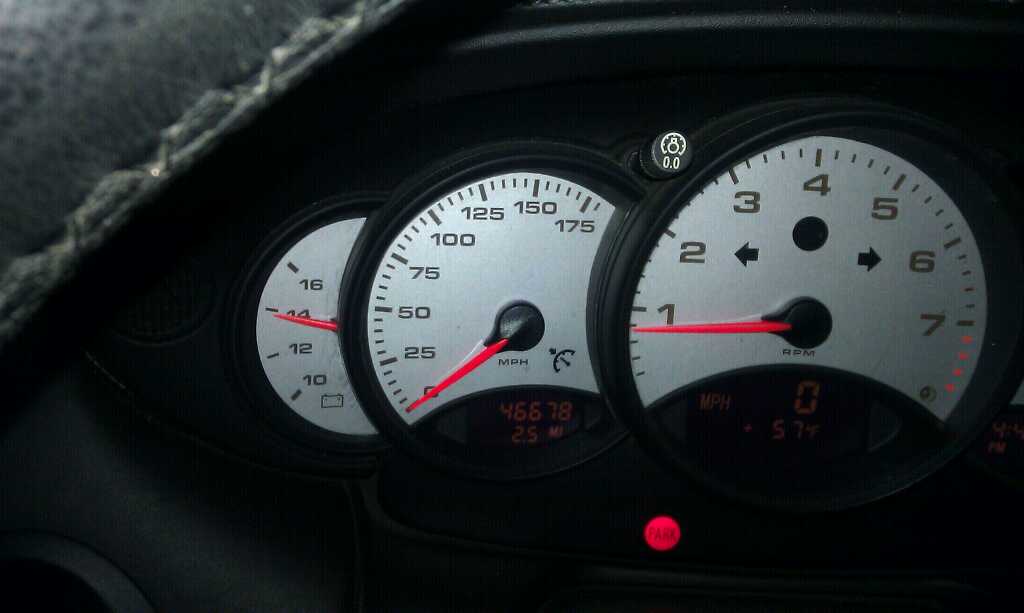
The dash display gauge when the engine is hot now drops to about 13.7v volts with lights, heater, stereo, indicator & wipers on, but my gauge under reads, so will really be closer to 14v. Never drops to where it was before. The picture above is with the engine hot, at night with the lights and heater on. Previously when the engine was cold the gauge displayed 13.5v, but when warm would drop to hover around 12v. I had been driving with the rear wing up for several months to keep the cables cooler. For diagnostics follow Ahsai's post, #9 in this thread. The wire I changed shows up in test #3 (between A & J in his diagram). http://www.renntech.org/forums/topic/44471-voltage-regulator-affected-by-heat-hence-low-voltage/#entry240001 To complete the testing follow Ahsai's post, #15 in this thread. There is no danger of causing damage as we are only testing loss due to the cables, there is little or no current plus the rear of the alternator is all plastic except for the bolt the starter cable is attached to so there is nothing to 'catch' on. You can stab around with the wire without worry. I'd still suggest finding some kind of inspection mirror (ladies make up mirror also works). http://www.renntech.org/forums/topic/44652-alternator-terminal-b-access/ Hope this helps. Mark -
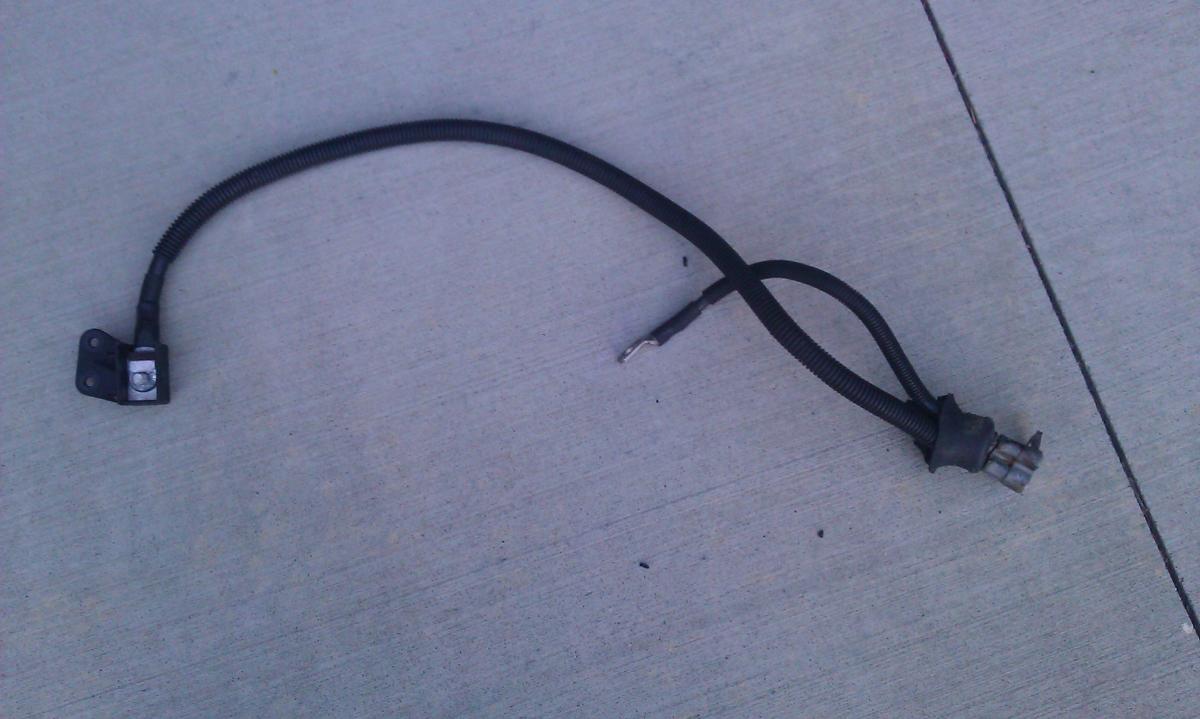
Alternator Starter Motor Cable Replacement Attached is a detailed description with photos and You Tube video link to replace the dreaded Y-cable that runs between the alternator, starter motor and rear jump start post. Thanks Mark How to remove Alternator-Starter Cable.pdf How to remove Alternator-Starter Cable.pdf Author MarkC Category Carrera (996) - Common Fixes and Repairs Submitted 11/26/2013 07:12 PM Updated 03/17/2017 05:14 AM
-
Alternator Starter Motor Cable Replacement
MarkC posted a tutorial in Carrera (996) - Common Fixes and Repairs
Attached is a detailed description with photos and You Tube video link to replace the dreaded Y-cable that runs between the alternator, starter motor and rear jump start post. Thanks Mark How to remove Alternator-Starter Cable.pdf How to remove Alternator-Starter Cable.pdf -
Alternator Voltage
MarkC replied to MarkC's topic in 996 Series (Carrera, Carrera 4, Carrera 4S, Targa)
Yes thank you (photo is a snap shot with lights running). Took 20 minutes Friday night to wiggle the alternator back in, but then found a snapped vacuum line - the one that runs to the far side of the engine, so $4 for a rubber 2" x 1/4" vacuum link later + 20 minutes Saturday morning to re-assemble the intake plenum, throttle body and air intake and we're back in business. I had a flutter when the car first started because it wouldn't rev, no response from throttle. Obviously I hadn't completely connected the wire for the throttle body, plus had some idle hunting when warm (750-800 rpm) but there were still loose air connections. I still have a slight idle flutter, 4 seconds at 750rpm then a little rise to maybe 775 and then back down to 750. So may have too take another look at those universal clips around the intake plenum. I actually think this job can be done now, without the alternator being removed and in under 2 hours start to finish (air box, throttle body, intake plenum, wire off rear of alternator, wire off starter, bolts off compressor, loosen power steering reservoir, pull out wire. Hindsight is always 20/20. If anyone in Southern California needs help on this one, just PM me, I may be able to come round to help. Will try to add a complete write up later this week - shame I can't add the video to show the rear AC Compressor bolt, but will probably just dump to You-Tube and link to it. Thanks Mark
-
Alternator Voltage
MarkC replied to MarkC's topic in 996 Series (Carrera, Carrera 4, Carrera 4S, Targa)
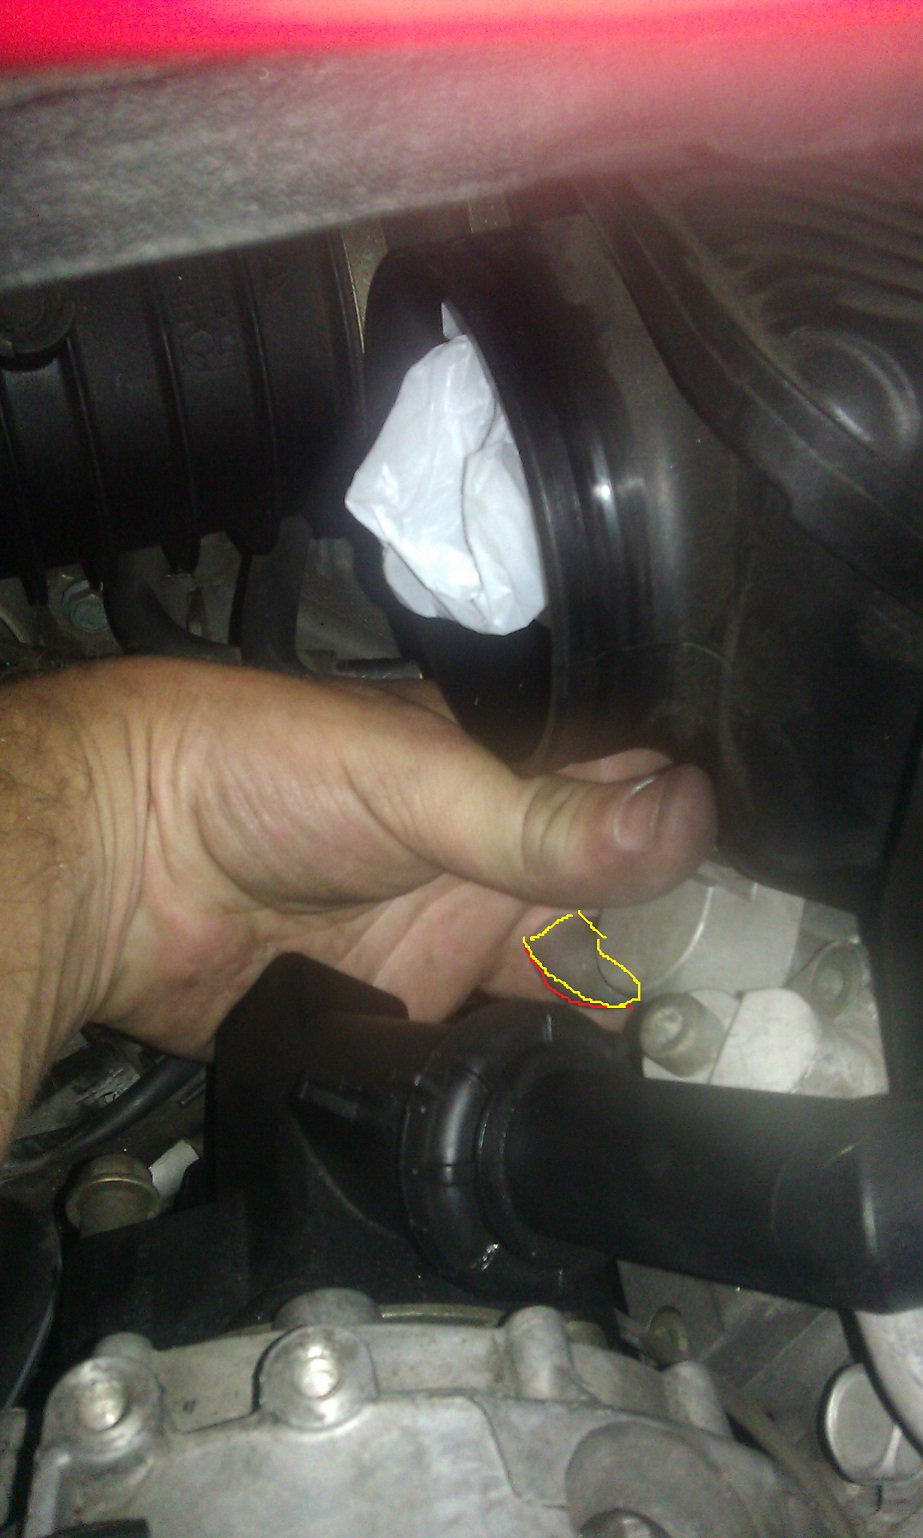
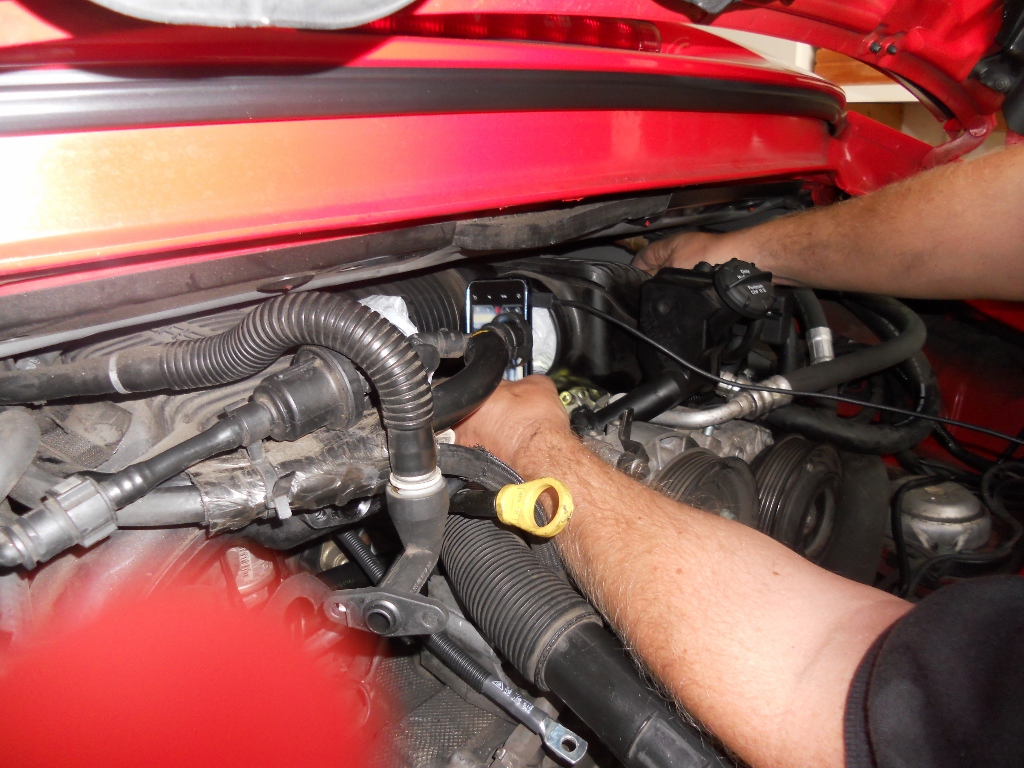
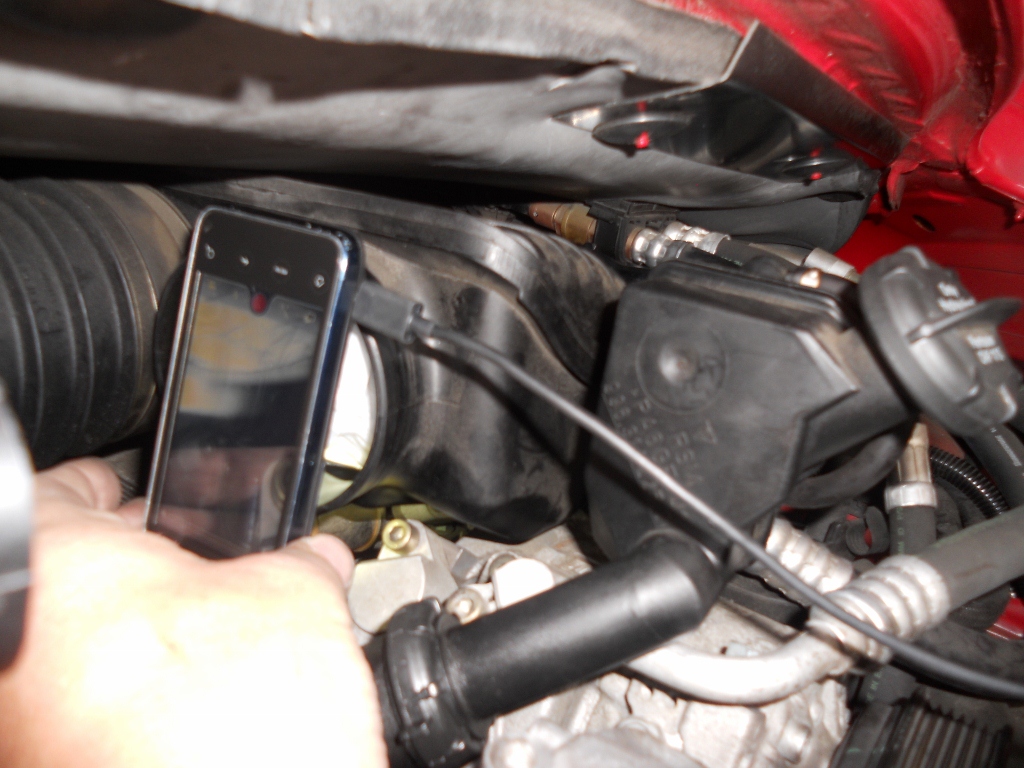
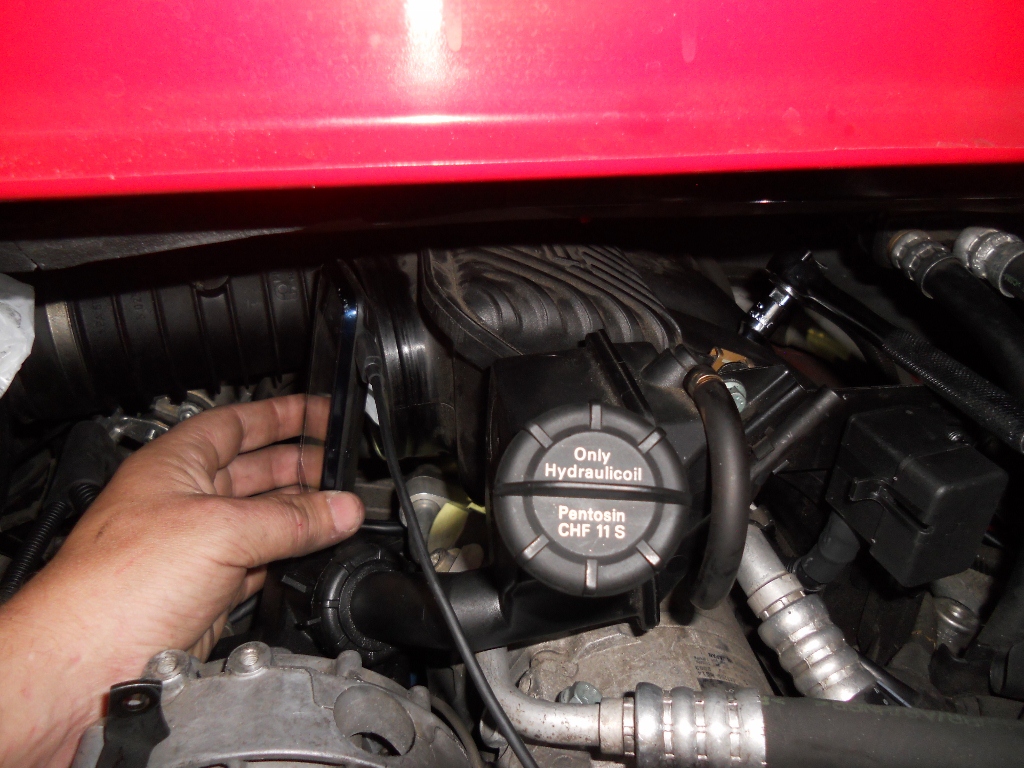
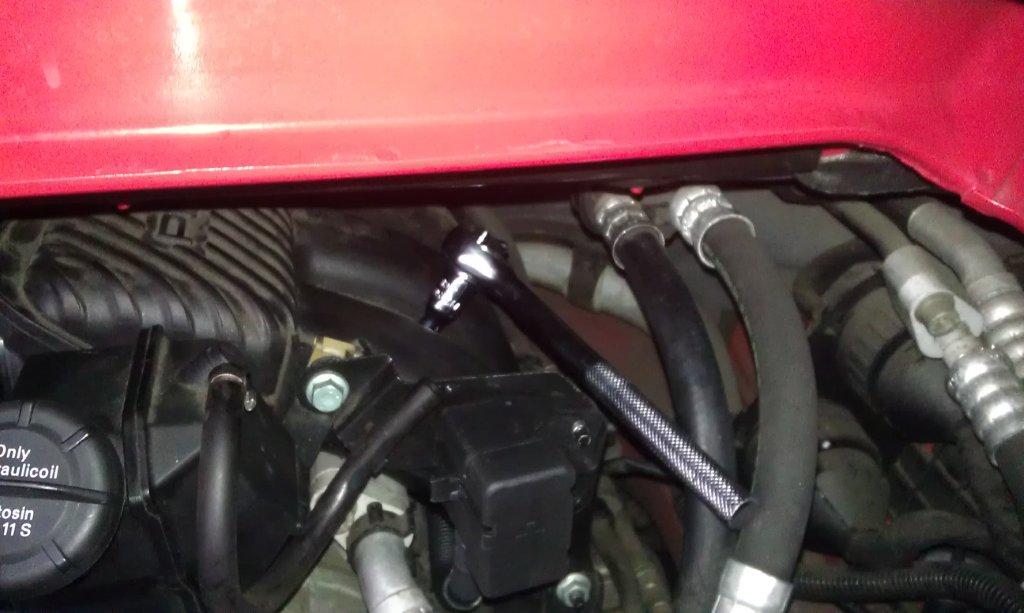
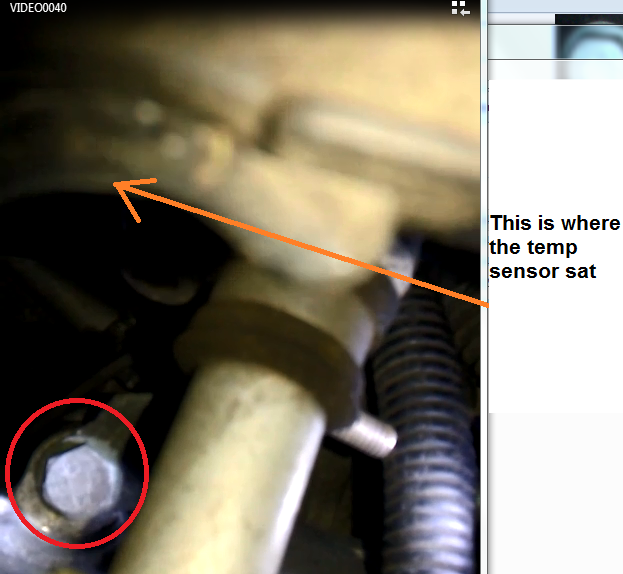
Returning from a long business trip I started to put everything back together today. Right now I'm going through fiddling with the alternator reinstall. I remember how tricky that was last time. Updates: The first image shows how to locate the rear bolt on the AC Compressor. I've removed my wedding ring and slid the solid freon line between my 3rd and 4th fingers (counting thumb as #1) highlighted by the yellow hand drawn lines. By doing so you should be able to touch the head of the bolt. The second image is another shot from beteen the intake runners. The 3rd shot shows how I'm holding my phone in movie mode with my left hand (power lead because my battery is nearly dead) and have my fingers between the solid AC line, while my right hand is holding the top of the bolt. I can see from the phone/camera exactly where the bolt is and my left hand fingers can nudge it into place. The next 2 pictures just show the camera/phone location clearer. The last picture shows the rear bolt angle the same as the front 2 as the extension bar lies between the intake runners. For a video see the follow up post. I ended up repeating the whole procedure due to dropping the temperature sensor rubber grommet behind the AC Compressor during re-install. I can confirm the AC Compressor can be removed in 5 minutes and installed in about 7. Mark
-
Alternator Voltage
MarkC replied to MarkC's topic in 996 Series (Carrera, Carrera 4, Carrera 4S, Targa)
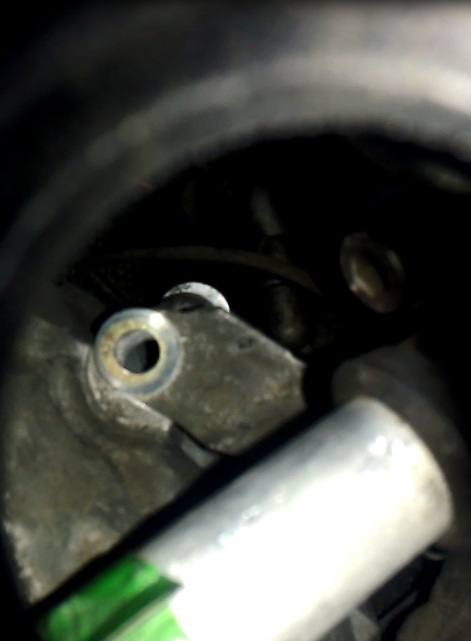
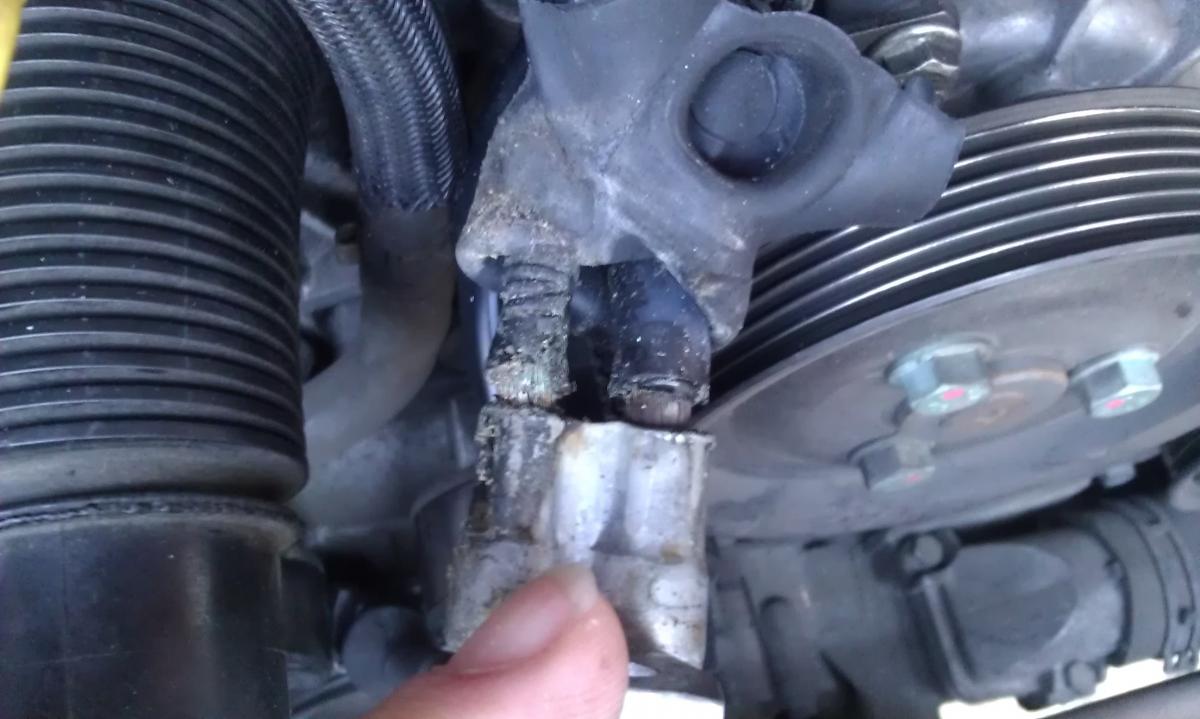
Solved. Here is the offending cable out of the car, waiting for the new part arrival. For me the bolt on the rear of the compressor has to come out (who knows how I'm going to get it back in), see picture - there's a bracket that connects the bolt (red circle) to one of the refrigerant lines that is just not reachable. On the refrigerant side It has a 10mm bolt on one side and a 5.5 female hex on the other (yellow circle), but neither location is accessible unless you have 5 year old's hands. Mark
-
Alternator Voltage
MarkC replied to MarkC's topic in 996 Series (Carrera, Carrera 4, Carrera 4S, Targa)
So I've rotated the reservoir, undone all 3 bolts (removed the front 2 to ensure they aren't catching), but still can't remove the AC Compressor. I can rotate L-R, and pull forward 1/4" and lift the front. Think the rear bolt is catching and not clearing the threads. One of the AC lines catches on the inlet, but don't think that's the problem. Any ideas? Mark -
Alternator Voltage
MarkC replied to MarkC's topic in 996 Series (Carrera, Carrera 4, Carrera 4S, Targa)
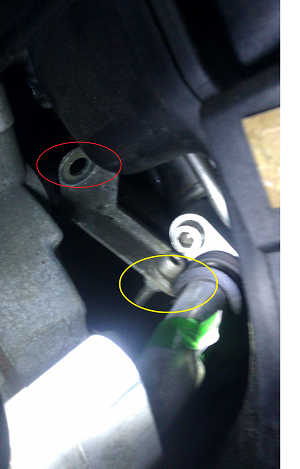
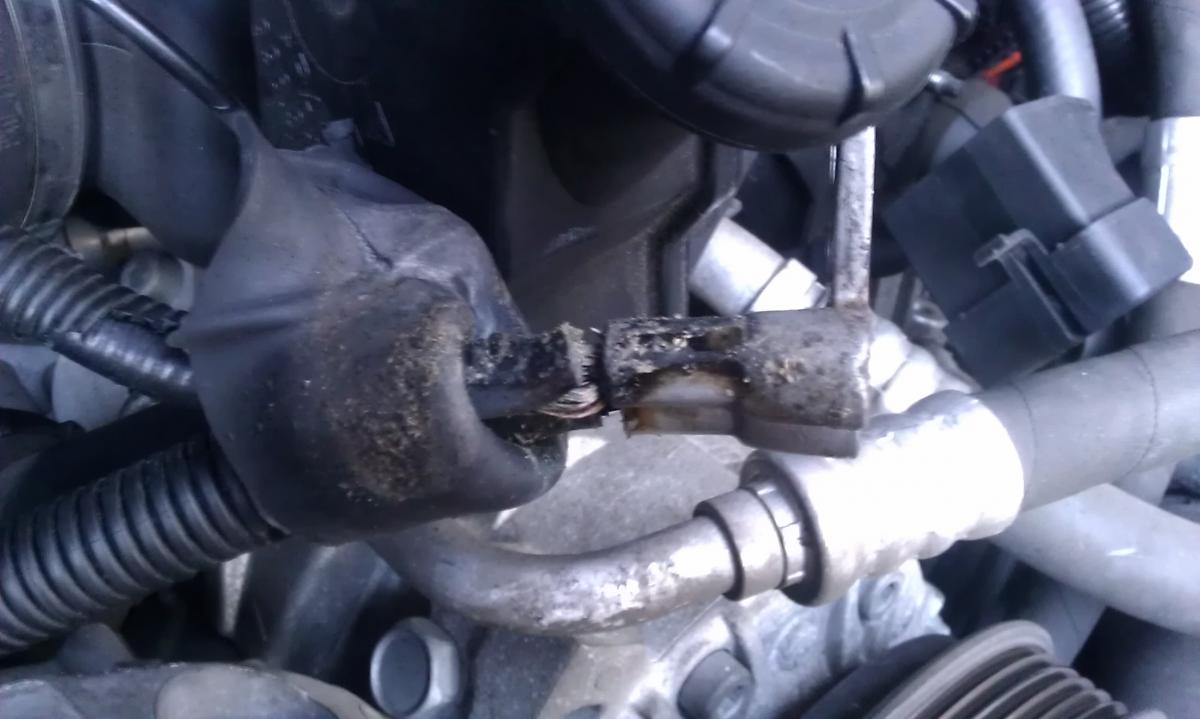
The connection at the starter was the problem, heavily corroded - see first 2 images below. My car spent 3 years in Boston, and the last 10 in Southern California where it hasn't see rain since. Parts ordered, but not in stock, so I have 5 days to figure out the last 2 challenges... I've succumbed to the fact the AC Compressor has to come off. I removed the temp sensor and can see a bolt which looks like it's on a bracket directly below what appears to be a HVAC line - see next image. Is this the correct bolt? Just a little concerned on how to get it back in after removal. Anything else I need to know here (other wires/hoses etc to come off)? Any gotcha on that rear bolt? As far as the power steering reservoir. I presume rotate the red circled (last image) lock at which point whatever is in the reservoir is coming out (unless I suck out what's in there first). Is that correct? Thanks Mark
-
Alternator Voltage
MarkC replied to MarkC's topic in 996 Series (Carrera, Carrera 4, Carrera 4S, Targa)
Ahsai, I've removed airbox, alternator, throttle body and intake plenum - so now have access to the starter wiring. Took less than 1 hour, not bad so far. One of your other posts states the AC compressor must be loosened to remove the wire. Does the jump start post not come apart, so only the #21 wire and spade can be withdrawn? I can see (and almost touch the whole length of the wire) and there appears to be sufficient space for the wire & spade to pass between the compressor and intake. Am I missing something? Might be looking for more guidance if the compressor has to be removed. Is it possible to fish the wire(s) the other way out, i.e. pulled from the jump post, between compressor and intake? Guess I'll find all this out next weekend, after the parts arrive. Thanks Mark -
First of all thanks to Ahsai for the post on the wire and inspection mirror in order to access the rear of the alternator. Same story as many others here, 14v at start up and as the car warms, drops to 13v (with nothing running). Dash volt meter drops to 12v with lights, a/c on, but actually measures 12.7v at jump start post and battery. I replaced the voltage regulator 9 months ago, appeared OK for 3-4 months. During the summer the problem re-occurred. I read many posts on other's problems. When the engine is warm, the voltage drop from the back of the alternator to the +ve post in the engine bay (jump start post ?) is 0.8 volts, obviously way too high. Car is a MY 2000 911 C2. There appears to be 2 different harness images posted from the various discussions, so I'm trying to figure out am do I need to replace the Y cable #28 or #21 from the respective images. Also how difficult is this after the alternator is back out? Hoping not as bad as Equinox 997 post. Is it the same as Ahasi's description in this link? http://www.renntech.org/forums/topic/44682-how-do-i-replace-the-cable-from-the-alternator-to-the-starter/ Thanks Mark
-
Replaced the regulator on the alternator, reconnected battery now need radio code. I tried the VIN at the dealer and they gave me '6565' which didn't work, so presume radio has been changed at some point. Model: CR220 Type: 4362 Ser#: X5015406 Thanks Mark
-
Finally completed with success - thanks for the DIY. Comments: For first timers please circle the specific hex nut - I know it's OTT but it helps. For me the rear facing hex screw was the only one that would not free easily. I recommend finding a long allen key or something with a grip similar to the Porsche unit used to lock down the hardtop (not standard 2" long unit). For me locking pliers on the end of the allen key provided sufficient leverage. It takes more than 30 minutes the first time. For me it took 15 mins from start to having the carpet removed. 24 hours to free the hex screw after leaving WD40 on overnight and a day thinking about how to increase leverage (after hitting with rubber mallet, hammer, etc all failed). About 20 minutes to fill the reservoir with a 5ml syringe (free from a CVS pharmacist who was intriged with what I was trying to do) and the flexi-tube from my 2 year old's sippy cup - took 15 squirts and extreme care with towels and kitchen roll to avoid spilling hydraulic fluid. Then 15 minutes more to reassemble the carpet after first reconnecting the rear deck cover to confirm roof functionality. I also stuffed kitchen roll below the fill hole and around the red/blue flexi-pipes to capture drips and removed the washer before starting to keep it safe. Thanks Mark
-
I am also having a roof problem which sounds like the DIY hydaulic fix. The rear deck lid opens, and front latches release but no roof movement. Have been hearing nasty noises from the mechanism the last couple of open/closes. Following all the information I have stripped the carpet out for the DIY hydraulic fill and can see fluid about half way up the reservoir, but quick question. Which allen screw needs removal? The one in the center between the red/blue cables or one of the 2 smaller screws on the side of the unit (passenger side)? The center screw appears very stiff. Just squirted some WD40 and waiting to see if it loosens. Thanks Mark
-
Took my car to the dealer for 30k service and the roof started working again (park light ok) and the dealer reported no issues. However 2 months later the roof has locked in the down position. No handbrake light with flashing dash light. This time however the door key does not operate the roof, so now I am thinking could be the same as Izzy's thread. However with a completely inoperable top how do I open the panel it to access the reservoir? Does the allen key method previously described (one turn each side) open the panel? Thanks, Mark
-
All, I need to replace the rear tires on my 2000 911 Cab. The fronts are SportContact (not 2) with 5k miles on them however I am having difficulty locating new SportContacts (265/35/18). What's the thought on mixing front/rears, say SportContact2 on the rear as they are easier to source? Thanks Mark
-
Smarttop Issue?
MarkC replied to clundin's topic in 996 Series (Carrera, Carrera 4, Carrera 4S, Targa)
All, Does anyone know if the SmartTop works even if the handbrake light microswitch has failed? Just debating whether to bother replacing the switch or just install the SmartTop. Thanks Mark -
My dash button stopped working today. When I arrived at work with the roof down nothing happened - no dash light from handbrake with flashing cab light when the button is pressed. The door key works so no doubt it is the microswitch on the handbrake. The question to the group is will the SmartTOP work with the microswitch broken? I might just buy/install the SmartTOP and leave the handbrake switch broken (saw the ealier posts, looks like a $10 part and a hour's work). Mark
-
Average life for stock suspension?
MarkC replied to drpaulmarsh's topic in 996 Series (Carrera, Carrera 4, Carrera 4S, Targa)
What about suspension bushes? I do not believe the shocks on my 00 cab are worn but the ride is awful - bangs and crashes. Could just be the California roads or the 18" rims. Just do not remember the test rides in other cars with 17s riding as badly. Makes my old '68 Healey feel smooth. Anyone else feel a 911 is too harsh or am I becoming a wus (rhetorical). Mark -
Hard to engage 2nd gear
MarkC replied to J9000's topic in 996 Series (Carrera, Carrera 4, Carrera 4S, Targa)
How do we access the tranny oil filler? Is this a dealer to do? Thanks Mark