Welcome to RennTech.org Community, Guest
There are many great features available to you once you register at RennTech.org
You are free to view posts here, but you must log in to reply to existing posts, or to start your own new topic. Like most online communities, there are costs involved to maintain a site like this - so we encourage our members to donate. All donations go to the costs operating and maintaining this site. We prefer that guests take part in our community and we offer a lot in return to those willing to join our corner of the Porsche world. This site is 99 percent member supported (less than 1 percent comes from advertising) - so please consider an annual donation to keep this site running.
Here are some of the features available - once you register at RennTech.org
- View Classified Ads
- DIY Tutorials
- Porsche TSB Listings (limited)
- VIN Decoder
- Special Offers
-
OBD II P-Codes - Paint Codes
- Registry
- Videos System
- View Reviews
- and get rid of this welcome message
It takes just a few minutes to register, and it's FREE
Contributing Members also get these additional benefits:
(you become a Contributing Member by donating money to the operation of this site)
- No ads - advertisements are removed
- Access the Contributors Only Forum
- Contributing Members Only Downloads
- Send attachments with PMs
- All image/file storage limits are substantially increased for all Contributing Members
- Option Codes Lookup
- VIN Option Lookups (limited)


insite
-
Posts
341 -
Joined
-
Last visited
Content Type
Profiles
Events
Forums
External Paint Colors
Downloads
Tutorials
Links Directory
Collections
Store
Everything posted by insite
-
more or less. the black box that connects to the window motor is PART of the regulator. it houses the cables that raise and lower the glass. it is permanently connected to the cables and the cable tracks, so to replace the window regulator, you must remove all of it: glass, cable tracks, regulator gear box, and motor. upon installation of the new regulator, you need to adjust it per my earlier post. also of note: if you buy a new regulator, there is a green plastic piece screwed to the bottom of the FRONT cable track. it's important to leave this attached for the boxster (it's removed for the 996). if you buy a used regulator, make sure you transplant the green plastic stop from your old regulator to the new one. if you don't do this, your window will roll down too far in the door and it will rattle around. BTW, this really isn't that difficult of a job. it seems really complicated, but it's not so bad.
-
Anyone....Need link to Fuel Pump replacement
insite replied to CJ_Boxster's topic in 986 Series (Boxster, Boxster S)
hmm. maybe not the MAF. do you have an OBDII scanner? -
Replacing ALL struts due to rattling and 99k mileage
insite replied to CJ_Boxster's topic in 986 Series (Boxster, Boxster S)
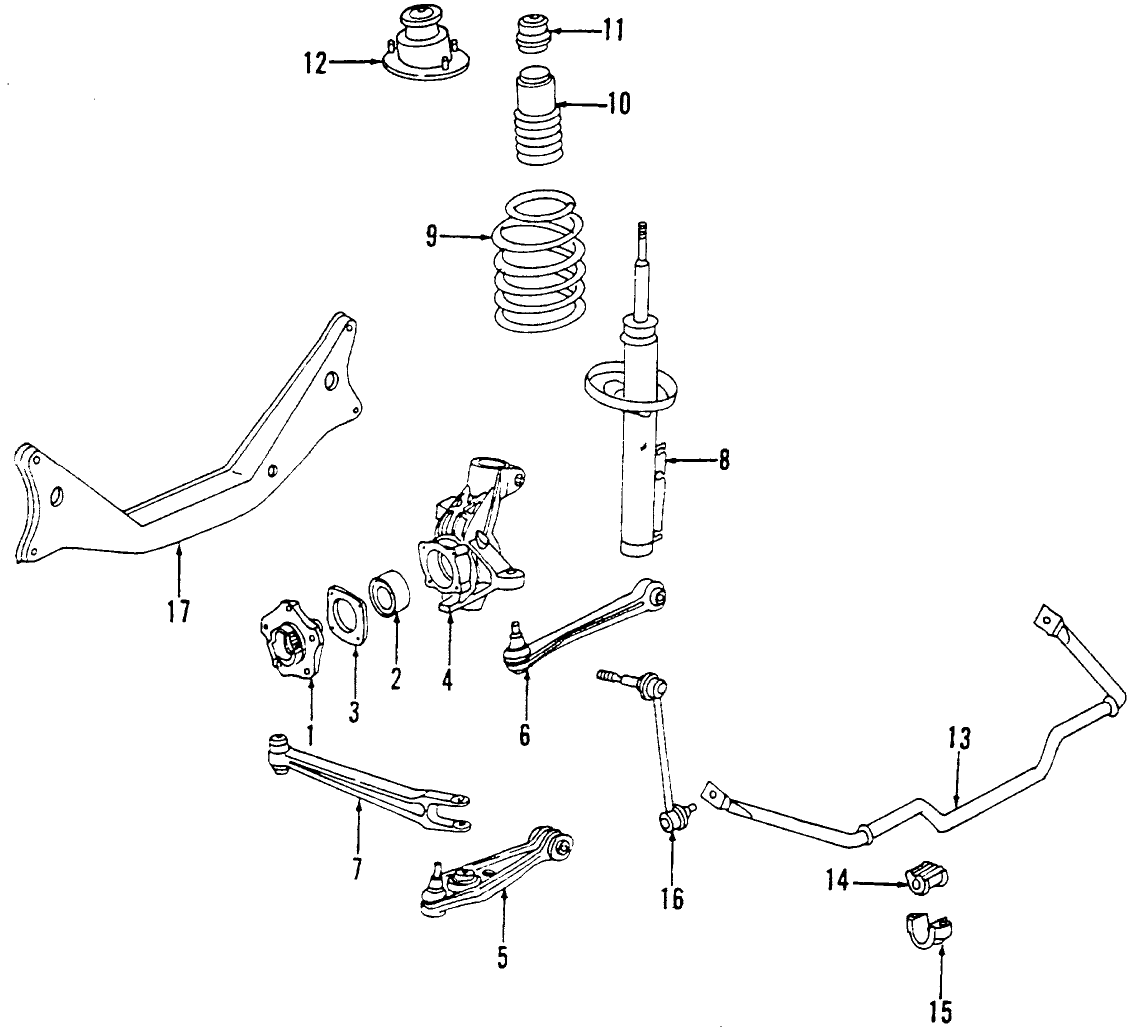
don't know if there's a write-up on it, but it's easy. for descriptive purposes, the lower control arms are the ones that the wheel carriers are attached to (part #5 in the pic below). the upper control arms (a.k.a. track rods) that you want to replace are part #7 in the pic below (FYI, the part number is 986.331.043.07 and they're the same on both sides of the car. jack up the rear of the car & put on jack stands (chock front wheels). remove the rear wheels. remove the bolt that attaches the upper control arm to the lower control arm (bolt head is 18mm, nut is 21mm). remove the bolt that attaches the upper control arm to the chassis. i think the bolt head is 18mm. the nut is designed to stay on the car, but you still have to hold it. it's not a typical nut, it's square. hold it with an 18mm open ended wrench. slide arm out of car. install in reverse order. torque for both bolts is 160NM / 118lb-ft.
-
just replace the regulator. as for the adjustments, they need to be performed when installing a new regulator. the adjustments were also in response to a binding issue some had with the window glass against the window seal.
-
Replacing ALL struts due to rattling and 99k mileage
insite replied to CJ_Boxster's topic in 986 Series (Boxster, Boxster S)
they probably won't be covered by the warranty since it's the bearing in the control arm that goes bad (it's a wear item). this sounds like the control arm issue. three of us boxter owners work together; we all had similar issues and they all turned out to be the upper control arms (a '97 and two '99s) -
agreed. it doesn't matter if there's slack in the motor, the regulator and electronics are designed to compensate for that. if you need a motor, PM me. i bought a used regulator to replace mine and it came with a motor, which i don't need.
-
Anyone....Need link to Fuel Pump replacement
insite replied to CJ_Boxster's topic in 986 Series (Boxster, Boxster S)
almost guarantee it's your MAF. if you want to check, unplug your MAF and go for a drive. when the MAF signal isn't present, the car uses a default fuel map to run the car. if the problem goes away with the MAF unplugged, you have found your culprit. -
Is the regulator the black housing attached to the motor? If so I read a post where I guy said the black bushing has the round holes that attach to the large gear round out. Does this sound like the condition? If so I have found several motor/regulator assemblies used and cheap. the regulator is definitely the problem. the regulator itself is comprised of the black housing attached to the motor AND the rails / cable that move the glass up and down. it's not too tough to change. read your other post (i just replied to it) and follow the adjustment instructions i posted after you install the new regulator. FYI, you can get a used regulator from german auto dismantlers for around $85.
-
no one has mentioned adjusting the window regulator yet. it is possible to adjust the regulator to change the pressure against the door seal. if you open the door, there are four rubber plugs underneath the door. the middle two cover the mounting points for the regulator halves. if the bolts are loosened, they are designed to slide in (toward the car) and out (away from the car). to properly adjust them, slightly loosen the bolts and slide them in (toward the car) as far as they will go. tighten them. with the window up, close a sheet of paper in the door between the window and the window seal. try to pull the paper out. if it comes out, loosen the adjustment bolts, slide them out (away from the car) approximately 10mm and tighten. test w/ paper again. repeat this process until the paper doesn't slide out. replace cover plugs and you're done. it's also possible that the window regulator allows the window to roll up too far. porsche specs the window glass to overlap the seal by 4mm (evenly) across the top seal. if the overlap is greater than 4mm or if the overlap is uneaven (for instance, 2mm overlap at the front and 6mm overlap at the rear), than it is necessary to adjust the regulator stops. to do this, roll the window down (you can't reach the adjustment screws with the window up) and open the door. under the door, remove the outer two rubber plugs (next to the ones mentioned in the first paragraph). this will expose the closure height adjustment screws. turn the screws clockwise to lower the closure heigh or counterclockwise to raise the closure height. try two turns and close the window / door to check seal overlap. repeat adjustment process until the glass overlaps the seal about 4mm accross the top of the seal. you are done.
-
-
Replacing ALL struts due to rattling and 99k mileage
insite replied to CJ_Boxster's topic in 986 Series (Boxster, Boxster S)
I see, is the noise typically a chatter or rattle at low speeds over bumps or cracks in the road, Majority of the noise is coming from my 2 rear struts...Any idea what that could be...i heard that when struts get so old that something internally will rattle and chatter cause of wear or miss-alignment due to excessive wear. it's likely not your struts. a chatter / clackity-clack in the rear (more prominent when cold) is usually due to a worn bearing in the upper control arms. the upper control arms must be replaced as the bearings are not servicable. the strut top mount bearings mentioned before are generally the culprit if you hear noises from the front (again, not necessarily the strut itself). -
it runs up under the fender to the ABS modulator. if you open the front trunk & remove the plastic covering from around the master cylinder, you'll see the ABS unit. if you remove the wheel well liner, you'll see the brake line.
-
i had it up in the air last night with the wheel off to change a control arm. got under it with some good light. the mount is completely shot. monday i just glanced at it and the sleeve appeared centered in the rubber. last night, the sleeve was sitting completely at the top of the mount ring. very counterintuitive; it feels NOTHING like a worn motor mount to me. wonders never cease. new mount will be on the way when my suppliers open up for the day. Thanks again for your help.
-
Best Exhaust Back-Pressure for 2.7L Engine?
insite replied to edevlin's topic in 986 Series (Boxster, Boxster S)
excellent points! -
back to square one. it's not the engine mount. i'm going to elaborate as best i can to describe the issue. it really feels / sounds almost exactly the same as a bad CV joint in a FWD car. it seems to come directly from (or very near to) the right rear wheel. it happens whether i turn right or left, although it seems to happen at an earlier threshold during left hand turns. it will happen during slower tight turns or when cornering fairly aggressively in sweepers. the problem is nonexistent at any RPM when not moving, moving in a straight line (accel or decel), or during leisurely turns. i'm inclined to think it's indeed a CV joint, but i've yet to encounter another person who has had one go bad, so i don't know how the symptoms manifest themselves in these cars. any thoughts are greatly appreciated.
-
Best Exhaust Back-Pressure for 2.7L Engine?
insite replied to edevlin's topic in 986 Series (Boxster, Boxster S)
if by intake you mean strictly the filter / tube, tuning the exhaust indeed has nothing to do with the picture, although ensuring your intake is unrestrictive enough to take full advantage of a freer exhaust is important. for instance, in a car with significant cam overlap, the exhaust scavenging effect of a header will actually pull intake air into the cylinder. a handicap on the intake plumbing would reduce this effect. on the other hand, if by intake you include the manifold, this should be matched to the exhaust for maximum benefit. the intake runner lengths / diameters should be tuned to the same desired RPM range as the header. -
Strategy for Dealing With Possible Engne Problem
insite replied to KevinH90's topic in 986 Series (Boxster, Boxster S)
i had a very similar experience with a bad tank of fuel. -
Best Exhaust Back-Pressure for 2.7L Engine?
insite replied to edevlin's topic in 986 Series (Boxster, Boxster S)
and to add to that, the only time comparatively large diameter tubing / ~ zero back pressure is desirable in a normally aspirated car is under racing conditions. scavenging won't occur at low revs with that type of set-up (no low range torque) but WILL occur at very high revs to maximize peak power. tractability is greatly reduced (not streetable). this is a difference between street and race headers (tubing size / length determines 'power band' within the rpm range). -
Best Exhaust Back-Pressure for 2.7L Engine?
insite replied to edevlin's topic in 986 Series (Boxster, Boxster S)
true, back pressure, per se, is unnecessary. VELOCITY, however, is critical. generally what happens when those out of 'the know' try to reduce back pressure is that they enlarge tubes in the system. this can result in sub-optimal exhaust velocity, which will in turn inhibit the ability of the system to scavenge ('suck') gasses out of the system. -
very, very interesting! you may have saved me a wasted axle. funny thing is, i first thought a tire was rubbing because the vibration felt deadned by rubber to me. a bad mount could be my issue. Thanks!
-
really? it doesn't happen under ANY condition while driving in a straight line.
-
i think it's the PCV valve (honestly).
-
i'm trying to diagnose an issue. basically, when i take a hard corner in either direction, i get a 'rumble' from the rear right of the car. it sounds / feels the same as a front wheel drive car with a bad CV joint. i've not heard of many going bad in the box, so i wanted to get some opinions. i've checked to make sure the tire's not rubbing anywhere, i've checked the play in the wheel bearing (none), and i've checked the CV boots (fine). thoughts? thanks in advance.
-
instrument clock/oil level indicator missing?
insite replied to porschestuff's topic in 986 Series (Boxster, Boxster S)
the bulb lights up the LED stuff; without the bulb, the LED can't be seen. probably when you're pushing on it, your jiggling the bulb and the filament is temporarily making contact and lighting the bulb. it could also be a poor contact between the bulb housing and the circuit board. it's cake to check / replace. -
yup; e-gas started in 2000.