Welcome to RennTech.org Community, Guest
There are many great features available to you once you register at RennTech.org
You are free to view posts here, but you must log in to reply to existing posts, or to start your own new topic. Like most online communities, there are costs involved to maintain a site like this - so we encourage our members to donate. All donations go to the costs operating and maintaining this site. We prefer that guests take part in our community and we offer a lot in return to those willing to join our corner of the Porsche world. This site is 99 percent member supported (less than 1 percent comes from advertising) - so please consider an annual donation to keep this site running.
Here are some of the features available - once you register at RennTech.org
- View Classified Ads
- DIY Tutorials
- Porsche TSB Listings (limited)
- VIN Decoder
- Special Offers
-
OBD II P-Codes - Paint Codes
- Registry
- Videos System
- View Reviews
- and get rid of this welcome message
It takes just a few minutes to register, and it's FREE
Contributing Members also get these additional benefits:
(you become a Contributing Member by donating money to the operation of this site)
- No ads - advertisements are removed
- Access the Contributors Only Forum
- Contributing Members Only Downloads
- Send attachments with PMs
- All image/file storage limits are substantially increased for all Contributing Members
- Option Codes Lookup
- VIN Option Lookups (limited)


insite
-
Posts
341 -
Joined
-
Last visited
Content Type
Profiles
Events
Forums
External Paint Colors
Downloads
Tutorials
Links Directory
Collections
Store
Everything posted by insite
-
jules - i have experienced similar symptoms twice. once, it was bad fuel purchased at a gas station in the middle of nowhere. the high octane they were selling was very old and probably had some water in it. the other time i had similar symptoms, it was the oil separator. the bellows that connects the oil separator to the crankcase was shredded. when it was cold outside, any attempt to give my car gas would result in the RPMs dropping dramatically, like it was going to stall. once it was warm, it seemed okay, but still hesitant at times. try inspecting your oil separator, especially if it's the original since it's ten years old.
-
well that certainly makes things a bit more complicated! can you describe the throttle hesitation bit as best you can? does it happen from a stop? from any constant speed to acceleration? on decel? this is a manual trans, correct?
-
it looks like the car is trying to lean itself out above idle and then allow the mix to richen at idle. this indicates a car that is likely a bit starved for air at engine speeds above idle; at idle it seems to get enough air. check your air cleaner. check for vacuum leaks on the secondary air injection system. also, it technically could still be your MAF. let it run for awhile without a DME reset and see if it throws a code. in the meantime, check the stuff i mentioned above.
-
use the generic OBD II tool again; it should tell you 'readiness' status. if all is OK, adaptation is complete and we can begin to diagnose again.
-
not really. i have run zero rear toe before, though. THAT was touchy.
-
i know, but so far, your adaptation process is leading me to believe that you may still have a problem there. we'll wait until it completes to further diagnose.
-
check these every time you drive the car as it adapts. if they continue to drift negative, it's your MAF. eventually, the car will starve for fuel when you lift off the throttle. the computer will try to compensate with an STFT correction and breach the rich threshold, throwing a code. confirm this when your CEL comes on at a stop light (my gut says it will when your adaptation is complete). once this happens, unplug your MAF and go for a drive. your throttle hesitation issue should be cone, as the DME goes to a default fuel map when it senses an open MAF circuit. this will confirm the bad MAF.
-
going to the track next thursday; if all goes well i'll have a GPS data logger on board, so i'll post some data and video when i get a chance.
-
thanks; hadn't reviewed a durametric output before. plugs is a thought. vacuum leak on that side of the motor is another thought. use propane or carb cleaner to search for a vacuum leak.
-
can you post your fuel trims?
-
jmatta - is that pic w/ H&R springs? the front looks to be about the same ride height as my RoW M030. for some reason the front of my car seems lower than those of my buddies w/ M030. who cares; my car's faster!
-
well there's a simple answer to that. my girl won't let me get spare wheels / tires / trailer until we move to a bigger place w/ more storage. i'll go along with this just fine considering all the crap she lets me get away with (i am a child). :-) in the meantime, i'm destined to run dual use tires. know of an aggressive street / track tire that will last at least 5K miles and work in the rain? right now i've found that the KDW2's or the RE-050A PP's give me the most bang for the buck; i still go through three - four sets a year. it's killing me.
-
i've continued to play around with my settings. i like no toe up front and less than 1/16" in back. i'm currently maxed with front camber at -1.6. you may not be able to reach this setting with your car, it just depends on the vehicle. you can dremel out the camber slots in the strut towers if you need to get more front camber. i'm still running -2.0 in back. for my driving style, which sounds a lot like yours, my tires actually last longer this way. as for tire pressures, if you've got the base boxster M030 sways, use 30/32. if you have the base rear and the S front M030's, use 32/32. if you still have a choice, get the base rear sway and the S front sway. i recommend this on both S and base models (it's the thickest of each); it's much more neutral than stock (less understeer).
-
Boxster Engine Mount Replacement
insite replied to BoxsterRS's topic in 986 Series (Boxster, Boxster S)
here's a pic. i think mainly it helps maintain caster (and hence camber) through the corners. bottom line: it's more crisp.
-
Boxster Engine Mount Replacement
insite replied to BoxsterRS's topic in 986 Series (Boxster, Boxster S)
i used Flexane 80 to do mine. i notice a bit of extra vibration at idle and when decelerating past 2400 RPM. other than that, it's fine. the idle really is a bit more harsh. not sure how much worse the Flexane 94 would be. Once the 80 cured, it was pretty darned hard. FYI, i also filled my control arm trailing link bushings with Flexane 80 and baked them to cure. this made a MARKED difference in handling crispness. -
i like the M030 bars; they're made by porsche and are fairly cheap.
-
toe in about 1/32" on each side. you'll have a hard time setting thrust angle without an alignment rack or toe plates.
-
you actually do away with the factory springs. the coil-over is a combination strut / spring that usually allows adjustable damping (compression / rebound) settings and adjustable ride height. some also come with built-in camber plates. not necessary for street driving, but for serious racers, they help.
-
you can get the same M030 RoW kit from sunset for about the same price (shipped). they'll expidite shipping for $20 - $30.
-
Noisy Boxster Rear Suspension
insite replied to w_pienaar's topic in 986 Series (Boxster, Boxster S)
thanks, geoff. those are the lower control arms. we're discussing the rear uppers. for those who have never seen these, they are similar to the GT3 lower arms, which separate from their bearings. they are shimmable for added camber. the fabcar arms have rebuildable ball joints. the only problem is cost. it's around $1000 for the 4 bearings + another $1000 per fabcar arm. then, add another $200 or so for shims and fasteners. basically, unless you race in IMSA or Rolex, you probably won't spend the dough. -
Noisy Boxster Rear Suspension
insite replied to w_pienaar's topic in 986 Series (Boxster, Boxster S)
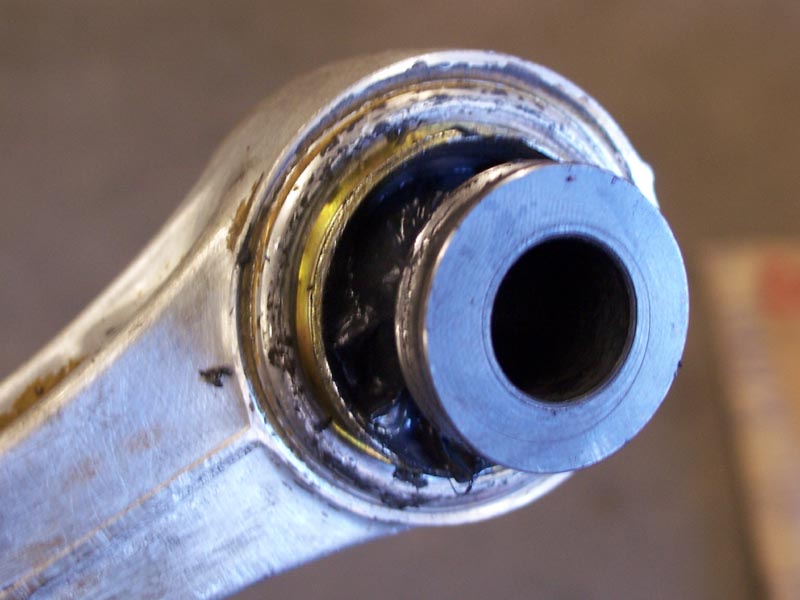
once you remove the boots, you will see on the 'crimp' side that the crimp retains a brass ring and that the brass ring holds the bearing cartridge in. first, press the brass ring in (VERY lightly). then, press the crimp. i suppose you could try just pressing the crimp; i didn't do it that way though. as for the noisy arm, i did NOT remove the bearing from that arm. i used the above process on both arms. one seems to have worked. the other seems worse to me. post your results / modifications when you finish. maybe we can nail down a process together for repairing these things. good luck. -
Noisy Boxster Rear Suspension
insite replied to w_pienaar's topic in 986 Series (Boxster, Boxster S)
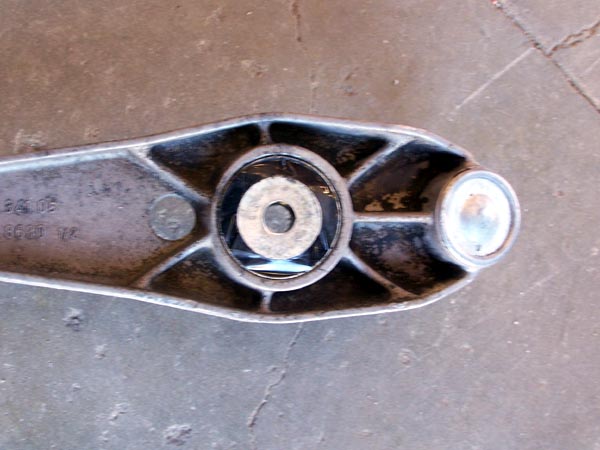
absolutely do NOT remove the bearing. you'll never get it back in with the crimp in tact. the loose bearing in the photo was removed from a bent control arm to see if there were any part numbers on it that may lead us to a replacement supplier. -
Noisy Boxster Rear Suspension
insite replied to w_pienaar's topic in 986 Series (Boxster, Boxster S)
this is complete. i tried this with two control arms. after one month, the right side is silent and the left is louder than ever. i'll attempt a repair on the left again to see if i can't figure this out for good.....not sure when i'll get to it though. BTW, CJ - in your pic, you are correct about where to press. you have to press the cartridge in first though.
-
Noisy Boxster Rear Suspension
insite replied to w_pienaar's topic in 986 Series (Boxster, Boxster S)
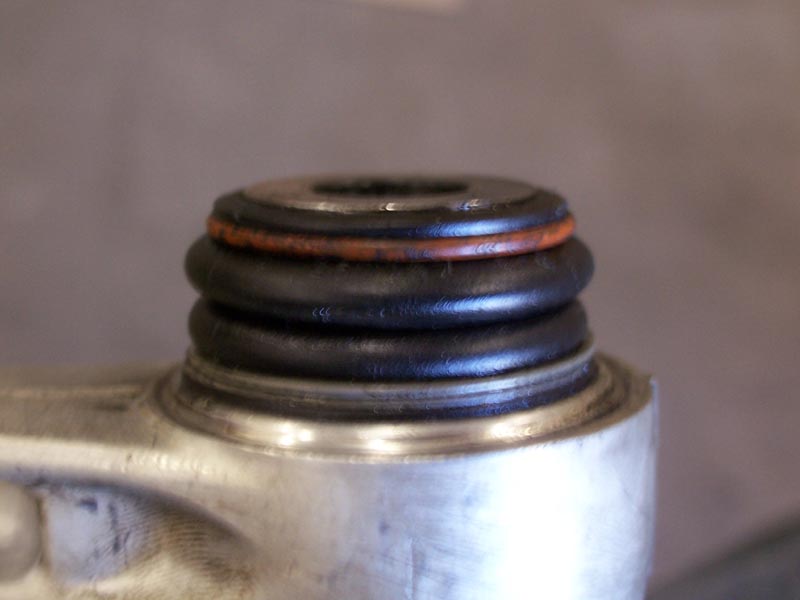
install the boots. the lower snap ring needs to be assembled to the boot and threaded down to the base of the boot (it's too hard to open / slide in place; threading works better).
-
Noisy Boxster Rear Suspension
insite replied to w_pienaar's topic in 986 Series (Boxster, Boxster S)
then grease it....