Welcome to RennTech.org Community, Guest
There are many great features available to you once you register at RennTech.org
You are free to view posts here, but you must log in to reply to existing posts, or to start your own new topic. Like most online communities, there are costs involved to maintain a site like this - so we encourage our members to donate. All donations go to the costs operating and maintaining this site. We prefer that guests take part in our community and we offer a lot in return to those willing to join our corner of the Porsche world. This site is 99 percent member supported (less than 1 percent comes from advertising) - so please consider an annual donation to keep this site running.
Here are some of the features available - once you register at RennTech.org
- View Classified Ads
- DIY Tutorials
- Porsche TSB Listings (limited)
- VIN Decoder
- Special Offers
-
OBD II P-Codes - Paint Codes
- Registry
- Videos System
- View Reviews
- and get rid of this welcome message
It takes just a few minutes to register, and it's FREE
Contributing Members also get these additional benefits:
(you become a Contributing Member by donating money to the operation of this site)
- No ads - advertisements are removed
- Access the Contributors Only Forum
- Contributing Members Only Downloads
- Send attachments with PMs
- All image/file storage limits are substantially increased for all Contributing Members
- Option Codes Lookup
- VIN Option Lookups (limited)

kgoertz
-
Posts
91 -
Joined
-
Last visited
Content Type
Profiles
Events
Forums
External Paint Colors
Downloads
Tutorials
Links Directory
Collections
Store
Everything posted by kgoertz
-
My 997 bucking/misfire
kgoertz replied to active 997's topic in 997-1 Series (Carrera, Carrera 4, Carrera 2S, Carrera 4S)
Does the problem happen when the engine is warm? My car occasionally hesitates when it is first started and I'm pretty sure the problem first appeared after installing 200 cell cats. But is is fine after a few minutes of running. I'm assuming it is caused by reduced backpressure and the computer doesn't compensate for it while it is still in open-loop mode while the O2 sensors are heating up. But that is just my theory. -
Thanks Mijostyn. Nice explanation. I'm still looking for a nice set of 18" rims to downsize mine and your argument helps justify the cost.
-
Thanks Mijostyn. That was an informative post. My wheels have never been perfectly balanced and I think I'll try a local speed shop with your advice. Nice. I was also wondering about the impact of low side-walls on a 911 and I would be interested in understanding why cornering would be better with a larger side-wall. The PO had installed (beautiful) 19" rims on my 996 which was really only designed for 18". At one point I was running 315/25R 19 on the rear which is getting pretty thin. I've been looking around to downgrade to 18" rims mostly to improve ride and handling but I'm not sure how it would impact track/spirited driving. I assume the impact would be similar to downgrading from 20" to 19" on a 997.2.
-
Sport Techno wheels
kgoertz replied to moosey's topic in 996 Series (Carrera, Carrera 4, Carrera 4S, Targa)
Unfortunately I can't say for sure. The previous owner did the installation and I didn't know enough at the time to ask the right questions. I don't believe there were any other modifications though. The rest of the suspension is stock, brakes are stock and the fenders don't look like they were touched. I thought Porsche listed the Sport Techno rims as an option even for a narrow body 996. I had found a link showing that they were available with an offset that looked correct (63mm). They were 18x11 et63 with a part number of 996.362.142.52. -
Sport Techno wheels
kgoertz replied to moosey's topic in 996 Series (Carrera, Carrera 4, Carrera 4S, Targa)
FWIW. I was actually looking to replace my 19" rims with 18" sport techno rims. I am currently running 11x19 rims now on the rear without any problems (also on an 02' Targa). I'm not sure of the offset but they do stick out a little farther than they should. I don't mind but some might. This is lowered with a Techart coil-over suspension which is similar to pss10. -
I recently replaced my original motor mounts with semi-solid mounts from RSS. They are similar to the Wevo semi-solids (from the research I did ahead of time). They were roughly double the price of the stock mounts but the reviews on them were really good. I've had them in for over a month as a DD. Overall I'm happy with my decision and would do it again, although are definitely some negatives. I do plan on taking the car to the track later this year and I'm expecting a slight improvement. The positives are: Slight improvement in handling even on the street. The car feels just a little bit tighter around corners Shifting is a little smoother and it got rid of the the judder of a sloppy shift Engine noise in the cabin has noticeably increased under throttle, but I think that is a good thing. It sounds much more raw like I had expected a 911 to sound in the first place :-) There main negative is that engine vibrations are now a little more noticeable. I can now tell which RPMs result in the most vibration....~3K is probably the worst. Cabin noise is also a little louder which is a positive under throttle, but not quite as ideal when cruising. Neither are a big problem and they make the car feel a little less than a GT and a little more like a sports car.
-
I don't have any information on offsets, but I have an 02 Targa (NB) with 19x11" rims. They were on the car when I bought it, but I've been contemplating dropping back to 18" for a long time. With 19"s the ride is a little harsh and I'm convinced that the balance would be a little better with 18"s, plus they stick out slightly from the body. Having said that, the 19"s look awesome on the car (IMHO) especially when it is lowered to European specs (or slightly lower).
-
Both Fabspeed and Maxspeed-Motorsports are very good quality and almost certainly better than stock. I installed mine myself on a Saturday morning in about 4 hours but that included polishing a few of the clamps and taking my time. You should be able to replace with aftermarket for ~$2K installed. Or go used.
-
If you search on this site for catalytic converter I'm sure you'll find some good information. I replaced both of my cats last year with aftermarket ones due to a rattle. The main options are - replace with used (they seem to sell anywhere from ~$250-800 each) - replace with OEM (I believe you can find them substantially cheaper than you were quoted). For example I just found them at autoatlanta.com for just over $1800 each but I remember finding them for less than that last year - replace with OEM style aftermarket (same design but usually 200 cell cats). Maxspeed-Motorsports is one vendor that makes these - replace with aftermarket X-pipe design (sounds slightly meaner and possibly a tiny gain in HP using 200 cell cats) There are several vendors for the x-pipe design including Fabspeed, Maxspeed-Motorsports (NHP) and a few others that I have forgotten. The cost of these for a pair are usually still less than the cost of a single OEM cat. In my case I went for the aftermarket X-pipe from Maxspeed-Motorsports in Montreal and I've been extremely happy with them. I have been running them for about 8 months so far. I was expecting to take them through emissions (and pass) in Ontario last week, but as it turns out the new emissions test simply checks that the cars computer tests have all passed. My cats run fine and there are no codes, so I passed without any issue. Although I would be very surprised if they didn't pass a tailpipe emissions test. I would also highly recommend Fabspeed just given what I have read online here and my personal interactions with them. But I also liked the quality from Maxspeed and they were cheaper and easier to ship within Canada. The only negative I have found is that my car hesitates a little at low RPM for the first few seconds of driving when it is really cold. I'm not sure it is the cats, but I have a feeling the fuel maps in open-loop mode at startup are not quite correct for the reduced backpressure.
-
Shifter Trim Refinishing
kgoertz replied to fbgh2o's topic in DIY Articles - Carrera (996) - Common Fixes and Repairs
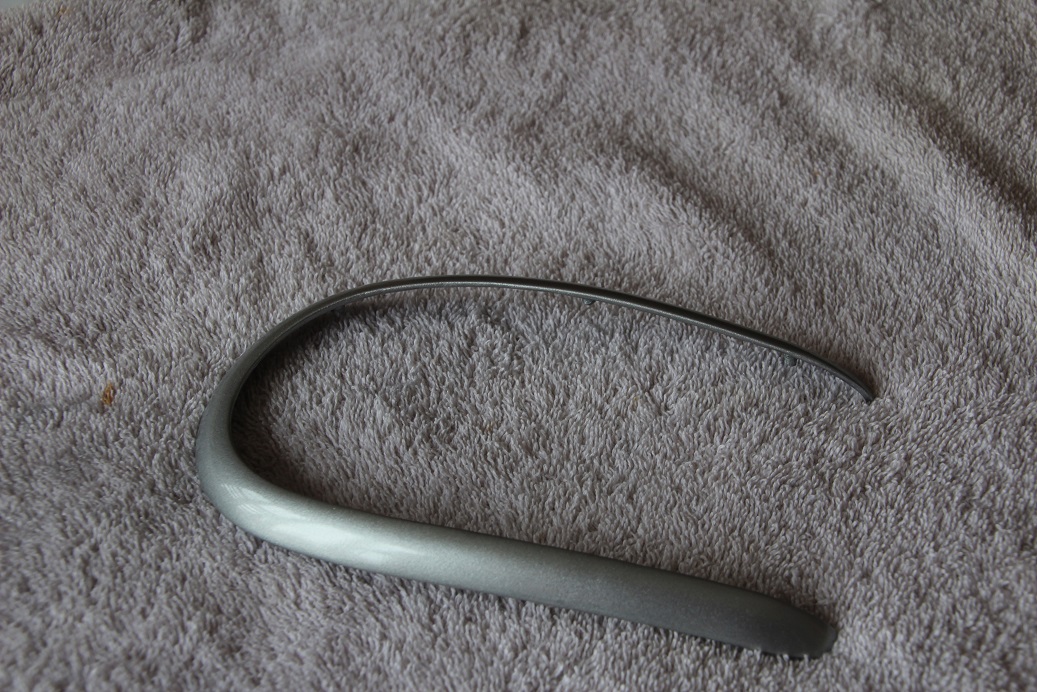
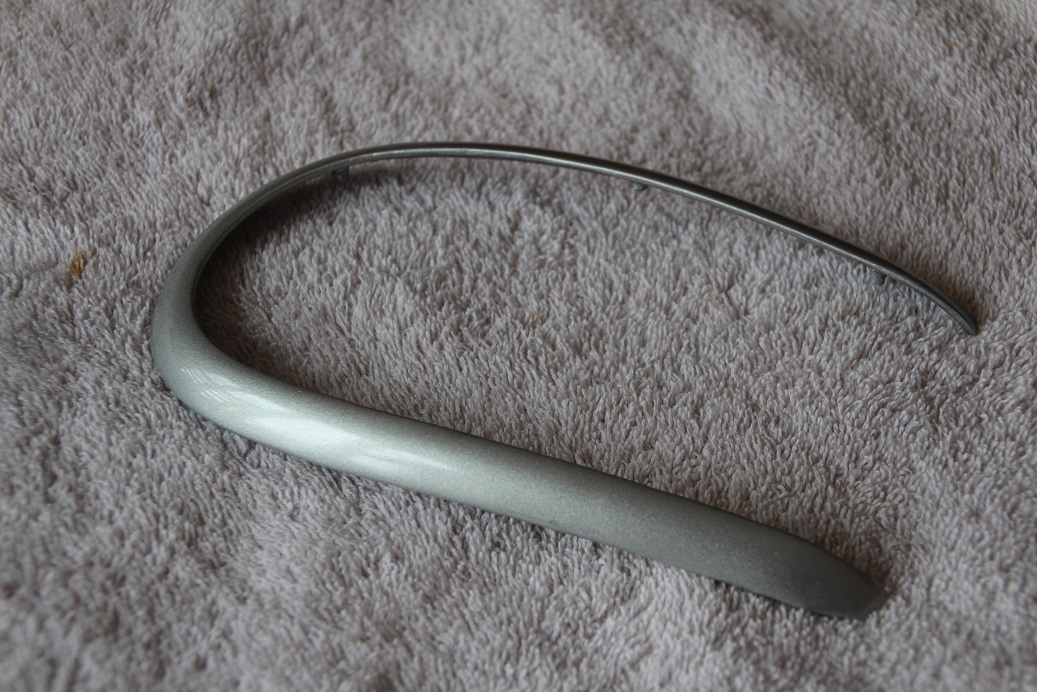
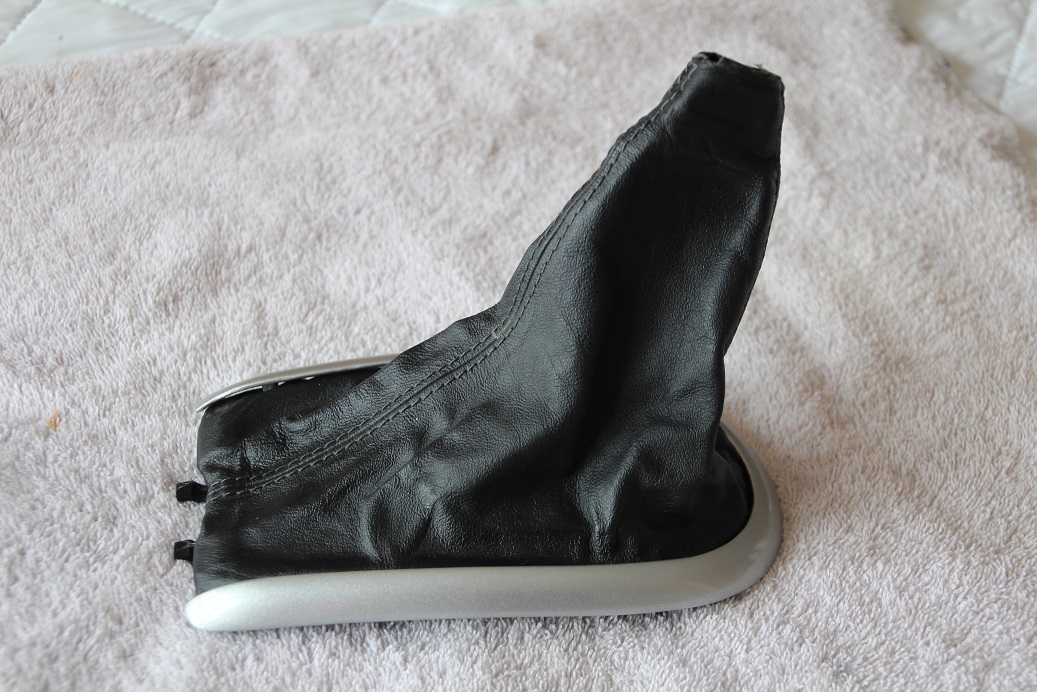
Thanks fbgh2o for the DIY! I just finished repainting my trim and I thought I'd post my results and some tips I learned. I'm very happy with the results. It is almost perfect and much, much better than before. I'm thinking about painting a few other interior pieces next :-) I took the same approach as the instructions but with a few differences: The paint I used was Testors Lacquer Diamond Dust (1830MT) on the recommendation of another rennlister. I really like the metallic look I didn't use a primer but I did have some adhesion promoter based on another recommendation. It seemed to work really well. I tried using a Dremel with a cylinder sanding disk to remove the paint. It worked quickly, but it also scratched the surface which required quite a bit of sanding to clean up. Sadly I only learned that after the first coat. See next bullet. The metallic paint really, really shows any surface flaws. I thought the trim plastic was perfect but after the first coat I realized it wasn't I found that 400 grit wet sandpaper was about right to smooth the surface and remove paint due to overspraying. 1000 grit worked well to remove dust and imperfections between coats Painting took a little practice. After my first attempt I found the best approach was to use very light coats. Spraying too much easily resulted in runs. But since the paint dried in 20 minutes it was pretty easy to do 5-6 coats The paint was fairly soft even when completely dry. I decided to coat with about 3 light coats of a lacquer clear coat. It worked great and brought out the finish even more Since I painted the back of the trim the little posts that held the trim to the leather boot wouldn't quite fit. I had to sand them down, and then use a bit of glue to attach it back to the boot I'm very happy with the results. Next on my list is to try the same paint on the ashtray delete I just ordered. Note that I had the white balance set incorrectly in my first picture but I corrected it for the final shots :-) These are the final trim just before installing
-
Porsche parts - used/salvage
kgoertz replied to Silver_TT's topic in 996 Series (Carrera, Carrera 4, Carrera 4S, Targa)
Just to follow up on comment #9. I have had the aftermarket cats on for almost a year without any significant issues. Definitely no CEL, although the engine seems to hesitate a little when it is first started and it is cold outside (ie <5 degrees celcius). I'm not sure it is caused by the cats though but I think I remember hearing other similar stories. My guess is that the backpressure has changed enough to cause the engine to not run perfectly when it is still in open-loop mode. It isn't a big problem and it just means revving the engine slightly higher than normal when it is very cold (but still below 3K) and it goes away after about 30 seconds. I upgraded primarily to fix a rattling cat and I didn't want to put another 10 year old cat on to replace since the local options were asking ~$800 each. I also didn't want to spend as much on a single new OEM cat as it would cost to replace both with a better system. I installed them myself on a Saturday morning. It took 3-4 hours of moving slowly, but it was a bit easier than I was expecting. The MaxSpeed cats had an adjustable clamp that compensates for any slight deviations in position, although they did fit perfectly. The O2 sensors fit without modification although one of the wires is now a little tight and didn't fit in the original mounting clamps. The biggest challenge is getting the bolts off between the cat and the exhaust manifold without breaking them, but even if they break it isn't a huge problem. Spraying on a some releasing oil the night before (I forget the name but similar to WD40) solved that problem. I actually have to get it emission tested in Ontario in the next few weeks but I'm anticipating an easy pass based on feedback from others with the same or similar cats. Mine actually started rattling at the end of a 4 hour track day. Once I determined it was the cats I drove home and looked online and found a few other people who had run into the same problem. One of the comments was from someone who had replaced the cats with OEM multiple times and he tracked the car often but I don't really know if that was common. My guess is that the cats are fine when new, but the added stress of the heating/cooling cycles when tracking the car shortens their life span. But that is just my guess. The aftermarket ones (ie Fabspeed or NHP from MaxSpeed) are much higher quality than the OEM ones in terms of appearance, steel, and the welds but I have no idea how well the 200 cell cats stand up yet. My $0.02 would be to replace with used in your case if you can find one for a reasonable price, and if not call up one of the reputable after-market companies. -
Porsche parts - used/salvage
kgoertz replied to Silver_TT's topic in 996 Series (Carrera, Carrera 4, Carrera 4S, Targa)
Personally I would recommend going aftermarket as long as you aren't concerned with keeping the car completely stock. The stock cats are known to break and rattle if you stress them out on a track day. Mine died last year and I decided to replace them with an X-pipe design from MaxSpeed Motorsports for ~$1500 which is a few hundred more than their stock-looking design. They sound better than stock (in my opinion) and might add a few extra hp. Much cheaper than stock replacement and I'm willing to bet they will last much longer than a used set. There are quite a few options that are discussed here including Fabspeed and MaxSpeed. I installed them myself and posted an article on here about the experience. -
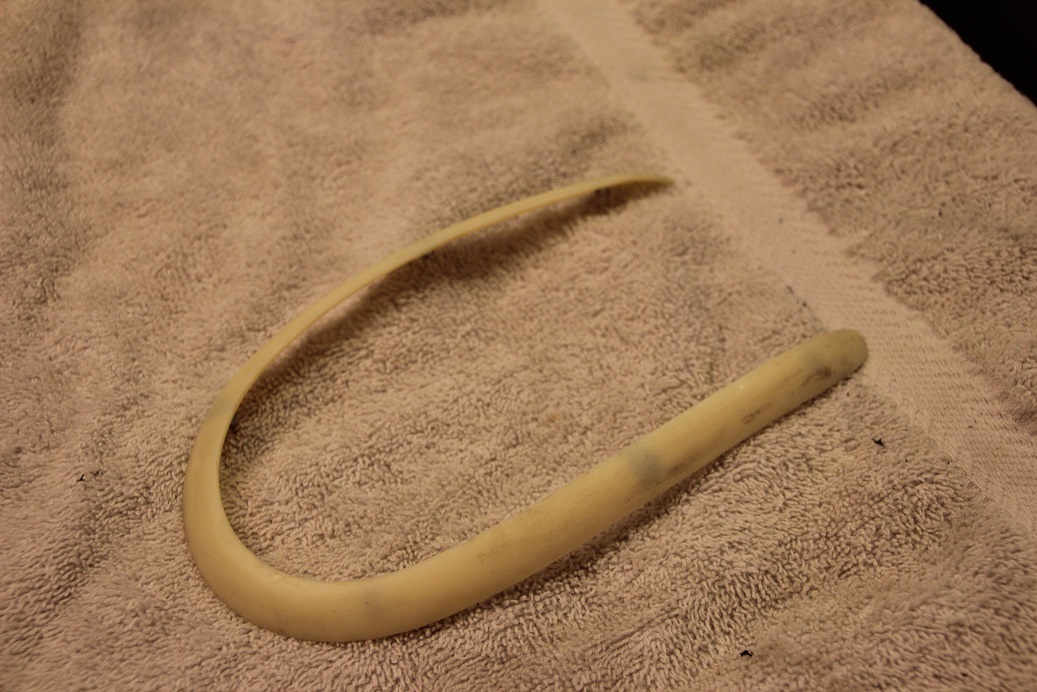
Shift Knob Refinishing My shift knob was looking pretty rough. The brushed steel was scratched and looked well worn. I originally assumed the brushed steel portion of the knob was just painted plastic to match the rest of the 996 interior and I was planning on sanding it down and repainting myself. I had even gone as far as looking for a replacement mostly because I enjoy the look and feel of a good shift knob. I tried scratching off a little paint and realized the finish was actually brushed steel and not plastic Author kgoertz Category Carrera (996) - Common Fixes and Repairs Submitted 01/23/2013 07:04 PM
-
Nice DIY. Thanks for the instructions. I was planning on pulling apart my SAI and this DIY helped convince me it was worth the effort. I used Teflon bearing used for bicycle bearings but I may replace with Mobil in the future. Using a syringe was a great idea idea. I also used a compressor to clear out some of the dust in the motor and it might be worth recommending. The amount of soot that blew out of the motor was pretty significant.
-
My shift knob was looking pretty rough. The brushed steel was scratched and looked well worn. I originally assumed the brushed steel portion of the knob was just painted plastic to match the rest of the 996 interior and I was planning on sanding it down and repainting myself. I had even gone as far as looking for a replacement mostly because I enjoy the look and feel of a good shift knob. I tried scratching off a little paint and realized the finish was actually brushed steel and not plastic :-) Since I had already decided to refinish the knob I started the steps to refinish. I used tools that I already had available which included: electrical tape to protect the leather while polishing dremel with a flexible shaft 100 grit circular paper sanding disks (approximately 2cm diameter). (3 or 4) 400 grit circular paper sanding disks. (3 or 4) circular cloth polishing attachments for the dremel (5 or 6) course "steel cleaning" polishing compound final finish polishing compound liquid polishing paste (probably not necessary) black shoe polish to clean up the leather The first step was to protect the leather using electrical tape. It was pretty easy to position the tape very close to the steel by stretching the tape. I originally taped over the Porsche crest, but later found out that it was easy enough to avoid touching it using the circular sanding disks. I then used a small paper sanding disk with a dremel to sand off the brushed finish and remove the scratches. The first step was with 100 grit sanding disks. Using a circular paper disk make it easy to get very close to the edge of the steel and also follow the contours of the knob. This took about 15 minutes. After the first stage the knob looked like this (still with the electrical tape attached) The next step was to sand away the scratches from the 100 grit sandpaper. For this I used 400 grit paper sanding disks with the dremel. It took approximately as long as the first step (15 minutes). With a little practice I was able to get very close to the edge of the steel. At this point there were still a few scratches that were too deep to easily get with the 400 git paper so I had to repeat the process using the 100 grit disks. The next stage was using a course polishing compound with a small round polishing wheel for the dremel. The polish melts when it comes in contact with the spinning wheel. The polishing compound removed the irregular reflections from the steel and made a noticeable difference from the previous sanding. I then did the same with a polishing compound made for the final polish. This step didn't make much of a difference but the knob was now looking pretty shiny. For a final polish I used a liquid metal polish (Mothers) that I had previously been using on my rims. After this the knob looked almost perfect. I removed the electrical tape and use shoe polish on the leather to clean it up a little. The result was better than I had expected. Not quite "brand new" but very close. And since it is pretty easy to polish I may end up doing this every year or two. The final pictures are below. It looks much better 'live' than in the pictures.
-
I switched from PS2's to the Super Sports two years ago. They are on my daily driver although they've also been on the track twice. I'm definitely not going back to the PS2s, although the biggest advantage is the price. They definitely wear better and dry grip seems a little better than the PS2s. I'm not quite convinced they are better in the wet and I can get the tires break loose when pushed, although they are definitely very good. Absolutely dreadful in even the lightest snow though :-) I'd vote for going with the Super Sports especially if you are replacing all 4.
-
Transmission replacement
kgoertz replied to mbufkin's topic in 996 Series (Carrera, Carrera 4, Carrera 4S, Targa)
I was going to suggest the same thing. I had a problem where the transmission would jump out of 2nd gear. It only happened when cold and it only usually happened immediately after putting it in gear. After a while I could tell when it was going to happen because the shift into 2nd gear wasn't quite as deep as normal. I had my local indy replace the 2nd gear detent with the one from GBox when they had the transmission out of the car for an IMS upgrade. The part is just a small steel cylinder and is relatively inexpensive. Apparently it is possible to DIY with the transmission in the car. You should be able to find many discussions on the subject by searching here or on google. I have yet to test out the fix with sub-zero celcius weather, but otherwise I haven't had any problem since. -
Considering '07 Targa 4
kgoertz replied to C2cab's topic in 997-1 Series (Carrera, Carrera 4, Carrera 2S, Carrera 4S)
There have been a few squeaks with the roof when going over bumps, but I've been able to solve them with a little grease along the inside of the roof. It is a real issue although I consider it a minor one. No problems other than the roof. I did hear a rumour that the 996 was based on the coupe chassis (without any reinforcements) but Porsche switched the 997 Targa to use the cab to improve the rigidity. -
Considering '07 Targa 4
kgoertz replied to C2cab's topic in 997-1 Series (Carrera, Carrera 4, Carrera 2S, Carrera 4S)
I'm not aware of any specific issues with the Targa to look out for, other than to make sure it opens/closes easily. But FWIW I've had my 02 Targa for half of it's life and I'm still a huge fan of the model. The back glass makes it very easy to store things behind the rear seats and the ability to open the roof easily means I have it open almost year round. Plus the targa keeps the beautiful lines of the coupe while still allowing a little of the open air feel. -
996 Interior touch up paint ?
kgoertz replied to britdave's topic in 996 Series (Carrera, Carrera 4, Carrera 4S, Targa)
I've been considering repainting some of my interior for the same reason. The paint on both my shifter and my parking brake handle is wearing off. I am thoroughly unimpressed with Porsche's decision to use aluminium paint instead of the real metal especially on the shift knob :-( The rest of my interior is excellent and the warn paint really ages the car. Are there any good online sources that already have the right paint colour(s)? -
Rear Tire Blowout
kgoertz replied to jimmy3530's topic in 996 Series (Carrera, Carrera 4, Carrera 4S, Targa)
There are strong rumours that the Pilot Supersport will get the N rating in the near future. There are lots of discussions on the topic that can easily be found by searching here and on google. The SuperSport tire is substantially cheaper than the PS2, has a better wear rating, and is generally rated higher performance than the PS2 in every category. I switched from PS2 to the SuperSport two years ago and I'm still happy with the decision. Tire wear is noticeably better and they handle better both on the street and on the track. I'm not quite convinced that the wet performance is better though. The PS2s seemed to corner like on rails even in the wet but I can definitely get the SuperSports to break loose. That could always be due to my improved driving confidence though :-) They are completely useless in the cold and snow though. I don't drive my car in the winter, but I tried them on a cold day with a light snow covering once and was barely able to get the car back in the driveway. I'd definitely recommend the SuperSports over the PS2s even though the SuperSports aren't N-rated yet. But if you are driving in cold temperatures and/or snow and aren't buying snow tires then definitely go for the A/S Plus. -
If you search this forum I think you'll find a few articles on getting a new battery from Wallmart. They have a good quality battery that is the right size for less than $150 if I remember right. I'd replace the battery first and see if that helps. When I first got my car I was worried about replacing with non-Porsche parts...but that worry fades pretty quickly especially for things like batteries, brakes etc.
-
I went through this when replacing my cats earlier this year. The O2 sensor location was changed between MK1 and MK2 996. Prior to 2002 the second oxygen sensor is near the muffler clamp, but in 2002 it was moved to the top of the cat. The physical dimensions for the cats are the same. Aftermarket catalytic converters often come drilled out for both. I'm pretty sure either would fit, however the O2 sensor leads have to be extended if you switch from one that has the O2 sensor at the cat to one that has the O2 sensor near the muffler clamp. I'm not completely sure about the 997.1 cats in a 996 though.
-
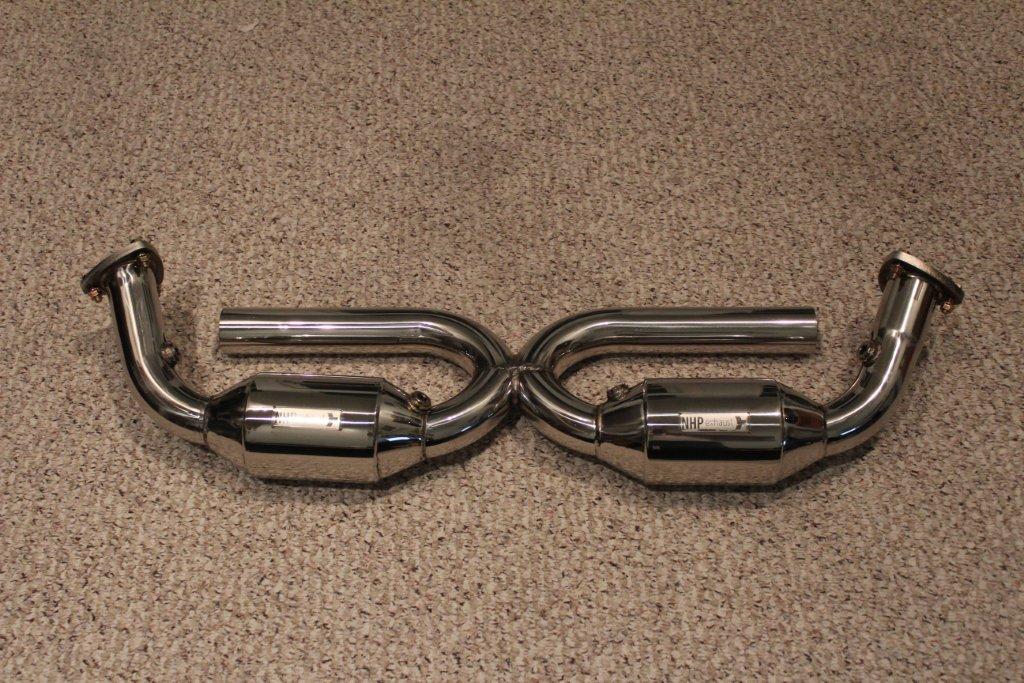
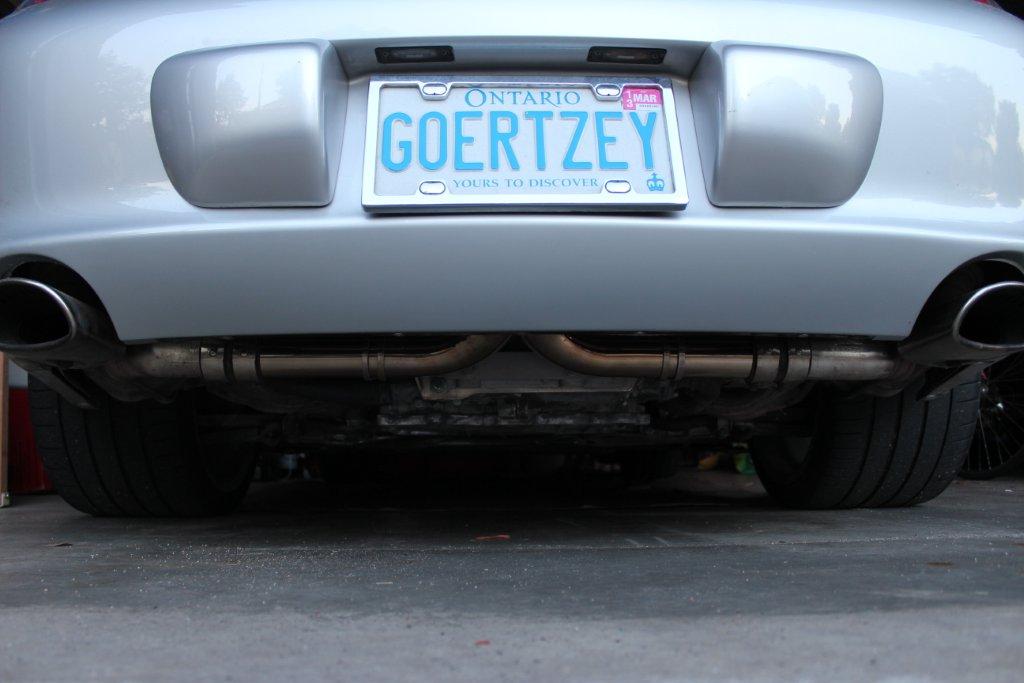
I just finished installing new catalytic converters on my 02 Targa. It took longer than expected but I am very happy with the results and I thought I'd share. I was replacing the cats due to a rattle that developed after a track day, although I'm pretty sure they were on their way out well before then. After digging through options and reviewing past experiences on this site I settled on getting 200 Cell X-pipe cats form Maxspeed Motorsports in Montreal. The options that I had were: 1) Replace my driver's side cat (the once that was rattling) with a used one. Price somewhere between $500 and $800 but no guarantee it would solve my rattling 2) Replace with Porsche parts from local dealer (something like $1800 each) 3) Replace with Porsche parts from an online dealer. I find them as low as $1200 (at least that was the price listed online) 4) Fabspeed X-pipes between ~$1700 and ~$1800 5) FVD - Not sure but likely the same or more than Fabspeed 6) Maxspeed 200 cell cat in the same format as stock (~$1200) 7) Maxspeed X-pipes with 200 cell cats (~$1400) My primary goal was to replace the stock cats with something with higher quality and would prefer a little more throaty exhaust. I'm not convinced the claims of significant HP improvements although ~10hp seems reasonable. Also it had to run without throwing CELs and ideally without requiring extensions for the O2 sensors. Both Alex from Fabspeed and Nello from Maxspeed seemed very honest, knowledgeable, and professional. I ended up ordering from Maxspeed and had the cats in a few days since they met my goals. They looked great and the quality was exactly what I was hoping for. Some of the minor things that help persuade me was the size was slightly adjustable to accommodate any slight variances in sizing, and the fact that Maxspeed was in Canada which made shipping simpler. I've included a picture of the cats before I installed them. Installation took me almost 6 hours spread over the weekend but that included time to sand the rust off all of the clamps and the exposed pipes to the mufflers, clean the MAF, and clean most of the other parts I had to remove. I ended up shearing off one of the bolts on the old cats when trying to remove them, so I soaked the remaining bolts overnight before continuing. It wasn't a problem at all though since my cats are done anyway. The rest were pretty simple. Some of the tips I'd recommend for anyone doing this include - I was worried that getting the O2 sensors removed from the cats would be a challenge. It turned out to be very easy and could be done with an adjustable wrench. I didn't use any heat or penetrating oil. - have a small sanding drum handy if you'd like to claps to look as new as the rest of the exhaust. It only took about 15 minutes but the clamps ended up looking like new and was well worth the effort. I used a small sanding drum on my drill as well as my dremel with a fine grade sanding drum. - I should have ordered new bolts to go on the clamp holding the muffler to the cat pipe. They were quite rusty and could have used a replacement - I wasn't sure whether or not the cats could be installed without removing the muffler. Well they definitely can't. So plan on removing one of the two mufflers. Removing the muffler is probably possible without removing the wheel, but having access from the wheel well makes the job simpler. I didn't see the need to remove the bumper - soak the bolts between the cat and the manifold over night as well as the bolts on the clamp between the muffler and the cat. I used PB Blaster (here: http://www.blastercorporation.com/PB_Blaster.html). They had it at my local parts store. I didn't have any problems getting any nuts/bolts separated after soaking. - it probably makes sense to clean out the MAF at the same time. You have to disconnect it and remove the airbox anyway - the O2 sensor positions aren't quite the same on the Maxspeed cats. No extensions were necessary for me, however the wires were too tight to fit in all of the clips. I didn't consider this a big problem but it took an extra few minutes - having a breaker bar definitely helped Some of the parts that I bought or needed for the job - MAF cleaner - PB Blaster - High temperature anti-seize compound (copper) - O2 sensor socket (~$15) - 6 point 13mm socket with 1/2" drive (just in case the bolts weren't going to cooperate) - breaker bar I finished the job tonight and took the car for a good test drive. The rattling is gone and the exhaust sounds great even at idle and low RPM. I think it is slightly louder and deeper than stock but I'm not sure anyone else would notice. But I'm very happy with the improved sound. For performance it seemed to rev a little better at the top end but it also feels like it might be missing a little torque below ~3000 RPM. Obviously it is very hard to tell though and there is a theory on this site that the computer has to re-learn its curves after changing the cats. I'll get a better impression after driving it a few days. Overall I am very happy with the result and I'm proud of myself for getting it installed and not breaking anything :-)
-
996 Rotors Replace or Resurface?
kgoertz replied to Johnny-5's topic in 996 Series (Carrera, Carrera 4, Carrera 4S, Targa)
I did quite a bit of research before buying my pads, but I ended up just buying pads from OEM manufacturers. I believe Textar is the main manufacturers, and even the Bosche or Brembo pads have the name Textar stamped into the actual pad. My conclusion was that buying a set from Porsche would likely result in the identical pad but at twice the price. Also there are options to get better breaking performance on the track, but you have to compromise on cold performance and noise (and possibly dust). I was about to try a set of "EBC Red Stuff" since they claim to generate less break dust, but the reviews weren't stellar. I'm happy with the Textars so far although they didn't quite stand up to the heat when I had them out for a track day.