Welcome to RennTech.org Community, Guest
There are many great features available to you once you register at RennTech.org
You are free to view posts here, but you must log in to reply to existing posts, or to start your own new topic. Like most online communities, there are costs involved to maintain a site like this - so we encourage our members to subscribe or donate. All subscriptions and donations go to the costs operating and maintaining this site. We prefer that guests take part in our community and we offer a lot in return to those willing to join our corner of the Porsche world. This site is 99 percent member supported (less than 1 percent comes from advertising) - so please consider an annual subscription or donation to keep this site running.
Here are some of the features available - once you subscribe RennTech.org
- View Classified Ads
- DIY Tutorials
- Porsche TSB Listings (limited)
- VIN Decoder
- Special Offers
- Paint Codes
- Registry
- Videos System
- View Reviews
- and get rid of this welcome message
It takes just a few minutes to register, and it's quality Porsche information at a low cost.
Contributing Members also get these additional benefits:
(you become a Contributing Member by subscribing or donating money to the operation of this site)
- No ads - advertisements are removed
- Access the Contributors Only Forum
- Contributing Members Only Downloads
- Send attachments with PMs
- All image/file storage limits are substantially increased for all Contributing Members
- Option Codes Lookup
- VIN Option Lookups (limited)


dr_karlb
-
Posts
34 -
Joined
-
Last visited
Content Type
Profiles
Events
Forums
Exterior Paint Colors
Downloads
Tutorials
Links Directory
Collections
Classifieds
Store
Everything posted by dr_karlb
-
997 Problems
dr_karlb replied to oscaac's topic in 997-1 Series (Carrera, Carrera 4, Carrera 2S, Carrera 4S)
I have the same issue... random misfires on all cylinders Was told by the indy shop that the misfire sensors on the early 997's were too sensitive and there was a TSB to widen the CEL range. Anyone know if this is true ? The car runs great and smooth otherwise -
Anyone have any experience with Flintworks in Campbell for 997 service. Thanks
-
Ditto. And I am happy to confirm that the Bosch 94-R is an EXACT replacement for the OEM battery in the 1997 997tt. What about the vent tubes ? I just picked one up and it doesnt seem to have a place to mount the tubes...
-
I have new Tubi mufflers on the way for my 997S, and will do this exchange myself. Are there DIY instructions for this specific for the 997 ? I did my 996, so know that very well. Are there any differences ? The tips look like they attach in a different way and there is the bar to support the rear bumper. I did search and found the 996 DIY link again. Thansk K
-
I have just sold my 2001 996 C4 Cab (for a 997S Cab), and the new owner is complaining that the cab top doesnt work anymore (it has been flawless for the last three years and even the day he picked it up!) As a last good deed, i was going to see if i can get him the info on what may be wrong. He said he has the hand brake on, the engine running and when the dash button is pressed he hears clicking sounds and the cab light starts flashing. My search found that the engine bay cover may be the issue, but he took it to Fremont Porsche and they said the Hydraulic motor is bad and quoted him $2500. Q: How much is a Hydraulic motor for these cars and what is the install time ? Do these go bad frequently ? All the issues i could find here and on Rennlist were bad microswitches and possible low or old Hydraulic fluid. Any advice ? Thanks
-
Ignition Lock Failed ?
dr_karlb replied to dr_karlb's topic in 996 Series (Carrera, Carrera 4, Carrera 4S, Targa)
Mike, Thanks for the link. Did this on tuesday evening in about 30-minutes. For anyone in Silicon Valley, Audi in Stevens Creek carry the switches in stock for $37. As soon as i said "Ignition Switch" the guy recited the p/n back to me... guess he gets a lot of these :-) I broke open the old one to see this issue and the little plastic tab that holds the return spring in place was broken off and jaming the whole mechanism.... exactly what it felt like when turning the key. Well all fixed now :-) -
Ignition Lock Failed ?
dr_karlb posted a topic in 996 Series (Carrera, Carrera 4, Carrera 4S, Targa)
So my key has been getting kind of sticky to remove from the ignition lock, and yesterday it seems like a spring has slipped inside. It doesnt spring back when i start the car, and seem like i have to push against the spring to remove the key now. Is this replacement a DIY ? I did a quick search but the relavent thread didnt seem to help. Any idea of the cost for the dealer to do this? One thread said it was a recall item on Boxster... is this the same on 996's ? Thanks -
Low Speed Fans Question
dr_karlb replied to dr_karlb's topic in 996 Series (Carrera, Carrera 4, Carrera 4S, Targa)
Just ran to the parking lot and tried this. Car hasnt been driven for 7 hours so is cold. No fans if i just run the engine. Hit the AC and the fans come on fast in a feew seconds. There are relays for each side ? Neither low speed works and both hi speeds work. Is there a layout for the relays ? Thanks -
Low Speed Fans Question
dr_karlb replied to dr_karlb's topic in 996 Series (Carrera, Carrera 4, Carrera 4S, Targa)
I work in Santa Clara and Live in Mtn View. I thought the AC kicked the fans into high speed no matter what the engine temp ?? I dont think ive ever had them run at low speed... In stop and go the engine temp will creep up and if i hit the AC it stabilizes again. After the coolant tank change i got the chance to just let the car get all the way to temperature and the fast speed kicked in, but never saw the low speed. Where is the fan ballast and how can i test this. Im an engineer so have access to some tools and im quite handy :-) Thanks -
Loren (and all), after completing the coolant tank R&R this weekend, i let the car idle up to temperature. I never heard the low speed fans come on at all, but when the gauge got just into the 0 in 180, the high speed ones kicked in. I put the AC on and Off to see if there was a speed change, but it felt and sounded the same (AC runs fast seepd right ?) Q: I read there was a fuse for the low speed that blows after getting wet by driving thru puddle sometimes. Where can i find that fuse (and do you have a Part number ?) Anything else to check ? Thanks
-
HELP, Coolant tank removal
dr_karlb replied to dr_karlb's topic in 996 Series (Carrera, Carrera 4, Carrera 4S, Targa)
Ok, Well i got this one completed on saturday afternoon. No so bad really... took about 1hr 45min or so. After the tank came out i couldnt see the cracks anywhere so spent a stressful afternoon wondering if i had fixed anything and actually had cracked heads/cylinders etc. The next day i took a close look and had a V shaped crack on the backside of the tank in one of the folds, with crusted coolant just below it. There were a bunch or other cracks starting deep inside the plastic at different locations Mine is a 2001 so has a different tank design to the one in the DIY (longer at least). Here are my comments to help others with the newer tank. Take off the gas cap and the coolant cap before you start. The coolant drains really slowly with the cap in place (and really fast with it removed) I only removed the Air Box Snorkel, not the whole assembly. Its not really in the way at all. Remove the secondary air pump entirely. This seems much easier that tying it back. Only one hose and one connector to remove. Absolutley, follow Lorens advice and get screw type hose clamps. Those spring type are a B$%^& to get off and im sure i could never put them back correctly. This was the hardest part of the job in my case. The level sensor in this years tank comes out very easily. I would remove completely before removing the tank, and certainly not install it back in the new tank until its fully installed. Both were extremely easy jobs, and im sure i would have broken it if it was mounted on the tank Remove the fuel filter. I made a real meal of this (fully removed the screw clamp, tried to unscrew the fuel lines etc). Its actually very easy. Loosen the screw type hose clamp and the whole assembly unclips from the coolant tank (clip at the front nearest you, tab in a slot at the back). The upper fuel hose is on some kind of quick disconnect running along the top of the engine bay, and the lower fuel line gets removed in the DIY anyway. The whole thing then just slips out (and dumps a filter-load of gas on my feet!) Dremel off the tab on the tank's locating feature furthest away from you. Only one little part needs to come off, and for good measure i did the same on the new tank. There are 6 tabs and its a tight fit, so one wont be missed. In really cant see how dropping the engine can help the removal in any way. Mine hung up on the hose clamp on the big (1.25"?) coolant tube running front to back. I loosened the hose clamp and rotated out of the way, the tank just slid right out. Sorry i cant be more specific, but i was a bit surprised it came out so quick and cant describe this any better. Reinstallation was also surprisingly fast. Tilt the top of the tank towards the engine so the lower hose parts miss the fuel rails and it seem to go right back in I pulled the bleed valve up to fill the tank and got most of the coolant back in. After a short drive it needed a few pints to go from min to max. So far no leaks, Q: if the fuel lines leak you could smell this, right ? I think im being paranoid, and dont see any leaks. The quick disconnect on the fuel filter inlet came off so easy im worried it doesnt seal well.... but it doesnt leak when i watch the engine idle hot or cold. Perhaps this can be added to the DIY if there is interest.? -
HELP, Coolant tank removal
dr_karlb replied to dr_karlb's topic in 996 Series (Carrera, Carrera 4, Carrera 4S, Targa)
Thanks Jeff, Planning on taking the dremel home from Work. I plan to start this friday night or sat morning and hope i dont need any spares from the dealer. Thanks for the offer... lots of people seem to get really frustrated with this DIY. I work on expensive machinery every day, and some of those are quite tight to get to. Fingers crossed on this one that i get lucky and get a tank that comes out easily -
HELP, Coolant tank removal
dr_karlb replied to dr_karlb's topic in 996 Series (Carrera, Carrera 4, Carrera 4S, Targa)

-
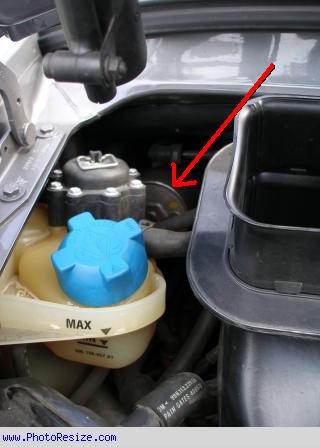
I will be changing my cracked tank in the next few days. I have read all the DIY's and threads. I have a quick question. There is a cylinder shaped thing on the right side of the tank quite deep inside the engine bay. (i will try to post a picture) What is this and does it need to be removed ? If so how do i remove it ? Can the tank come out with it in place ? None of the DIY's mention this or show it on the photo's, but it looks to be in the way. (i have a 2001 C4 Cab if that helps) Any special tools needed for this job (metric sockets, wrenches and allen keys ??). Do i need a special tool for compressing the hose clamps ? ANy other advice ? From the DIY i guess i do the following: Remove the Air Filter (single bolt ??) Remove the Air Pump (2 bolts and one nut) Remove 2 fuel lines (do i need to do anything special here ? Blead something afterwards ?) Drain the coolant from the one drain plug at the engine bottom Remove 3 hoses and 1 sensor from the coolant tank Carefully pull the tank out Thanks
-
Quick question, What is the AFM, and where is it located ? Are there any line drawings showing the various components that are refered to in this DIY ? Thanks
-
Can You overfill coolant tank ?
dr_karlb replied to dr_karlb's topic in 996 Series (Carrera, Carrera 4, Carrera 4S, Targa)
The max line is right at the seam of the tank so i filled it to the top of the seam. You really cant see this at all well from the outside. It does appear to have dumped the excess onto the exhaust and i cant see a leak anywhere now. Not a drop today on two short commute runs so far. The level is still at the seam looking from the outside, but the max arrow looks like it is pointing to the top of the seam. Thanks -
I have a 2001 C4 Cab, and preparing for a track day i re-filled the coolant and replaced the cap that seemed to be seeping around the edges. After a few track sessions, i noticed coolant on the ground... about a 1/2 cup perhaps. It wasnt under my car at the time, so i didnt think it was mine, then after the next session i saw a little more coming from my car... about a few tablespoons full. The car was getting hot on the track, but not close to overheating needle was on the right edge of the 0 in 180 during the most aggressive driving. The coolant was still full (not below the seam in the plastic tank), but i did fill it to the top of the plastic seam when looking into the tank. After driving 180-miles home again, i got a few more drips on the driveway (perhaps 10 drips in 2 days) I couldnt see any place it was leaking from, but it was collecting on the header pipes of the exhaust just below the coolant tank. The exhaust tip looked like it had dried, crusty coolant on the underside. Q: Can you overfill the tank and blow the excess out ? The leak seems to have slowed/stopped Q: Will i see any other symptoms if it leaks ? I often get erratic temperatures especially during slower driving or waiting in traffic. it will drift from between the 8 and 0 to just to the right of the 0. Will a system leak make this worse? The cap was crusty from a small leak there for a while. Q: Does the DIY for tank replacement apply to 2001 ? I think the tank is bigger... does it remove the same way?... i dont want to get half way thru and find i need to drop the engine...(i cant DIY this im sure) Q: Do i need any special tools for the removal/re-installation. The clamps look pretty beefy. Any precautions when the fuel lines are removed ? Does the system need bleeding after this ? Thanks
-
Oxygen Sensor removal
dr_karlb replied to dr_karlb's topic in 996 Series (Carrera, Carrera 4, Carrera 4S, Targa)
Thanks to all for the advice. I changed out the sensor this weekend in not more that 15-minutes and all seems good so far. The regular wrench worked fine... i purchased the crows foot and it was useless as it wouldnt fit in that location The Bank1 Sensor2 is really hard to get to by hand from the bottom, so i unclipped the "snorkel" inlet to the airbox and could get my hand down to unscrew, once it was loosened from the bottom with the wrench. Oh, i purchased the sensor from oxygensernsors.com as Loren posted the link. The dealer wanted $350 for the sensor !!! Online it was about $100 -
Oxygen Sensor removal
dr_karlb replied to dr_karlb's topic in 996 Series (Carrera, Carrera 4, Carrera 4S, Targa)
I got codes P0139 and P1117. Loren informed me this was the after CAT o2 sensor, and a slow heater response... aging of the sensor in them list. I connected and disconnected a few times to clean the contacts. It went away for about a month after a hard drive and an AX event, but now its back more permenant. Thanks for the info about removal... hope i have skin on my knuckles after this one :-) -
So my intermittent oxygen sensor slow heat up CEL became more permenant... SO i have the new sensor and wrench on order, dur to show up in a day or two. I looked at the sensor on the car today, and i cant see how i can get it out ? Is there a DIY ? I cant see a place to even get my hand near enough to touch it. Do i go in from the top ? Its the one After the CAT, so it looks like its mounted on the exit conical part of the CAT itself. Is there a trick or do i just start removing the exhaust system until i can get access ? Thanks
-
As it says on the donation page You have now been upgraded - elaspsed time -- 48 minutes. You should have full access now. Thanks Loren... i got in now :P There is SO much useful stuff in there... .... The top lube instructions are dated 9-15-00 "Noises in the convertible top" right ? Also i saw a TSB about creaking in the steering... i think i have just this issue. They said there are new bearings to fix this ? Is this just an annoying noise issue or will it suddenly break on me ?? Thanks... well worth the contribution
-
Hi Loren, I just contributed to access these very TSB's... but can find a Retail Price Search or any TSB's that i can view. Can you guide me to the right place ? Thanks
-
Cab Window Replacement
dr_karlb posted a topic in 996 Series (Carrera, Carrera 4, Carrera 4S, Targa)
I have a 2001 C4 Cab, and looks like the usual window delamination. Its very small, located on the corner and perhaps 1" on each side of the corner. Is it possible to stick this back together ? If not, any recommendations for shops in the Bay Area (south bay prefered) who can fix or replace the window ? Thanks -
HELP, Intermittant CEL and Codes
dr_karlb replied to dr_karlb's topic in 996 Series (Carrera, Carrera 4, Carrera 4S, Targa)
One other quick thing... Which sensor is P0139 ? Drivers side or passenger side. Is it the sensor running along the pipe just below the rear bumper ? Thanks -
Can you knowlegable guys help me. I have an intermittant CEL issue. The codes are P0139 and P1117. The readed i had didnt have useful descriptions. The CEL started coming on about 3 weeks ago, always at the same place on my drive home in the evening (about 5 minutes from work, on an approx 50mph expressway) It would stay on for a day or so and then not show up again for 2-4 days, then the same deal, perhaps 4 times now. I only just got find a code reader while i still had the CEL on to read the codes Any advice ? BTW its a 2001 Carrera4 Cab, 14,000 miles, minor service and MAF replaced approx 6-months ago. No mods (well PSE mufflers installed) Thanks in advance