Welcome to RennTech.org Community, Guest
There are many great features available to you once you register at RennTech.org
You are free to view posts here, but you must log in to reply to existing posts, or to start your own new topic. Like most online communities, there are costs involved to maintain a site like this - so we encourage our members to donate. All donations go to the costs operating and maintaining this site. We prefer that guests take part in our community and we offer a lot in return to those willing to join our corner of the Porsche world. This site is 99 percent member supported (less than 1 percent comes from advertising) - so please consider an annual donation to keep this site running.
Here are some of the features available - once you register at RennTech.org
- View Classified Ads
- DIY Tutorials
- Porsche TSB Listings (limited)
- VIN Decoder
- Special Offers
-
OBD II P-Codes - Paint Codes
- Registry
- Videos System
- View Reviews
- and get rid of this welcome message
It takes just a few minutes to register, and it's FREE
Contributing Members also get these additional benefits:
(you become a Contributing Member by donating money to the operation of this site)
- No ads - advertisements are removed
- Access the Contributors Only Forum
- Contributing Members Only Downloads
- Send attachments with PMs
- All image/file storage limits are substantially increased for all Contributing Members
- Option Codes Lookup
- VIN Option Lookups (limited)


Kim
-
Posts
382 -
Joined
-
Last visited
Content Type
Profiles
Events
Forums
External Paint Colors
Downloads
Tutorials
Links Directory
Collections
Store
Everything posted by Kim
-
Programming Remote
Kim replied to 911porschefan's topic in 996 Series (Carrera, Carrera 4, Carrera 4S, Targa)
It sounds to my (amateur, admitedly) ears as if this dealer is not quite up to the task. The key does not "take the program". The key is unaffected by the process. Rather, it is the CAR's computer that is programmed to recognize a new key immobilizer and remote unlocking signal (2 different tasks). This operation requires the PST2 (or newer equivalent), and I have watched through the process. At the point of mating the key head imobilizer transponder, the program asks for the super secret vehicle code available only from PCNA. At the point of mating the remote transmitter, the program asks for the bar code from the key head tag. Point of trivia: for MY2000, at least, the car's computer can accomodate 5 imobilizer transponder signatures. If a key is suspected stolen, the old key transponder signature can be erased from the car computer's memory .... to make it incapable of starting the car (key will turn, but car will not start). If one is simply adding a new key head, then this step can be skipped .... unless removing a key is necessary to make room for the new one. Good luck, -
Help... PSE cutout
Kim replied to Mendrax's topic in 996 Series (Carrera, Carrera 4, Carrera 4S, Targa)
I am not familiar with European wire size specs, but this is a very light duty wire .... they all are in the PSE installation. In U.S. terms, I would say to stay somewhere in the 20/22/24 guage range, and you couldn't go wrong. For comparison, an electric lamp cord in the US is 18 guage. (higher number = smaller wire size). Hope that helps. -
Help... PSE cutout
Kim replied to Mendrax's topic in 996 Series (Carrera, Carrera 4, Carrera 4S, Targa)
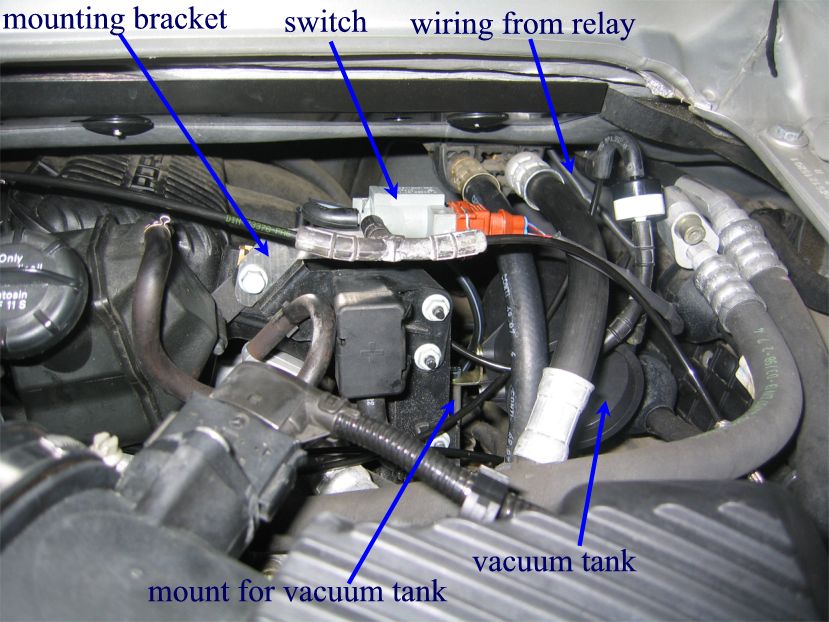
The valve is most likely the vacuum switch that, electrically controlled by your dash switch, routes vacuum pressure to open and close the two bypass actuators, one on each muffler. This vacuum switch is labeled "switch" in this photo: The vacuum controlled by this switch is routed to these actuators: The normal position for these actuators is "noisy". It takes vacuum pressure to close them to the "quiet" position. Since yours are permanently on quiet, it is my guess that either both are stuck (not likely), or the vacuum switch is stuck in the actuated (quiet) position. Start your car and then give the switch a tap with a tool handle. See if that makes a difference. If it does not, then disconnect the vacuum source and output from the switch. That should allow the muffler actuators to revert to the spring loaded, noisy position. It that works, it is a clear sign that your switch is bad. You may need to replace the switch.
-
Help... PSE cutout
Kim replied to Mendrax's topic in 996 Series (Carrera, Carrera 4, Carrera 4S, Targa)
Well, then, you can do that as described in my post. Since you have the factory loud/quiet switch, why can you not simply switch it to quiet while getting your government inspection? Then, if they are happy, you could simply cut the speed wire. -
Help... PSE cutout
Kim replied to Mendrax's topic in 996 Series (Carrera, Carrera 4, Carrera 4S, Targa)
If your plan is to simply interrupt the speed wire (pink/gray) with a switch, then you will have a situation in which your car is factory normal (quiet between 29-45) when the switch is 'on', and NOT quiet in this speed range when the switch is 'off'. The current is so light that the volt/ohm rating of the switch is not important. You need the R61 .... Single Pole, Single Throw (SPST) that is NOT momentary contact. -
99 996 Electrical Problems?
Kim replied to sledder's topic in 996 Series (Carrera, Carrera 4, Carrera 4S, Targa)
Before you go to expense / trouble of replacing alternator, do a search here for voltage regulator. -
Removal of Cabriolet top
Kim replied to a topic in 996 Series (Carrera, Carrera 4, Carrera 4S, Targa)
I would strongly urge you to use someone who does not need you to supply him with directions for the work. I watched some of the work on mine, and it was quite complex. I would not entrust the job to anyone who was not well familar with it. After consulting two generic upholstery/top shops, I went straight to a dealer to get a recommendation .... upon the advice of the two guys I first consulted. The quality of the reinstallation after repair will have a much more direct effect on your enjoyment of the car than the new plastic window. One has only to stand and watch a 996 top cycle down and up to appreciate all that is going on there. -
That is correct. A newer, Porsche OEM 996 cab top with a glass back window cannot be simply installed on a 996 that came with a plastic window. Much is different, including the shape/size of the recess into which the top folds and stows. The discussion here is about a recently released after market top for the 996 which incorporates a glass back window approximately the size of the Boxster's. The window is much smaller .... creates sort of s Speedster look .... which I assume is to allow it to fit into the older cars' smaller recess.
-
Thorsten, That is exactly how it works. It results in the angle bracket sitting about 2 inches higher than the hole into which the bolt is inserted. I believe that is why so many have a hard time finding the mounting location .... that and the fact that the photo in the TSB makes it appear that the bolt is inserted in an area much closer to the rear bumper than it actually is.
-
installing PSE on 996C4
Kim replied to jo996's topic in 996 Series (Carrera, Carrera 4, Carrera 4S, Targa)
The driver's seat rails are held down by 4 torx head bolts, one at each corner. You need a 12mm Torx socket to remove them. It is not necessary to remove the seat to route the wires, but I found it necessary (even though I am small) to remove it to fit myself under the dash to work a the relay carrier. I DID NOT unplug the seat wiring .... I just unbolted the seat rails and then leaned it backward. I did not remove the door sill. Instead, I easily slipped the wires under the edge, between the black plastic and the carpet. The PSE switch is not available in gloss as far as I could find. You can spray it with gloss clear coat, and it will look fine. Be sure you do a search here for all the tips and hints. You particularly should refer to the DIY by Orient Express. -
PSE Kit from Suncoast Porsche
Kim replied to charlesl's topic in 996 Series (Carrera, Carrera 4, Carrera 4S, Targa)
My nearest Audi dealer did not have this part .... said he had never had it in inventory. I followed Orient Express' suggestion, and used a short length of heat shrink tubing to span the gap between the split wire wrap (covering the two wires coming from the relay panel) and this connector at the vacuum switch. Using a little carefully applied heat, the heat shrink tubing will mold tigthly to both the connector on one end and the wire wrap on the other, providing a nice, neat, and secure installation. -
Litronic lights without wiring harness
Kim replied to prado's topic in 996 Series (Carrera, Carrera 4, Carrera 4S, Targa)
The Litronic light units will work just fine without installing the accompanying wiring harness. In a retro fit situation, leveling is not available, no matter how much wiring you install. That only works with factory installed Litronics. The benefit of the wiring harness that comes with a Litronic retrofit kit is that it enables the xenon portion of your new unit (the low beam) to rotate up to join the hi beam (still just a halogen bulb) when you select hi beam, thereby making hi beam a good deal more effective. -
Airbag Deactivation switch
Kim replied to bsg03Cab's topic in 996 Series (Carrera, Carrera 4, Carrera 4S, Targa)
Over on Rennlist, there is a recent thread revealing 2 websites selling the Britax equivalent of the Zoom seat for as low as $59.00. This is, of course, without the airbag deactivation kit .... but, if you're going to place the seat in the rear, then you don't need the kit anyway. -
Help needed with workshop manual !
Kim replied to P.Viby's topic in 996 Series (Carrera, Carrera 4, Carrera 4S, Targa)
As long as the internal media in your dead hard drive is not physically damaged, a good computer tech and/or data recovery company can retrieve all the data for you. -
Programming Remote
Kim replied to 911porschefan's topic in 996 Series (Carrera, Carrera 4, Carrera 4S, Targa)
First, you should try a new battery in your remote key head. If this does not work, then you should search this forum to find the method for reviving a dead remote key head by inserting the battery with reverse polarity .... momentarily .... and then reinserting it properly. This may revive your remote. If not, you need to buy a new remote head to go with the metal key shaft you already have. The procedures to get this new remote head mated to your car are detailed exactly in the post immediately above yours in this thread. -
Does a blown fuse aaffect the Alarm?
Kim replied to Gator911's topic in 996 Series (Carrera, Carrera 4, Carrera 4S, Targa)
It seems the quickest way to find out is to try it. You need to replace the fuse in any event. -
Any idea to fix this?
Kim replied to jimmy1117's topic in 996 Series (Carrera, Carrera 4, Carrera 4S, Targa)
In the Atlanta area (Marietta) it only cost just over $300 to have the entire bumper painted .... at a first class shop .... if you take it off and put it back on yourself. -
996 Cab Top Delamination
Kim replied to danjen's topic in 996 Series (Carrera, Carrera 4, Carrera 4S, Targa)
There have been a couple of previous threads on this. A search will produce more detail, but here is the broad brush, as I know it: There is a TSB regarding this and the approved fix .... IF the delamination does not exceed a couple of inches. Otherwise, TSB calls for replacement of the top. 1. yes. I had a new aftermarket top installed. 2. I looked all around Atlanta area, and received an offer to remove top, "attempt repair by stitching all around window", but without warranty of results: $600. 3. See #2. A new GAHH top, identical to OEM except for a ring of stitching around the window, cost me $1900 installed at indy shop recommended by dealer. Same shop would install OEM top for $3000. I am very happy with my results. -
Face lift Turbo lights
Kim replied to Scouser's topic in 996 Series (Carrera, Carrera 4, Carrera 4S, Targa)
Berny, As I understand the Litonic retrofit issues (having installed one on my 2000), they are thus: 1. If you have face lift fenders & front bumper, you can (in fact, must) physically install facelift headlight units. 2. If you install Litronics where you had none before .... without new wiring, they will work, but the low beam will not rotate up to join the high beam when hi beam is selected, as Porsche intended. 3. If you install the retro kit wiring harness (pretty easy mod), then the low beam WILL rotate up when hi-beam is selected. 4. Auto-leveling is not available in a retro fit, period. 5. Installing units with washer nozzles is no problem, as long as you do not expect the washers to function. 6. You can get new corners for the headlight units that do not have the opening for washer nozzles, if you prefer the cleaner look. -
PSE install with Gemballa parts
Kim replied to toddel68's topic in 996 Series (Carrera, Carrera 4, Carrera 4S, Targa)
As I recall, there was a good deal of extra wire in the two leads that run back to the engine compartment. I would estimate that I cut off several feet during the installation. Therefore, if you have the Porsche harness with the two long (pink & grey, I think) wires for the vacuum switch lead .... then the length of these wires should accomodate just about any routing to the engine. -
PSE install with Gemballa parts
Kim replied to toddel68's topic in 996 Series (Carrera, Carrera 4, Carrera 4S, Targa)
On the vacuum tank. If it will fit physically, then there should be no problem with "support" of the heavier tank. The factory tank is bolted to a very solid location. On wire length to the engine compartment. The factory wires route across the back of the rear seats (left to right) then through the firewall and one third of the way back (right to left) across the engine compt to the vacuum switch. You can lay out your Gemballa wires in advance to see if they will follow this route. You can also splice in extensions if necessary. I see no problem, however, with taking any route that will get you to the desired location. If Gemballa has a better idea, use it. The list of parts you mention is mostly one of minor pieces. I would be surprised if the total expense was high. Good luck. -
Intermittent cab top operation
Kim replied to wross996TT's topic in 996 Series (Carrera, Carrera 4, Carrera 4S, Targa)
Scouser, Note that he said he had removed his SmartTop, and the problem remained. I would think that eliminates the unit as a source of his problem. The other recent thread on the Porsche forums regarding a RemoteTop problem included the poster's admission that he had "bent some pins" & "crossed some wires" attempting the installation. Certainly can't be blamed on Wilhelmy. I have posted, and noticed a few other simlar posts, that my SmartTop unit at one point did not function as intended. In every instance I have read, here and on RennList, the poster reported that the company, once contacted, provided technical support and quick replacement, no questions asked. There may be complaints regarding their customer service, but I have not seen any. The bottom line seems to be that, (annecdotally, at least) among Porsche and the commonly used third-party suppliers, the SmartTop folks do at least as well as anyone else out there when it comes to quality of product, technical support and customer service. It may be too expensive for you .... or you may simply choose not to purchase one .... but I don't believe anything I have seen posted here is reason to blame the SmartTop for cab top problems, or to "loose confidence" in the product or the company. No relationship with Wilhelmy, other than as very satisfied retail customer. -
manual hood release
Kim replied to emty's topic in 996 Series (Carrera, Carrera 4, Carrera 4S, Targa)
Even if the car will not jump start through the lighter, it should accept enough current to open the trunk. In the void space behind the passenger side headlight, high up in the wheelwell, you should find the looped end of a steel cable. This is the emergency release for the trunk lid. If you don't see it there, jack and support the car, then get underneat the right front fender and look up into that area. It may have slipped down. You can jump your car via the positive post in the engine compartment, also. Use something soft and thin (paint stir stick, kitchen plastic spatula) to insert below your left side tail light. Pry up gently on the light unit while looking underneath with a light. Should find the same type steel cable loop described above. Fish it out with a thin, hooking tool, piece of wire, etc, and pull to open the engine cover. Good luck, -
New Pixar's Car.. is....... 99?
Kim replied to vfxbox's topic in 996 Series (Carrera, Carrera 4, Carrera 4S, Targa)
According to the new Pano: Its a MY99 that was originally damaged in transit. Then given to PCNA training facility where it was repaired, disassembled, repaired over the years .... until PCNA was sending it to the crusher. Instead, it was donated to the movie folks, updated with 02 body panels, then converted by a movie car guy to more fully resemble the cartoon vehicle. Wheelbase shortened 7 inches. Roof raised 3.5 inches. Eyelids built into windshield, with magnets to control and turn them. Teeth added to front bumper. -
My Horror Story With GHL MOTORSPORTS.. Buyer Beware
Kim replied to Cameron75's topic in 987-1 Series (Boxster, Boxster S)
This tale certainly left me with questions: 1. why would someone who can afford a brand new Porsche drive that new car 1000 miles in the hopes of getting a bargain on an exhaust from strangers with whom he had no prior experience ? 2. After the first meeting produced broken promises, lame excuses, and/or clearly poor service attitude, why would someone .... even having made the drive .... then proceed to let them work on his car? 3. either question 1 or question 2 would have stopped me .... and my car was 5 years / 30K miles old when I got it. I was, and remain, very particular who works on it. 4. Finally, with each successive broken promise / rudeness / screw up / warning from a third party .... how is it that a new promise of yet more goodies was enough to ignore everything that had happened up to that time .... and once again trust these guys with your car? I'm flabbergasted .... but not so much by the shop's actions, as by your decisions.