Welcome to RennTech.org Community, Guest
There are many great features available to you once you register at RennTech.org
You are free to view posts here, but you must log in to reply to existing posts, or to start your own new topic. Like most online communities, there are costs involved to maintain a site like this - so we encourage our members to subscribe or donate. All subscriptions and donations go to the costs operating and maintaining this site. We prefer that guests take part in our community and we offer a lot in return to those willing to join our corner of the Porsche world. This site is 99 percent member supported (less than 1 percent comes from advertising) - so please consider an annual subscription or donation to keep this site running.
Here are some of the features available - once you subscribe RennTech.org
- View Classified Ads
- DIY Tutorials
- Porsche TSB Listings (limited)
- VIN Decoder
- Special Offers
- Paint Codes
- Registry
- Videos System
- View Reviews
- and get rid of this welcome message
It takes just a few minutes to register, and it's quality Porsche information at a low cost.
Contributing Members also get these additional benefits:
(you become a Contributing Member by subscribing or donating money to the operation of this site)
- No ads - advertisements are removed
- Access the Contributors Only Forum
- Contributing Members Only Downloads
- Send attachments with PMs
- All image/file storage limits are substantially increased for all Contributing Members
- Option Codes Lookup
- VIN Option Lookups (limited)


hspiva
-
Posts
19 -
Joined
-
Last visited
Content Type
Profiles
Events
Forums
Exterior Paint Colors
Downloads
Tutorials
Links Directory
Collections
Classifieds
Store
Everything posted by hspiva
-
Update: I have been unable to find an alternate battery to OEM. The height is the issue. Optima batteries can be placed on their side, but none are narrow enough to fit. It seems that owners with only one battery must be patient. They should at least ensure that all related TSBs are done. If part of a TSB, the replacement battery is free. Also, keep an eye on your ampmeter. It should read 14VDC while the engine is running. I have learned to use a trickle charger or solar charger (away from 110VAC) in the winter. I may still get annoying idiot lights, but I can still start the thing. Regarding parking valets, I have installed an under-dash switch to deactivate my keyless start. With it on, removing the key will not "power down" the electronics. Big drain fast. Even techs have problems with using the button. Ciao for now
-
Cayennes and Touaregs with a single battery and lots of accessories seem to have a major battery drainage issue. Has anyone found a deep cycle battery that will fit under the driver's seat? Optima does not make one that is "short" enough. Their yellow top would be perfect. Thanks in advance!
-
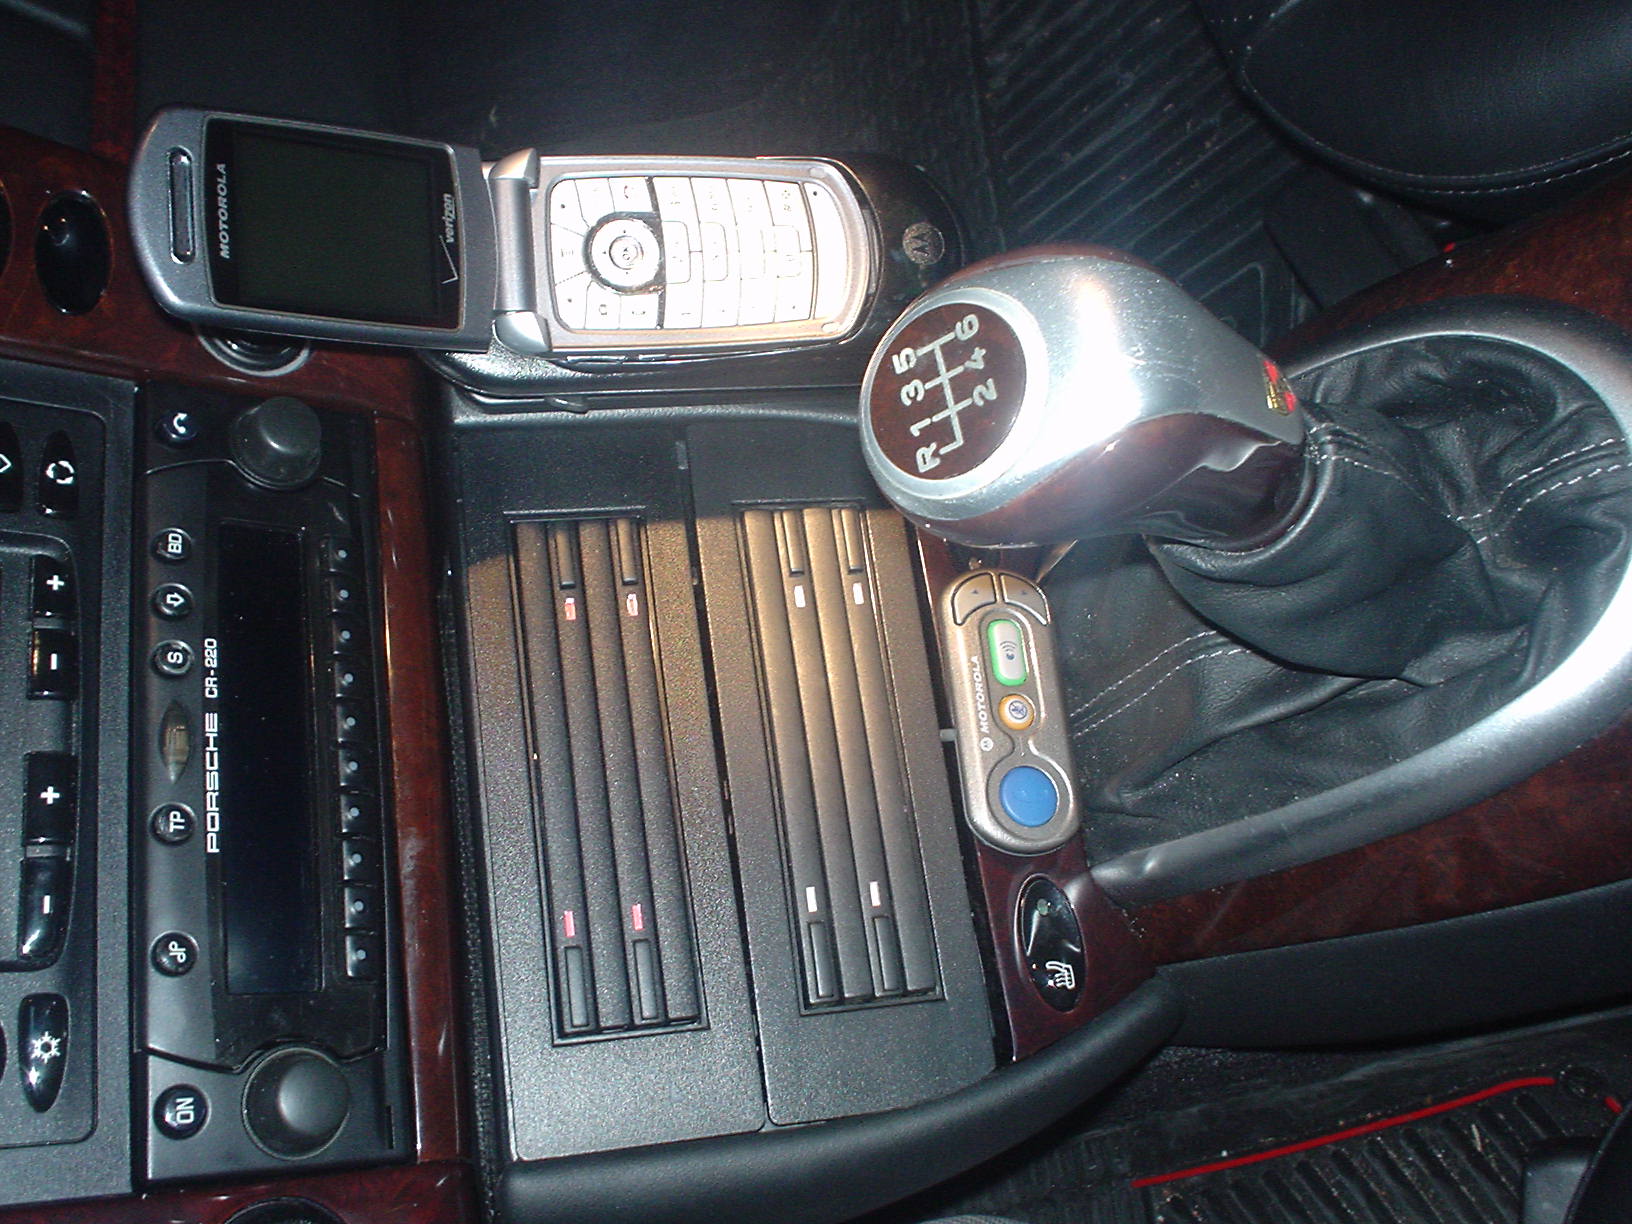
Sorry. Been away for a while. The lower CD holder just involved a little trimming of the face plate. Snapped right in. I have since replaced it with a cubby, as my iPod is used most of the time. I ended up changing the microphone placement from the instrument panel to the junction of the A pillar trim and the headliner. It seems to work better there. I have also changed my phone to one with a full qwerty keyboard. For mounting, I just zip-tied the swiveling belt clip to the mounting panel using existing holes from the previous mount. I also had to switch out the power cord, of course. Motorola has since updated kit to make the control panel smaller. The real nice thing is that it works with any Bluetooh phone. Phones can stay on your hip or in your bag.
-
Nano in an Ashtray
hspiva replied to tdgmd's topic in 996 Series (Carrera, Carrera 4, Carrera 4S, Targa)
I had an old Sony Network Walkman doing nothing, so installed (hardwired) it in my ash tray. I needed to remove the metal piece and use the Dremel a bit, but it works great and is hidden when the lid is closed. The Sony has its readout on the side, so fit in like toast in a toaster, with spare memory sticks alongside. The ash tray light stills works. Changing batteries is a pain, however. Hooking the Nano up to switched 12VDC and audio input in a removable fashion would be a better situation all around. -
Nano in an Ashtray
hspiva replied to tdgmd's topic in 996 Series (Carrera, Carrera 4, Carrera 4S, Targa)
I did a CD220 / Bluetooth install described in the 996 DIY section of this forum. The microphone location works well, as it is the right front speaker that the Becker kit activates. You just have to get used to not speaking at the speaker / radio. I placed the Bluetooth switch panel between my seat heater switches. A "four-hole batwing" is available if one needs an alternative for Porsche switches. Switch illumination is just a matter of tapping into the wire for another switch, or running a wire to the relay panel. Power and mute are conveniently located near the airbag control unit. This is described elsewhere in detail. My costs are described in my install post, so you'll get an idea of semi-plug-and-play parts involved. One last thing, Bluetooth has taken my mind off my phone, and let me drive. Good luck. -
Installation of Cellular Telephone Car Kit using Porsche Parts Intro This is a description of the installation of a Motorola Bluetooth Car Kit into a 2001 996 C4. I also wanted to be able to charge the phone in the car, and to use a hidden exterior antenna. As Bluetooth allows the phone to remain on your belt or in your briefcase or purse, the antenna and console parts are optional. In the pictures, I elected to initially mount the phone control unit in the center console. When I install my seat heaters, I’ll most likely move it under the passenger seat. As I have a black leather interior, exposed parts are black plastic or vinyl. You will need to change these to match your interior. The seat stop is to prevent the passenger seat from hitting the console. The cost of this project is roughly: $200 for a hands-free car lit for most phones. Non-Bluetooth kits include cradle. $50 for a phone cradle with power and antenna connections $100 for the parts necessary to install a vinyl console. For leather, add at least $250. $150 for the parts necessary to install the Porsche antenna $20 for the parts necessary to connect Becker radio and car kit to sound, mute and power Relevant TSBs: “Preparation for Mobile Phone Installation Instructions” #9187 “THB System 8 Telephone Installation Instructions” #9191 (good pictures) Becker Parts for Phone Sound, Aux Sound, Mute, and Power: 1319 116 276 1 Audio/telephone cable kit 5001 524 276 1 Phone power cable Call Becker of North America at 201-327-3434 Porsche Parts: 996 647 125 00 1 Telephone Antenna (LHD) 996 647 127 00 1 Antenna Holder (LHD) 999 507 067 09 4 M5 Sheet Metal Nut for antenna 999 073 203 00 4 Combination Screw M5 for antenna 996 612 037 00 1 Antenna lead 996 552 094 04 A12 1 Phone console (black vinyl) 996 552 624 02 1 Holder bracket for telephone console 999 919 121 09 5 Oval-head screw M5x16 for holder bracket & console 996 552 298 00 01C 1 Top cover for mounting of phone cradle (black plastic) 996 552 824 00 01C 1 Cover plug for top cover screw (black plastic) 999 073 210 00 1 Sheet metal screw M4.8x13 for top cover 996 521 663 01 1 Seat stop for comfort seat (electronic) or 996 521 665 00 1 Seat stop for mechanical seat (manual) Other Parts: Mini VHF to FME adapter to connect antenna lead to phone cradle Additions and Variations to TSBs: Prep work The cowl panel cover (big plastic piece between windshield and trunk) comes off and the antenna mounts to its right side bottom. The TSB has pitiful line drawings. See picture. After popping off the covers for the wiper and cowl nuts, they come off with a 13mm box wrench and 10mm socket, respectively. The other screws need a Torx #20. Moving the battery is necessary for running the antenna lead (and safety). You do not need to remove the right front seat unless you are locating the phon econtro unit underneath. Removal of the left may help in re-installing the service grommet. You do not need to remove the sill or sill linings. Install telephone antenna This is a good time to change your pollen filter, as the antenna bracket will block access. Route antenna lead into passenger compartment This is the most painful procedure, as the service grommet has insulation glued to it, so must be removed to run the antenna lead. Re-installation is awkward. Install electrical wiring harness Your center console should be empty, and carpet and trim pieces on the right side removed. The Becker radio kit comes with radio removal tools. This is where you blend your hands-free car kit with the Becker parts. All PCNA cars have a “telephone preparation” socket at the bottom of the front center console. Your Becker phone connector plugs directly into it. Note: the wire colors on the socket may not match the wires on the plug. The socket provides switched and un-switched 12VDC, ground, and mute. This is a good source of power for such things as MP3 players and garage door openers. The Becker Radio Kit has everything needed to use you car speaker (right front) as the phone speaker. This is a good time to install an auxiliary input to your radio for future MP3 player installations. I tend to leave wires at their maximum length until I have used the item for a while. If you decide to move the phone control unit, you’ll need the length. Use the proper adapter, if necessary, to connect the antenna lead to your phone cradle. Install microphone Use the microphone that came with your phone’s car kit. Mounting the microphone in the Porsche location may take some modifications, but is the best choice. The TSB does a good job of describing cable routing. Use a stiff wire to run the cable towards the windshield through the instrument cluster. Install telephone bracket Now is when you re-install the service grommet, carpet pieces, radio, and other console items. Before installing the lowest console unit, install the “batwing” and place the phone touch pad in the center of it. This is where using Porsche Parts is most pleasing. All fits are precise. Mount your phone cradle to the top cover using instructions that came with the cradle. Once all wires are tucked away, and the phone cradle wires are routed through the console, mount the console on the bracket. There is a small cover on the console to which I ran a “N” socket for switched 12VDC. The top cover with phone cradle mounts easily. Enjoy!

-
Nope. If the phone is on when you start the car (or hit the button), it will link up automatically. The phone also has an "auto hands free" setting under "car settings". I'll finish the install soon, and post a parts list with cost, aTSB list, and pics.
-
I am just finishing a very nice installation of a Motorola Bluetooth Car Kit for my new Motorola v710 cel phone. I used parts from Porsche's cel phone "Solution", and a couple of TSBs. The result is a very clean look. Before I take up site bandwidth, I thought I'd check for interest from moderators and members. I'd like to give back to a forum that has been invaluable to me. If acceptable, please describe the preferred posting protocol for such a procedure. I'm a wrench more than a techie. Thanks in advance for your input.
-
Rear Window cleaning
hspiva replied to RayGT3's topic in 996 Series (Carrera, Carrera 4, Carrera 4S, Targa)
Ditto on microfiber pad on the end of a stick. I use the window cleaner from Griots Garage, but they do not ship it to California. Our beloved C.A.R.B. doesn't like the alcohol content of their formula. I've used a mixture of Windex and alcohol in a pinch. A little goes a long way on inside glass. If you have Window tinting, the same website sells a "plastic cleaner" that is excellent. They sell the stick above also. Good luck. -
The clear or "smoked" lenses make an incredible difference on dark cars. Lots of sources for these parts. eBay often has a few choices. I have an extra pair of smoked side marker lights that I'll offer here before listing on eBay. They are new and in the Hella (OEM) boxes wraped in the original tissue paper. How about $30 plus shipping? I have also seen protective headlight film that was tinted, but it was not my thing. Enjoy!
-
Window tint
hspiva replied to jimmy1117's topic in 996 Series (Carrera, Carrera 4, Carrera 4S, Targa)
Window tinting may seem innocuous, but it will result in a ticket if you are in a small town or have already captured the badge's attention. Fortunately it is a "fix-it" ticket as far as insurance is concerned. Having consulted with more reasonable law enforcement types, I recommend the following: 1. If you are going to tint the front windows, tint the windshield, and make sure all windows match. It looks more "natural" - whatever that means. 2. If you are not going to tint the windshield, but want to tint the fronts, go lighter than the rear and not much darker than the windshield. Again a more "natural" appearance, and plausible tint deniability. My car has option 1 and has had no problem with 37% all around. It is also a black car. I always drive as if the car was stolen. My wife has option 2 and was hassled after being pulled over for speeding in her SUV. She denied any aftermarket tinting on her part, and was "only" ticketed for speeding. Drive carefully out there, especially in the Peoples Republic of California -
I'd like to do the same. I have a wood handbrake handle/button that I'd like to switch with my wood/aluminum-look hand brake handle and button. That would allow me to keep the matching leather and stitching. I thought I might just try unscrewing the button and pulling off the handle, but thought it best to check around first.
-
PSE Exhaust Conversion
hspiva replied to 911h20's topic in 996 Series (Carrera, Carrera 4, Carrera 4S, Targa)
Try this option. No "stealth mode", but less $$ and less weight: Fabspeed muffler bypass -
Thanks. Your pics are invaluable. I especially liked the detail of the vacuum attachment, as that seems to determine "switchability". I'm gathering funds and then parts to install the rain sensor, auto-dimming mirrors in and out, seat heaters, and PSE. In the meantime, I'm going to do a "cupholderectomy". Like with my wife's Touareg, these mods are a "benevolent disease", eh?
-
DSP amp upgrade
hspiva replied to P.Viby's topic in 996 Series (Carrera, Carrera 4, Carrera 4S, Targa)
How hard is it to add DSP to a CDR-220? I don't like my cupholders (even if in leather), and would prefer to substitute DSP. If this is not an option, is there a work-around to add PSM-1 and DSP? -
What do all these numbers mean
hspiva replied to DeAd-EyE's topic in 996 Series (Carrera, Carrera 4, Carrera 4S, Targa)
Stan, you might be mistaking eights for sixes. I also have 236 (18" tires), X76 (flared rocker panels), and 09981 (unknown). I also have XKN and XKS (unknown) 09991 (Exclusive Program) is a special order. The first owner of mine ordered all leather and all wood. You have to do this "off" the usual order form. I have five or six lines of options - primarily leather and wood. I've sent for a Cert of Authenticity, so will report back. Congrats on your unique Eleven. -
No need for "fitted" luggage in C4
hspiva replied to hspiva's topic in 996 Series (Carrera, Carrera 4, Carrera 4S, Targa)
I love it. It's main function is to protect the lid from dings from contents. Since it is just plastic and foam, its weight is minimal. The cardboard box in which it arrived weighed more. -
Where do you park your Porsche
hspiva replied to JimPDX's topic in 996 Series (Carrera, Carrera 4, Carrera 4S, Targa)
My wife and agree to be careful. We usually don't use valets, rather tip them to keep it on the porte cochere. We have never been denied. I would add to your list: Park on "high ground". A sudden rainstorm and flood (not hurricane!) in New Orleans turned my 1986 911 into a U-boat. Fortunately the insurance paid well. It was a sorry sight, however. -
This is a bit "low tech", but it may save an owner some money that can be better spent on a higher tech item: The 996 C4 "boot" space can fit a (rectangular) piece of luggage 22"x 14" x 10". Coincidentally, the Porsche "fitted" luggage "small trolley" in both aluminum and "ultralight" match these measurements. The international airline standard for a carry-on bag is 22" x 14" x 9". Hence, all luggage OK for airline carry-on will fit your 996 C4 - and vice versa. Please note that the space in the 996 C2 is slightly larger (22" x 14" x 15.75") due to the mini-spare stored upright, rather than the collapsible spare stored horizontally. I put the money into the Das Schild, and some other fun stuff, and used a rolling carry-on I already owned. I hate rattles and dents.