Welcome to RennTech.org Community, Guest
There are many great features available to you once you register at RennTech.org
You are free to view posts here, but you must log in to reply to existing posts, or to start your own new topic. Like most online communities, there are costs involved to maintain a site like this - so we encourage our members to donate. All donations go to the costs operating and maintaining this site. We prefer that guests take part in our community and we offer a lot in return to those willing to join our corner of the Porsche world. This site is 99 percent member supported (less than 1 percent comes from advertising) - so please consider an annual donation to keep this site running.
Here are some of the features available - once you register at RennTech.org
- View Classified Ads
- DIY Tutorials
- Porsche TSB Listings (limited)
- VIN Decoder
- Special Offers
-
OBD II P-Codes - Paint Codes
- Registry
- Videos System
- View Reviews
- and get rid of this welcome message
It takes just a few minutes to register, and it's FREE
Contributing Members also get these additional benefits:
(you become a Contributing Member by donating money to the operation of this site)
- No ads - advertisements are removed
- Access the Contributors Only Forum
- Contributing Members Only Downloads
- Send attachments with PMs
- All image/file storage limits are substantially increased for all Contributing Members
- Option Codes Lookup
- VIN Option Lookups (limited)

Ahsai
-
Posts
2,804 -
Joined
-
Last visited
-
Days Won
10
Content Type
Profiles
Events
Forums
External Paint Colors
Downloads
Tutorials
Links Directory
Collections
Classifieds
Store
Everything posted by Ahsai
-

Service time for water pump and thermostat question
Ahsai replied to mcmike27's topic in 986 Series (Boxster, Boxster S)
Forget about the original housing. You can get a plug-and-play NEW housing that comes with the low temp thermostat installed from Pelican (Wahler or MotoRad) http://www.pelicanparts.com/cgi-bin/ksearch/PEL_search.cgi?command=show_part_page&please_wait=N&make=POR&model=986M§ion=WATpmp&page=1&bookmark=5&part_number=996-106-013-59-M902 Quite reasonably priced. -
Coolant leak Challenge?!?!
Ahsai replied to Hobbes's topic in 996 Series (Carrera, Carrera 4, Carrera 4S, Targa)
Smart choice :) -
Oil Level Check after refueling
Ahsai replied to jl-c's topic in 997-1 Series (Carrera, Carrera 4, Carrera 2S, Carrera 4S)
If your engine is fully warmed up when refilling, AND if you refill the whole tank (takes longer), it should only wait a few seconds to give you the oil level reading. I know because sometimes that's how I got the low oil level warning first. -
Coolant leak Challenge?!?!
Ahsai replied to Hobbes's topic in 996 Series (Carrera, Carrera 4, Carrera 4S, Targa)
Excellent time to replace that starter/alternator "y" cable since you have done almost all the labor for it already. Just need to remove the alternator. -
yet another P1123 newbie thread
Ahsai replied to JasonStern's topic in 996 Series (Carrera, Carrera 4, Carrera 4S, Targa)
That makes a lot more sense. Your fuel trim numbers seem to suggest both banks are affected, maybe more so in bank 1 so I won't be so sure about leaky injectors. In addition to the techron cleaner I think it's a good strategy to wait and see till the CEL comes on again, which will make diagnosing the problem easier. -
+1 on Sunset. Unbeatalbe price and great staffs there, friendly and helpful. Always have good experience buying from them. They always check the parts you order against your VIN to give you the correct and latest parts. I wish they have online ordering though. Some other aftermarket parts I would go with Pelican e.g,. alternator regulator
-
It is not uncommon for a generic or "global" OBD II scanner to not see some codes on Porsches; you need to have it scanned with a Porsche specific scanner such as the PIWIS or Durametric system. something like this? http://www.auto-tool-shop.com/porsche-piwis-tester-p-235.html Try Durametric. Much cheaper at $250-ish If you use an Android phone, you can get a $15 OBDII bluetooth scanner and the $5 Torque App. Leave the scanner in the car and plug it in as soon as the CEL is ON. It sounds like you had some misfires that cleared out by the time you tried to read the codes.
-
Need help from the collective: P1699
Ahsai replied to Brad Roberts's topic in 987-1 Series (Boxster, Boxster S)
How's the voltage with the a/c, rear defroster, and heated seats (if equipped) all ON? If it's lower than 13.2V, it's likely you have a alternator/cable problem. -
yet another P1123 newbie thread
Ahsai replied to JasonStern's topic in 996 Series (Carrera, Carrera 4, Carrera 4S, Targa)
Can't imagine how you can get excessive vacuum. That kind of vacuum you will only get if you snap the throttle and close it abruptly. When the engine is only idling, it can't generate that much vacuum. Can you test your gauge on another vacuum port directly off the intake manifold or on another car just to make sure it's accurate? Also, if the vacuum is trully excessive, you should see a lower fuel pressure based on how the regulator works. However, your idle fuel trim is Removing fuel so that's not consistent. -
Can't explain the coil packs but glad it was an easy fix :)
-
yet another P1123 newbie thread
Ahsai replied to JasonStern's topic in 996 Series (Carrera, Carrera 4, Carrera 4S, Targa)
In that case, I think your 0.9 bar ( negative 0.9 bar strictly speaking since 0 bar gauge reading = atmospheric pressure) is highly suspicious since it's close to complete vacuum. Our engines just cannot produce that much vacuum at idle. You should read about -0.58 bar (17 inHg) if you are at sea level. http://www.renntech.org/forums/topic/40898-need-help-with-intake-vacuum-gauge-reading-from-more-cars/#entry241744 -
You need to measure it again when the engine is fully warmed up. When cold idling, the throttle butterfly is partially open letting more air in hence less vacuum.
-
yet another P1123 newbie thread
Ahsai replied to JasonStern's topic in 996 Series (Carrera, Carrera 4, Carrera 4S, Targa)
Question, does your vacuum gauge read 1bar absolute pressure (i.e., 1 bar = atmospheric pressure) when it's not connected to anything? If so, 0.9 bar reading means the vacuum is very weak that it's very close to the atmospheric pressure hence not providing much vacuum. That is different than saying 0.9bar of vacuum or 26.6 inHg, which btw I don't think our engine can ever pull even at idle fully warmed up. Another point is the pdf is for Boxsters so the detail numbers may not be the same as 996's although I would imagine the pressure specs should be close. I could not find the 996 equivalent version. -
Alternator terminal B+ access
Ahsai replied to dphatch's topic in 997-1 Series (Carrera, Carrera 4, Carrera 2S, Carrera 4S)
The higher v drop at cold start is normal due to the high current drawn by the secondary injection pump and the current charging the battery after the starter current draw.Not sure what other loads you had at the time. 150mV drop is excellent if you had the a/c and low beam ON (~54A total load). Just for reference. On my 996 with the new cable, my B+-to-battery-POS v drop is 180mV @ 54A on a hot engine. -
Alternator terminal B+ access
Ahsai replied to dphatch's topic in 997-1 Series (Carrera, Carrera 4, Carrera 2S, Carrera 4S)
Just to add to Bing's and JFP's comments, take my example of losing 0.5V on that 3 feet cable when the load is 50A. The equivalent resistance is then 0.5V/50A =0.01 Ohm. Even a Fluke 87V has a resolution of only 0.1 Ohm when measring resistance, hence NOT capable of measuring such low resistance. -
You can use CHF202, which supercedes (and is compatible with) CHF11s http://www.globalautoparts.biz/pentosin_hydraulic_fluids.html
-
To find out where you lose voltage, check post #9 here http://www.renntech.org/forums/topic/44471-voltage-regulator-affected-by-heat-hence-low-voltage/#entry240001
-
yet another P1123 newbie thread
Ahsai replied to JasonStern's topic in 996 Series (Carrera, Carrera 4, Carrera 4S, Targa)
Your "O2 2k" graph is very strange that the sensors are swinging way too slowly. Was the reading taken at idle or other rpm? Also, what was the sampling rate? At idle, I expect swinging about once per second and at 2k rpm, the swinging should be even faster. -
yet another P1123 newbie thread
Ahsai replied to JasonStern's topic in 996 Series (Carrera, Carrera 4, Carrera 4S, Targa)
Jason, You have already been posting precat O2 sensor readings for both banks (red=bank1=cyl 1-3, lue=bank2=cyl 4-6) so all you need is post-cat O2 sensor readings, which is not that critical in this case I think. Your TRA is -0.24 (bank1) and -0.19 (bank2), which means at idle, the DME has to REMOVE 24% and 19% of fuel to keep the ideal A/F ratio. Your FRA is +1.10 (bank1) and +1.08 (bank2), which means at load, the DME has to ADD 10% and 8% of fuel to keep the ideal A/F ratio. So whatever you have seems to be affecting both banks. The readings seem to very close to "too little fuel at load" example #3 on page 8 here. -
I just replaced mine ('03 C2 manual transmission) so yours may be a bit different. You can check with Sunset Porsche or Suncoast Porsche for the latest cable for your car based on your VIN. I didn't need to remove the starter and the following steps worked for me: - remove the airbox, drive belt, then the alternator - remove cable from alternator - peel back the thick rubber sleeve on the starter +ve terminal then remove the connection nut using very long extension - remove the throttle body - unscrew the power steering fluid reservoir cap then rotate (not remove so no fluid loss) the reservoir anti-clockwise to make room for a/c compressor removal - remove the a/c compressor (3 bolts. Bolts will stay on the compressor. One bolt at the back that can be seen by an inspection mirror. Remove the engine compartment temp sensor with the rubber grommet between the 4&5 intake runners and put an extension there). The compressor only needs to come out slightly to create clearance for the bulky jump start terminal to pass - there's a plastic bracket in the middle of the cable that snaps and locks onto a palstic tab which in turn mounts on the engine. Cut the old plastic bracket with a pair of dikes but make sure you don't damage the tab the bracket locks onto. - cut the zip tie that's in the middle of the cable - remove the cable from the left of the engine bay Install is the reverse except snap the plastic bracket onto the tab only at the final step because it's virtually impossible to disengage it once it's locked in, except destroying it.
-
Alternator terminal B+ access
Ahsai replied to dphatch's topic in 997-1 Series (Carrera, Carrera 4, Carrera 2S, Carrera 4S)
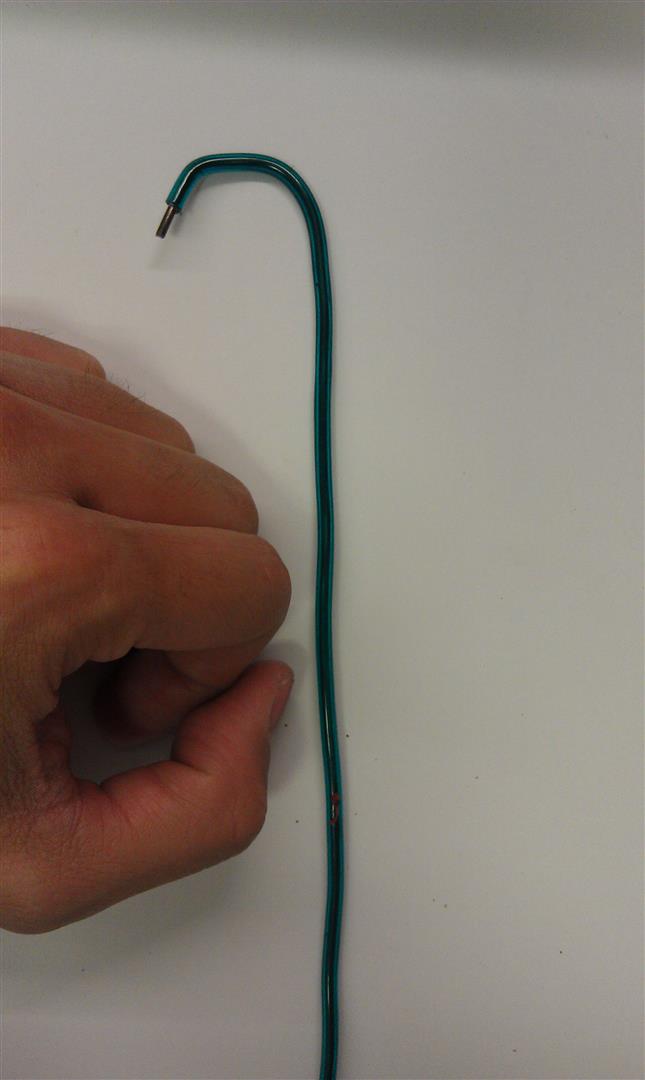
My "secret weapon" for the B+ terminal :) A solid core insulated stiff wire hooking from the back of the alternator, with about 1/4" of metal wire exposed. Just conenct it to your multimeter first, then probe the back for a quick reading. You have to hold it by hand otherwise it can't stay connected though but it's good eough for checking v drop of that starter/alternator cable under load. Wear protective glasses and be very careful pooking around the rotatating pulleys and the always live terminal though. I got a v drop of 0.4v sometimes between the B+ and the engine +ve jump start point in the engine bay (low beam and a/c ON) so I knew the cable is bad. Removed it and saw lots of corrosion at the starter end. Replaced it with the latest cable and now the v drop is not even 0.1v under the same condition.Clever approach. Is the engine running or are you measuring while energizing the starter ? Where is the +ve jump start point in the engine bay ? Not familiar with that but will google it . I measured everything only when engine is running because I don't have a helper to help me crank. Actually just realized your car does NOT have that jump start terminal in the engine bay. I was thinking about my 996. Sorry about that. Your cable actually goes from B+ to the starter, then to the battery (with a connection point in between at the transmission). In you case, you will have to measure the v drop between the B+ and the battery +ve post in the frunk then. When you load the car with a/c and low beam, the load is about 50A. If you further add rear defroster and two heated seats, you get about 90A going through that cable. If there's corrosion, v drop will show up (0.4v in my case @50A only) between the B+ and the engine jump terrminal (only 3 feet of cable). Even when cranking, the current is only about 200A momentarily and then tappered to 100-60A. So 90A load on the alternator is enough to test that cable. -
Alternator terminal B+ access
Ahsai replied to dphatch's topic in 997-1 Series (Carrera, Carrera 4, Carrera 2S, Carrera 4S)
My "secret weapon" for the B+ terminal :) A solid core insulated stiff wire hooking from the back of the alternator, with about 1/4" of metal wire exposed. Just connect it to your multimeter first, then probe the back for a quick reading. You have to hold it by hand otherwise it can't stay connected though but it's good eough for checking v drop of that starter/alternator cable under load. Wear protective glasses and be very careful poking around the rotating pulleys and the always live terminal though. I got a v drop of 0.4v sometimes between the B+ and the engine +ve jump start point in the engine bay (low beam and a/c ON) so I knew the cable is bad. Removed it and saw lots of corrosion at the starter end. Replaced it with the latest cable and now the v drop is not even 0.1v under the same condition.
-
yet another P1123 newbie thread
Ahsai replied to JasonStern's topic in 996 Series (Carrera, Carrera 4, Carrera 4S, Targa)
Now I see what the problem is. Jason said he saw 0.4V-0.78V but your post said 0.4mV to 0.78mV....the units are different. -
yet another P1123 newbie thread
Ahsai replied to JasonStern's topic in 996 Series (Carrera, Carrera 4, Carrera 4S, Targa)
Hi Bing, Did you mean the opposite? 0.4V~0.74V indicates the sensor sees a RICH mixture so the DME will try to reduce fuel (i.e., fuel trim will be negative). Also consistent with the code, which complains that the DME needs to remove too much fuel to get the correct A/F ratio. Jason, Your attached O2 readings seems to be for bank 1 (red) and bank 2(blue) both pre-cat sensors. They look fine (good voltage range) albeit switching a little slower than I remember. Would be good to also log the same during cold start. Should take a couple of minutes if that to get smiilar swinging measurements since the O2 sensors are heated. -
yet another P1123 newbie thread
Ahsai replied to JasonStern's topic in 996 Series (Carrera, Carrera 4, Carrera 4S, Targa)
This is for boxsters but the principles should also apply to 996's http://www.pelicanparts.com/techarticles/Boxster_Tech/19-FUEL-02_Sensor/OBD-II-scan.pdf It calls for checking fuel pressure too high and leaking injectors. When you said O2 sensor reading 0.4 to 0.8V, was that from the pre-cat sensor or post-cat sensor? Which bank? It will help if you can plot the pre-cat O2 readings of both banks together to compare the two during idle no load and fully warmed up. That way, you can see if your problem exists only on bank 1, which the code complains about. A fuel pressure problem should affect both banks.