Welcome to RennTech.org Community, Guest
There are many great features available to you once you register at RennTech.org
You are free to view posts here, but you must log in to reply to existing posts, or to start your own new topic. Like most online communities, there are costs involved to maintain a site like this - so we encourage our members to donate. All donations go to the costs operating and maintaining this site. We prefer that guests take part in our community and we offer a lot in return to those willing to join our corner of the Porsche world. This site is 99 percent member supported (less than 1 percent comes from advertising) - so please consider an annual donation to keep this site running.
Here are some of the features available - once you register at RennTech.org
- View Classified Ads
- DIY Tutorials
- Porsche TSB Listings (limited)
- VIN Decoder
- Special Offers
-
OBD II P-Codes - Paint Codes
- Registry
- Videos System
- View Reviews
- and get rid of this welcome message
It takes just a few minutes to register, and it's FREE
Contributing Members also get these additional benefits:
(you become a Contributing Member by donating money to the operation of this site)
- No ads - advertisements are removed
- Access the Contributors Only Forum
- Contributing Members Only Downloads
- Send attachments with PMs
- All image/file storage limits are substantially increased for all Contributing Members
- Option Codes Lookup
- VIN Option Lookups (limited)


Cefalu
-
Posts
60 -
Joined
-
Last visited
Content Type
Profiles
Events
Forums
External Paint Colors
Downloads
Tutorials
Links Directory
Collections
Store
Everything posted by Cefalu
-
Updated chain tensioner
Cefalu replied to Cefalu's topic in 996 Series (Carrera, Carrera 4, Carrera 4S, Targa)
OK, got it. I have the original roller type chain, so the 996-105-180-57 is the newest tensioner for my car. The exterior spring style tensioner is only for the later tooth type chain. I thought maybe the dealer had sent me an old part since it lacked the spring, and I didn't want to miss out on all that bonus spring goodness! I plan to install this weekend while I change my oil. Thanks!! -
DIY clutch replacement?
Cefalu replied to midlifez's topic in 996 Series (Carrera, Carrera 4, Carrera 4S, Targa)
The biggest tip on a clutch replacement is to R&R the clutch slave and upper bell housing bolts after you have tipped the trans down. It gives you much easier access. The clutch is one of those "while you are in there" jobs, do the AOS and IMS bearing too. -
Updated chain tensioner
Cefalu replied to Cefalu's topic in 996 Series (Carrera, Carrera 4, Carrera 4S, Targa)
From what I can tell, the latest greatest IMS tensioner is updated from 996-105-180-56 TO: 996-105-180-57. That's what Logray concluded last June in the thread referenced above. But, the big question I have is, I thought the newest design(s) were supposed to have a supplemental exterior spring to increase the chain tension when there is no oil pressure present, such as a cold start. -
Updated chain tensioner
Cefalu replied to Cefalu's topic in 996 Series (Carrera, Carrera 4, Carrera 4S, Targa)
I must be missing something here! I read the TSB and that thread before I posted my question. The TSB seems to talk about the overall change to a tooth type chain, and an improved IMS seal. I can't change my chain type, so the TSB does not seem to apply to me. And I installed the ceramic IMS bearing so I have the modified IMS seal already. As far as the TSB goes, I think I have done as much as I can without tearing the motor totally apart and replacing the chain type. The thread was confusing to me, and to the posters who participated in it as well. I knew I had the most recent part numbers, according to that thread, but the TSB and the thread referred to an updated tensioner that had an exterior spring. JFP noted in that thread the exterior spring was the new design. And mine did not come with a spring. That's the issue. Is mine an update of the updated design? -
Broken Oddments Tray Hinge
Cefalu replied to Loren's topic in DIY Articles - Carrera (996) - Common Fixes and Repairs
I replaced my hinges without removing the center console either. It did help to use needle nose pliers to install the "U" shaped aluminum backing channel in. I also went one size up in the river . I thought the factory rivet was too small. -
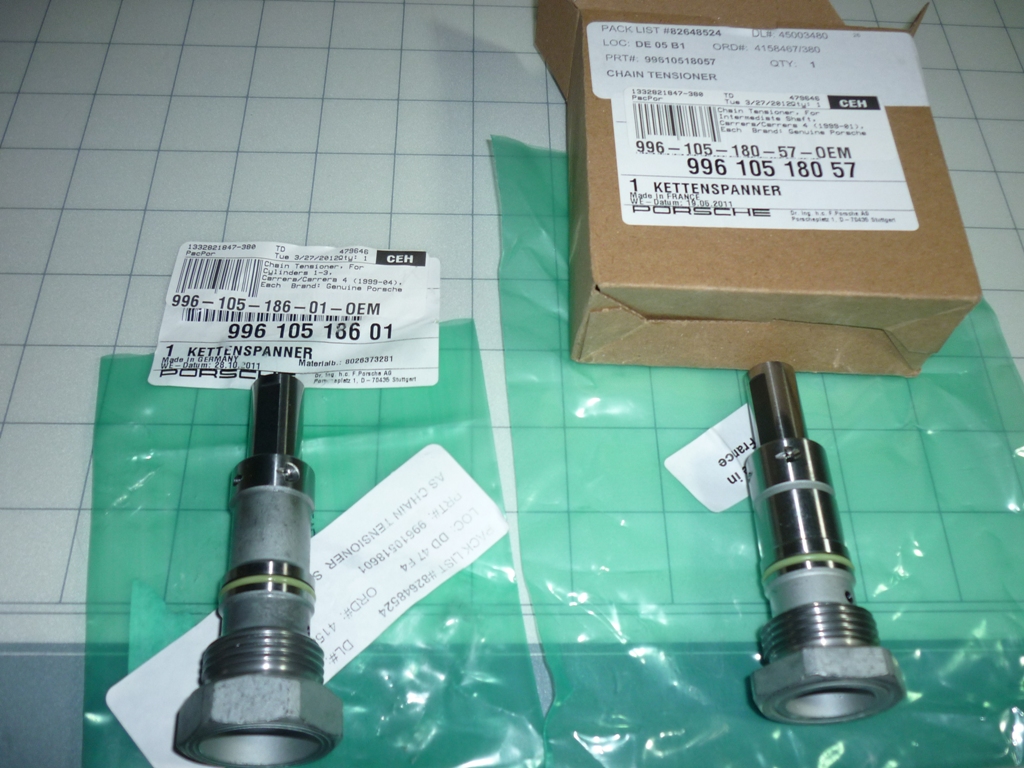
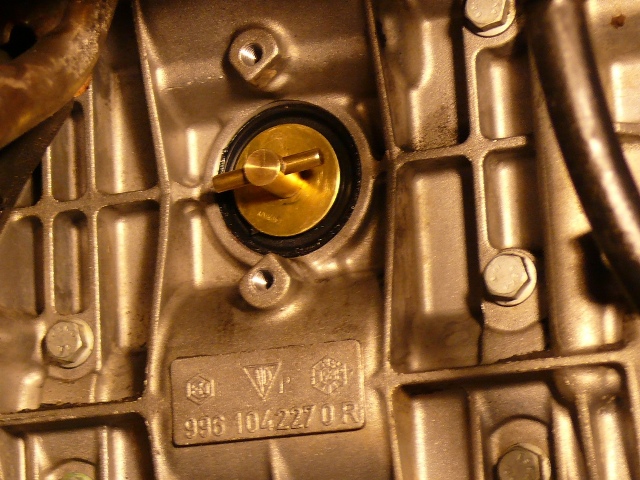
When my 1999 996 sits for a week or so and isn't driven, I get a brief moment, maybe 1 sec where I can hear what I think is the cam chain at a cold start. I know tappet sounds and I don't think that's the issue. So I ordered two new tensioners, 1-3, and IMS (not 4-6 too hard to get to for now) to see if that fixes the issue. I was expecting to receive the updated style which had the exterior spring. These ones don't have the exterior spring. Did I get the old type? Or has it changed again? The attached pic shows I received parts 996-105-186-01 and 996-105-180-57. Correct part number but old part sent? Thanks, Doug

-
1999 996 Cabriolet
Cefalu replied to Bmargetts's topic in 996 Series (Carrera, Carrera 4, Carrera 4S, Targa)
This doesn't help you much, but mine will only let me put the top up and down with the e brake on with the engine off. My top will not go up or down with the engine on. -
IMS tools
Cefalu replied to Black_on_black's topic in 996 Series (Carrera, Carrera 4, Carrera 4S, Targa)
The 5 chain motors are easier. Locking the accessory belt pully and pulling 2 of the 3 tensioners will suffice. Done it personally. Many others have done it too. But the 3 chain motors have less " drag" and can unintentionally rotate when the bearing is pulled, throwing your timing off. Pulling the 3 tensioners and locking the cams might be your safest approach on a 3 chain motor. It's an easy job if you do your research and go slow. Rennlist has lots of DIY writeups. -
I bought new seals , then decided I didn't want to chase down the connectors to unplug the solenoid wires. So I cleaned it all really well, and RTV silicone sealed them. Have not leaked since. I noticed that the solenoid was not exactly centered on the seal, so even a new seal was probably going to leak again.
-
I have an oil leak - PICS
Cefalu replied to white99c2's topic in 996 Series (Carrera, Carrera 4, Carrera 4S, Targa)
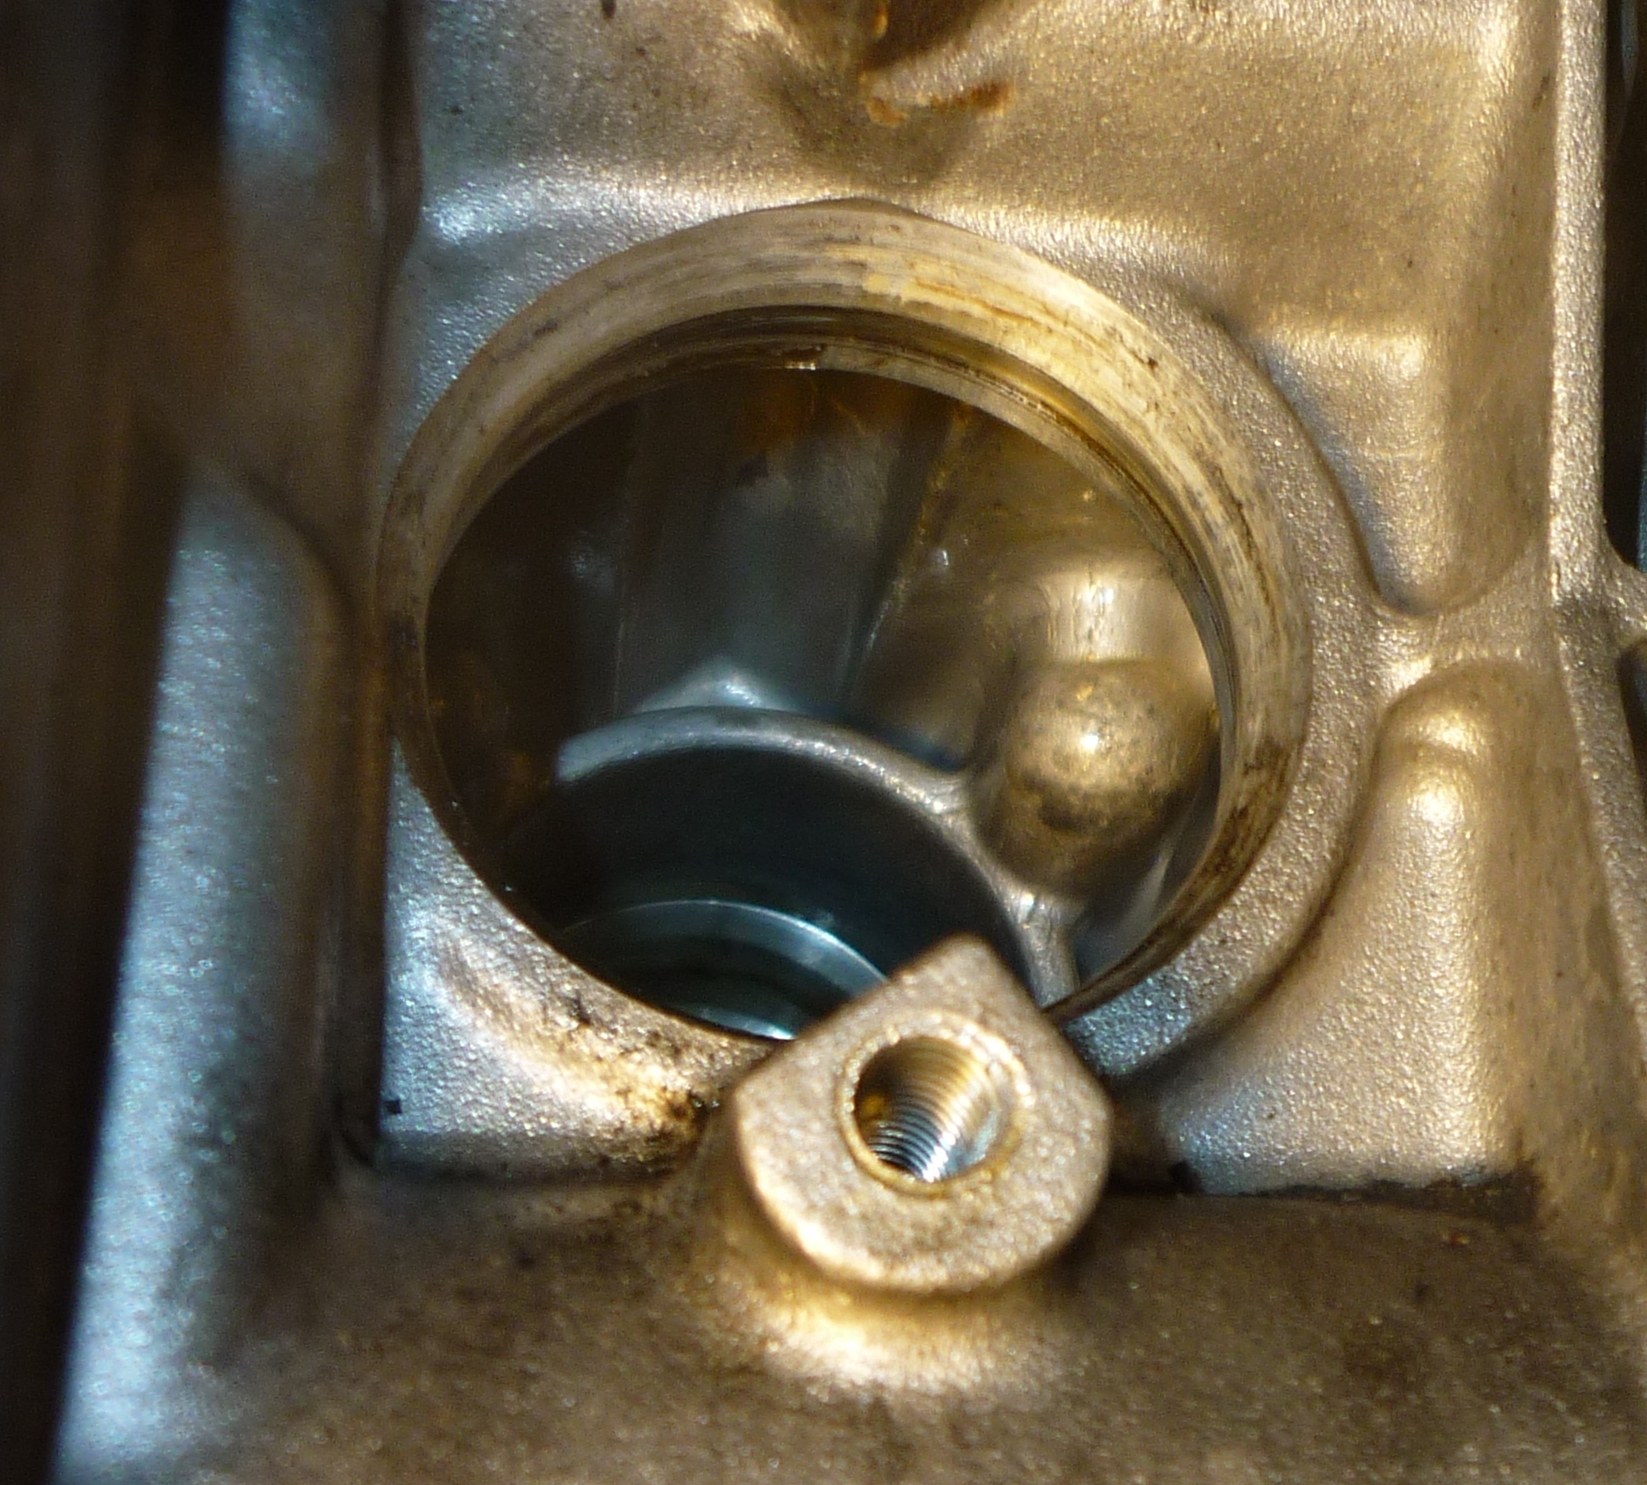
Here is the link to some photos which solved a similar leak on a 1999 C2. http://www.renntech....__1#entry172615 Attached is a pic of the solenoid I was reffering to. At the top of the picture is a circular object with some wires coming out. That's the solenoid. It has a flange with a gasket that sits on the solenoid. You can replace the flange seperately.
-
What's your mileage?
Cefalu replied to vwrado's topic in 996 Series (Carrera, Carrera 4, Carrera 4S, Targa)
1999 C2 cab, 6 speed, 61,000 miles. Vacuum switch on air pump failed, spark plug tube O rings leaked, small seperation is occuring between the plastic window and canvas, about 3" long right now. That's about it. Full (large) leather interior looks like new. Zero rust. Needed a new clutch at 60K miles, while I was in there I replaced the AOS, IMS bearing (LNE ceramic now) and RMS. RMS never leaked. factory IMS bearing was tight and no seal failure. AOS was fine too. Happy with car, it's a good runner. -
I have an oil leak - PICS
Cefalu replied to white99c2's topic in 996 Series (Carrera, Carrera 4, Carrera 4S, Targa)
Probably either the spark plug tube seals or the solenoid for the timing chain timing. I forget the porsche name for the solenoid. I have a '99 and they both leaked in that same spot. Easy fix. But clean and inspect. -
Reliability of 996 Engines
Cefalu replied to Loren's topic in 996 Series (Carrera, Carrera 4, Carrera 4S, Targa)
I have a 1999 C2 Cab with 61,000 miles. Has been well maintained and has been pretty trouble free. I had a relay go bad in the secondary air injection and that is the only problem I have had. It was a $20 fix However, it needed a new clutch, so I installed a new RMS, LNE ceramic IMS bearing and a new AOS. The old RMS was not leaking but I wanted to upgrade to the newest 997 version. The old IMS bearing was not exhibiting any signs of failure and the upgrade was purely for peace of mind. The IMS bearing flange seal was leak free. In fact there was no oil between the flange and the bearing. The old bearing was in perfect condition, tight and the seals were good. The AOS was not showing any signs of failure either, but it is very difficult to get to, and while I was in there replacing the clutch it made sense to swap it out. All done now and the car runs great (again) -
The '99's do have spark plug tubes whose O rings leak. That is probably the source of some oil. The cam solenoids tend to weep also. You can buy new seals for them as well. All in all pretty easy DIYr job. When I did my 60K service I changed the spark plugs, tube O rings and cam seals. No more leaks.
-
Leak when jacking up car
Cefalu replied to rlim's topic in 996 Series (Carrera, Carrera 4, Carrera 4S, Targa)
Bail on the hamburg technic. I bought some coil packs from them (eBay) Doushparts claimed were OEM. They were unmarked generic with no country of origin. I read on a BMW forum they are sourced from India and china. I would stick with OEM. I wouldn't risk adding a new vibration due to a lower quality motor mount. -
IMS "death rattle" ?
Cefalu replied to hindswillrox's topic in 996 Series (Carrera, Carrera 4, Carrera 4S, Targa)
I have a 1999 C2, Cab, 6 speed, w/ 58k miles and get the rattle on cold start if the car has been sitting for several days. I guessed it was the chain tensioners since the noise goes away after a second or so on cold start. I gave it a start this morning and no rattle, since I drove it yesterday. My clutch is a little grabby, so when I do the clutch I will do the tensioners, rails, IMS bearing etc. -
Oil Leak Around Coil
Cefalu replied to jbelliajr's topic in 996 Series (Carrera, Carrera 4, Carrera 4S, Targa)
Do a search on spark plug tubes, lots of info there. -
Replacing Spark Plug Tube
Cefalu replied to 986Flyer's topic in 996 Series (Carrera, Carrera 4, Carrera 4S, Targa)
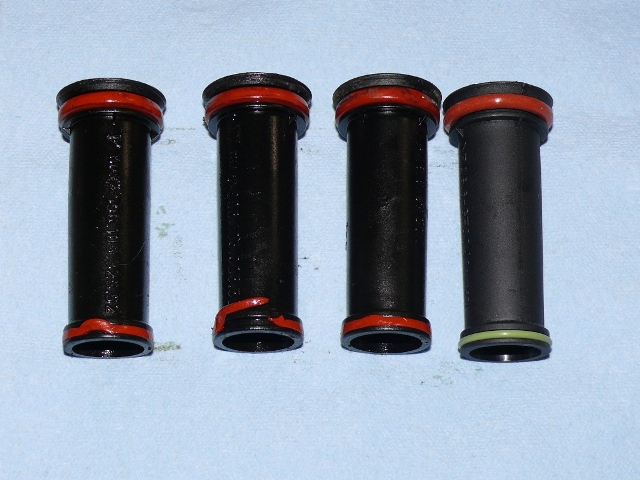
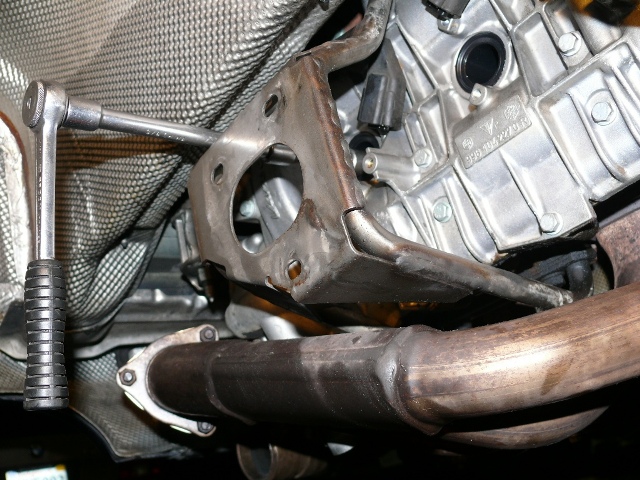
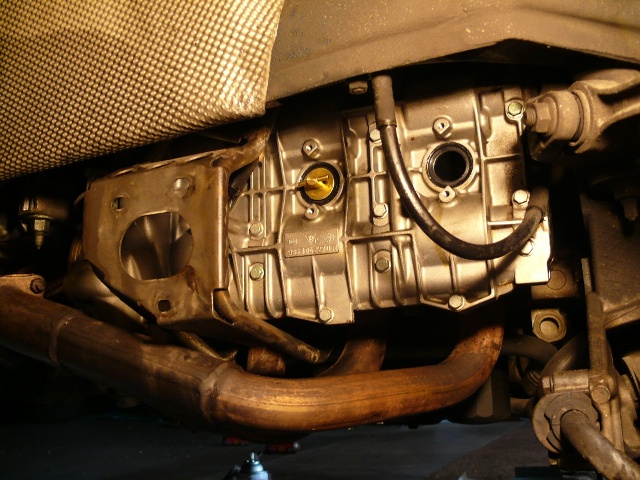
All my spark plug connectors and coil packs were fine. I cleaned them up with throttle body cleaner and they looked great so they all went back in. I replaced the tubes and O rings as a matter of precaution. I didn't want to go through this again because I tried to save $1.50 on an O ring. I had also heard that the tubes sometimes crack so I replaced all of them also. In hindsight, my tubes looked fine and I probably didn't need to replace them. I wanted to see how well the O rings seated after I installed a new tube, so I tried to pull a tube out with the boat plug contraption. It just slipped and I couldn't get the tube out. So I hope that meant I had a good seal. I was also very careful to apply even pressure on the tube when I installed them so I wouldnt get the O ring pinched when they went back in. The coil packs are held in place with 5mm allen head bolts. A normal 5mm allen socket is too long to fit on 3 of them. I also cut a 1/2" long piece of allen wrench off and inserted it in a 5mm 1/4" drive socket with a wobble extension to get at the upper coil pack bolts. I used a low profile stubby 1/4" ratchet. That combo worket just fine. To break them loose I used the typical angled allen wrench. 1/4" drive sockets/ratchets/extensions and the 5/8" magnetic spark plug socket I picked up for $6 on eBay were key to working in the tight space. No duct tape required as I have heard others use. I used wobble socket extensions instead of universals in the crooked connections. Pelican advertises a german made magnetic 13/16" socket for the 996's for $50, but the plugs are 5/8". Go for the $6 5/8" magnetic eBay one. And the three nuts on the muffler bracket go really speedy if you have an air ratchet to screw/unscrew. I had no trouble at all with the two 17mm nuts on the clamping sleeve once I shot them with liquid wrench and let them sit overnight. The mufflers were a breeze to drop. This won't be a bad job next time. -
Replacing Spark Plug Tube
Cefalu replied to 986Flyer's topic in 996 Series (Carrera, Carrera 4, Carrera 4S, Targa)
No drama finishing up. You are crazy if you don't take the exhaust off to do this job. In fact I would warn any one who is considering doing this job for the first time that you need to drop the exhaust so you can see what the heck you are doing. otherwise, 3 of the 6 spark plugs you will be doing by feel. If I were only changing the spark plugs, I might be tempted to leave the exhaust in place now that I have this job under my belt. But for those of you who have engines with tubes and O rings, you should R&R the O rings when you replace the spark plugs anyway. They are going to leak with time, and it makes a mess. I used 1 can of engine cleaner, 6 cans of carb cleaner and one can of electrical contact cleaner to clean up the oily mess. The exhaust takes 5 minutes to drop and 5 minutes to install on each side. 10 easily accessesd nuts total. You will drive yourself insane trying to R&R the upper allen screws of the coil packs with the exhaust in place. It will also be very difficult to pop the tubes and spark plugs in and out working with little light or hand space. What I found interesting was 4 of 6 inner O rings were pinched when the motor was built. If you look at the pictures below, every drivers side O ring was pinched out of place when the motor was built. You will also note that the pinch was at the bottom of the tube every time. AND the part number lines up with the pinch. For whatever reason, they installed the tube so the part number was facing down. One O ring was totally cut, and one looked fine. 5 of 6 failed. NOTE: the green O rings are a new PAG part # that superseded the orange ones installed at the factory. You need to be very careful when you connect the plug to the coil pack. Its not an easy fit. It takes some massaging and you need to hear the "click" to confirm the plug properly connected to the coil pack. Very hard to do with the mufflers in place. Since this was my first coil pack R&R, I wanted a visual confirmation as well, and you can't do that with the mufflers in place. With the spark plug tubes removed I was able to see what the inside of the head looked like, and I was very happy. Totally clean and looked excellent for a 57K miles motor. Tomorrow night I put the plastic cover back on the bottom of the car, replace the serpentine belt and my 60K service is done. Ho finito
-
Replacing Spark Plug Tube
Cefalu replied to 986Flyer's topic in 996 Series (Carrera, Carrera 4, Carrera 4S, Targa)
Wish me luck, tonight I do the drivers side. I hope all I find are bad seals and not cracked tubes where pieces are missing! I read a post where someone had a tube that cracked and they left a chunk of plastic in the motor. -
Replacing Spark Plug Tube
Cefalu replied to 986Flyer's topic in 996 Series (Carrera, Carrera 4, Carrera 4S, Targa)
Let me start off by stating this is the first time I have worked on a Porsche. Most of my wrenching has been done on Alfa's and BMW's. I am impressed with this Porsches engine layout. I thought it would be much worse than it has been. When you peek under the car or look in the engine compartment it looks like 10 lbs of Sh*t stuffed in a 5 lb sack!! But I am not impressed with this stupid spark plug tube. They had to know when they concocted this design it would leak. I too am in the process of doing the 60K service on my 1999 C2 Cab which includes replacement of the spark plugs. Because I read here on Renntech that the spark plug tubes often leak and possibly crack I also ordered 6 new tubes and all new seals. I have only done the passenger side, and discovered that 2 of the 3 seals were deformed and leaking oil. Those deformed seals must have become deformed by Otto when he popped them in the motor in Stuttgart. There is no way they could break and creep like that with time. I used a synthetic grease to lube them up and they easily popped right in. Of note, the spark plugs I found in my motor were Bosch, not Beru. I ordered new Bosch ones from Pelican. I went to West Marine who is a marine retailer to locate the T handle rubber expanding transom plug. The plug was $6. The 1" (25.4mm) plug was too small. The spark plug tube is 26.3mm dia. Even when I screwed the plug in as tight as I could get it, the plug wouldn't expand large enough to fit tight inside the tube. So I ended up buying a 1-1/4" plug and trimmed it down to fit. I used razor blades and a peanut grinder with a wire wheel to shape the plug. The reshaped plug worked perfectly and easily pulled the tubes out. You will note from the pictures how oily everything was. (My first clue my O rings had failed!) Despite this, the car never leaked oil on the ground or used oil. The tube leak was probably contained mostly by the outer seal. Although some did seep past. The tubes were full of oil, even on the one good seal. It took 3 cans of carb cleaner on the passenger side, and one can of electrical contact cleaner to clean up the 3 coil packs and plugs. I presprayed with an engine degreaser and let sit overnight before I cleaned with the carb cleaner. It looks much better. All of the coil packs were fine and had no cracks. Some people have noted it helps to remove the muffflers. ABSOLUTELY. I don't see how you can do this job otherwise. At least not with normal sized hands. Plus I didn't want to take any chances with the tube removal, spark plug threading and replacement of the coil packs. Considering how easy it is to drop the muffflers it's a no brainer. Most of these pics are the passenger side which is the "easy" side. The drivers side is worse. I started on the drivers side and gave up, then moved to the passenger side. That's tonight. To remove the muffler you need to loosen the two 19mm bolts on the round cat to muffler clamp. Push the clamp towards the cat side until the clamp is flush with the end of the pipe. Then there are 3 nuts which have to be removed from the plate which is attached to the bracket with the 4 pipe supports. The muffler is free at this point. You need to remove the rear tire too because the muffler slides forward and then down. I didn't know what I was doing, so I also removed the 2 very long bolts which bolt the muffler to the bracket, but in hindsight I don't think I needed to do that. That's it and then you have excellent access. Picture "tube 2" shows the support plate with the 3 holes that have the three nuts which have to be removed to seperate the muffler from the support bracket. Picture "tube 3" shows the muffler bracket before I removed the muffler with one of the two long bolts, that I don't think I needed to remove. Lastly, despite the warnings against using anti seize, I lightly used it. I have 30 years of experience (weekend warrior) of working on all aluminum engines, and I have never once had a problem with anti seize. I use the gold Lubro Moly brand and am careful when I torque fasteners. When I replace these plugs next time, I know they won't be seized and will screw out safely. It makes no sense to me to not use anti seize on a spark plug. When water, aluminum and steel are connected together it makes sense to me to use anti seize. All this work was done on a cold motor, not a warm one as suggested by PAG in the workshop manual.
-
I agree with your point completely. Areas in PA that require sniffers (usually larger metro areas) are not required to use rollers, the car is warmed up (often by taking to for a short drive), then connected to the sniffer. Shops like the one we use for state emissions have a four wheel chassis dyno with an airflow fan that they use to prevent unfortunate problems that occur when the 17 year old shop low-man takes a customer's year old Ferrari out to warm it up. What the 160 stat will do for a car stuck in traffic is to take longer for it to get hot, and then allow it to cool back to the lower base line temp when it gets moving, which is were most cars spend the majority of their time...........at least those outside of the Bay area................. It could be worse, you could live in LA. It's just one giant traffic jam down there. The Bay Area is bad traffic wise, but it's a smaller area. Your comments make sense to me. I am on the fence about the thermostat, but I think I understand better now what it will and won't do for me.
-
You will have a hard time getting any useful data while hooked to a smog machine. Here in CA they use a treadmill with a tailpipe probe and an OBD connection. They run the car at 25 mph on a treadmill. No airflow over the radiators, but the engine running at 25 mph and the vehicle at a dead standstill. Your cooling fans will be running and engine temps will be controlled by the DME fan controls, not a thermostat. You would need to rig some sort of external cooling supplement to get coolant temperatures low enough while on the treadmill to see what effect the 160 degree thermostat has. My only point here is everyone should understand that the 160 degree thermostat isn't going to help keeping coolant temps low once you stuck in traffic. At that point either thermostat is wide open and coolant temps are controlled by DME fan programming.
-
OK, so the time for the first cooling fan to actvate once you hit traffic is delayed with the 160 deg thermostat. I can see that, as you have the reduced thermal mass of 20 or so liters of coolant helping you out. However, once you are sitting there stuck in traffic, either thermostat ceases to play a role in controlling coolant temperature, as the car goes into a different mode. That mode being prevention from overheating as opposed to prevention from running too cold. The prevention from overheating aspect is controlled by DME fan programmimg. The prevention from running too cold is controlled by the thermostat. Actual operating temperatures fall in between these two controls. It would make sense for the DME's preset programing to trigger fan activation. Then, all that is needed is to reprogram the fans to activate at a lower temperature, and the car could actually take advantage of the 160 deg thermostat when encountering a reduced airflow situation. That said, I am fully in favor of finding a way to reduce coolant temps a bit. But it doesn't look to me that a 160 degree thermostat is going to help you once you are stuck in traffic, or have found yourself in a situation that has caused airflow over the radiator to be reduced. And, my guess is that most people who would be interested in lowering coolant temps would specifically expect them to be better controlled in a traffic situation, which for the most part won't be helped unless the DME is reprogrammed to activate the cooling fans at a lower temperature.
-
So why isn't anyone discussing the radiator fans involvement here? While the thermostat regulates the minimum temperature coolant parameter, the cooling fans regulate the maximum temperature parameter, which is what most people are concerned with. The coolant temp sensor signals low speed fan operation to begin at 206 deg F. and high speed is triggerd at 216 deg F. With inadaquate airflow over the radiators like you would experience in slow traffic or worse yet a smog test, both thermoststs will be fully open and dependant on fan airflow to control engine temperature. Have you ever had your electric fan fail? I have. Even on a cool San Francisco winter morning, you won't last 5 to 10 minutes in traffic with a failed electric fan before your coolant temp light goes on. However, if you were not stuck in traffic and you were moving along with sufficient airflow over the radiators, the 160 deg F thermostat would lower engine coolant temperatures below the stock thermostat. And that bothers me. I would rather see my motor have a consistent coolant temperature than one that swings from 170 to 216. Is that wide band good for the motor? In my opinion the only way the 160 deg thermostat can be helpful is if the fan sensor temps are changed to signal operation at lower temperatures. But new sensors are just part of the solution, you also need that 3rd radiator, otherwise the fans will be on all the time leading to premature fan wear or worse, potential fan failure. So what is really needed is a kit that includes a reduced temp thermostat, new coolant temp sensors that operate at lower coolant temperatures and a 3rd radiator to reduce the load on the cooling fans.