Welcome to RennTech.org Community, Guest
There are many great features available to you once you register at RennTech.org
You are free to view posts here, but you must log in to reply to existing posts, or to start your own new topic. Like most online communities, there are costs involved to maintain a site like this - so we encourage our members to donate. All donations go to the costs operating and maintaining this site. We prefer that guests take part in our community and we offer a lot in return to those willing to join our corner of the Porsche world. This site is 99 percent member supported (less than 1 percent comes from advertising) - so please consider an annual donation to keep this site running.
Here are some of the features available - once you register at RennTech.org
- View Classified Ads
- DIY Tutorials
- Porsche TSB Listings (limited)
- VIN Decoder
- Special Offers
-
OBD II P-Codes - Paint Codes
- Registry
- Videos System
- View Reviews
- and get rid of this welcome message
It takes just a few minutes to register, and it's FREE
Contributing Members also get these additional benefits:
(you become a Contributing Member by donating money to the operation of this site)
- No ads - advertisements are removed
- Access the Contributors Only Forum
- Contributing Members Only Downloads
- Send attachments with PMs
- All image/file storage limits are substantially increased for all Contributing Members
- Option Codes Lookup
- VIN Option Lookups (limited)


Q-Ship986
-
Posts
232 -
Joined
-
Last visited
-
Days Won
1
Content Type
Profiles
Events
Forums
External Paint Colors
Downloads
Tutorials
Links Directory
Collections
Store
Everything posted by Q-Ship986
-
You might be surprised how little air in the system will make the pedal feel soft. I would bleed again until it is firm. Make sure you do each wheel position, first the outer, then the inner bleeder valve. You probably don't need to do the pedal pumping routine anymore, and since you seem to have it most of the way, I doubt now that you'd need more than another liter to do it again (especially w/o needing to do a clutch circuit). Never re-use any fluid. --Brian
-
I think you might need to do a combination of things suggested above. First, buy/rent a pressure bleeder. A lot of us use the Motive pressure bleeder; I'm very happy with mine--used it on all my cars. Also, since you've already filled with ATE blue, I would go back to ATE 200 (regular color). You'll need at least two liters, and I agree with TP that you'll probably need three. Use a turkey baster to get as much of the existing fluid out of the reservoir as possible. Then top off the reservoir with new fluid and fill the pressure bleeder with at least two liters of new fluid. Connect the pressure bleeder to the reservoir and pressurize per its instructions (i.e. do not exceed 20 psi, check for leaks, etc.) Note to others: If you haven't run the master cylinder dry, you don't need to do this particular procedure. Starting at the right rear caliper: - Connect a drain tube to each of the fittings on the caliper. Drain into a suitable container (I use a gallon jug). - Open the outer bleeder valve. When the fluid runs clean/new and bubble-free, close it. - Open the inner valve. - When the fluid runs clean/new and bubble-free, open the outer valve. Now both valves are open and fluid is flowing. - Move to the driver's seat. - Fully depress the brake pedal three times. Each time: hold the pedal to the floor for 2-3 seconds before slowly releasing it. - After the third cycle, return to the caliper. - Close the inner bleeder valve. - Let the outer valve bleed for a while until you are absolutely sure the fluid is clean/fresh without bubbles, then close it. - Open the inner valve again and make sure the fluid flows clean and bubble-free from there, too, before re-tightening it. Check the fluid level in the pressure bleeder. Re-fill and/or re-pressurize as necessary. Repeat the same procedure at the left rear. Then the right front, and finally the left front. You'll use a lot of fluid on the right rear, then less and less as you move through the other calipers. Don't re-use any fluid. After the brakes, I would bleed out the old fluid from the clutch circuit, too. Not too easy on jack stands, let me tell you, but it can be done with patience. I used Loren's DIY instructions for 996. Hope it works out for you. --Brian
-
Wind Deflector Flaps in Breeze
Q-Ship986 replied to Chigurh's topic in 986 Series (Boxster, Boxster S)
The black frame is not to go on either side of the "clip." There is a notch in the bottom of the frame that is to be put directly over top the raised portion of the clip (shown in your photo). First, from the back side of the roll hoops, center the frame over that raised portion; there should be no real effort necessary to do so. Then carefully engage the clips on the roll hoops. At least that's how it is on my 2003. --Brian -
I would get a quote from Fred Baker Porsche. They do paint and body work on the premises. A few years ago I had some minor work done there to my 2003. The work was very reasonably priced and I was very satisfied with the results. I am sure Stoddard would treat you right, too. They have a national reputation for Porsche restoration. I have no experience with Porsche of North Olmsted, but I think they are a boutique dealer without a body shop. Sunnyside closed their Porsche showroom years ago, at about the same time Porsche of North Olmsted surfaced. My closest dealer is Cascade, which I am very satisfied with for parts and service; but they do not have a body shop. I'd take my car back to Fred Baker for that kind of work without hesitation. It's nice to have choices in our area. --Brian
-
Safelite installed a new windscreen in my Boxster last fall. Porsche glass, trim frame, and seal, all of which they obtained from one of my local dealers. From the paperwork they gave me, it looked like they paid dealer MSRP; I only paid my insurance deductible. Since insurance was paying, they needed to get their OK to buy the OE glass. When I asked Safelite about "their" glass, in case my insurance balked, they said it was equivalent, met DOT standards, etc. There are a few threads here in Renntech about different glass, including Saint Gobain (the OE supplier) and Pilkington. I theorized that the Safelite glass would end up being one of those; I never found out because my insurance company ended up springing for the OE glass anyway (thanks, USAA!). I don't know how it is with your car, but the A-pillar trim and defroster panels had to come out. I did that myself before the installer arrived at my home. The A-pillar trim needed to be removed to make the radio antenna connection. The defroster trim needed to come out because they had to cut the glazing along the bottom of the windscreen from the inside of the car, rather than the outside. The trim could stay in to do that, but it seemed to me it could've been easily damaged by the cutting tool in the process. Basically, though, there's nothing special it seems to changing the windscreen in one of our cars versus most others, it's just that there is a lot of potential to scratch or damage something else in the process. The paint around the windscreen; the body panels and paint due to leaning on them; the dash, seats/leather, etc. on the interior. I think that's mostly what there is to worry about. In my case, the installer was a nice guy and very professional. He took his time, at least two hours, and did excellent work. --Brian
-
Angry man must own this Boxster
Q-Ship986 replied to soopster's topic in 986 Series (Boxster, Boxster S)
Welcome back, Jeff. It's been a while. -
New 18" Wheels - right rear tire touches body
Q-Ship986 replied to azzar0's topic in 986 Series (Boxster, Boxster S)
Interesting. So bare with me... Again, I am not arguing, nor am I questioning your logic, I am just trying to understand the complexity of the offset issue. If my understanding is correct, the definition of a wheel offset is the distance between the center of the wheel and the outer edge of the wheel, where the center of the wheel represents ET0. If the offset is negative than you would need to 'shave' the wheel in order to fit (because you are too close to the strut housing). If the offset is positive, then you would add a spacer to fit - is this correct? If the wheel says ET42, doesn't that imply a positive offset? If it was a negative offset shouldn't it be marked as ET -42? Following the notation logic, since you are 42 mm out and you need to be 47 mm out, doesn't it follow that you would need to add 5mm in order to accomplish that offset? I think the confusion is between negative and positive offsets. It appears that most people I've talked to assume a positive offset whereas you and jmatta assume a negative one. Also, if it was truly an offset issue, wouldn't I see this problem on BOTH sides? It is clearly happening only on the left side, not at all on the right side. Upon close inspection, I was able to confirm that the right fender was already rolled (the inner lip is tucked in) while the left fender has not been rolled (the inner lip is sticking out). My suspicion is that the left fender was replaced at some point in time, hence the difference; which would, in turn, explain the issue. With that said, I am more confused than ever :huh: Thank you for your input and patience First, your understanding of offset, your definition of it, is incorrect. Please see the tirerack.com link in one of my previous posts. Second, I can't speak for jmatta, but I am not assuming negative offset. Negative offset is actually quite rare for a passenger car, and I don't know any contemporary Porsche wheel that is negative offset. I think you really need to look at that tirerack.com link. Then imagine the spacer you added. Don't imagine it screwed to the hub/rotor. Imagine it screwed to the wheel. Can you see what happens to the effective offset? (On a wheel with positive offset, like yours, it decreases.) --Brian -
New 18" Wheels - right rear tire touches body
Q-Ship986 replied to azzar0's topic in 986 Series (Boxster, Boxster S)
I am assuming that you are correct, that the wheels you have in hand are 18x10 ET42. I am also assuming that in order to fit your Boxster, you need ET47. The bottom line, no matter what on-line calculator you use, or who you talk to, you can't make your ET42 wheels into ET47 wheels. You'd actually have to machine 5mm off of the mounting surface of your ET42 wheel to get ET47 (and that is definitely not recommended!). Following the simple logic first proposed by jmatta in an early post: If your tires were rubbing on the outside to begin with, and you added a wheel spacer to "push them out," then you just made the situation worse. I think where people can get confused is in the symantics of "adding" a spacer. For instance, it's incorrect to think that if you "add" a 5mm spacer, you should "add" 5mm to ET42 and "get" ET47. If you're still not convinced, what is your offset if you "add" a 42mm spacer to your rear axle and use your ET42 wheel? Is it ET42 + 42 = ET84? (No, it's ET0, or zero offset.) Also, I think that calculator in the link uses some potentially confusing terms, like "extend," which I think may have burned you. --Brian -
New 18" Wheels - right rear tire touches body
Q-Ship986 replied to azzar0's topic in 986 Series (Boxster, Boxster S)
Right, which is why I added the spacers. So now the offset is 47 (42 + 5). If adding a 5mm spacer brings the offset to +47 then the wheel's original offset must be +52 (52-5=47). Offset is the distance between the rim's center-line and the surface which mounts flush on the hub. The spacer "brings" this surface closer to the center-line and pushes the wheels out. So, with spacers, you can only reduce positive offset. Bringing the wheels out changes suspension parameters such as the roll center or the scrub radius. It also reduces the effective spring rate because the wheel acts on the springs through a "longer arm". It could also put more load on bearings etc. So, generally, it pays to be conservative with offset changes. At 5mm, however, there should not be much of a concern, especially if your final offset is 47 - which corresponds to Porsche's post-2002 986 IXRC option: "Sport Techno wheels" (8Jx18 ET50, 10Jx18 ET47). Now, if you do have a rim that is ET42 - and I apologize for doubting you again - and by adding a 5mm spacer it rubs less that before on the outside lip, I must have my definitions wrong. The wheel in this case is ET42, which is a positive offset of 42mm. Adding a 5mm spacer makes the effective offset 37mm, not 47mm, and obviously aggravated the fender rubbing condition in this case. If you need ET47, you can't get there with ET42 wheels. Simple drawing and definitions here, at tirerack.com. --Brian -
Where I store my car for the winter, there is no electricity. I have pulled the battery and connected a maintainer directly to it for many winters. Absolutely no problems upon re-installation. My car is an '03 Boxster S with PSM, etc. --Brian
-
Per Federal regulations, there are none of these letters in any VIN for the United States: I, O, or Q --Brian
-
Thanks for that. --Brian
-
If you look in the post where the pic is from, you'll find the part numbers. --Brian
-
Car won't start after seat swap
Q-Ship986 replied to exlondoner's topic in 996 Series (Carrera, Carrera 4, Carrera 4S, Targa)
The alarm control unit has a power window control input; it is pin A18 for my car. It's obvious that box needs to be properly reinstalled. --Brian -
Fuel injector cleaners?
Q-Ship986 replied to C4C_Leon's topic in 996 Series (Carrera, Carrera 4, Carrera 4S, Targa)
Dude, relax....it is not directed at you. You are the one that suggested changing the oil after fuel treatment...there is no relationship between the two systems (if there is you are in trouble). We are just saying that it is a marketing ploy to suggest changing the oil after fuel treatment (i.e., it is bs to do this). I understand that text can be read different ways, but I’m very relaxed here. After all, it’s the holidays, I’m on vacation, and this subject isn’t exactly politics or religion...so no worries. In any case, I jumped into this thread at post #18 and please note it wasn’t me that suggested anything in the first place. I simply tried to provide a viewpoint of the merits of both sides of this topic based on my education and experience, for whatever it is worth. I hope we can start with an agreement that the combustion process within automotive engines isn’t 100% thorough and that some unburned fuel is par for the course. Obviously this has vastly improved over the years as intake and cylinder head designs have been refined, fuel atomization and spark delivery have been improved, and engine management has been optimized. In addition, water and soot are by-products of combustion. Not all of the gases and solids exit the exhaust port(s). Some exhaust is forced past the piston rings into the crankcase, a condition known as blow-by. For many engines, especially those with variable valve timing, some exhaust is also forced back into the intake system due to slight overlap between the intake and exhaust valve cycles, often eliminating the need for a separate EGR system. A certain amount of blow-by is a given and acceptable even when the engine is shiny and new. It varies depending on the engine and application due to design specifications and manufacturing tolerances for things like piston ring groove clearances and end gaps. The sealing between piston and cylinder wall generally gets worse with deformation and wear. Crankcase pressure increases due to the blow-by and has been managed for over 50 years by PCV systems and the like--including the troublesome crankcase ventilation system for many of us with M96 engines. (Any failed external oil separators out there?) Oil sprayed under the pistons to line the cylinder walls with every stroke is a cause of oil consumption within the combustion chamber, the amount depending on many factors such as the condition and use of the engine. Thus, the interface between the crankcase and the combustion chamber is not exactly an impermeable barrier. Anyway, just considering blow-by, it’s sure not fresh, particle-free country air getting past the piston rings into the crankcase that gets managed by the crankcase ventilation system. Water, fuel, soot, etc. get into the sump; certain amounts are perfectly normal. I just don’t see how that can be so adamantly denied. Used oil analyses right here on these boards show the presence of fuel and water in low-mileage M96 engines for which Blackstone labs spells out maximum reference levels. Too much fuel or any other contaminant in the oil can spell doom for many reasons; no disagreement there. That’s why mechanical and electronic systems, along with regular maintenance such as oil changes, are in place to manage it. The discussion here early on centered around whether the deposits that get cleaned out of the intake system and combustion chamber by additional fuel detergents can get into the oil and necessitate an oil change. My position IS NOT that you should change your oil after running a fuel system additive. My position IS that it doesn’t hurt to do so (within reason) and it depends on many factors whether it makes a difference. If you want to change your oil after running a bottle of Techron or something, it’s probably overkill and generally unnecessary especially with today’s engines and consistent use of quality fuel. But, based on my knowledge and experience with fuel and additive testing, it’s just not outright BS to think it might be a good idea in certain circumstances. I know what I saw happen to the oil in some of the tests, and it wasn’t pretty. Happy Holidays and let’s hope for a better 2009. Take care, --Brian -
Fuel injector cleaners?
Q-Ship986 replied to C4C_Leon's topic in 996 Series (Carrera, Carrera 4, Carrera 4S, Targa)
The gasoline you put in your car has the same chemicals as these after market additives do. So I wonder why you don't change your oil after every fillup? There is NO WAY, I repeat, NO WAY for any additive to get from the cylinders into the oil without also having gasoline get into the oil. If this is the case, your engine is doomed anyway. But, marketting is very powerful on some people. Is this marketing comment directed at me? I don't have a perspective here from anyone's marketing. --Brian -
Fuel injector cleaners?
Q-Ship986 replied to C4C_Leon's topic in 996 Series (Carrera, Carrera 4, Carrera 4S, Targa)
Who is marketing that? I didn't read that in this thread. --Brian -
Fuel injector cleaners?
Q-Ship986 replied to C4C_Leon's topic in 996 Series (Carrera, Carrera 4, Carrera 4S, Targa)
In graduate school, I had an engineering internship at an automotive proving ground. Among other things, I had some involvement in on-going testing being conducted by a major petrochemical company. Controlled, on-road testing using production vehicles/engines. Different fuels, different additives. Intake and heads removed and torn down at regular intervals. Valves weighed before and after. Deposits and oil analyzed. Etc. From what I recall in college, internal combustion engines are not 100% efficient and not all of what occurs during strokes 2 and 3 exits through the exhaust port(s) in stroke #4. I've also noted that oil analyses include the amount of water, fuel, insolubles, and the like. For example, Blackstone has criteria for fuel at <2.0% and water at <0.1%. Their criteria for these are not 0.00% (like it is for glycol). Thus, I'm not convinced that unburned fuel and other contaminants from the combustion process can't possibly get into motor oil under normal circumstances. It seems to me that how much this actually occurs has changed over the years as engines have tightened-up, component tolerances have improved, and the efficiency of combustion has increased with design enhancements like direct injection and advanced engine management. It definitely seems debatable how much it really matters whether you change your oil after running an additional fuel detergent. After all, wouldn't variables such as the condition of the oil itself, the effectiveness of the detergent, the type and amount of build-up, and the condition of the engine (i.e. pistons, rings, cylinders) factor into the equation? Anyway, what guides me in my own vehicle maintenance regimen extends from my experience about 15 years ago during my internship. Just before scheduled oil changes, I run a tank of fuel with a good dose of Techron. I don't think it is necessarily misguided or overly conservative to advise others of the same. -
Taking out the front vents
Q-Ship986 replied to kevinkw's topic in 996 Series (Carrera, Carrera 4, Carrera 4S, Targa)
Rattles drive me crazy and I have hunted down more than a few in my day on many cars. Squeaks and rattles are often eliminated by using foam or felt tape in strategic areas. Car companies also use specialty lubricants like Dupont Krytox. My advice is to continue to try to isolate the source/area of the noise. If you remove potentially offending trim, examine the placement and wear of any foam/felt tape. Look for missing or broken mounting tabs and fasteners. Take the car for a drive without the trim installed, perhaps do so for each piece you remove, one at a time. Replace or re-fit any foam/felt tape. Apply a very light amount of lubricant (I like Krytox and/or dielectric paste) to suspect components. These steps usually work. --Brian -
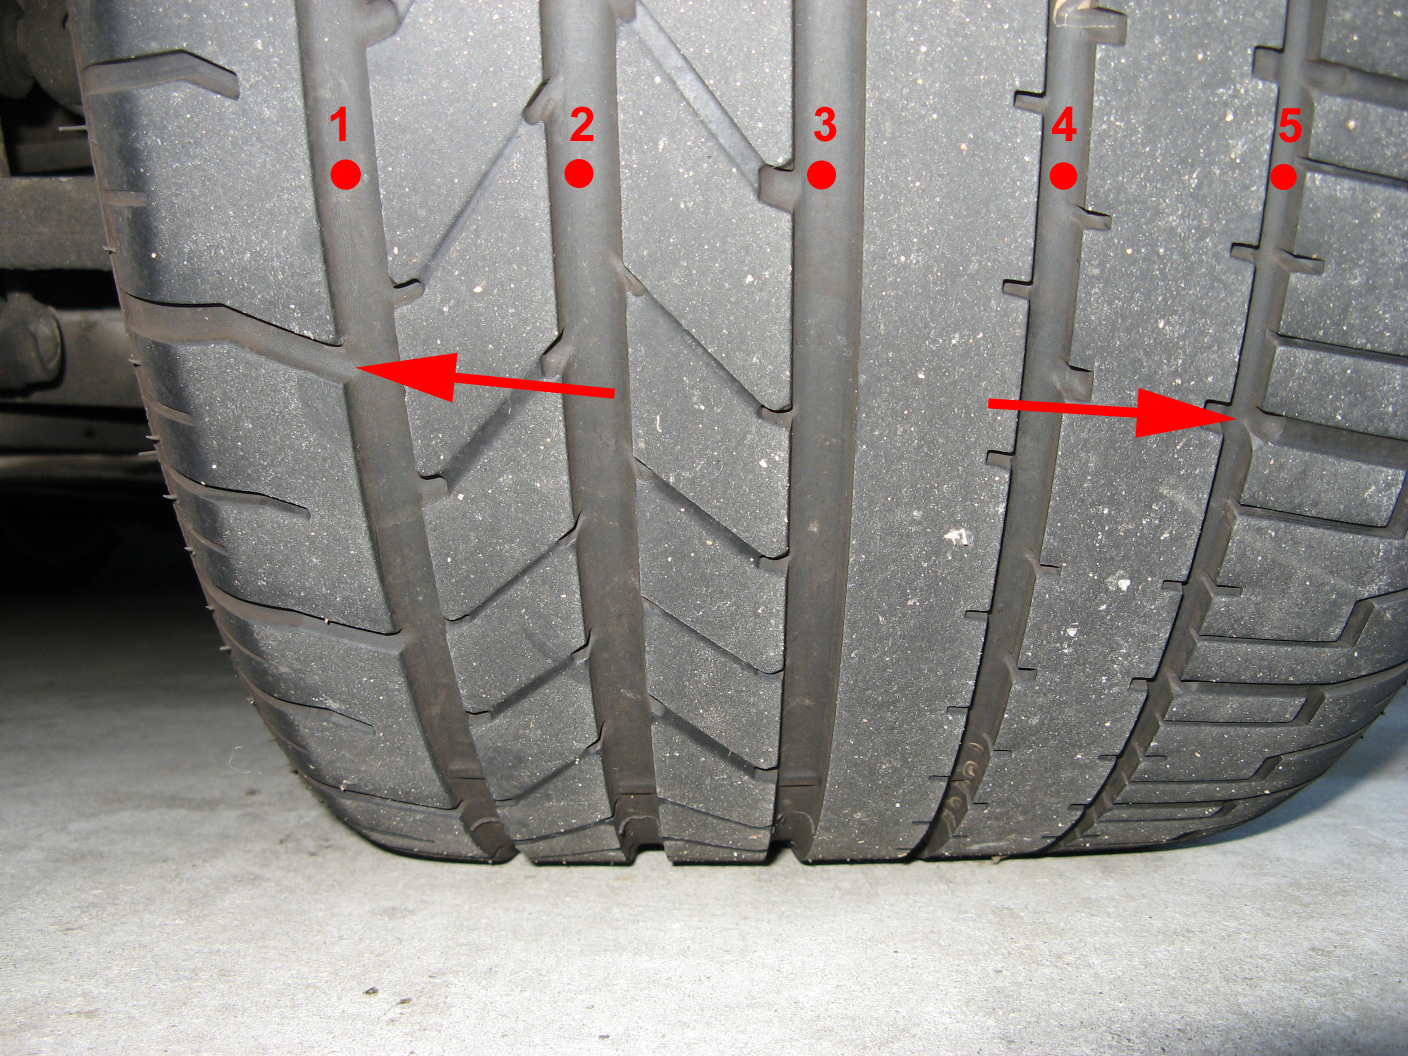
Outside wear on rear tires
Q-Ship986 replied to rrspikemarty's topic in 996 Series (Carrera, Carrera 4, Carrera 4S, Targa)
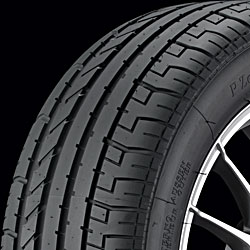
tlh, Interesting to hear of your similar situation. Was the extreme outside wear only on the right rear (related to the wishbone damage?). Was the camber, or toe-in setting the culprit (or both)? An alignment is in my future. An alignment check is probably not a bad idea, but again, the wear of the tire in your photos not only looks typical, it looks like it is wearing more on the inside portion of the tire. For comparison, I think you may want to look at a new PZero Asimmetrico: If you get a depth gauge and measure the tread depth in the slots as I have marked with dots on your photo below, you will probably find that the outermost groove (groove 5) is deeper than the innermost groove (groove 1). I think you must be hung up on the difference in appearance of the lateral slots marked by the arrows. The outside shoulder rib has a shallower skid line, which means the lateral slots are not as deep as other slots on other ribs. Note the way the outer shoulder slot is "stepped up" from the groove. The outer skid line tapers to even shallower depth as it approaches the arc point, which is the end of the tread at the outermost edge. This is all typically done to enhance handling performance. Less tread depth and rubber mass increases block stiffness and reduces hysteresis to prevent tread chunking, among other things. Most important on the outside shoulders which endure the most stress/strain under cornering. Hope that helps. --Brian
-
Windshield replacement
Q-Ship986 replied to Westcoaster's topic in 987-1 Series (Boxster, Boxster S)
From what I understand, if you can cover the damage with a quarter (about 2 cm diameter), then it is generally considered repairable. Unless it is in your primary field of vision. Then, I think they are inclined to do one of the following: 1.) replace the entire windscreen, or 2.) attempt a repair and evaluate the visual anomaly before deciding whether to replace the windscreen. Now, in my latest experience, which was very recently, I was asked if I could cover the damage with a dollar bill. I took that to mean that improved repair techniques have stretched the ability to repair larger damage. If you are using insurance, it is often entirely up to you whether to repair or replace, no matter where the damage is located or how bad it is. Many insurance companies waive deductibles and fees for repairs. Check your policy. I have had numerous repairs by Safelite over the years with very good experience--none done on the glass right in front of me, though, which could be quite annoying in the end, I think. As for the structural issue, the bead of glazing that affixes the windscreen to the frame is quite sizable and somewhat flexible; therefore, how much strength is afforded to the vehicle from the windscreen seems negligible. For 996, the windscreens are the same for coupes and cabriolets (excluding options like rain sensor, diversity antenna, tinting, etc.). --Brian -
Windshield Rash
Q-Ship986 replied to Rphdude's topic in 987-1 Boxster Convertible Top Issues and Solutions
Hmmm, that gives me an idea, Griots sells windshield polishing compound, I wonder if this would 'fix' some of the smaller imperfections and make the whole situation a little more tolerable? But... I was worried that polishing the windshield would 1) remove any protective coatings, and 2) produce a web of fine scratches that would reflect the light (much like swirl marks on paint)? Some windscreens do have a coating/treatment on their interior, so I would hesitate to polish the inside without knowing. But, I don't personally worry about the outside. I have used clay and ordinary paint polish on my glass for years. Ford, Toyota/Lexus, GM, Porsche....no issues. Although I have no way of knowing, my feeling is that glass and plastic polishes are not any different than paint polishes, which come in different levels of aggressiveness. My guess is that these specialty polishes are simply just fairly low cut and perhaps tinted blue or something. I generally only use Meguiars, having a few grades on hand and only using the least aggressive to get the job done. No doubt, you can scratch and etch glass, but really, would polish (and a buffing method) that is safe for your clearcoat be likely to do any damage to glass? As they say, though, test in an inconspicuous area first. --Brian -
Windshield Rash
Q-Ship986 replied to Rphdude's topic in 987-1 Boxster Convertible Top Issues and Solutions
I just had a new windscreen installed, Porsche original equipment glass made by Saint-Gobain Sekurit. I didn't notice until after the installer was gone and I was cleaning it up that it was alarmingly speckled over its entire exterior surface. With bright light, the right angle, and a close view, it looked more like tiny razor cuts 0.5mm long than pin points, actually, if that makes any sense. Wouldn't wipe off with glass cleaner or naphtha. I was peeved. On a whim, I hand polished it with Meguiar's polish/glaze, same stuff I use on the paint. Speckling virtually gone. Try that? --Brian -
Remove/Replace Windscreen Sealing and Trim ?
Q-Ship986 replied to Q-Ship986's topic in 986 Series (Boxster, Boxster S)
Answering my own question here. It turns out that you can rather easily remove and replace the EPDM rubber seal (996.541.531.01) around the windscreen without disturbing the glass or the metal/plastic trim that it presses into. The metal/plastic trim, however is not likely to be removed without significant effort, unless you are taking the glass out, too. The trim is more than decorative, it acts as a spacer between the body and the glass and has glazing oozed into it in various areas, particularly the upper corners. With the windscreen in place, my advice is not to attempt to remove the trim from the glass unless it is evident that it can be easily loosened from 100% of its periphery. --Brian -
No, you remove two torx bolts on one side and one torx screw on the other (use your fingernail or small screwdriver to lift the plastic cover). Then simply pull the whole visor off. --Brian