Welcome to RennTech.org Community, Guest
There are many great features available to you once you register at RennTech.org
You are free to view posts here, but you must log in to reply to existing posts, or to start your own new topic. Like most online communities, there are costs involved to maintain a site like this - so we encourage our members to subscribe or donate. All subscriptions and donations go to the costs operating and maintaining this site. We prefer that guests take part in our community and we offer a lot in return to those willing to join our corner of the Porsche world. This site is 99 percent member supported (less than 1 percent comes from advertising) - so please consider an annual subscription or donation to keep this site running.
Here are some of the features available - once you subscribe RennTech.org
- View Classified Ads
- DIY Tutorials
- Porsche TSB Listings (limited)
- VIN Decoder
- Special Offers
- Paint Codes
- Registry
- Videos System
- View Reviews
- and get rid of this welcome message
It takes just a few minutes to register, and it's quality Porsche information at a low cost.
Contributing Members also get these additional benefits:
(you become a Contributing Member by subscribing or donating money to the operation of this site)
- No ads - advertisements are removed
- Access the Contributors Only Forum
- Contributing Members Only Downloads
- Send attachments with PMs
- All image/file storage limits are substantially increased for all Contributing Members
- Option Codes Lookup
- VIN Option Lookups (limited)


1schoir
-
Posts
2,739 -
Joined
-
Last visited
-
Days Won
9
Content Type
Profiles
Events
Forums
Exterior Paint Colors
Downloads
Tutorials
Links Directory
Collections
Classifieds
Store
Everything posted by 1schoir
-
Juniinc: Great job, with good photos! If you could compile a avery detailed DIY with additional photos and list of materials, it could be revolutionary. Regards, Maurice.
-
-
Convertible Top - graphite grey
1schoir replied to memphis986's topic in 986 Series Part Number Requests
SGG: There's a guy over on PPBB that posted that he was going to add a liner to his early Boxster and do a photo and text DIY for the procedure in about two weeks. I'll keep an eye on that and post here if he comes through. Regards, Maurice. -
Juniinc: Excellent DIY! Your second and third photo show the litlle "dish" below and at the front of the snorkle... The fourth photo is not as clear. What happens to the "dish"? Regards, Maurice.
-
Seat Heater Light Won't go Off
1schoir replied to 1schoir's topic in 986 Series (Boxster, Boxster S)
Richard: Thanks so much for the crystal-clear diagram. I have to take out my seats to resolve my other problem (airbag light) anyway, so I will try the swap as you suggested to see if I can narrow down the cause of this annoying red light. Regards, Maurice. -
Clubhead: If you are referring to the transmission brackets, part numbers are as follows: 986 375 084 03 Transmission bracket, right 986 375 083 03 Transmission bracket, left As for the engine mount... 986 375 023 05 - up to and including MY98 986-375-023-07 - from MY99 on. Cost for the motor mount, about $225 at Sunset. Or, you could buy an "improved" remanufactured engine mount (stronger than original) from "Pedro's Garage" over on PPBB... $75.00 with core, $125 outright with no core. Regards, Maurice.
-
Tires, Boxster, best Bang for the buck & size
1schoir replied to pk2's topic in 986 Series (Boxster, Boxster S)
Bob: You might also want to consult the most recent Consumer Reports edition... They tested Ultra High Performance Summer and Ultra High Performance All Season tires a couple of weeks ago, and, while I don't follow CR when it comes to things automotive, there is some valuable information there. They did not test the Goodyear Eagle F1 All Season, but, if I am reading their explanations correctly, they rated the performance of the All Season tires on a scale that can be used to compare them to the Summer tires. For All Season, they rated the Falken Ziex ZE-912 and the Nitto Neo Gen ZR tires as their top performers among about 15 models IIRC. The price of the two aforementioned sets of tires are about 3/5's or so of the Goodyear All Seasons, but again, there is no direct comparison in that particular report. Regards, Maurice. -
Seat Heater Light Won't go Off
1schoir replied to 1schoir's topic in 986 Series (Boxster, Boxster S)
To clarifiy further... The red light is NOT on when the ignition is off. It is on when the ignition is on or when the engine is running. Any help appreciated. Regards, Maurice. -
Symptoms sure sound like all of the other weird electrical manifestations which all end up pointing to the ignition switch. Here is a sample from the link below describing usual symptoms: Symptoms of a broken switch include: breaking plastic sound while moving the key (one time), difficulty inserting or removing the key, unusual 'key feel' while turning the key, and/or the car 'thinking' the key is still inserted even when it's removed. In my case, the 'key feel' was different and my dash lights stayed on. Depending (reports vary), the car thinks the key is still inserted, so the lights, dash, fans, etc. still work. With the electrical functioning, even sporadically, the battery drains. It's important to pop the front hood before the battery goes dead, or you'll have to figure out the trick to getting it open. The door sill hood release won't work if the battery is dead! Buy the Audi part ( about $35) and, if you are nimble and flexible, easy fix while being upside down looking up at the underside of the dash. You also need a tiny flat screwdriver. Here is the link for detailed instructions and photos: http://industryfigure.com/berkeley/Porsche...itionswitch.htm Good luck, and let us know the outcome. Regards, Maurice.
-
Shawn: Thanks for the info. Will definitely check the wires for cuts/chafes as this most recent variety of airbag light only reared its ugly head about 3 months ago. Regards, Maurice.
-
'Standby' current draw?
1schoir replied to fastboydave's topic in 996 Series (Carrera, Carrera 4, Carrera 4S, Targa)
Dave, Loren: Thanks guys! BTW, my knowledge of things electric (aside from house wiring) can best be described as "electrically challenged"! LOL. You guys have inspired me to go out and buy a basic automotive wiring and testing book. Regards, Maurice. -
'Standby' current draw?
1schoir replied to fastboydave's topic in 996 Series (Carrera, Carrera 4, Carrera 4S, Targa)
Dave: What is the correct way to connect the DMM? Regards, Maurice. -
O.C. CA. Boxster owners? Need a hand…
1schoir replied to pk2's topic in 986 Series (Boxster, Boxster S)
PK: Can't help you with this one because I'm in New York, but I was wondering what your current symptoms are? Regards, Maurice. -
'Standby' current draw?
1schoir replied to fastboydave's topic in 996 Series (Carrera, Carrera 4, Carrera 4S, Targa)
Thanks. Regards, Maurice. -
'Standby' current draw?
1schoir replied to fastboydave's topic in 996 Series (Carrera, Carrera 4, Carrera 4S, Targa)
Loren: How does one accurately measure that current, and at what point? Regards, Maurice. -
Door "comfort open" question
1schoir replied to jbboxsters's topic in 986 Series (Boxster, Boxster S)
Maurice, Beats the heck out of working, which has prevented me from much wrenching on my "new" car... :) Anyhow, thanks for the hint about aligning the bottom of the brackets. I'm thinking when I get around to doing this that I'll press my photographer son and his camera$ into service and maybe make a diy page of it (it'll prolly take longer to format the page and photos than to do the regulator install). Eric Eric: Excellent! Looking forward to reading that DIY! Tell your son, the more pictures, the merrier! Regards, Maurice. -
Door "comfort open" question
1schoir replied to jbboxsters's topic in 986 Series (Boxster, Boxster S)
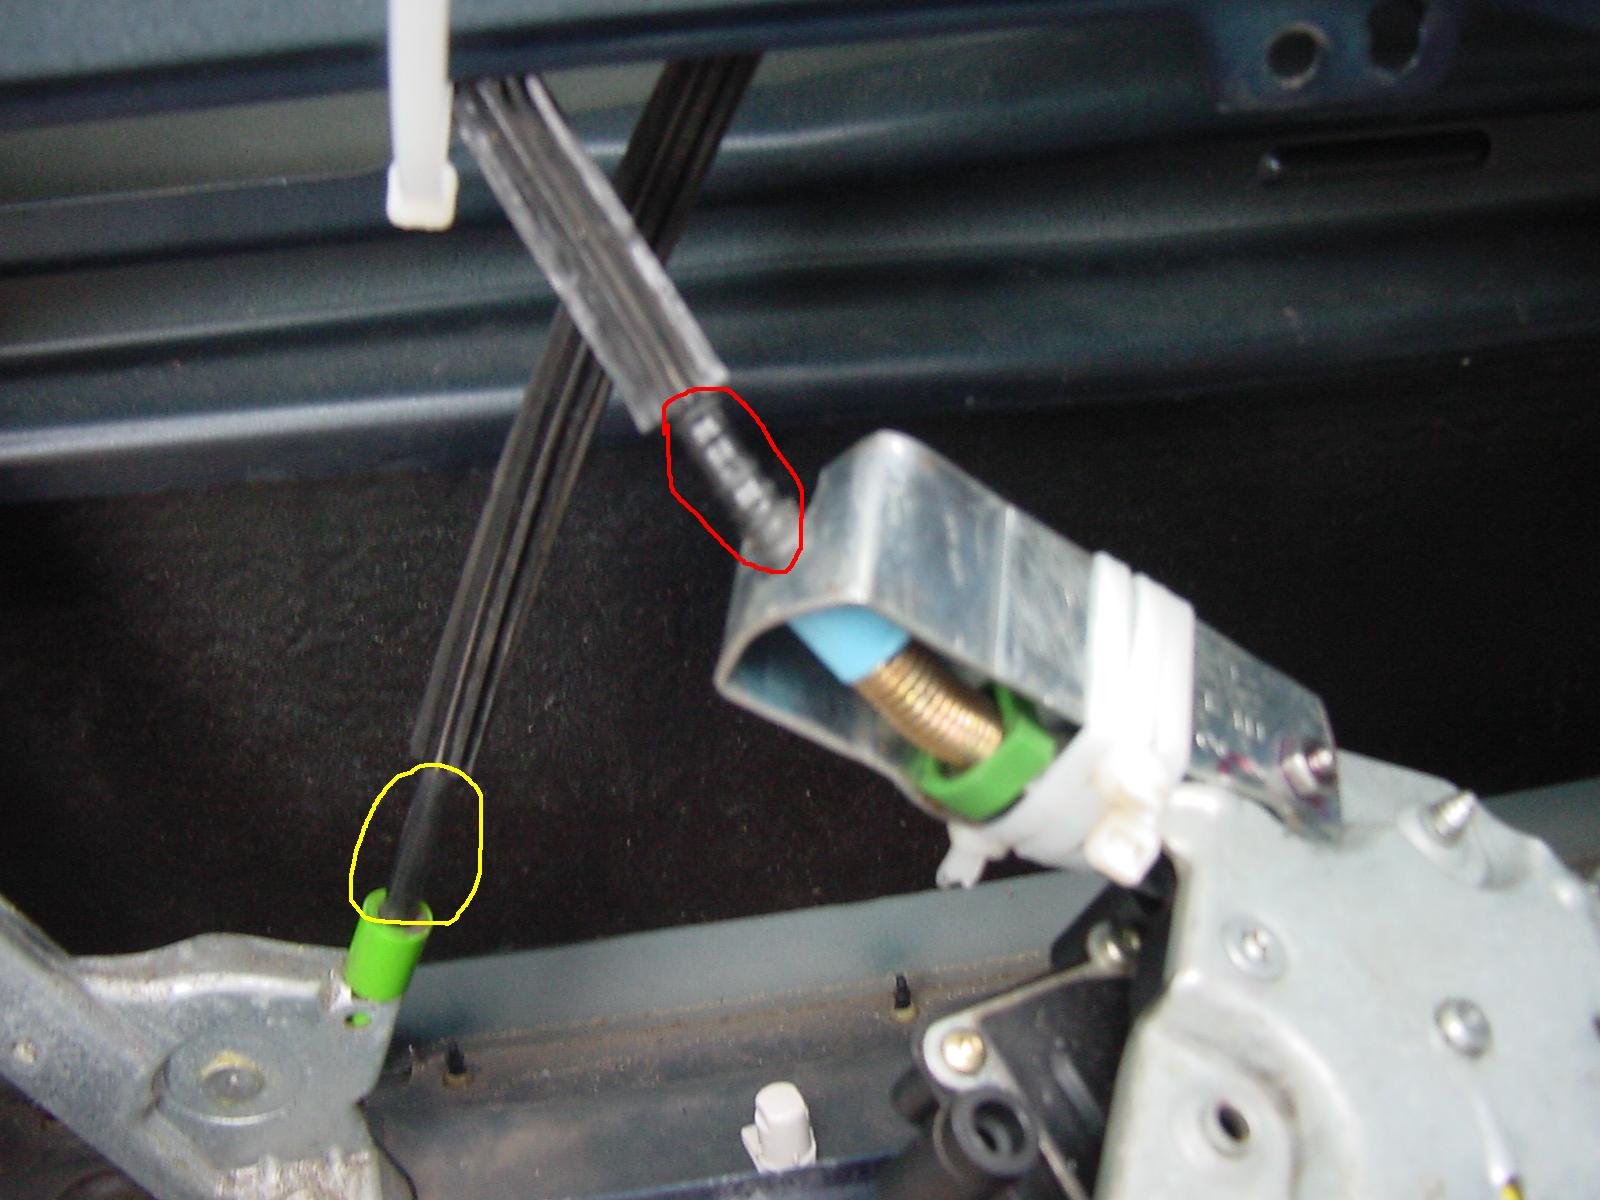
Eric: Congrats! That's what I call jumping right in! Remember, before you unbolt the two nuts that hold the two regulator legs to the bottom of the door skin, be sure that on the inside you mark the position of the "feet" of the legs where they rest on the bottom of the door (with a Sharpie Marker or similar). You can almost see the "foot" of one of the regulator legs in the photo I posted above, just below the metal part that is below the yellow circle in the photo. When you reinstall the new part, that will save you from having to adjust those legs back and forth, as they affect the inboard-outboard angle that the surface of the window adopts as it goes up and down. Regards, Maurice. -
Door "comfort open" question
1schoir replied to jbboxsters's topic in 986 Series (Boxster, Boxster S)
Chris, got any tips on avoiding breaking stuff? What parts break, the little clip pins? really, the only pieces that you need to worry about (and you don't *really* need to worry about them) are the interior door latch covers (the piece above the door handle). they have these little tabs that break very easily. the good news is that if you break them, they still fit securely - and it just makes it easier to remove them next time! ;) i broke both of my door handle pieces, so i can't really give advice on how to be successful in removing them. :lol: efahl: I concur with Chris in that the interior door latch covers is the only tricky part. I have had some repeated success in avoiding the breaking off of that little tab as follows: It helps if you press down HARD on that part near its top rear and then, after sticking the small screwdriver in from underneath to pull the bottom away at the front slightly, rotate that part up (while maintaining the hard downward pressure near its rear) by its rearmost section and it will come off without damage. If you can visualize it, that little tab near the rear that is prone to breaking is a small right angle hook that faces up and, by pressing down hard, you are clearing the horizontal slot that it hooks onto before the upward rotation starts to rotate it away from the small horizontal slot. Good Luck. Let us know how you make out. Regards, Maurice. -
Cosmos: To get a rough idea of what the job entails, check out the procedure as it applies to Boxsters as it also contains some very useful tips that will save you time and frustration if you decide to DIY on your C4S (e.g., cut the old bellows in half... buy the additional ancillary parts..., etc.). Here's the link to Mike Focke's Boxster Pages AOS replacement: http://mike.focke.googlepages.com/airoilseparatorreplacement Regards, Maurice.
-
MY97 Base Boxster, 16K miles (long story about mileage). The airbag light has been on more than it has been off since I bought the car 2 years ago. Initially, I replaced both seat belt buckles with the recommended parts and reset the light with my Durametric. I later learned of an updated (superceding) TSB (number 6924) which also recommends installing "service set belt buckle" (2 sets) and bought the two sets but have not yet installed them. When the airbag light goes on now, the Durametric reads codes as follows: Fault Number: 21 Description: Ignition circuit, driver Repair Infomation: This code applies to the driver airbag, and the connection between the steering wheel and the airbag. If I reset it, it displays the same fault again within 1 second of pressing "clear codes." Once in a while, in addition to displaying fault number 21, it will simultaneously display the following (the previous fault number 21 always pops up): Fault Number: 45 Description: Belt buckle, driver Repair Infomation: Driver side belt buckle may have been unplugged at some time, check connector to belt recepticle. If I clear this fault code, it will not reappear for 5 or 6 miles. The question is how to proceed? Do I first follow the steps in the TSB for installing the "service set belt buckle", which is essentially a set of ground wires, connectors, heat shrink tubing, etc. , and which are installed to create a better ground for the seat belts? Or, do I first deal with the steering wheel ground issue? If so, how do I cure this apparent airbag to steering wheel ground problem? Note: I removed the steering wheel and sprayed some DeOxit on the connectors I could see, but that did not resolve the problem. Any suggestions or comments or photos of which ground is involved with the steering wheel much appreciated. Regards, Maurice.
-
MY97 base Boxster. My passenger's side seat heater switch has the red indicator light on permanently, and does not vary no matter which way or how many times the switch is pressed. However, the seat does not heat up in all three positions. In other words, there is one position where the light is on red and the seat does not heat up (so this should be the "off" position but the light is not "off"). When the switch is pressed again, it should be yellow but is red and the seat gets warm. Press one more time and the light is red and the seat is hot. Press off position and seat heater turns off, but light remains constant red. I tried swapping the switch with the driver's side switch, then installed a brand new switch and still no joy. The driver's side works as it should (i.e., off=no light, warm=yellow light, hot=red light. Any ideas on how to proceed? Regards, Maurice.
-
Door "comfort open" question
1schoir replied to jbboxsters's topic in 986 Series (Boxster, Boxster S)
JB: What goes wrong with the regulator is that the outer (black plastic/rubber) sheath that the inner metal cable slides in actually stretches and crumples in conjunction with the "damper spring" located on one leg of the flat triangular metal regulator body onto which the motor is mounted. Also, sometimes the plastic sleeve that the damper spring presses against sometimes cracks or a small piece of it splits off. As the stretching and crumpling progress, you get less and less of that magic 1/2 inch retraction. More often than not, it will happen in sudden small steps or even in one sudden step. This is also sometimes combined with a stretching of the inner metal cable. Here's a photo of one variation... The crumpling of the outer sheath. The red circle shows the crumpled outer sheath. The yellow circle shows a "normal" outer sheath at another location. Disregard the metal clamp/contraption. I devised that to repair my regulator. It only worked for about a month. Not worth the effort, IMO. Your description sounds like a bad regulator. The motors rarely go bad in comparison to the regulators. Regards, Maurice.
-
Driver Door Glass Strange Behavior.........
1schoir replied to tah's topic in 986 Series (Boxster, Boxster S)
TAH: You're most welcome. Let us know how you make out. Regards, Maurice. -
Driver Door Glass Strange Behavior.........
1schoir replied to tah's topic in 986 Series (Boxster, Boxster S)
Tah: If you are referring to part #14 in your diagram, the part numbers are: 996 613 125 00 driver's (left) side 996 613 126 00 passenger's (right) side. The diagram is from the Porsche Parts List Catalogue. Mike Focke, on PPBB.COM, has an explanation on how to access it, as follows: Get a parts list (called the "PET") by going to https://techinfo.porsche.com/ and select "Country-USA", select "Workshop Information", Select "Genuine Parts Catalog", select "Catalog 20" "986 Boxster" and download. This will give you a 400 page .pdf file from which pages can be printed as needed Regards, Maurice. -
Driver Door Glass Strange Behavior.........
1schoir replied to tah's topic in 986 Series (Boxster, Boxster S)
Eric: Try copying and pasting this link, it has excellent instructions and photos: http://www.ecoutez.net/boxster/door-panel-removal/ Regards, Maurice.