Welcome to RennTech.org Community, Guest
There are many great features available to you once you register at RennTech.org
You are free to view posts here, but you must log in to reply to existing posts, or to start your own new topic. Like most online communities, there are costs involved to maintain a site like this - so we encourage our members to subscribe or donate. All subscriptions and donations go to the costs operating and maintaining this site. We prefer that guests take part in our community and we offer a lot in return to those willing to join our corner of the Porsche world. This site is 99 percent member supported (less than 1 percent comes from advertising) - so please consider an annual subscription or donation to keep this site running.
Here are some of the features available - once you subscribe RennTech.org
- View Classified Ads
- DIY Tutorials
- Porsche TSB Listings (limited)
- VIN Decoder
- Special Offers
- Paint Codes
- Registry
- Videos System
- View Reviews
- and get rid of this welcome message
It takes just a few minutes to register, and it's quality Porsche information at a low cost.
Contributing Members also get these additional benefits:
(you become a Contributing Member by subscribing or donating money to the operation of this site)
- No ads - advertisements are removed
- Access the Contributors Only Forum
- Contributing Members Only Downloads
- Send attachments with PMs
- All image/file storage limits are substantially increased for all Contributing Members
- Option Codes Lookup
- VIN Option Lookups (limited)


ar38070
-
Posts
544 -
Joined
-
Last visited
Content Type
Profiles
Events
Forums
Exterior Paint Colors
Downloads
Tutorials
Links Directory
Collections
Classifieds
Store
Everything posted by ar38070
-

Q: MY03 2.7L, want to install some items
ar38070 replied to Alee@Renntech's topic in 986 Series (Boxster, Boxster S)
I believe that 2002+ 996's have the droopy head lights like the TT. Boxsters never got those. -
Q: MY03 2.7L, want to install some items
ar38070 replied to Alee@Renntech's topic in 986 Series (Boxster, Boxster S)
Brakes Unless you want the look then no need to change even if you want to track the car. The stock brakes are more than adequate for the track. The most you have to do is change the pads. 20K is nothing on the brakes if you have never tracked the car. You might need rotors and pads but the calipers should be fine. If you want red calipers then you can paint your existing ones. If you want holed in your rotors you can get rotors with holes that are same as the stock 986. You cannot just swap the calipers. You have to do the rotors, calipers and pads. 996 brakes are the same as 986S brakes. You cannot directly swap 986 brakes with 986S/996 brakes. The fronts will swap but the rears will not. There is a difference in how the e-brake is mounted or something. I forget exactly what the difference is. -
Torque wrench recommendations
ar38070 replied to Greg's topic in 996 Series (Carrera, Carrera 4, Carrera 4S, Targa)
If cost is an issue then go to www.harborfreight.com. $20 for a click style. They also sell the S-K which is about as good as you can get for $90. I have an S-K and a Sears. When you have two you can check them against each other to see how the calibrations are. Then you can check against a buddies if you are really paranoid. I have a beam style that I do not use anymore. The nice thing about the beam style is that it cannot go out of calibration. -
That is what you need. I got a longer bolt and bolted the stock receptacle using the rear side mount location. Or you can drill another hole in the side mount and bolt it there. I notice that the 9060 only has one hole at the front. That means that you cannot really change the height only the rake. Ideally you want to run 8 up front and 9 or 9.5 in the rear. This would let you use either 225 or 245 up front and 255 or 275 in the rear. With 8's up front you need an offset of about 42mm. With 9's in the rear you need an offset of about 45mm. If the offset of the wheel you are considering is higher, for example 50, then you would need to use an 8mm spacer to get it to fit. There is some leeway here, say 5mm, either way. If you err it is better to err with a lower offset as this will push the wheel out which is usually less of a problem. You can get by with the stock sizes but you are stretching things a bit if you want to run the 245's and 275's. If you have questions about width go to www.tirerack.com and look at the specs for the tire that you want to run. It will list what wheel widith the manufacturer recommends for that tire size. Look under spens not sizes and pricing. I just looked at the Toyos and they are looking for 8-9 up front and 9-9.5 in the rear.
-
In case you have not tried it, test drive another boxster clutch to see if it feels the same to you.
-
You can usually find a GT3 seat for $1200-1300 on ebay. One thing that you have to keep in mind is that the GT3 seat comes ready to bolt in i.e. it has side plates and seat rails and a place to mount the stock belt receptacle. Any race seat that you buy will need those parts also ($100-200) on top of the cost of the seat ($300-$800). Brey Krause makes the correct side plates and seat rails for a number of seats (mainly sparco and recaro) for the boxster. If you do not use their parts then you will have to fabricate some kind of adapter to mount the seat to the bolt pattern in the floor of the boxster. If you do it yourself it does not cost much but if you have to farm it out then it will cost you. If you go the Brey Krause route then you need the side plates, seat sliders and the adapter plates to mount the seat sliders to the boxster floor. Also when you put in the shell you will have to reroute your sub strap. It now needs to run up through the hole between your legs. This will require either a hole in the floor pan (which you said you do not want to do) or yet another mounting bar (brey krause makes one) that bolts between the seat rails. I believe some people have mounted a Y shaped sub belt to the front floor mounting bolts. If you are buying all new realistically it will cost you $800-900. $500-600 for the seat and $200-300 for the mounting hardware. It can be done cheaper, say $500, (used seat or there are some seats in the $300-400 range) but in that case it may cost more if you have to fabricate custom mounting parts.
-
Help with some tires
ar38070 replied to JimPDX's topic in 996 Series (Carrera, Carrera 4, Carrera 4S, Targa)
It has to be said, however, that the apparent technical knowledge of tyre technology of the people volunteering their views so far (with the notable exception of Loren and Toolpants, of course) barely extends beyond "something black and round". Consequently, I'm not sure what information you are able to derive from their views. Cheers Uwe <{POST_SNAPBACK}> At least we are expressing our opinions on point. -
Help with some tires
ar38070 replied to JimPDX's topic in 996 Series (Carrera, Carrera 4, Carrera 4S, Targa)
Considering how many people have said they do not like either the stock continentals or pirellis I think the N rating is a bunch of marketing (to be polite). Porsche is hardly the only high performance car maker. No other marque feels the need to spec special tires. It also depends on how you are going to drive. If you going to be constantly driving at 130+mph then you might want to be a bit pickier about what tire you use. If all you are going to do is every day street legal driving then any decent V rated tire or better is fine. -
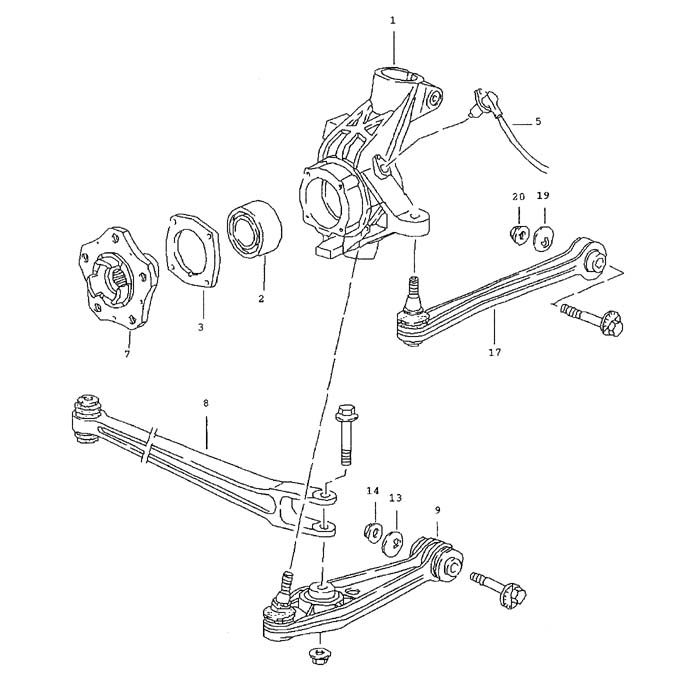
See the drawing. For some reason the drawing does not show the dust shield that is also present. Once the nut (6) is removed then you can pull out the tension bolt (5). The wheel hub (10) is a press fit in the bearing (2). It needs to be pressed or extracted out of the inner race of the bearing. There are 4 bolts not shown that hold the cover (9) in place. After removing the bolts and the cover you should see the bearing (2). You then use the extractor to pull the bearing out of the wheel carrier (1).

-
Shoulder belts wraparound style around the roll bar. Lap belt bolt in or snap in style. Either eyebolts (outside threaded into the stock belt location and the inside in a hole drilled throught the tunnel) or use the Brey-Kraus (www.bkauto.com part #9001 and 9003) mounts. Anti-sub belt: Stock seat use 6 point style attached to the same points as the lap belt. Race seat either a 6 point style attached to the same points as the lap belt or a 5 point style bolted to the floor.
-
Help with some tires
ar38070 replied to JimPDX's topic in 996 Series (Carrera, Carrera 4, Carrera 4S, Targa)
N rated tires are not required. As Loren said they have just been approved. Non N rated tires with similar performance specifications are just as good and usually less expensive. Check out www.tirerack.com for other choices and probably better pricing than what you can get locally. -
18mm metric socket (not common in a lot of sets) 32 mm metric socket (I think that is the right size for the axle nut) torque wrench good to 348 ft-lbs (to retighten the axle nut) Ball joint separator tool #9560 (used to be able to get it from Performance products for $100 but they do not seem to carry it anymore. You can get it here http://www.continentalimports.com/porsche_part.html for $150). Propane torch to heat wheel carrier Some way to remove the bearing (either a press or some kind of bearing extractor. Sir Tools www.sirtools.com makes one for $150). 10mm hex bit to remove the brake caliper. Assorted other standard metric wrenches and sockets It is theoritically possible to R&R the bearing without removing the wheel carrier in which case you would not need the Ball joint tool nor the 18mm socket.
-
They will fit as long as the offset is correct.
-
Boxster rear wheels - 18x10 et40?
ar38070 replied to antiriced's topic in 986 Series (Boxster, Boxster S)
They fit fine on a stock boxster with either 265/35 or 285/30 tires. Also look fine. Even with 285's they do not stick out of the wheel well. Stock 18's are 265/35 ET45 I believe. -
4 bolts should be ok if you take it easy. Depending on the design of the hub you may be able to get to the remains of the bolt from the back side. If you can get to the backside then start backing the remains of the bolt from the back until you have enough protruding from the front to work it out from the front.
-
Adding 3rd rad(GT3) to a 2.7 Boxster(01), 5sp
ar38070 replied to por911's topic in 986 Series (Boxster, Boxster S)
A friend of mine did this upgrade on his 2000 2.7. Works fine. Had some minor installation quibbles but otherwise no issues. -
Suncoast or Sunset porsche usually have good prices on oem parts.
-
Hard to engage 2nd gear
ar38070 replied to J9000's topic in 996 Series (Carrera, Carrera 4, Carrera 4S, Targa)
J9000: Do not worry about it. This was in response to TP's query on the Redline cocktail. If you are looking for Redline products for future use then: www.redlineoil.com -
Hard to engage 2nd gear
ar38070 replied to J9000's topic in 996 Series (Carrera, Carrera 4, Carrera 4S, Targa)
If you have not tried them you might try some of the Porsche dismantlers: www.silverstarrecyling.com in rancho cordova, ca www.oklahomaforeign.com "Shockproof" from the redline website: ShockProof? Gear Oil A unique lubricant containing a suspension of solid microscopic particles as an extreme pressure agent--unique solid dispersion which cushions gear teeth to help prevent tooth breakage and allows the use of lower viscosities. The viscosity characteristics allow the lubricant to resist throwoff and provide a film thickness greater than an SAE 250 grade, with the same low fluid friction as with our 80W140. Recommended for heavily-loaded racing differentials and transmissions, Off Road racing and problem gearboxes. Offers a "best of both worlds" balance of relatively low drag and the utmost in protection. -
Hard to engage 2nd gear
ar38070 replied to J9000's topic in 996 Series (Carrera, Carrera 4, Carrera 4S, Targa)
My replacement 5 speed (on the car 20K miles now) was hard going into 2nd until the oil warmed up. It does have swepco in it which may not be the best for these trannies. Recently however it has 'loosened' up and 2nd gear is not so bad now when cold. J2000: Is it always hard to shift to 2nd? or only when it is cold? If always then something is probably wrong with the tranny. In either case what happens if you double clutch? If it is hard to shift when hot and double clutching allows you to shift easily then you probably have a synchro problem. TP: The reason for the cocktail is that the 75w-90 originally did not have the same additive package as the regular 80 weight gear oil (it was not 'shockproof'). Adding 1 part 80 weight gave you the 'shockproof' additive. Supposedly the 75w-90 now has the additive so the cocktail is no longer needed. MarkC: You might want to look at your technique. When shifting to 2 and 4 make sure that you are pulling the shifter straight backwards. On the 3-4 shift you do not even need to hold the knob. The springs center the shifter in the correct side to side plane. Just put your fingers on the front part of the knob and pull straight back. 2nd is more of a problem when cold. 4th should not be a problem when cold. -
Most tracks wont allow hand held cameras. At least on the west coast.
-
Bosche Super 4 spark plugs update
ar38070 replied to Jinster's topic in 986 Series (Boxster, Boxster S)
Yes I have had Bosch 4417's in my car for the last 25K miles with no problems. (1998, 56K miles) -
Probably not worth the effort. The IOport is $100 and the Brey Krause is $165. IOport has a sale going on soon. Forgot exactly what date.
-
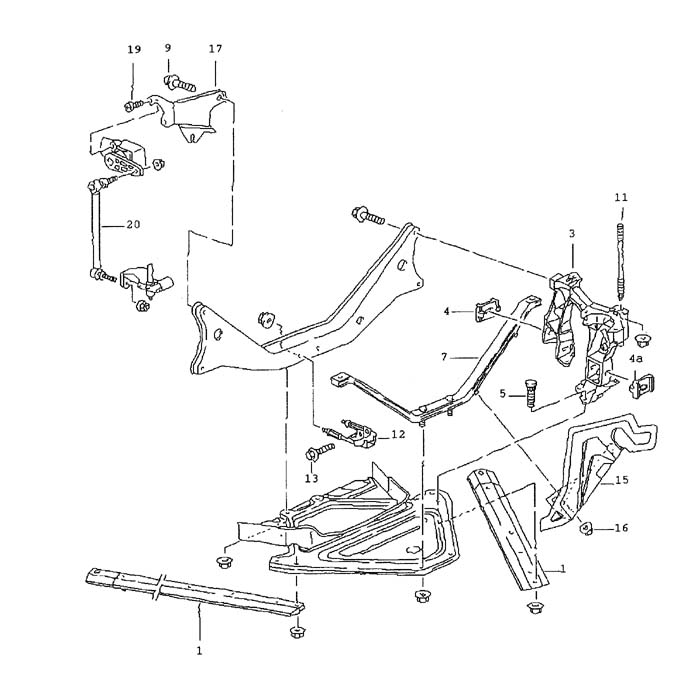
Refering to the attached drawings: Are you saying that when you press down on the wheel carrier that forward suspension link (8 in the first drawing) is hitting the diagonal strut (1 in the second drawing)? That is odd. On my car (though it does not have the stock suspension) at full droop there is 3 inches of clearance between the forward suspension link and the diagonal strut. If you can, take a picture of what it looks like and post it or send it to me. We can take this offline if you want. You can email me at eshih@pacbell.net.
-
The tool is available from performance products for $100. If you are a PCA member then you can get a 20% discount. The tool is well worth the money. (I just checked the catalog and I do not see the tool there. Hopefully they still carry it. ) The torque for the nuts on the diagonal strut is 48 ft-lbs. You should not have to remove this. The sequence for removal of the strut is: 1)Take off the wheel 2) Remove the stabilizer 3) Loosen the drive shaft from the transmission 4) Pop the toe control arm and control arm ball joints with the porsche tool 5) Take off the brake caliper. You do not have to take the rotor off but taking it off makes lifting the wheel carrier/strut/drive shaft easier. 6) Take off the three nuts holding the top of the strut to the body 7) Push/pull down on the control arm sufficicently so that you can swing the top of the strut out. You have to push/pull hard as you need to compress the bushings. This is usually a two person job. One to push/pull the other to hold onto the strut as it swings out. 8) With the top clear you can now lift the carrier/drive shaft, strut off of the control arm ball joint. 9) Depending on how you disconnected the sway bar you may have to undo the bolt that holds it to the wheel carrier as this bolt also clamps the strut into the wheel carrier. Actually you said you have to replace a wheel bearing. That means you have to take off the rotor. You do need to have the right tools to get the bearing out. Heating the wheel carrier with a propane torch helps. Sir Tools (www.sirtools.com) makes a tool to R&R the bearing ($150). Theoretically this tool works without having to remove the wheel carrier from the car. When I did it I could not figure out how to do it on the car (though in retrospect I think I know what I did wrong). Anyway the tool works great for putting the new bearing in. When you put the new bearing in it helps to heat the wheel carrier with a torch and to freeze the bearing. If you do not have that tool you will need access to a some kind of press to press the new bearing in.