Welcome to RennTech.org Community, Guest
There are many great features available to you once you register at RennTech.org
You are free to view posts here, but you must log in to reply to existing posts, or to start your own new topic. Like most online communities, there are costs involved to maintain a site like this - so we encourage our members to subscribe or donate. All subscriptions and donations go to the costs operating and maintaining this site. We prefer that guests take part in our community and we offer a lot in return to those willing to join our corner of the Porsche world. This site is 99 percent member supported (less than 1 percent comes from advertising) - so please consider an annual subscription or donation to keep this site running.
Here are some of the features available - once you subscribe RennTech.org
- View Classified Ads
- DIY Tutorials
- Porsche TSB Listings (limited)
- VIN Decoder
- Special Offers
- Paint Codes
- Registry
- Videos System
- View Reviews
- and get rid of this welcome message
It takes just a few minutes to register, and it's quality Porsche information at a low cost.
Contributing Members also get these additional benefits:
(you become a Contributing Member by subscribing or donating money to the operation of this site)
- No ads - advertisements are removed
- Access the Contributors Only Forum
- Contributing Members Only Downloads
- Send attachments with PMs
- All image/file storage limits are substantially increased for all Contributing Members
- Option Codes Lookup
- VIN Option Lookups (limited)


ar38070
-
Posts
544 -
Joined
-
Last visited
Content Type
Profiles
Events
Forums
External Paint Colors
Downloads
Tutorials
Links Directory
Collections
Classifieds
Store
Everything posted by ar38070
-
<{POST_SNAPBACK}> Thanks for the info. I guess when the ecu's are re-flashed, the drive blocker code is not modified.
-
I am reasonably certain that the car's ecu can have at most 3 or 4 keys to which it will respond (it is at least 3 as that is how many keys the car comes with. It has been bandied about before that 4 is the max). If you had your car synced to your existing keys then any earlier keys that could start your car will no longer work. I am not aware of the process where the car's serial number is burned into the key. If this were the case then if your ecu were to fry you would have to get new keys. There have been people who have done engine upgrades (boxster 2.5/2.7 to 3.4) and no one has mentioned the need for new keys (though maybe they forgot to tell us). As far as I know they just had their old keys synced to the new ecu.
-
What is your source for this statement?
-
You can try ebay. You have to be careful about model year. Also no matter where you get the key you will have to go to the dealer to have it cut and have the car programmed to recognize it.
-

Stuck in the middle of the wheel bearing job
ar38070 replied to zokman's topic in 986 Series (Boxster, Boxster S)
You said you did not have to use the Sirtools part J. I assume that means you had to use the hub extractor bracket (see picture) along with bolt and some of the other pieces. Correct? Also for future reference if you do not have the service manual set, www.autoatlanta.com has a lot of the assembly drawings on line. Also you can download it from here (14MB): http://www.autoatlanta.com/model/986catalog.html I do not think it is 100% complete but it is better than nothing.
-
Spark Plug Tubes Replacement
ar38070 replied to Izzy's topic in 996 Series (Carrera, Carrera 4, Carrera 4S, Targa)
A few drops of dishwashing soap mixed with water. -
Stuck in the middle of the wheel bearing job
ar38070 replied to zokman's topic in 986 Series (Boxster, Boxster S)
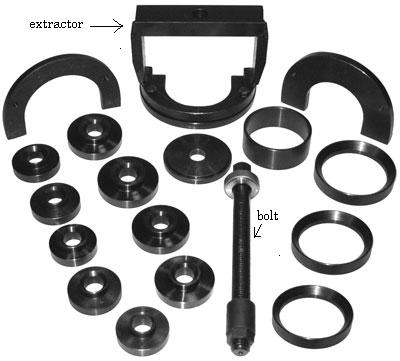
I am glad that you were able to complete the job. It also helps to heat the wheel carrier with a propane torch to facilitate the bearing insertion. The correct tool to separate the bearings is the Porsche tool #9560. I have seen prices for this tool anywhere from $150-$400. You can however get the exact same tool from www.harborfreight.com for $89. Item number 92882: http://www.harborfreight.com/cpi/ctaf/disp...temnumber=92882 The tool you use is the one in the upper right of the picture. Definitely worth getting if you ever have to do this again or if you ever do any suspension work. As you found out the pittman wedge is not the right tool for the job. I had assumed that since you had undone the track rod that you had the ball joint tool. Now for the bad news. As far as I know you cannot replace just the ball joint. You have to replace the entire arm ($$$). However I have heard of several people who have torn the ball joint cover and successfully covered the tear with some silicon sealant. Just check it from time to time to be sure that the patch has not broken. Out of curiosity when you took the hub out did the inner race of the bearing come with it or did the bearing stay intact? -
Stuck in the middle of the wheel bearing job
ar38070 replied to zokman's topic in 986 Series (Boxster, Boxster S)
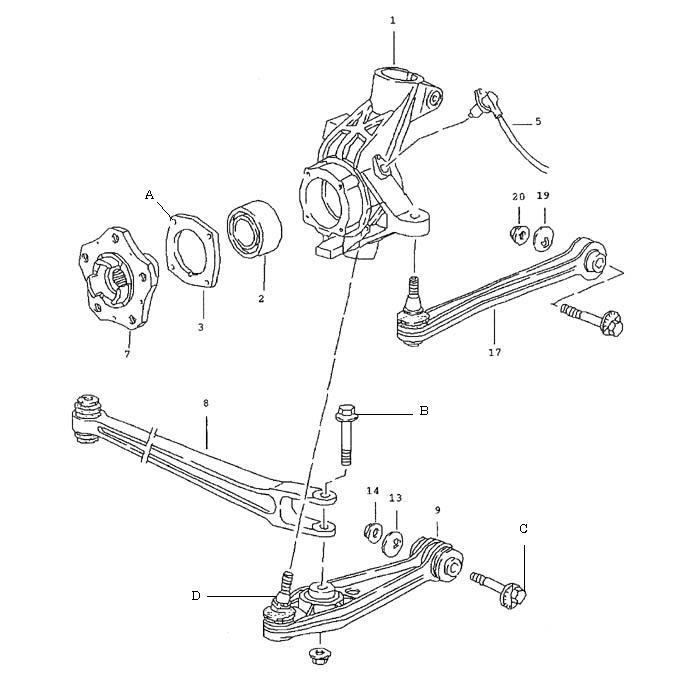
Refer to the attached picture. The wheel carrier is "1". There are two ways to do this. The first is the way that I have done it and the second is the way I think the Sirtools instructions want you to do it. Choose whichever works for you. First way: Now that you have the sway bar and track rod disconnected and the spring compressed you need to crack the track control arm ball joint ("D" in the picture). Now remove the three nuts holding the top of the strut to the body by putting the convertible top in the service position. Check your owner's manual if you do not know how to do this. Push/pull down on the track control arm. A second person helps here. With the track control arm pushed down as far as it can go (you need to compress the bushings) you should be able to lift the wheel carrier clear of the ball joint. Make sure that the spring and strut are as fully compressed as you can make it. As you have noticed the wheel carrier will slip on the strut. Hold it in place and remove the wheel carrier/strut from the wheel well. Second way: As you have the control arm disconnected from the track control arm and the sway bar disconnected, I think all you need to do is remove the camber eccentric ("C" in the picture). It might also be easier if you take off the nuts holding the top of the strut. With all this disconnected you should be able to pull out the wheel carrier/strut/track control arm assembly outwards until the hub clears the stub axle and the camber eccentric clears the body member. Then you drop every thing down so that the strut clears the wheel well. Wheel carrier disassembly (numbers/letters in quotes refer to the picture): With the wheel carrier off of the car: 1) Press the hub "7" out of the bearing "2" from the back of the wheel carrier "1". Do not be surprised when you do this that the inner race of the bearing remains attached to the hub i.e. the bearing comes apart. Assuming this happens you will need to use a bearing puller to pull the inner race off of the hub later. 2) There are 4 bolts not shown in the picture (location indicated by "A") that hold the bearing retainer "3". Remove these bolts and the bearing retainer. Also not shown in the picture is the brake dust shield that is between the hub and the bearing retainer that I believe is also held in place by the 4 bolts. 3) Now press out the bearing "2" from the wheel carrier "1".
-
Stuck in the middle of the wheel bearing job
ar38070 replied to zokman's topic in 986 Series (Boxster, Boxster S)
I am not sure what you have disconnected so far. It would help if you could post the instructions that you have and/or what if anything else has been disconnected to far. There are 3 suspension arms. The 1) track rod (toe adjustment, attached to the rear of the wheel carrier). the 2) track control arm (camber adjustment, what the wheel carrier sits on) and the 3) control arm (attaches to the middle of the track control arm and runs forward to the body). There are two possible bolts that this could refer to, the camber eccentric or the bolt that holds the control arm(3) to either the body or the track control arm(2). It does sound like the cam adjuster. We have never done it that way but it should work. If you do it this way then you should mark the adjuster so that when you reassemble it you can put it back in the same place otherwise you will have to re-align the car. I think that if you do it this way then you have to undo the bolt that holds the control arm to the track control arm too. Alternatively (and to address your other post about getting the wheel carrier off of the track control arm ball joint) then assuming you have the toe link ball joint apart, the sway bar disconnected and the three nuts holding the top of the strut to the body (underneath the convertible cover) undone: (We have always unbolted the drive shaft from the transmission at this point but you may be able to do the following without doing so since you have the axle nut off.) Now you should be able to remove the strut/wheel carrier/(drive shaft). In order to do this you must depress the control arm all the way down to enable you to get enough room to lift the wheel carrier off of the ball joint stud. This means compressing the suspension bushings. This is usually a two person operation. One person pushes/pulls down the track control arm while the other lifts/holds the wheel carrier until the track control arm ball joint drops out of the wheel carrier. If your car has a stock suspension you may have to use a spring compressor in order to keep the strut from extending. Also when you press down, the control arm running forward will eventiually bind against the flat strut that runs diagonally from the body to the bracket underneath the transmission. So watch out for that. I hope some of this helps. -
If you do not track your car then do not worry about it. The normal pressure rise of 2-3# that occurs under normal street driving is not going to influenced that much by the water content in the air. If you track then you are going to have to get a nitrogen bottle. If you have a large tank compressor you should have a water trap on it anyway.
-
One quart out of nine is not going to change the overall viscosity very much. Assuming you are changing the oil every 5000 to 7500 miles and you are only having to add 1 to 2 quarts in between, it is not a big deal to mix viscosities. IMHO (By some people's theories, the fact that you are adding a little fresh oil every now and then, actually improves the overall quality of the oil.) In part it will depend on how you drive the car. Leisurely, no big deal. Track it every day, bigger deal.
-
Spring Installation
ar38070 replied to landlwilson's topic in 996 Series (Carrera, Carrera 4, Carrera 4S, Targa)
This should work (from the boxster race board): http://gwl.rmsolo.org/hacks/suspension/index.html -
Better buy your wheel bolts now
ar38070 replied to Tool Pants's topic in 986 Series (Boxster, Boxster S)
You can buy with ball shoulders that are one piece though they are not Porsche parts. If you are the original owner they should have sleeves. -
Removal of front air intake grilles
ar38070 replied to zokman's topic in 986 Series (Boxster, Boxster S)
Yes you have to take off the bumper cover. In order to take of the cover you have to take off or at least loosen the plastic fender liners. -
Just cut off you old sensors an inch above the connector and twist the ends of the wires together, solder and shrink wrap.
-
I have done a front but not a rear. You need certain tools: 32mm socket to remove axle nut 10mm hex bit for the caliper bolts ball joint tool hub extractor or hydraulic press Bearing extractor 18mm socket or crowfoot Torque wrench good to 348 ft-lbs Propane torch Plus your usual wrenches, etc. Also removing the rear wheel carrier is more difficult than the front. The times that I have done it (strut replacement) you need to disconnect the drive shaft from the transmission (6mm or 8mm hex bit). Also in order to lift the wheel carrier off of the control arm ball joint you have to really depress the control arm in order to get sufficient room to lift it off of the ball joint. If you have a stock suspension you may have to use a spring compressor on the strut to keep it from extending the strut. The instructions above are correct. The only thing I am not sure about is heating the hub to remove the inner race. I think you would want to heat the race as the hub is inside the race. Also removing the race is a PITA if you do not have the right size puller. Also a rear alignment is probably not 100% needed as you do not touch any of the alignment adjusters. Would not hurt though. The Sir Tools part numbers are B 90-P2, B 90-3 and B 90-3J. The newer rev bearings (999 053 041 03 boxster part number not "S") seem to be better than the originals. I have not had any problems since I replaced mine.
-
Pirelli P Zero Nero ? Rosso
ar38070 replied to santambrogio's topic in 986 Boxster Suspension, Brakes, and Wheels
225 is probably the max width tire for a 7 inch width wheel. People have put on larger but it is definitely not ideal. Custom Alignment in Mountain View. Dietchwerks in Sunnyvale. Ken's Sportech in Campbell. -
Alarm going off for no appartent reason.
ar38070 replied to Berliner's topic in 986 Series (Boxster, Boxster S)
Also make sure that there is nothing in the car that can sway or fall like a pair of fuzzy dice :). If something rocks the car, passing truck, the wind, etc. the motion of object will set off the alarm. I once had a sunshade in the car and it slipped and fell when the car cooled off at night, setting off the alarm. -
I do not believe that any of the available tools will work without taking the wheel carrier off of the car, at least on the front. On the front the strut body is behind the axle so you cannot remove the axle. Since you cannot remove the axle you do not have access to the back of the hub so you cannot get a tool in there to press out the hub. You can probably do the rear as the drive shaft can be pulled out without removing the strut. Another tool is the Sir Tools one. It is about $250 for the porsche specific one. Taking the wheel carriers off will not effect the alignment. The only time the alignment might be effected is if you have to undo the top of the front strut in order to get the wheel carrier out. As long as you mark the position of the nuts that hold the top of the strut in place before you loosen them, you will be able to put it back in the same place as when you started.
-
No Brake Lights!
ar38070 replied to vfxbox's topic in DIY Articles - Boxster (986) - Common Fixes and Repairs
Look above the brake pedal. If I remember correctly it locks in with a 90 degree twist. -
manual transmission will not shift into 5th gear
ar38070 replied to NTx Car Guy's topic in 986 Series (Boxster, Boxster S)
What are the symptoms? Wont shift into 5th at all? Shifts but no acceleration? Shifts but pops out of gear? What, if any, previous symptoms leading up to the failure? -
Suspension confusion
ar38070 replied to mjb2448's topic in 996 Series (Carrera, Carrera 4, Carrera 4S, Targa)
I suppose it could take that long but it should not. The issue is whether or not you track your car. If you do not then it really is not necessary as a street car does not have a consistant weight distribution, i.e. do you have a passenger, do you have stuff in the trunk, do you have stuff in the back seat, etc. all of which will throw off a corner balance. Even in a car that is tracked the corner balance is a compromise as the car will balance differently with a full or empty gas tank, which is why you normally corner balance with half a tank. -
Suspension confusion
ar38070 replied to mjb2448's topic in 996 Series (Carrera, Carrera 4, Carrera 4S, Targa)
Re: PSS-9 While desirable it is not absolutely necessary to corner balance the car after install especially if the car is not taken to the track. Even if the corner balance is done it does not cost that much extra, about 2 hours of labor. Also you would not want to corner balance the car immediately after install as you should let the new suspension settle in for a little while anyway before the corner balance. The additional advantage of being able to tweak the ride height to suit your preference and being able to adjust the shock settings too may make the PSS-9 preferable of the Porsche options to some people. -
There is a way to replace the wheel bearing with the wheel housing still mounted to the car...you will need to purchase a OTC Hubtamer tool set (or similar). With this set you can pull out the hub and press the new bearing in. I have this set and it works great. <{POST_SNAPBACK}> Do you have the hubtamer or the hubtamer elite? Do you know what the difference is? Have you actually used in on a boxster/996? thanks for the info. ed
-
I have heard of people that have downloaded them. The reports are that they are okay. They do not list a manual for the TT or GT2 or GT3. I have emailed them several times about TT manuals but never got a reply. There was an ad in Excellence that was for a Boxster manual. I meant to email the company to see if they had one for the TT.