Welcome to RennTech.org Community, Guest
There are many great features available to you once you register at RennTech.org
You are free to view posts here, but you must log in to reply to existing posts, or to start your own new topic. Like most online communities, there are costs involved to maintain a site like this - so we encourage our members to subscribe or donate. All subscriptions and donations go to the costs operating and maintaining this site. We prefer that guests take part in our community and we offer a lot in return to those willing to join our corner of the Porsche world. This site is 99 percent member supported (less than 1 percent comes from advertising) - so please consider an annual subscription or donation to keep this site running.
Here are some of the features available - once you subscribe RennTech.org
- View Classified Ads
- DIY Tutorials
- Porsche TSB Listings (limited)
- VIN Decoder
- Special Offers
- Paint Codes
- Registry
- Videos System
- View Reviews
- and get rid of this welcome message
It takes just a few minutes to register, and it's quality Porsche information at a low cost.
Contributing Members also get these additional benefits:
(you become a Contributing Member by subscribing or donating money to the operation of this site)
- No ads - advertisements are removed
- Access the Contributors Only Forum
- Contributing Members Only Downloads
- Send attachments with PMs
- All image/file storage limits are substantially increased for all Contributing Members
- Option Codes Lookup
- VIN Option Lookups (limited)


pk2
-
Posts
668 -
Joined
-
Last visited
Content Type
Profiles
Events
Forums
Exterior Paint Colors
Downloads
Tutorials
Links Directory
Collections
Classifieds
Store
Everything posted by pk2
-
Convertible Top Woes
pk2 replied to 1schoir's topic in 986 Boxster Convertible Top Issues and Solutions
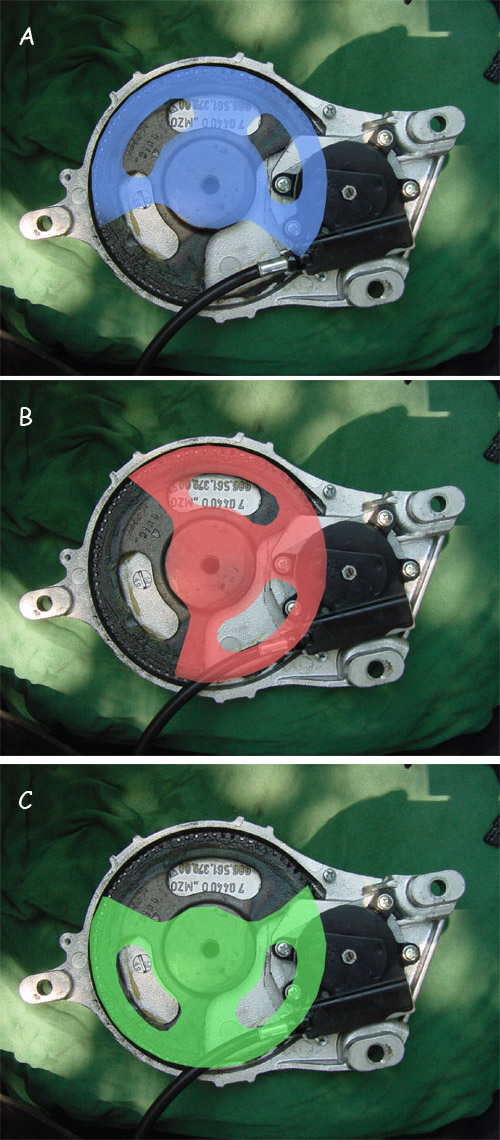
O.k. Maurice, Thanks again for all your advice. My tie rods came in today and I have read your thread upside-down and backwards several times. So tomorrow I'm jumping in. Plan in a nutshell is as follows: 1)Take the transmissions out 2)Check cable ends at motor (to short or unwound) 3)Take of the back covers off transmissions 4)Rotate the gear around with a drill drive so that the teeth face primarily towards cable thing (see pics) 5)Push v bar on and further drive the cable to align v bar with notches on housing face. 6) Snug screws of little black housing down 7) Reinstall back panel and reinstall transmission assems. 8) Re-attach cables to motor 9) Put tie rods on while loosened at middle joint. Top should be about 4-12in from at this point 10) Adjust pushrods crudely with middle joint and fine tune by rotating white, thread ball ends to line up each side of the front edge of the convertible top so that the two tongues fit into the slots onto the top frame of the windshield. Few little grey areas… 1) The center screw indicated with one of the red arrow in your last illustration looks like a nut with a slotted, threaded, headless screw in the middle. Is this cinched down as a single unit (screw and nut rotated together), or just the center headless screw that’s twisted? 2) Do I need to ad grease to gear, if so, anything special? 3) Still a little fuzzy as to where the gear should be when the v bar/ gear is right. As I understand it there are 2 possible positions 180 degrees from each other, both of which would allow for the v-bar to be aligned with the notches on the housing. It may be obvious when I open the transmission up. I've run a few "assembly in motion" scenarios thru my head, If you can, please see the attached images and tell me which on is closest to the approximate correct position: A, B or C. Your feedback is appreciated, correct me where I’m wrong & I'll assume your "good luck" . Regards, Peter P.S. things didn't go as planned...99% sure I mounted the v arms upsidedown (180 off)...not woried. But I've also got electrical problems, top won't go up, motor will noit run in reverse (with everything disconected See my new thread at http://www.renntech.org/forums/index.php?s...st=0#entry78820
-
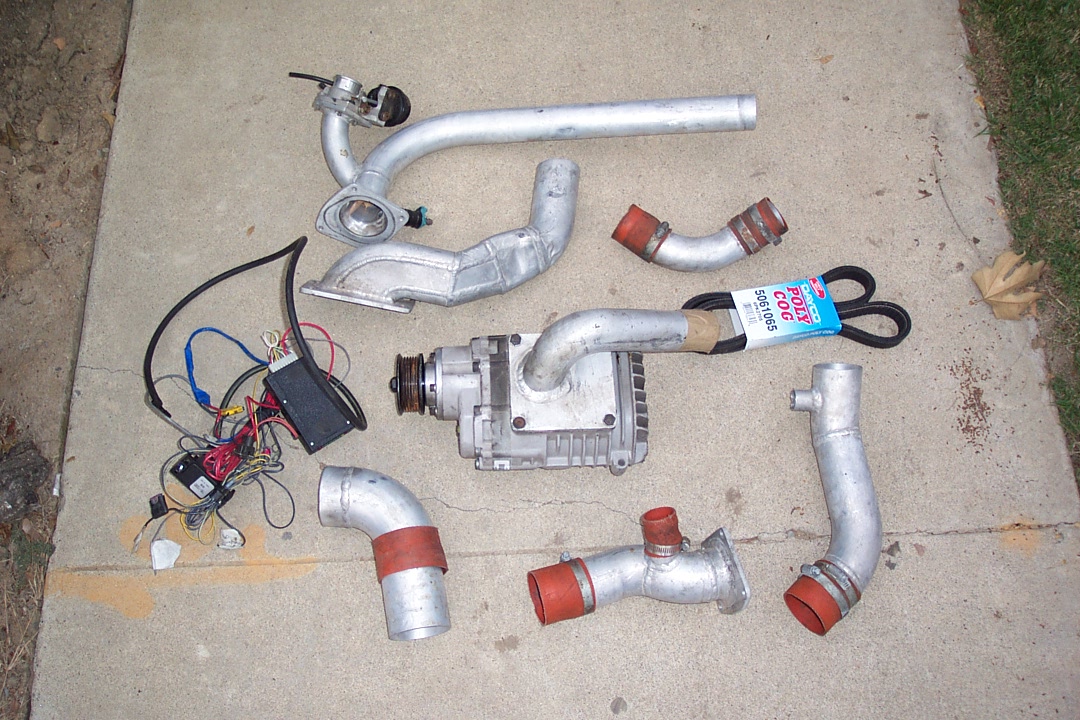
TCP boxster Supercharger…won’t fit. Any body done it?
pk2 replied to pk2's topic in 986 Series (Boxster, Boxster S)
Thanks, His names Matt and he recently sold that car. I've poured over his thread and have been in touch with him on and off over a year+ or so . He aludes to a problem he had with pipe #4,-took him 4 hours to get in. I beleive thats the one I got hung up on. There was a tube that goes from the SC up to the top of the engine which I saw no possible way to get in. Tried emailing him a while back to get some elaboration on that problem but got no reply. Think I'll try again. Thanks Again, Peter -
TCP boxster Supercharger…won’t fit. Any body done it?
pk2 replied to pk2's topic in 986 Series (Boxster, Boxster S)
Todd, Maybe it's not, but a tip off too me was that I'm already in possession of those the exact pics, they came with my used SC. More compelling are the very "un-factory-like hammer-bashings" on the upper half of the fat pipe coming off the back off the SC (Passenger side view). Unless this is a common mod, (or TPC hires baboons) I think it must be mine. The story I got was the motor was bought from out of state by someone in LA who did'nt want the SC. The SC was bought by a guy who tried to fit it to a 3.2L (it wont go). He in turn sold it to me (mines a 2,5 and this presumably fits) Regardless, do you mind if I pick your brain on or off line? I'm pretty handy with a wrench and German cars. I can't understand how or why I couldn't get this thing to fit. I'm really "re-phsyced" to make it go. Look forward to hearing from you Peter -
TCP boxster Supercharger…won’t fit. Any body done it?
pk2 replied to pk2's topic in 986 Series (Boxster, Boxster S)
TODD!! THATS MINE!!!! Talk to me!!!! Bought it used from a guy in LA a couple of years ago, Had it on a lift for 3 days, just could not get one of the pipes from the sc up through to the top, Been sitting in my trunk since. Finally psyched to have another go at it. MUST TALK! (don't worry, I'm not looking for a refund :) Regards, Peter I’m going to P.M. you if I can figure it out how on this forum or PM me, Peter I'm going to try to pm you, must talk
-
Top anatomy, physiology, and fix
pk2 replied to masterbm's topic in 986 Boxster Convertible Top Issues and Solutions
Me to Peter -
Mine was much worse than yours (torn), cost me about $250 Peter
-
anyone know a good shop in southern cali?
pk2 replied to TechArtBox's topic in 986 Series (Boxster, Boxster S)
I'm in O.C. Are you fixing, buying or selling? Peter -
Horn Problem
pk2 replied to natzee's topic in DIY Articles - Boxster (986) - Common Fixes and Repairs
Love it, my kind of fix. Got my silicone today. Did you use anything to wedge the plate and botls appart (like the origional ruber would( Gotta love it, lethargy is the mother of invention in my book. I bought my high temp silicone this morning. Did you use any sort of temporary shims to wedge between the plate and the nuts/ washers to hold the assembled parts in position (separating the horn circuit contacts) while the silicone set up? Mines pretty bad. Started sounding off by hitting the brakes to hard, ended when it just went started going on & off while parked, Current fix is a stick wedged between the airbag and the steering wheel, says to me I need to wedge those bolts out somehow. Also, did you take the plate off or could you squeeze the goop in from behind. Thanks, Peter -
Convertible Top Woes
pk2 replied to 1schoir's topic in 986 Boxster Convertible Top Issues and Solutions
Mark: Well, that was the key but in a roundabout way!... Here is a photo of the half-moon gear in the transmission. From this postion, you have to spin the cable so that the half-moon gear is near the middle of its travel. Then, when you install the transmission and install the V-lever (with the 19mm bolt torqued to 59 ft/lbs) you don't have far to go to line up the V-lever with the marking notches . Here is a photo of the transmission showing the marking notches. The notches, in the way they are slanted, help you to make sure that you don't have the V-lever installed 180 degrees off. Without RennTech Forums, I was looking at a big $$ repair, (to say nothing of the feeling of accomplishment). :renntech: Regards, 1schoir. Hello, Sounds like you’ve grappled with a problem that’s vexed me for years. My Boxster was T-boned awhile back. The body shop neglected reattach some of the opening and closing mechanism (just as well I suppose…reading this thread) Question, in your half moon pic, do you mean that unlike the image, the half moon gear should be centered, that is, it would rotate equal distances cw or ccw before it hits it’s stop? And, at this point, the arm will be roughly in the proper position? If so, what position is the top in (I think you mention 12 in. form the windshield?) If all those ducks are in a row and the pushrods etc. are in place, should the top be good to go? Also, the micro switch, is their only one on the drivers side? Thanks in advance for your reply. It’s really great to find a place where Porsche people aren’t afraid to get there hands dirty + have the smarts! Thanks in advance. Peter P.S. PM me if you’d like. Peter: I noticed in your other post that you stated that you have a MY99. The first thing you have to determine is whether you have the original style transmissions (Version A)....All of this should give you a place to start. Let us know how you progress or what roadblocks you run into. Regards, Maurice. Hello Maurice, Thanks a ton for your prompt and insightful reply. I’m hoping to put this baby to rest this weekend. I believe I have the “a” type transmissions because it has the alignment marks for the v arm (unlike the “B” ?). Also, when I had one out and was messing around with it, I felt that dead spot…real head scratcher at the time. Oddly though, I believe I have later model cables in that they have a bumpy surface texture which, as I read here somewhere, is indicative of reinforced sheathing that doesn’t get stretched. One other point (in my favor I hope), my top worked fine after the accident. It was my putting it back together (when the body shop didn’t) that I got in a pickle. Trying it out revealed a fundamental problem - a teeth nashing “thunk” and growl…with the top going nowhere. (probably the sound you were alluding to in your description of the misalignment of v bar) The good news is I think that I could only bear the horrible sounds a couple of times. Hopefully I gave up before I could damage anything. Half moon gear: In other words, your picture shows the gear approximately 180 degrees from where it wants to be (to be in the “Initial position”) for a ballpark alignment of the v arm with the notches. Or, to put it another way that single centered spoke should be point somewhere towards the black cable socket assembly thing. (I’m assuming that the slot for the v arm is permanently fixed, or part of, to the gear (no?)). Also, walking through this thing in my mind, is that gearbox you have exposed actually the back side of the front cover? That is. the other side of that gear/case assembly pictured would face the inside of the conv. top compartment? Roadblock potentials: I unfortunately only have one of the original (albeit broken red socket) pushrods to reference the final, installed length of 2 new ones. Do you think its length would be representative of both sides? If not, any idea how to “tune” the lengths to operate right (maybe the stuff of another thread…dun-no). What signals the top to stop moving (either up or down). I guess the door jam micro would be one. Another switch looking thing is above the drive motor (?). I also read there were 3 in total. Would they generate for mentioned stop signals? any adjustments there? I’d kinda like to put this right without taking anything apart. As I recall, the manual says to disconnect the cable for one side (at the motor ) to align the opposite side and transmission/v arm. Once the v bar is aligned, how man degrees in each direction should it rotate without it leaving the gear and freewheeling (indicating gear misalignment)? Anyway, I really appreciate your input. Read your whole thread (among others) and admire your methodical persistance in you're diagnosis. Regards, Peter -
I had a similar problem yrs ago with an old Fiat Spyder…Do you play softball?... :) Peter
-
First place to start is definitely by checking to make sure that both of the drive cables (on the side that goes into the motor which is in the center, under the clamshell,...If both sides appear to be operating in the opposite direction from each other as you describe, is it possible that you installed one of the V-levers 180 degrees off. With the keyed cutouts, it is possible to install the V-levers in only two positions: either the correct way or 180 degrees off. Regards, Maurice. Hi Maurice Thanks for the quick reply. I did stumble on that thread and, it and others were extremely helpful. Told me a lot, I almost took this post down. 1 point, even after the wreck, the top still worked just fine. Currently I’ve disconnected the tie rods. Opening and closing is purely manual (lift the hatch, undo the latch & pull the top back and down, hatch back down). As to your questions, my drive cables appear to be the “new” (bumpy) variety. That is the variety where sheathing presumably doesn’t stretch. Also, as I recall (when I attempted to fix this thing a couple years ago) there was no obvious “shortcoming” in the cable length and they did definitely drive the transmissions…aggressively. The car is a 99. As far as the version of the transmission, my manual describes versions references both “A” & “B”. By extrapolation I think I have an “A” in that it has raised bumps for aligning the “drive lever”, whereas in the “B” model, they talk about measuring down to the ball on the drive lever (illustrations are inconclusive). As to the steps I followed: I’ll try to attach them…makes it look so easy. As to the transmissions running in reverse to each other, that’s just what it sounded like might be happening, it would just make a grrrr -( painfull, loud:)-THAaUNK!-grrrr… with the top going nowhere. Needless to say I didn’t’ try it many times. Having seen on some thread here, the guts of the type “A” transmission, I guess what had me vexed, that’s the free wheeling section of the half moon gear…just couldn’t visualize it. That may help me visualize it into the correct position. Aside from ineveditable pratfalls, it really seems easy. But with so many threads on this topic . I anticipate I’ll be around this forum for some time while I try to get this thing working. Questions: Assuming I have all my ducks in a row after aligning drive levers into position, how should the rear clam-shell/cover and convert top be positioned for attachments of tie rods? Also why, how, and when do I adjust the length of these rods? Feel free to comment or impart any tidbits of wisdom. Thanks, Peter
-
Convertible Top Woes
pk2 replied to 1schoir's topic in 986 Boxster Convertible Top Issues and Solutions
Mark: Well, that was the key but in a roundabout way!... Here is a photo of the half-moon gear in the transmission. From this postion, you have to spin the cable so that the half-moon gear is near the middle of its travel. Then, when you install the transmission and install the V-lever (with the 19mm bolt torqued to 59 ft/lbs) you don't have far to go to line up the V-lever with the marking notches . Here is a photo of the transmission showing the marking notches. The notches, in the way they are slanted, help you to make sure that you don't have the V-lever installed 180 degrees off. Without RennTech Forums, I was looking at a big $$ repair, (to say nothing of the feeling of accomplishment). :renntech: Regards, 1schoir. Hello, Sounds like you’ve grappled with a problem that’s vexed me for years. My Boxster was T-boned awhile back. The body shop neglected reattach some of the opening and closing mechanism (just as well I suppose…reading this thread) Question, in your half moon pic, do you mean that unlike the image, the half moon gear should be centered, that is, it would rotate equal distances cw or ccw before it hits it’s stop? And, at this point, the arm will be roughly in the proper position? If so, what position is the top in (I think you mention 12 in. form the windshield?) If all those ducks are in a row and the pushrods etc. are in place, should the top be good to go? Also, the micro switch, is their only one on the drivers side? Thanks in advance for your reply. It’s really great to find a place where Porsche people aren’t afraid to get there hands dirty + have the smarts! Thanks in advance. Peter P.S. PM me if you’d like. -
Hi, I’ having similar problems (See above http://www.renntech.org/forums/index.php?showtopic=15743) My arms seem to have a slight bend in them, does it matter? Should the be completely flat? How on earth did you knot that one up…unsynchronized from side to side like mine? Thanks, Peter
-
Hello Any body have experience syncing the the open/close mechanism for a Boxster top. It basically has a “transmission on either side with a single drive motor in the middle My Boxster was T-boned awhile back. The body shop neglected reattach some of the opening and closing mechanism located in the folded top compartment (cables, motor, “transmissions”, tie rods, etc.). As a result, the mechanism got out of whack. That is after reconnecting the clap trap, one side was pulling the top down while the other was doing something else (puling it up?) I tried to straighten it out following the factory manual to a tee…no dice. I’m told by Porsche trained independent mechanics that it a real pain. This is reflected in the repair cost of $600. I’m no slouch at all around a wrench and German cars at all ( I.E. rebuilt a 928 engine from the ground up). Can’t believe I can’t do it myself. The thing that is throwing me is the “transmissions” for the lft and rt. side of the mechanism. Any help is appreciated P.K. P.S. Going back to the body shop is a non starter,,, to much water under the bridge.
-
Hello, Any body had the unfortunate occasion to refinstall the convertible eclectic top mechanism? My car was t-boned and in the process of rectifying the smash, my body shop disconnected one of the push rod things. Messed every thing up. Put the two sides out of sink...unusable. Even following the factory manual to a tee, it wound up sounding and behaveing like on side was closing and the other was trying to open. Seasoned factory trained Porsche mechanic say their a b_tch…estimate 6 hours ($600) I’m pretty clever and can figure out most stuff out. But this one has evaded me. Thinking of taking the whole mechanism out and trying to synchronize the 2 sides on a bench, or, trying to open it up and down one side at a time and synchronize that way. Ideas ? tips? Experience to share? P.K. (I chose not to take my car back to the body shop,,,no confidence there…quiet awhile ago any way)
-
TCP boxster Supercharger…won’t fit. Any body done it?
pk2 replied to pk2's topic in 986 Series (Boxster, Boxster S)
Thanks for your reply. I think i know him (dealt with a "Matt" in Ohio with respect to his sc job) had a blog of sorts but was apparently missing, for some reason, a lot the pertinant stuff. Last I heard he sold it but it's worth looking into. Thanks again PK -
Hello, Any body have experience installing a TCP supercharger (99 2.5l Boxster 5 spd if it matters). I picked up a used one and I do know my way around a wrench quite well. I could not though, get one of the pipes from the blower up through to the top of the engine. TCP claims it’s bolt . I couldn’t for all the money in the world get the thing through. Tips tricks...? Also, If you’ve a good blog or pics of the installation that would be great! Tcp manual leaves a lot to be desired (dig those illustrations) Thanks PK