Welcome to RennTech.org Community, Guest
There are many great features available to you once you register at RennTech.org
You are free to view posts here, but you must log in to reply to existing posts, or to start your own new topic. Like most online communities, there are costs involved to maintain a site like this - so we encourage our members to donate. All donations go to the costs operating and maintaining this site. We prefer that guests take part in our community and we offer a lot in return to those willing to join our corner of the Porsche world. This site is 99 percent member supported (less than 1 percent comes from advertising) - so please consider an annual donation to keep this site running.
Here are some of the features available - once you register at RennTech.org
- View Classified Ads
- DIY Tutorials
- Porsche TSB Listings (limited)
- VIN Decoder
- Special Offers
-
OBD II P-Codes - Paint Codes
- Registry
- Videos System
- View Reviews
- and get rid of this welcome message
It takes just a few minutes to register, and it's FREE
Contributing Members also get these additional benefits:
(you become a Contributing Member by donating money to the operation of this site)
- No ads - advertisements are removed
- Access the Contributors Only Forum
- Contributing Members Only Downloads
- Send attachments with PMs
- All image/file storage limits are substantially increased for all Contributing Members
- Option Codes Lookup
- VIN Option Lookups (limited)


Doug_B_928
-
Posts
148 -
Joined
-
Last visited
-
Days Won
2
Content Type
Profiles
Events
Forums
External Paint Colors
Downloads
Tutorials
Links Directory
Collections
Classifieds
Store
Everything posted by Doug_B_928
-
Thanks, Don, for taking the time to look at the info and respond. No loss of interest, just a combination of lack of time and trying to be penny-wise. I visually inspected everything for cracks and put my mityvac on the tester port by the vacuum pump. Figured I'd need a smoker to test better but your carb cleaner idea is an interesting one. If I attempt that I'll wait until it's nice enough outside and will have my wife watching with fire extinguisher in hand :) . Good to know hot film MAFs can actually be cleaned. Air filters in it have always been factory or OEM. I'm aware that coils tend to go at the same time, but inspect them frequently enough that I figured I'd try to save the $ and replace as each one goes out, but it has been in the back of my mind that one or more other coils could still be causing this. The engine strut mount looked good when I did the coils, but I'll inspect it more closely. Haven't checked the motor mounts as I have to wait to get it up in the air. I did the throttle body adaptation re-learn a few times, with no improvement. The 1355 code doesn't provide any additional information. From what I can tell, all I can do is clear it and see if it comes back (which is what happened). The CEL does not appear with this code, at least not yet.
-
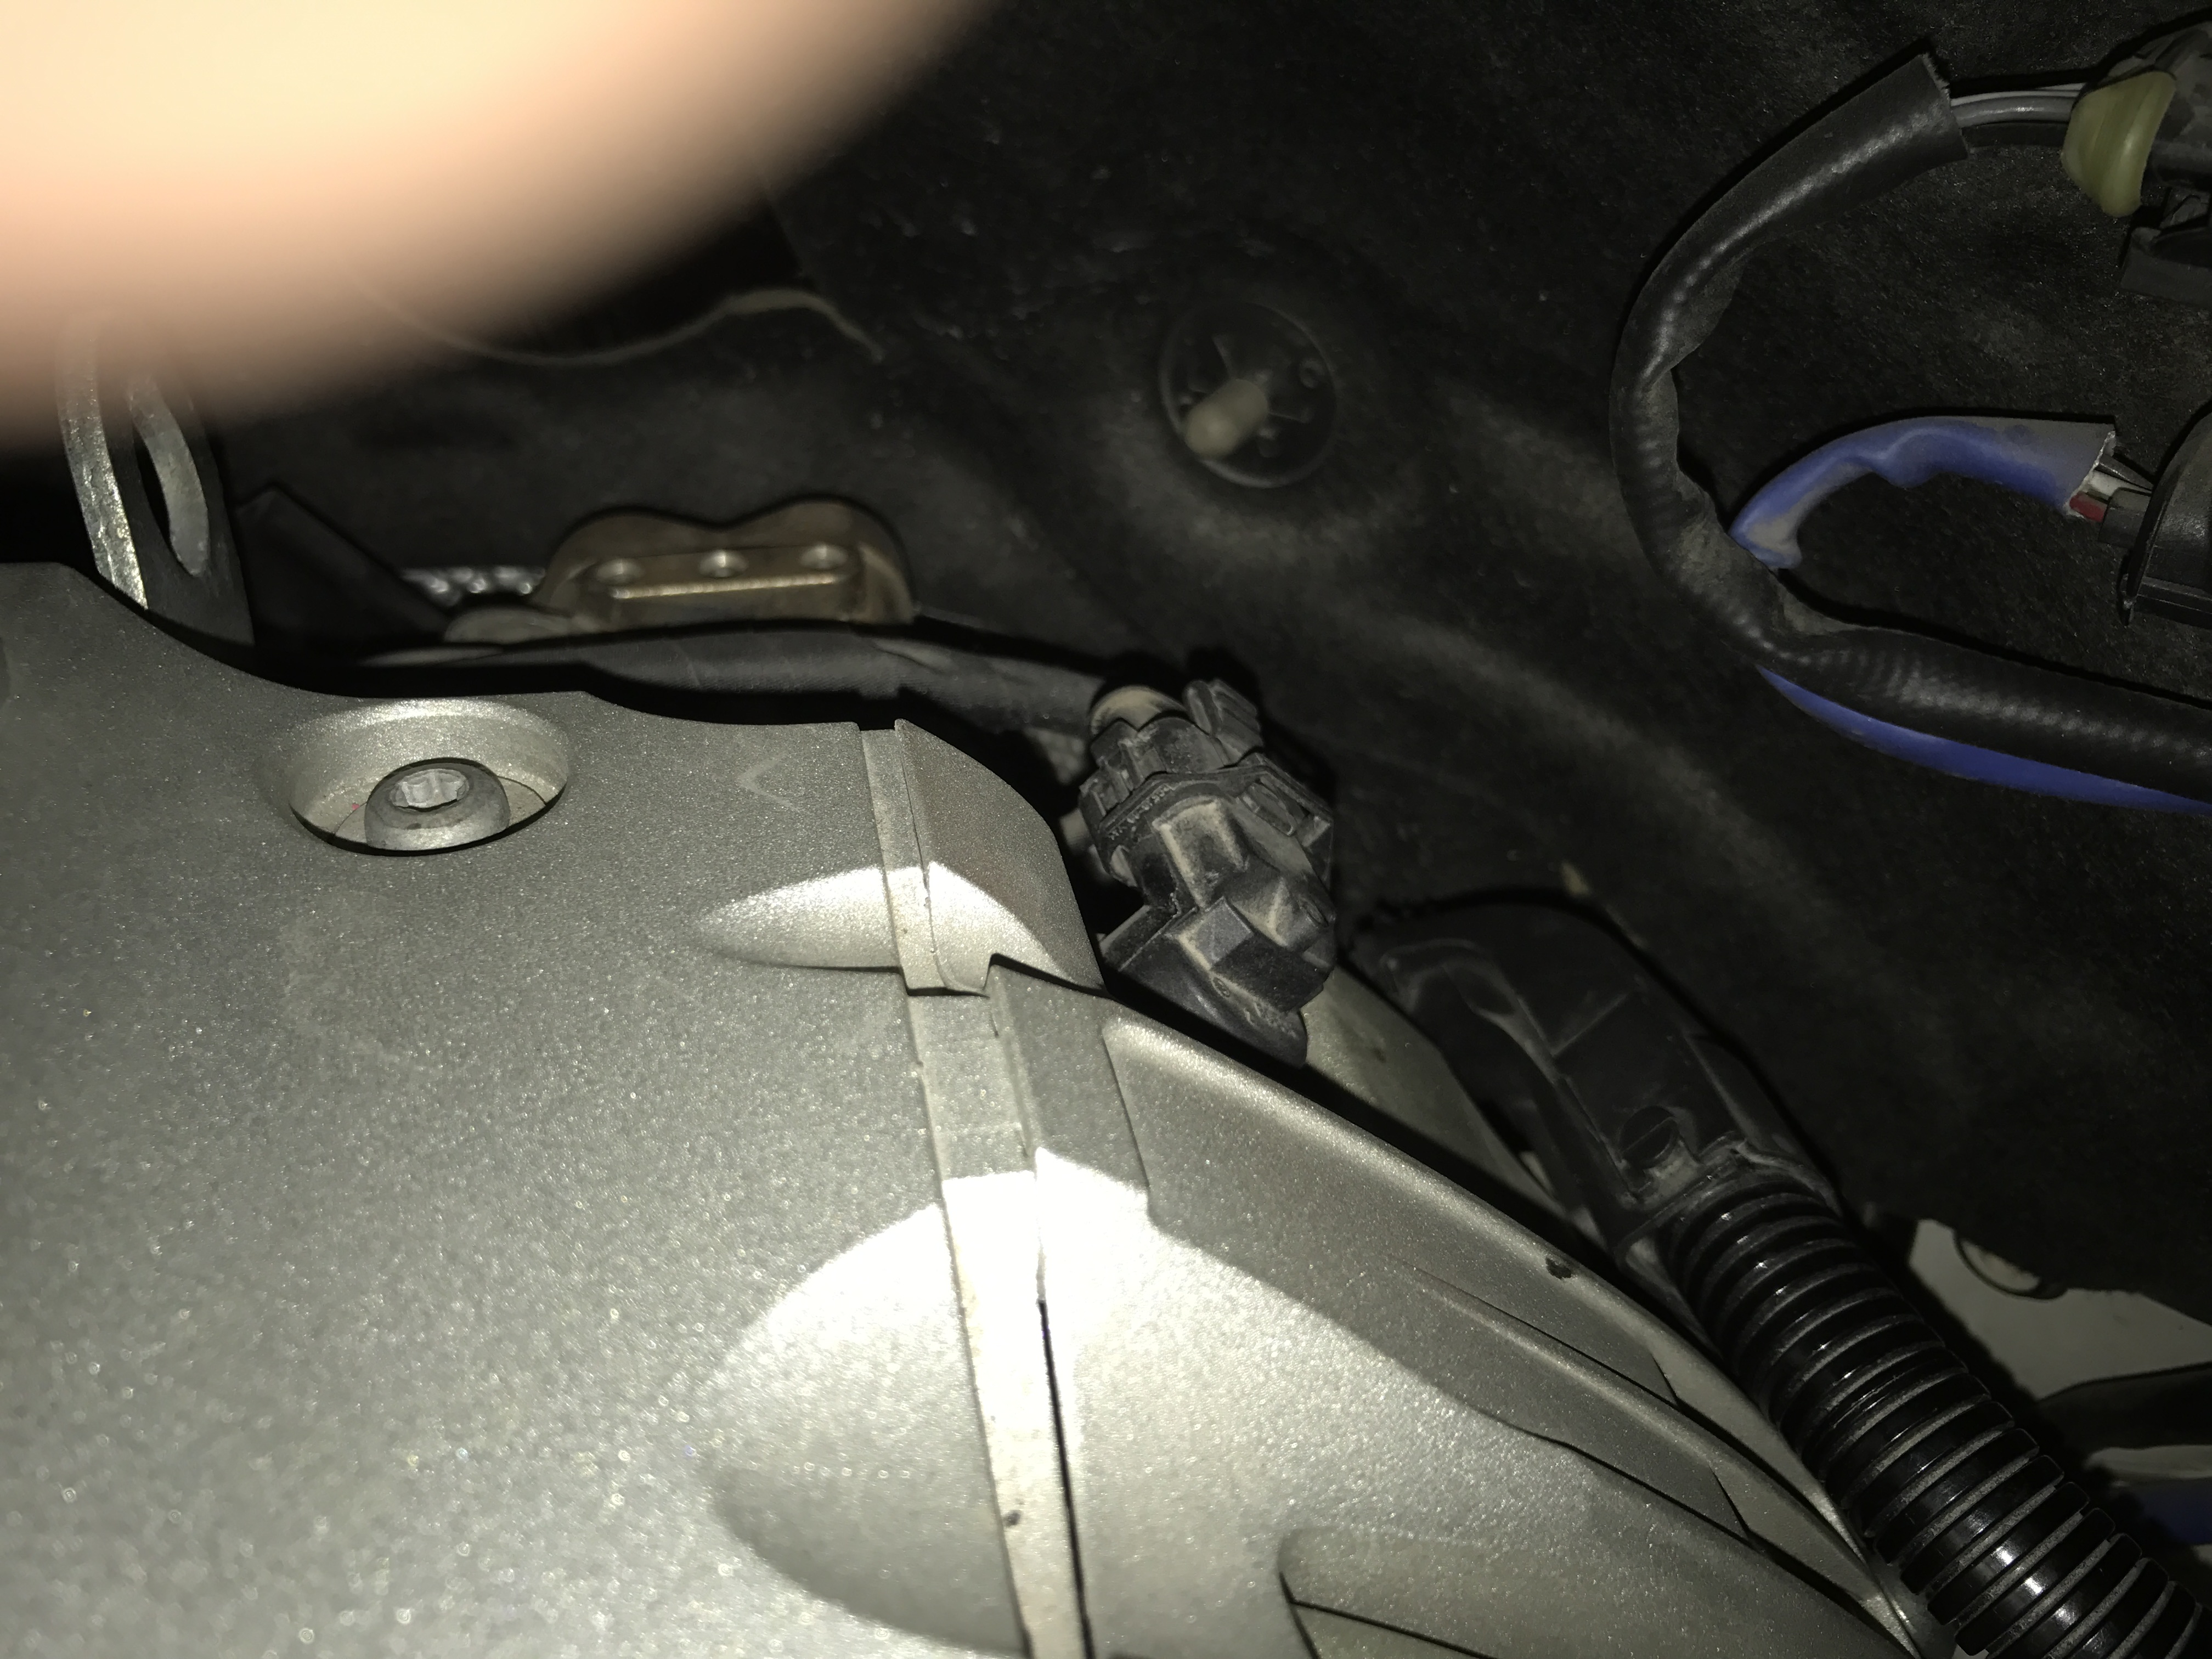
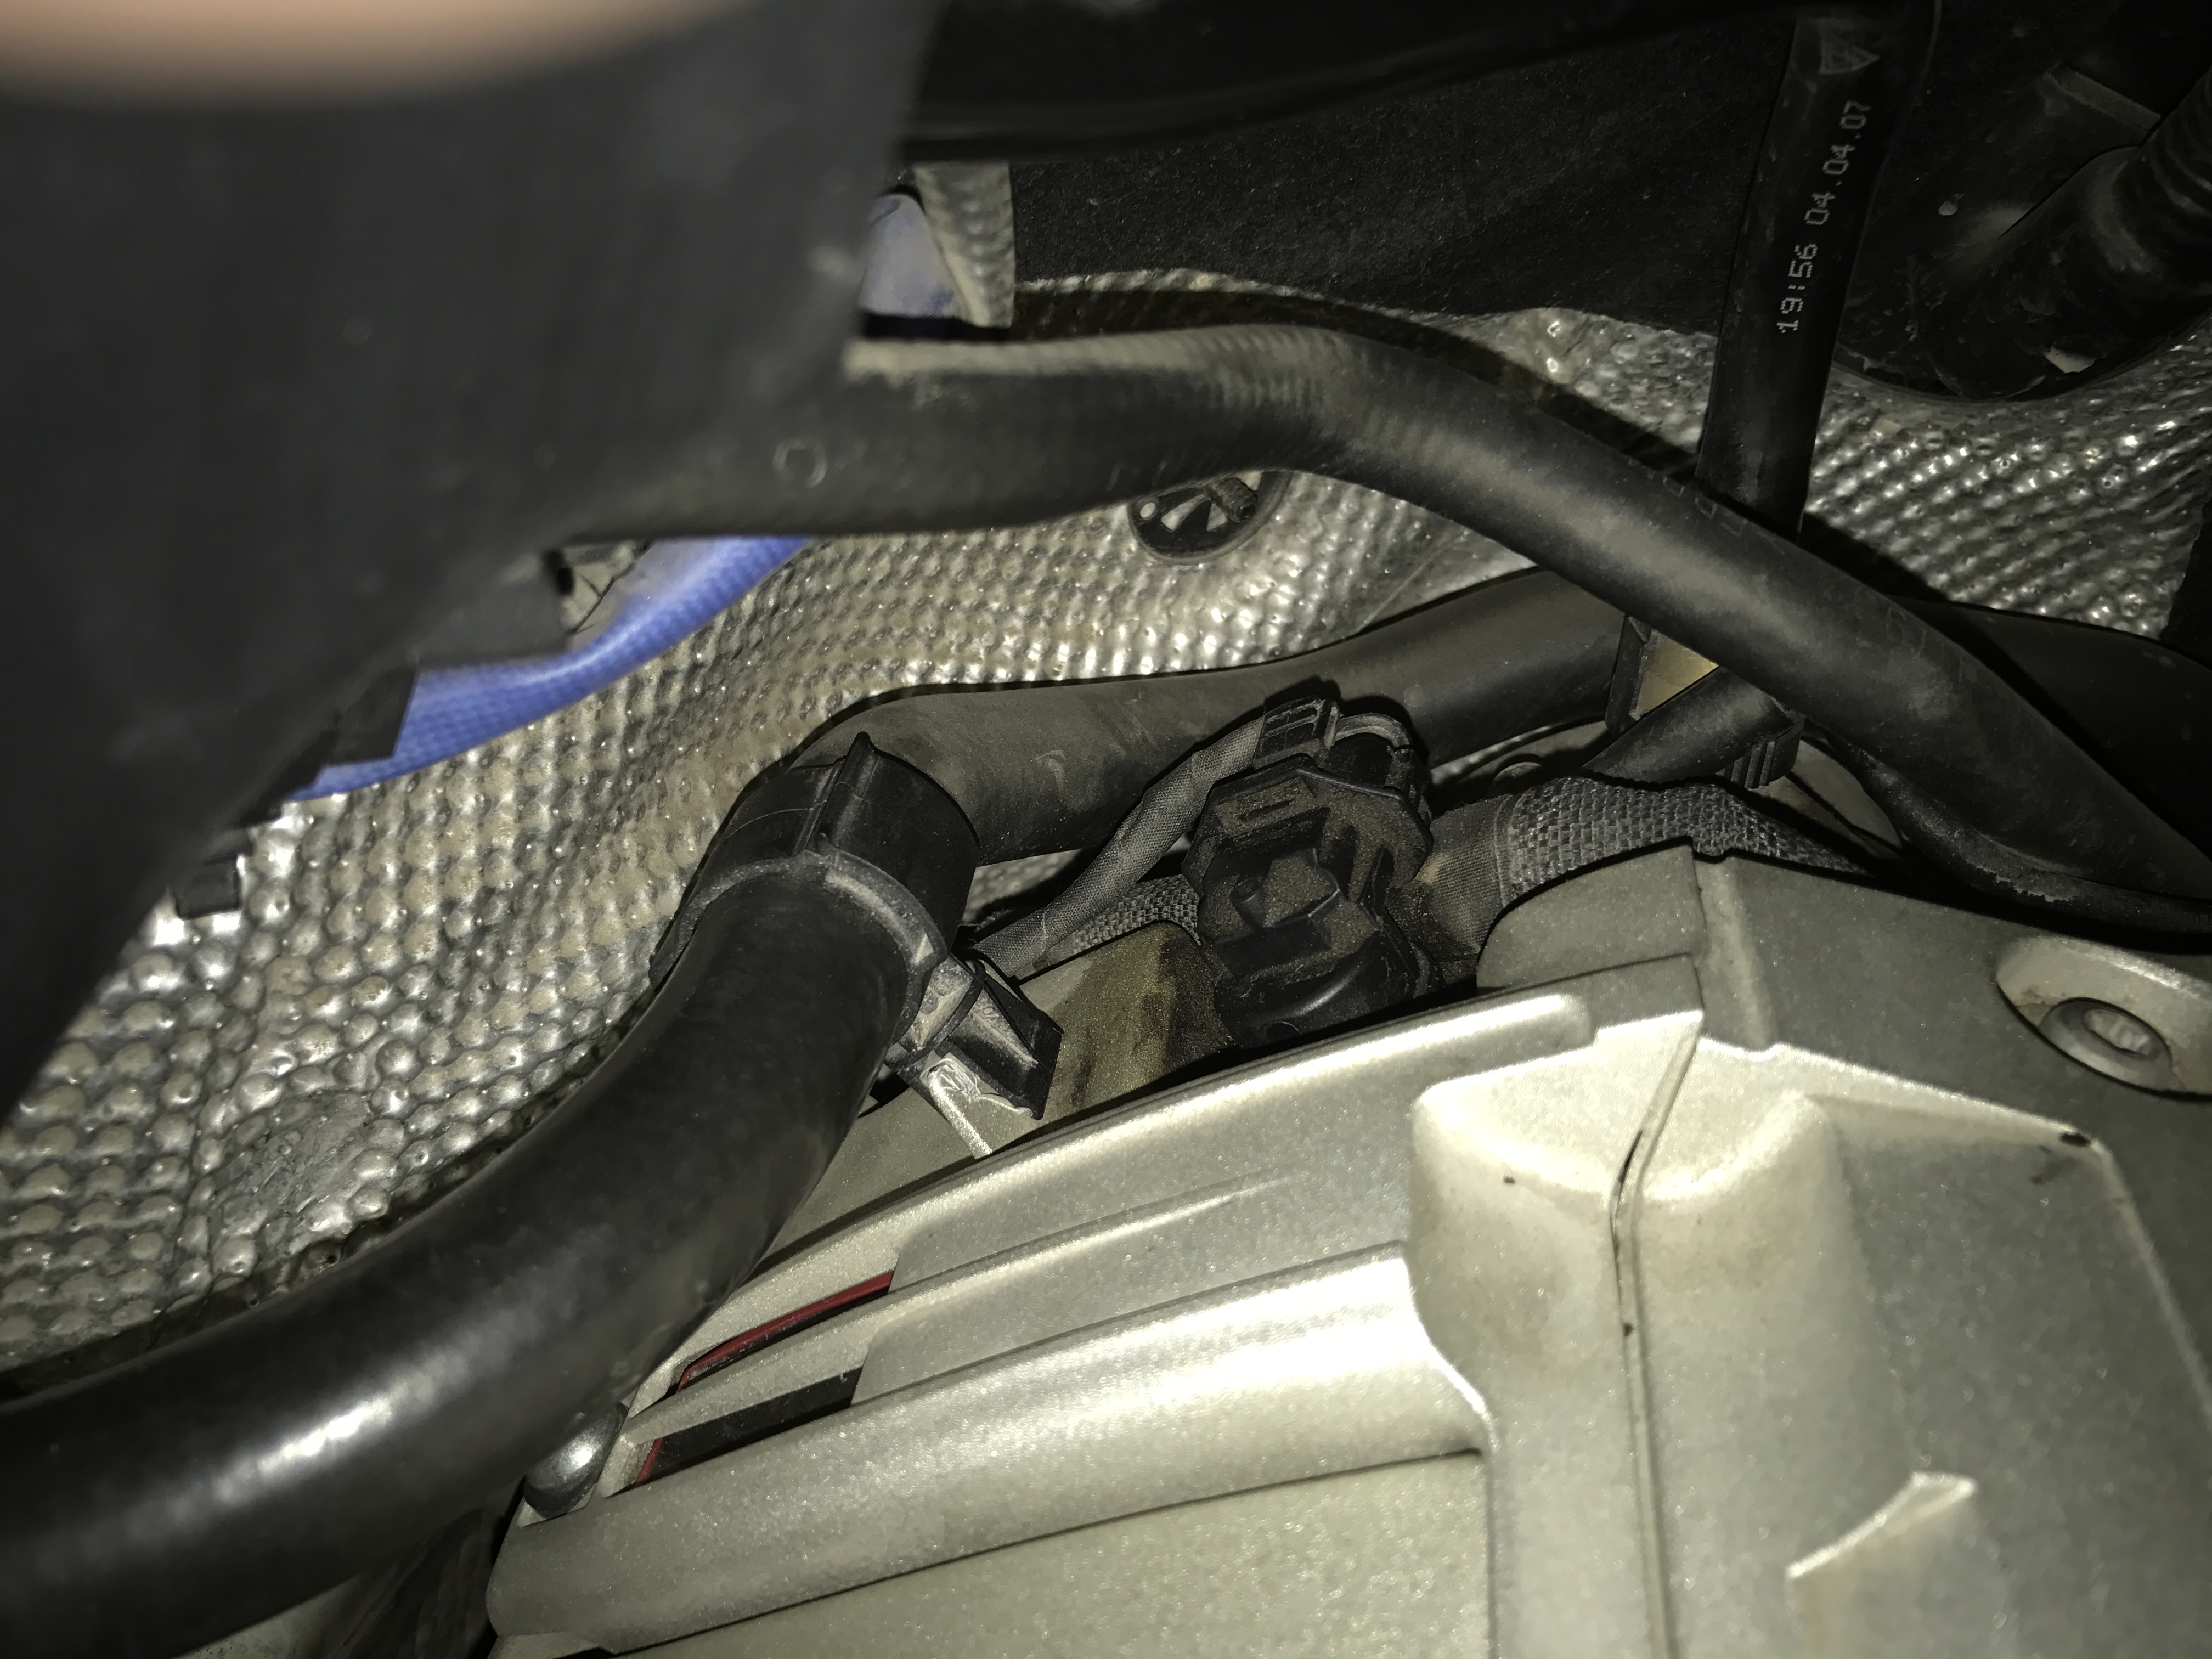
I think what I've taken pics of below are the camshaft position sensors. The right bank's sensor has a lot of oil residue around it. I looked with a mirror and it doesn't appear to be coming from anywhere else. The sensor appears to be in tight, though I didn't try to tighten it further. Does the oil residue around it indicated not only some kind of seal issue but also a potential problem with the sensor? Should I try removing it, cleaning it with a lint free shop towel, and seeing if that makes a difference to the idle? Or, should I switch it with the other side to see if I start getting a trouble code on the left bank?

-
Update: I'm still having the idle issue. I removed and cleaned the throttle body. No improvement. Apparently this car has 'hot film' sensors that are not cleanable; at least that's what I read somewhere on the 'interwebs'. Not sure how to 'align' the throttle body. I tried removing the cap on the AOS but it really feels like I'm going to break it. I've seen the Pelican write-up and it looks simple, but it really does feel like it will break before it stretches enough to go over more than one tab at a time. I checked the vacuum at the T by the vacuum pump and got a steady -75psi. Does the fact that it's steady suggest that it's not a vacuum issue? I checked the coils and did find the one on cylinder 7 to be cracked. So, I replaced it but the rough idle persists. I checked codes last week and there were some bizarre ones, but they all cleared. Just checked again this morning and the only one that's back is: 1355 Valve Lift Control, cylinder 3, implausible signal I'd rather not replace all of the plugs and other 7 coils ($$$) without knowing that it will solve the problem. Does anyone know what this problem points to? Could it be carbon build up on the valves? Camshaft position sensor? Are there any 'actual values' I can look at to get/provide more data?
-
Purchased and installed a new battery today (got the same Varta from the VW dealer). The one in it was original, with 25/7 stamped on the ground post (I think the truck was built in July of 07; 9.5 years is pretty impressive). Cleared any faults, took it for a 20 minute ride, checked for faults and none found. But, the idle is unchanged. At idle, in Park, the set point calls for 580 and the actual idle fluctuates between 576 and 544, if I remember correctly. It's at the former more than the latter and the change back and forth is quite quick. This is a very minor vibration that you can perceive only in the seat of your pants, so to speak. I had the coils out in September (for a bi-annual check up) and they looked fine. I replaced the plugs 4 years ago and they have gone 50,000 kms/30,000 miles; should still be fine. I could take out the plugs and clean them to see if that helps. Should I try cleaning the MAF? Or, should I just leave well enough alone (I suspect the dealership would say that this minor vibration is normal)?
-
It's over 14 volts and steady when running, but I tested it with ignition off using a multimeter a couple of hours after returning from my trip and it measured 12.17 volts. I'll get a new battery tomorrow and report back.
-
My wife's 2008 Cayenne S has had a very slight and somewhat intermittent vibration at idle for the past few weeks. Last weekend I hooked up my durametric. There were no trouble codes. I didn't see any significant number of misfires. I looked at the set point for the HPFP and the actual value and they were very similar, suggesting the HPFP is fine. I took a 250 mile round trip yesterday-today and today, at the beginning of the return trip the check engine light came on (solid, not flashing). The car runs fine but when I got home I tried revving it and it won't rev above 4K RPM (I'm guessing this is 'limp mode'). So, I pulled out my durametric and checked for faults. There were faults in 3 modules as follows: 1. In the Engine module there were 4 faults: (a) 0131 O2 sensor circuit low voltage bank 1 sensor 1 value below lower limit value (b) 1355 Valve lift control, cylinder 3 Implausible signal (c) 0301 Lost communication with gear shift module Value below lower limit value (d) 44FA 2. In the Air Conditioning Module (a) 819 Air-conditioning pressure sensor Open circuit/short circuit to ground 3. In the Automatic Tailgate module (a) 3234 Function restrict. due to critical vehicle electric. system condition Here is the work log which should be able to be opened with the durametric software Work Log-2016-12-16_04-50-20-PM.htm I clear the faults and short tested, and the only one that remained is #3 (Tailgate module). I've been wondering if my battery is in need of replacement. Would the low voltage to the O2 sensor create a rough idle? And, would that be a problem with the battery or a bad sensor itself? The Valve lift control sounds scary, but it's just an implausible signal so I'm guessing that's also electrical. Loren and other gurus, what do you figure?
-
Glad they got it figured out and thanks very much for posting this information.
-
That's the manual release for the fuel filler door lock (for when the power lock isn't working). I haven't looked at mine for a few years but I think it looked just like yours.
-
Sorry I can't answer your question, but I am interested in hearing more about your engine swap. Did you do it yourself? From where did you get the donor engine?
-
It's an interesting question. As Loren demonstrated, the 9PA etc. is in Porsche's documentation, but their part numbers often have the 955/957 (and probably 958 too), so this suggests that these numbers are also internal.
-
Thanks, Loren. Can you please elaborate a bit on looking for air leaks? Are you referring to a leakdown test?
-
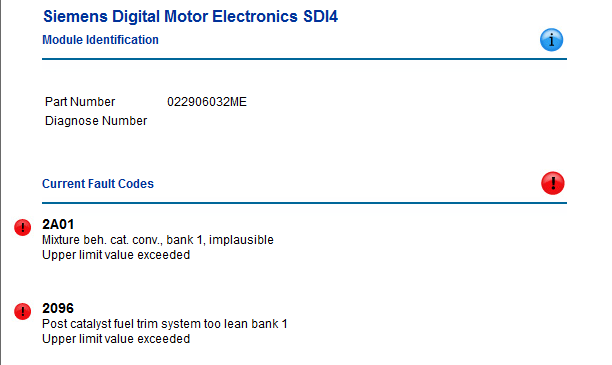
I checked for faults on my 2008 957S to assist EMC2 with a question, and ended up finding some faults about which I wasn't aware. Here's a snip of the Durametric output for the Engine Module: Can someone please tell me what these suggest?
-
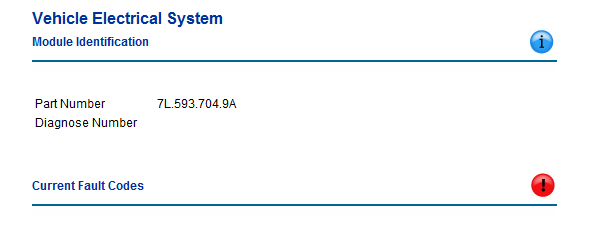
Here's a snip of what Durametric shows:
-
Only the red exclamation.
-
The entire time I've had my Cayenne I get a phantom fault in the electrical system using my Durametric. PIWIS does not show any faults. I informed Durametric of this but they have yet to fix it. I realize that you had a problem and so this fault could be legitimate, but just wanted you to know that this is an issue, at least with my 957S.
-
Ooops, I missed which subforum you were in (thought it was a 997). I haven't heard of this on a Cayenne but I'm sure others much more knowledgable than myself will chime in. Thinking out loud, I recall reading that some model Cayenne's have two batteries...
-
If the battery is good, then it sounds like the Battery/Starter/Alternator cable. Search for that to see others' descriptions of the symptoms etc. and see my write-up in the 997 DIY section for the fix.
-
I recently completed the Battery/Starter/Generator Cable replacement. Attached is a newbie-rated, pic-intensive write-up. Below is the introduction and table of contents so readers can decide if the document will be of use before downloading the pdf. "Recently I changed the infamous Battery/Starter/Generator cable on my 997.1. My car had been a bit sluggish on starting for some time, but, one day when I tried to start it after the engine was at operating temperature it would not start at all, as if the battery were dead. The next morning, after cooling off overnight and without charging the battery, it started. I researched the various Porsche forums and found that the aforementioned cable was the likely culprit. The revised part number for this cable, as of this writing, is 997.607.019.03. So, I ordered the part and undertook the replacement. Special thanks to ‘yvesvidal’ from 6speedonline for his tutorial, as well as a thread by ‘equinox’ on 6speedonline that ‘yvesvidal’ used, and a more brief but, nonetheless useful, post by ‘jkw911’ on rennlist. I followed yvesvidal’s procedure quite closely, though I did change the order of some portions. I’m a detail-oriented person and what I always hope for is that someone has created a highly detailed, picture-intensive write-up of a given procedure (so I won’t have to). Knowing that there are others out there like myself, I put together my notes for this procedure for my future reference and am posting it for those who would find it useful. This write-up is not for everybody as it is newbie-rated, highly detailed and pic intensive. To gauge time-to-completion, I’d guess that I spent 8 hours working on this job. Having now done the procedure, it would be faster, especially with this write-up. A note of caution before embarking on this procedure: as always, there are an infinite number of ways to screw things up so one undertakes this procedure at their own risk. What follows is how I completed the job and, as they say on the forums, your experience may vary." TABLE OF CONTENTS CHAPTER 1: INTRODUCTION CHAPTER 2: PARTS, SUPPLIES, TOOLS AND PRELIMINARY WORK Parts and Supplies Tools Preliminary Work CHAPTER 3: REMOVE REAR UNDERBODY PAN UNDER ENGINE CHAPTER 4: REMOVE AIR CLEANER HOUSING CHAPTER 5: REMOVE DRIVE BELT CHAPTER 6: REMOVE THROTTLE BODY CHAPTER 7: REMOVE PLENUM CHAPTER 8: REMOVE POWER STEERING RESERVOIR CHAPTER 9: REMOVE GENERATOR CHAPTER 10: DISCONNECT TUBES FROM AIR OIL SEPARATOR CHAPTER 11: DISCONNECT CABLE ON STARTER CHAPTER 12: DISCONNECT CABLE ATTACHMENTS FROM UNDER THE CAR CHAPTER 13: REMOVE THE AIR CONDITIONER COMPRESSOR CHAPTER 14: DISCONNECT CLIPS AND REMOVE CABLE CHAPTER 15: INSTALL CABLE CHAPTER 16: INSTALL AIR CONDITIONER COMPRESSOR CHAPTER 17: CONNECT AIR OIL SEPARATOR TUBES CHAPTER 18: INSTALL GENERATOR CHAPTER 19: INSTALL POWER STEERING RESERVOIR CHAPTER 20: INSTALL PLENUM CHAPTER 21: INSTALL THROTTLE BODY CHAPTER 22: INSTALL DRIVE BELT CHAPTER 23: INSTALL AIR CLEANER HOUSING CHAPTER 24: INSTALL REAR UNDERBODY PAN UNDER ENGINE CHAPTER 25: WRAP-UP 997.1 Generator-Starter-Battery Cable Replacement with Pics.pdf
-
997.1 Battery/Starter/Generator Cable Replacement with Pics I recently completed the Battery/Starter/Generator Cable replacement. Attached is a newbie-rated, pic-intensive write-up. Below is the introduction and table of contents so readers can decide if the document will be of use before downloading the pdf. "Recently I changed the infamous Battery/Starter/Generator cable on my 997.1. My car had been a bit sluggish on starting for some time, but, one day when I tried to start it after the engine was at operating temperature it would not Author Doug_B_928 Category Carrera (997-1) - Common Fixes and Repairs Submitted 08/01/2015 08:59 AM Updated 04/28/2017 02:54 PM
-
I recently completed the Battery/Starter/Generator Cable replacement. Attached is a newbie-rated, pic-intensive write-up. Below is the introduction and table of contents so readers can decide if the document will be of use before downloading the pdf. "Recently I changed the infamous Battery/Starter/Generator cable on my 997.1. My car had been a bit sluggish on starting for some time, but, one day when I tried to start it after the engine was at operating temperature it would not start at all, as if the battery were dead. The next morning, after cooling off overnight and without charging the battery, it started. I researched the various Porsche forums and found that the aforementioned cable was the likely culprit. The revised part number for this cable, as of this writing, is 997.607.019.03. So, I ordered the part and undertook the replacement. Special thanks to ‘yvesvidal’ from 6speedonline for his tutorial, as well as a thread by ‘equinox’ on 6speedonline that ‘yvesvidal’ used, and a more brief but, nonetheless useful, post by ‘jkw911’ on rennlist. I followed yvesvidal’s procedure quite closely, though I did change the order of some portions. I’m a detail-oriented person and what I always hope for is that someone has created a highly detailed, picture-intensive write-up of a given procedure (so I won’t have to). Knowing that there are others out there like myself, I put together my notes for this procedure for my future reference and am posting it for those who would find it useful. This write-up is not for everybody as it is newbie-rated, highly detailed and pic intensive. To gauge time-to-completion, I’d guess that I spent 8 hours working on this job. Having now done the procedure, it would be faster, especially with this write-up. A note of caution before embarking on this procedure: as always, there are an infinite number of ways to screw things up so one undertakes this procedure at their own risk. What follows is how I completed the job and, as they say on the forums, your experience may vary." TABLE OF CONTENTS CHAPTER 1: INTRODUCTION CHAPTER 2: PARTS, SUPPLIES, TOOLS AND PRELIMINARY WORK Parts and Supplies Tools Preliminary Work CHAPTER 3: REMOVE REAR UNDERBODY PAN UNDER ENGINE CHAPTER 4: REMOVE AIR CLEANER HOUSING CHAPTER 5: REMOVE DRIVE BELT CHAPTER 6: REMOVE THROTTLE BODY CHAPTER 7: REMOVE PLENUM CHAPTER 8: REMOVE POWER STEERING RESERVOIR CHAPTER 9: REMOVE GENERATOR CHAPTER 10: DISCONNECT TUBES FROM AIR OIL SEPARATOR CHAPTER 11: DISCONNECT CABLE ON STARTER CHAPTER 12: DISCONNECT CABLE ATTACHMENTS FROM UNDER THE CAR CHAPTER 13: REMOVE THE AIR CONDITIONER COMPRESSOR CHAPTER 14: DISCONNECT CLIPS AND REMOVE CABLE CHAPTER 15: INSTALL CABLE CHAPTER 16: INSTALL AIR CONDITIONER COMPRESSOR CHAPTER 17: CONNECT AIR OIL SEPARATOR TUBES CHAPTER 18: INSTALL GENERATOR CHAPTER 19: INSTALL POWER STEERING RESERVOIR CHAPTER 20: INSTALL PLENUM CHAPTER 21: INSTALL THROTTLE BODY CHAPTER 22: INSTALL DRIVE BELT CHAPTER 23: INSTALL AIR CLEANER HOUSING CHAPTER 24: INSTALL REAR UNDERBODY PAN UNDER ENGINE CHAPTER 25: WRAP-UP 997.1 Generator-Starter-Battery Cable Replacement with Pics.pdf
-
Update: I just read in another thread that the LN magnetic drain plug has a different torque spec of 19 ftlbs, so will torque to that from now on. Also, in subsequent oil changes I have put in 8 liters to avoid getting the overfull indicator intermittently. With 8 liters the oil level is usually 1 bar down, and sometimes on the full mark.
-
I can't say if that sounds normal for a CTT, but I definitely hear a difference on the right (passenger) side. Others that know far more than me will undoubtedly chime in, but, depending on what they say, I would take it for a scope to get it checked for the dreaded cylinder scoring on that bank. Hope for your sake that it's nothing.
-
Side light code reset
Doug_B_928 replied to dphatch's topic in 997-1 Series (Carrera, Carrera 4, Carrera 2S, Carrera 4S)
I used to get that error on my Cayenne until I replaced the bulb (even though the original bulb was still working). Local dealership told me that this can be an indication that the bulb is starting to fail. -
I'm not able to answer your specific questions, but I lowered the engine for my coolant and water pump procedure. The write-up is posted here so if you look in the DIY section and read my write-up you'll see in detail how what I did to lower the engine (what brackets were removed etc.)
-
Okay, will do. Thanks Loren.