Welcome to RennTech.org Community, Guest
There are many great features available to you once you register at RennTech.org
You are free to view posts here, but you must log in to reply to existing posts, or to start your own new topic. Like most online communities, there are costs involved to maintain a site like this - so we encourage our members to subscribe or donate. All subscriptions and donations go to the costs operating and maintaining this site. We prefer that guests take part in our community and we offer a lot in return to those willing to join our corner of the Porsche world. This site is 99 percent member supported (less than 1 percent comes from advertising) - so please consider an annual subscription or donation to keep this site running.
Here are some of the features available - once you subscribe RennTech.org
- View Classified Ads
- DIY Tutorials
- Porsche TSB Listings (limited)
- VIN Decoder
- Special Offers
- Paint Codes
- Registry
- Videos System
- View Reviews
- and get rid of this welcome message
It takes just a few minutes to register, and it's quality Porsche information at a low cost.
Contributing Members also get these additional benefits:
(you become a Contributing Member by subscribing or donating money to the operation of this site)
- No ads - advertisements are removed
- Access the Contributors Only Forum
- Contributing Members Only Downloads
- Send attachments with PMs
- All image/file storage limits are substantially increased for all Contributing Members
- Option Codes Lookup
- VIN Option Lookups (limited)


therock88
-
Posts
360 -
Joined
-
Last visited
-
Days Won
1
Content Type
Profiles
Events
Forums
External Paint Colors
Downloads
Tutorials
Links Directory
Collections
Classifieds
Store
Everything posted by therock88
-
 Hi, It has been covered on this site quite a bit. Try this link : Click Here Also, if you just need to top off a little, you may just try some distilled water if it is not very low. You can get that at the grocery store...Not Tap Water.....Distilled water. Good luck. DC
 -
Sport Chrono Package
therock88 replied to 355bhp's topic in 997-1 Series (Carrera, Carrera 4, Carrera 2S, Carrera 4S)
Here is a link to what it is: Click Here Everyone has an opinion I am sure. I have the Sport Chrono on my 997 Turbo and makes a hell of a difference when engaged. Very noticeable change....As if the car is not a beast as it is, when in sport chrono it is like riding a roller coaster in fast motion. I understand they now make them as add on kits as well. Not sure what the experience difference will be in a non-turbo (the turbo version gets a 10 second overboost in chrono mode!).....changes many other things as well (PASM dampened, shift mapping, throttle response, PSM settings etc..) DC -
Click Here: Link
-
Hi there... On Q1 - Do a search on this site as there have been articles/discussions on that topic and repair/replace options. On Q2/3 I have attached two images with the diagrams and part numbers for the rear decklid and spoilers. Good luck. DC

-
Agree with Pedro...Very early days a few idiots would flick their burning cigarettes out of the window and would get sucked into the air vents and thus a fire. Not a concern, and I have heard of nothing like that since 97 days. Of course I am sure some folks somewhere may have had other fires, but probably due to something goofy that they did rather than issues with the cars. Good luck! DC
-
Hi, It is right on the intake. Do a search on this site as this topic has been covered many, many times. No need to duplicate.......... Good luck. DC
-
GT3 package shelf "cover" part number?
therock88 replied to Qualified Pole's topic in 997 GT3, GT3 RS
Check Here Part is $219.... Click Here DC -
GT3 package shelf "cover" part number?
therock88 replied to Qualified Pole's topic in 997 GT3, GT3 RS
I think you need # 28 here. If not there are other part #'s listed to pick from. Good luck. DC
-
Anyone Know How To Remove The Exhaust Duct?
therock88 replied to therock88's topic in 997 TT, 997 GT2
Well.. No one ever responded....So I thought I would share, that the Rear Bumper cover has to be removed to get these out. Once the Bumper Cover is off, they simply have some plastic tabs that allow you to snap them out from what would be the inside of the cover (when it is on the car). Maybe that will help someone else who may need to remove them. DC -
Bosch makes the PORSCHE MAF sensor, so I do not know that there would be any difference. You may just be more hyper observant of the sounds etc.. Hard for the human ears etc., to detect any minuscule difference there would be anyway. You would need to connect an OBD device to see if you had different voltage, mixture, etc. readings. Sounds like you are OK. If you had issues, you would get a CEL, or will soon. DC
-
Horrible Brake Squeal
therock88 replied to BassMD's topic in 986 Boxster Suspension, Brakes, and Wheels
I would not worry about it unless it happens again. Likely rust build up (oxidation) on the rotor....Once it is cleaned off it is fine. This can also happen to a certain degree when you wash the car and immediately park it overnight. So unless you hear it and it persists, you should be fine DC -
Superseded part numbers...
therock88 replied to gwoodburn's topic in 986 Series Part Number Requests
Don't know any great detail on your specific issue, but typically when Porsche improves the design they create the new part. Does not mean the old part was bad nec. , and will obviously fit. Should be just like the one you are changing out, so no worries. Good luck. DC -
~1.5qt/600 miles?
therock88 replied to scxtasy's topic in 9PA, 9PA1 (Cayenne, Cayenne S, Cayenne Turbo, Cayenne Turbo S)
It is a high performance vehicle. Tight tolerances, quiet engines, soft rides, are found in a Toyota Camry...Porsche pushes the performance envelope like race cars....The price we all pay for that great ride! DC -
Car Won't Start after replacing MAF
therock88 replied to rchizz's topic in 996 Series (Carrera, Carrera 4, Carrera 4S, Targa)
Agree with PaulSpeed....There are a couple of different part numbers for these e-gas etc.. Also I assume you got this new? Some of the used ones on eBay may not work. Try installing your old one and see what you get...then you will know it is the part. Good luck! DC -
Car Won't Start after replacing MAF
therock88 replied to rchizz's topic in 996 Series (Carrera, Carrera 4, Carrera 4S, Targa)
I would suggest going through what you did again and making certain you have the battery cables on correctly & tight, and any other wires you may have disconnected in the process. Even if you disconnect the MAF it will not create the condition you describe. You can run the car with it unplugged or even removed (though not advised). So check all of your connections. The only other thing I could think of, is if you somehow cleared the connection with the key....Try using your second key and see if you get a different result? Good luck! DC -
Most likely have to pull the bumper cover. They come off pretty easily.
-
Want to add photo; yet file to large; what format?
therock88 replied to Dominic123's topic in Forum Comments/Suggestions/Bugs
To add to what Loren has indicated...1 MB is very large for a photo. A few things affect the file size; Color depth, pixel depth, size, and format. For photos, GIF is not a good choice as it has no compression algorithm and only supports up to 256 colors. Your best bet for a color photo is JPG or PNG....Both use a lossy compression algorithm and have color depths of 16 million colors +. I would suggest you set your photo to .JPG at 72 DPI pixel resolution and size it no more than 800 pixels wide. If you have an application that allows scaling of the compression(quality), anything over 60% will look very good and still maintain a relatively small file size. I have attached 3 photos for reference: One is a 60% compression JPG that only requires 113K File size and you can see it is clear. One is the same file as GIF. It takes 233K file size and is very pixelated. The last file is another JPG at 100% (no compression) and takes 322K file size and looks no better than at 60%. Hope that helps! DC
-
Crankcase sensor search in PET catalog shows the knock sensor. Listed as #33? Perhaps that helps?
-
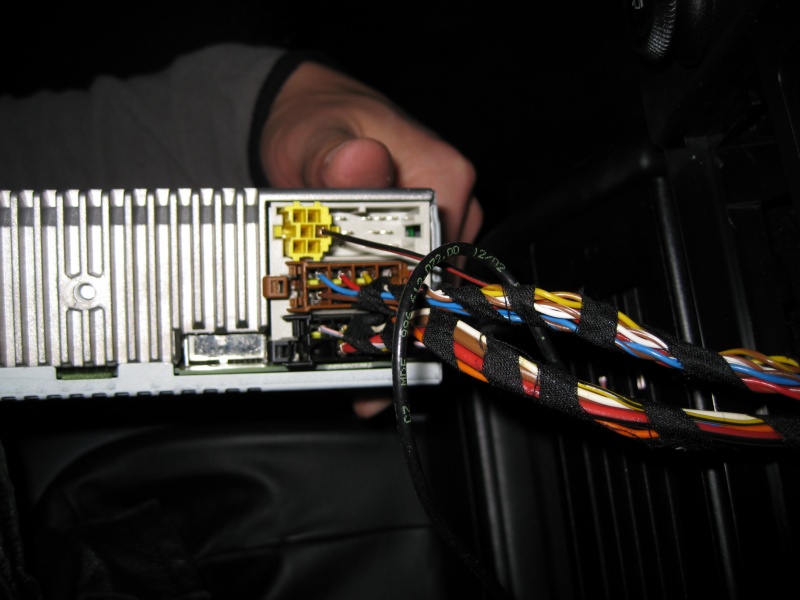
Radio Help!
therock88 replied to *fill-up*'s topic in 996 Series (Carrera, Carrera 4, Carrera 4S, Targa)
I do not have the steps or photos, but it is extremely simple. When you get the tools (which are just two "blades"), they insert in two small slits on either side of the face of the unit. When they are inserted (and they only;y insert one way....You have to have the right an left oriented correctly)..they depress little tabs on the side of the radio chassis that allows you to pull straight out (and may require some force). Just be careful not to scratch your dash panels as you pull out. Once it comes forward, there are a few plugs that simply disconnect...And your radio is out! Reverse process to reinstall. As I recall, the fuse is right on the back and visible as soon as you remove it. If I come across anything else I will post. Hope this helps. DC PS..Make sure you have your radio code available: And here are some pics I found:
-
Good to know...Thanks for sharing! DC
-
Send me a private message with your email address and I can send to you if you can't get them. DC
-
Without the module you are going to get all kinds of fun computer warnings and malfunctions....Get the module. Good luck. DC
-
Hi, You should use the search on this site as this question seems to come up every week. There are lots of threads on the subject for various models. Good luck. DC
-
HI, Was wondering if anyone knows or has a diagram/instructions of how the exhaust ducts are clipped in / removed? It is #15 in the image with the red arrow pointing to it. I was hoping to NOT have to remove the bumper cover, but suspect it may be required. Before I started trying to figure it out and potentially damaging something, I thought I would ask here. Any help, instructions, images, etc.... Appreciated! As always....Thanks! DC
-
Check out this thread on 6Speed: Here I think it answers your question(s) DC