Welcome to RennTech.org Community, Guest
There are many great features available to you once you register at RennTech.org
You are free to view posts here, but you must log in to reply to existing posts, or to start your own new topic. Like most online communities, there are costs involved to maintain a site like this - so we encourage our members to subscribe or donate. All subscriptions and donations go to the costs operating and maintaining this site. We prefer that guests take part in our community and we offer a lot in return to those willing to join our corner of the Porsche world. This site is 99 percent member supported (less than 1 percent comes from advertising) - so please consider an annual subscription or donation to keep this site running.
Here are some of the features available - once you subscribe RennTech.org
- View Classified Ads
- DIY Tutorials
- Porsche TSB Listings (limited)
- VIN Decoder
- Special Offers
- Paint Codes
- Registry
- Videos System
- View Reviews
- and get rid of this welcome message
It takes just a few minutes to register, and it's quality Porsche information at a low cost.
Contributing Members also get these additional benefits:
(you become a Contributing Member by subscribing or donating money to the operation of this site)
- No ads - advertisements are removed
- Access the Contributors Only Forum
- Contributing Members Only Downloads
- Send attachments with PMs
- All image/file storage limits are substantially increased for all Contributing Members
- Option Codes Lookup
- VIN Option Lookups (limited)


Fixxxer
-
Posts
42 -
Joined
-
Last visited
-
Days Won
1
Content Type
Profiles
Events
Forums
Exterior Paint Colors
Downloads
Tutorials
Links Directory
Collections
Classifieds
Store
Everything posted by Fixxxer
-
 Agreed. I'm thinking that the problem has only recently arisen due to the cooler weather; causing things to not want to slip and slide as they should. I'll keep checking it over the next few days. If it comes back, I may open the door up and perform the bicycle brake cable adjuster mod to tighten things up a bit (I already had to do that on the driver's side for the "window-not-dropping-when-the-door-is-opened" issue.) I'll keep you posted!
 -
I've made an interesting finding: After following the steps you outlined above, Loren, the problem persisted. The window would go down fine, but pause about half way up and go back down. So I decided to try opening the passenger door before attempting to use the one-touch operation again, and it worked! The window went up and down with no issues. I closed the door and tried to operate the window again... Still working! It seems that cycling the window through it's up/down positions with the door open has made it start working - at least temporarily. I'll keep an eye on it and post here with anything new I that find.
-
Thanks, Loren. I'll be running some errands in the next hour, so I'll give it a shot then and report back.
-
I've searched the forums, and I haven't found a similar issue... I have a 2004 Targa and the windows have been working great up until the last couple of weeks. Now when I have the passenger window down and I press the switch for it to go back up, it'll get about half way up, pause, and then put itself back down. After a couple of tries I can manage to get it to go all the way back up by holding the switch down. I've tried resetting the limits, but that didn't help. The driver's side window works great. Any ideas?
-
Another Key Fob Fix [EDIT: 2015/04/01] I've added a second 'fix' below this one. Check them both out and choose the one you'd like to try. My 2004 996 Targa key fob started acting up recently. It got to the point where I could press any of the three buttons and the LED would light up, but the car wouldn't respond. Sometimes when I would give the key a good whack on my palm it would work properly for a second, but then stop. Since the key's LED would light up with any button press, I knew that the buttons themselve Author Fixxxer Category Carrera (996) - Common Fixes and Repairs Submitted 04/17/2014 02:24 PM Updated 04/01/2015 05:29 PM
-
[EDIT: 2015/04/01] I've added a second 'fix' below this one. Check them both out and choose the one you'd like to try. My 2004 996 Targa key fob started acting up recently. It got to the point where I could press any of the three buttons and the LED would light up, but the car wouldn't respond. Sometimes when I would give the key a good whack on my palm it would work properly for a second, but then stop. Since the key's LED would light up with any button press, I knew that the buttons themselves were functioning properly. And because I could get it to sometimes work by hitting it, I was sure that there must be a broken solder joint somewhere on the PCB (Printed Circuit Board). Here's how I fixed it by using a heat gun to reflow the existing solder. Items needed: - Aluminum foil - Heat gun - Soldering iron - Solder Open up the key and pull out the PCB. Leave the battery in and try pressing the unlock button while putting pressure on different areas of the PCB to make it flex very slightly. When I did this, I found that applying pressure to one specific area would make the unlock button work every time. This just verifies that there's a bad solder joint somewhere. Remove the battery and desolder the plastic battery holder (two solder joints - easy to get to.) This is necessary because we'll be using a heat gun a couple of steps later and you don't want the battery holder to melt. Take a piece of aluminum foil and press it tightly against the side of the PCB with the key's buttons. You want to make sure that it conforms as much as possible to the shape of the PCB and all of its components. This servers two purposes: (1) it helps radiate heat away from the downward-facing side of the PCB, and (2) if any of the solder joints on the downward-facing side do melt, the aluminum foil will help hold the components in place. Set the key fob on a hard (nonflammable) surface with the foil/button side down. I used a metal baking sheet that I had in the garage. Cut a small piece of solder from your roll and place it on the top of the PCB. Make sure it's not near any of the electrical components. You don't want to accidentally create a short by having your solder melt to anything important! This piece of solder will be your control to let you know when everything has reached the correct temperature. NOTE: I ended up moving my control piece of solder from where it's shown in this photo (top left) to one of the holes where the battery holder was soldered on. This kept it from blowing around when I turned the heat gun on. Turn your heat gun on and move it back and forth over the exposed side of the PCB. You need to keep it moving to make sure that no one spot gets too hot. As soon as you see your control piece of solder start to melt, turn the heat gun off. This means that the existing solder has reached its melting point and should have reflowed to fix any broken joints. Let everything cool for a couple of minutes, re-solder your battery holder, insert your battery and give it a try! ------------------------------------------------------------------------------------------------------------------------------------------------------------------------------- If the above method doesn't work for you, try this: While the reflow method worked for me, it ended up only lasting for a couple of months before my key fob started acting up again. After taking it apart again and performing some diagnostics on the circuit, I discovered that the transmitter itself is what was causing the problem. Several of the solder joints weren't making great contact, likely caused by the PCB flexing in the key fob's housing over time. To fix it once and for all, I used a fine-tipped soldering iron to reheat the solder on each pin of the transmitter while I applied downward pressure to the top of the transmitter itself - ensuring a good connection. I'm going on about 4 months now after the fix and it's working like it's brand new! Open up your key fob, desolder the battery holder, and locate the transmitter (circled in the image below.) I soldered some AA batteries on mine for testing the circuit... Ignore those. :) Use something like a pencil eraser to apply pressure to the top of the transmitter. At the same time, very carefully touch your soldering iron to the top of each pin on the transmitter to re-melt the existing solder. Make sure that you only leave the soldering iron on each pin for, maybe 1 second - if that long. Too long could overheat and ruin the IC (Integrated Circuit.) After reheating a pin, make sure to lift the soldering iron straight up and wait a few seconds for the pin to cool before moving to the next one. Lifting the iron straight up, as opposed to sliding it from pin-to-pin will insure that you don't accidentally create a short between two pins with some solder stuck to your iron. I don't know if this last step helped or not, but I added a small roll of tape to the top of the transmitter. That way, after soldering the battery holder back on, it will keep a constant bit of pressure on the top of the transmitter - Hopefully keeping those solder joints from "cracking" loose again. Just re-solder your battery holder back on and you're all done! Good luck!
-
I have a 2004 Targa with the Bose upgrade. When I bought the car, one of the previous owners had replaced the headunit, removed the Bose amp, and had not reconnected the passenger footwell sub. I'm not a huge music listener in the car, so I'd like to remove the Bose subwoofer to get some more legroom back on the passenger side. However, I can't seem to find a carpeted trim piece to cover the hole that's left by the subwoofer. Does anyone know where I can find that, or have a part number? Thanks!
-
Did you ever get a chance to document this? I'm having a similar issue, but having some pics of what needs to be greased would help me a lot! :)
-
Low Engine Temp at High Speed
Fixxxer replied to Fixxxer's topic in 996 Series (Carrera, Carrera 4, Carrera 4S, Targa)
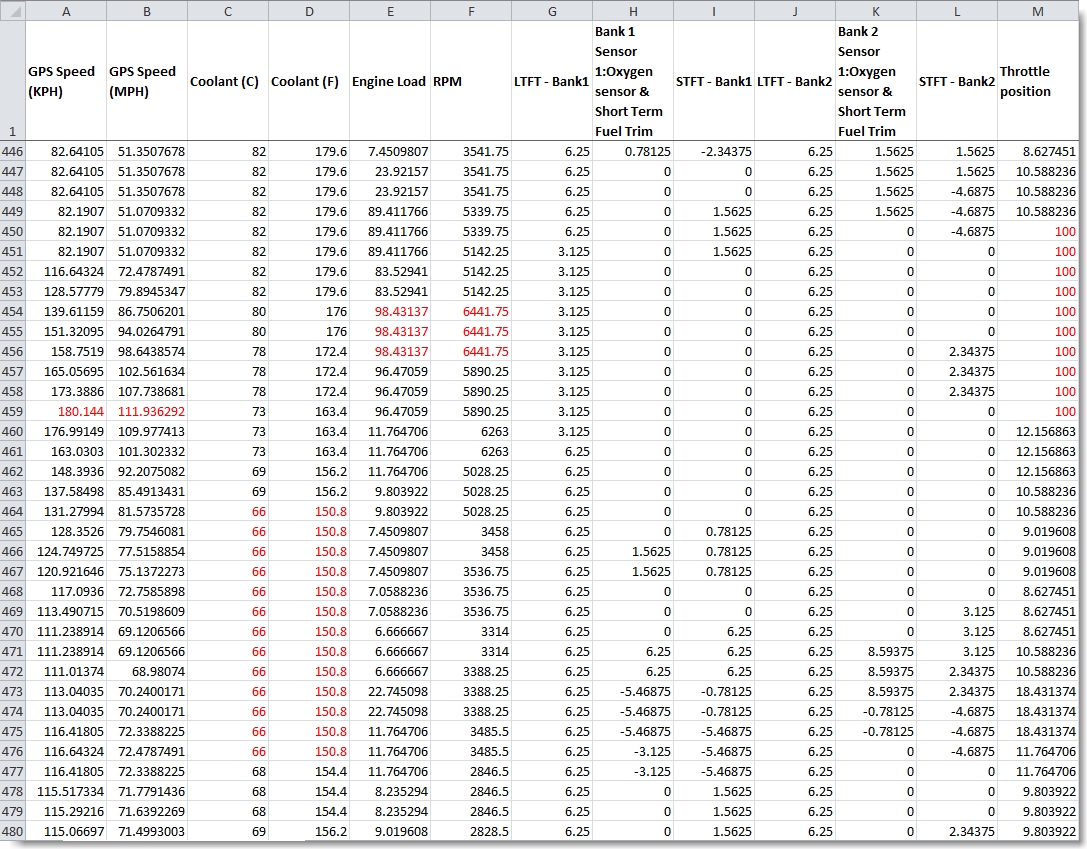
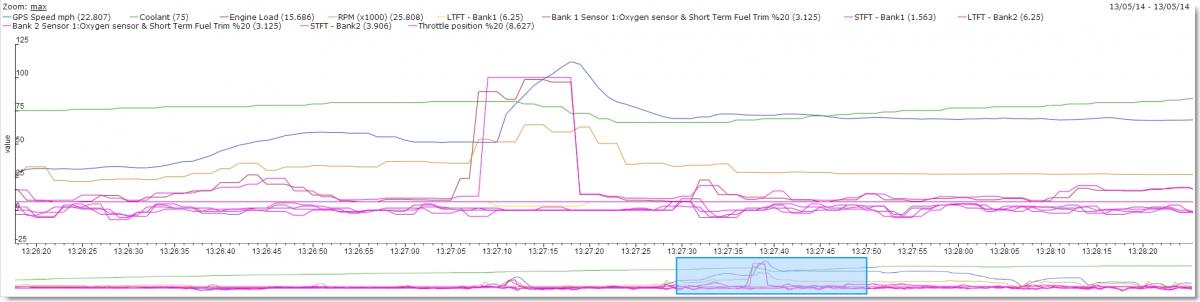
Thanks for the replies so far, guys. I was able to pull some data from Torque that shows this happening. I only made it up to 111 mph on this quick run, so the temp only dropped from 179 F to 150 F, but it's still noticeable in the data. Attached you'll find a screenshot of the raw data, a graph, and a ZIP file containing the whole spreadsheet of data. In the graph, the green line is coolant temp; the blue line is GPS speed; and the tall, flat purple line in the center is throttle position. There are no unusual spikes (+/-) in the coolant temp's data (as seen in the overall zoomed-out view at the bottom of the graph), other than the one discussed here at high speed, so I find it hard to believe that it's a temperature sensor issue. Could it be the water pump, or maybe air in the coolant system? Thanks again! -Lee 2013-05-14 2004 911 Targa Torque Log.zip
-
The other day I got my 2004 996 Targa up to ~120 mph at a track day event. After my first run, I glanced down at the coolant temp gauge, and I noticed that it had dropped to ~140 (it's normally around 185 when warmed up) and was slowly coming back up to normal. On my next run it happened again, but only after I was over ~100 mph. When it happens the needle quickly drops to 140 - within 5 to 10 seconds. On one hand, I'm thinking that the volume of air at that speed is cooling the coolant down very quickly. But that's an awful big drop in temp... I'm also wondering if I have a thermostat that's stuck open. However, the motor doesn't take a long time to warm up in the mornings - maybe 5 minutes at normal city speeds (40 - 60 mph), and it stays constant at 185 in everyday driving conditions. Has anyone else experienced this? Is it normal? Thanks! -Lee
-
Recurring P0172 and P0175 CELs
Fixxxer replied to Fixxxer's topic in 996 Series (Carrera, Carrera 4, Carrera 4S, Targa)
Interesting. Thanks for the info! -
Recurring P0172 and P0175 CELs
Fixxxer replied to Fixxxer's topic in 996 Series (Carrera, Carrera 4, Carrera 4S, Targa)
Still no CELs! I think cleaning the MAF is what did it. The car is still running much better than before, especially when starting from a stop (I have a manual trans., not Tip). I still wonder though, how could a dirty MAF cause a CEL to only occasionally show up? Shouldn't it appear the next time I drive after it was reset? Weird... -
Recurring P0172 and P0175 CELs
Fixxxer replied to Fixxxer's topic in 996 Series (Carrera, Carrera 4, Carrera 4S, Targa)
Just for giggles, I replaced the stock airbox this week (it had a K&N FIPK installed from the previous owner) and cleaned the MAF. My first impressions are that it's running better/stronger, but it could be my imagination. I'll pulled some OBD2 data on a couple of short trips, and the LTFTs look okay - still no CELs. I'll keep an eye on it and report back if anything strange happens. -
Recurring P0172 and P0175 CELs
Fixxxer replied to Fixxxer's topic in 996 Series (Carrera, Carrera 4, Carrera 4S, Targa)
Okay, this is still really troubling me. Last week, I disconnected the battery for about 30 minutes, thinking that a reset of the ECU might help it re-learn everything properly. Unfortunately, the very next day it popped another CEL (same as above) on my way home from work as I was pulling up to a stop sign. Something is really screwy here... It shouldn't be an O2 sensor, a vacuum leak, a leaking fuel injector, or a stuck Evap purge valve, because any of those would either be throwing different fault codes and/or only affecting one bank. That only leaves the MAF or an air leak. I've checked and can't find any air leaks. Plus, if it was an air leak, it wouldn't be happening so randomly and only at idle, would it? When I tested the MAF voltage at KOEO (Key On Engine Off) and at idle, the readings were right where they should be: 0.9V - 1.0V at KOEO, and 1.45V at idle. However, when I revved the engine a bit (around 3,000 RPM), that figure came up to around 1.8V. Is that normal, or should it remain at 1.4V through the RPM band? If it's not the MAF, what else does that leave? Any help would be greatly appreciated. This is driving me nuts! -
Recurring P0172 and P0175 CELs
Fixxxer replied to Fixxxer's topic in 996 Series (Carrera, Carrera 4, Carrera 4S, Targa)
Thanks, Karl. That is very interesting. I tested my MAF last night using this method, and it checked out just fine. There's something else going on here... I'll check again for air leaks. -
Recurring P0172 and P0175 CELs
Fixxxer replied to Fixxxer's topic in 996 Series (Carrera, Carrera 4, Carrera 4S, Targa)
Thanks for the reply! I actually saw that thread in my search - I just wasn't sure if the fuel trim data I captured would help pinpoint the problem. BTW, I've also looked for air leaks and found none. EDIT: The plugs that I installed were OEM and were gapped properly. I was receiving the same CEL before the plug change, so I don't think it's related. That's interesting that Porsche doesn't use STFTs. I didn't know that! -
Hello everyone. I've had these two faults appear three separate times now, all within about 100 miles of each other, and all when the car has been idling for a short period. P0172: System too Rich (Bank 1) P0175: System too Rich (Bank 2) I've searched the forums, and it seems the likely cause is the MAF, but I wanted to post my Torque Pro logs of when the CEL occurred to see if any of you could help me pinpoint the problem. For what it's worth, I just changed my spark plugs last weekend (after having seen the CEL twice) and inspected the ignition coils, but no problems were found and the CEL appeared again this morning. My MAF looks clean to the eye, but I'm hesitant to use electrical contact (no residue) cleaner on it unless it's absolutely necessary. The first Torque Pro log below is from just before the CEL occurred when I pulled up to a stoplight. The second log is from a few seconds after the CEL occurred as I was pulling away from the stoplight. Log #1: Pre-CEL Time: 04-Apr-2012 09:02:15.096 Speed: 0.979mph Bearing: 341.0 G(calibrated): 0.00141555 Fuel Trim Bank 1 Short Term(%): 0 Fuel Trim Bank 2 Short Term(%): -1.5625 Fuel Trim Bank 1 Long Term(%): 0 Fuel Trim Bank 2 Long Term(%): -0.78125 Engine Coolant Temperature(°F): 184.99999595 Engine Load(%): 2.35294127 Engine RPM(rpm): 691 Mass Air Flow Rate(g/s): 6.25 Throttle Position(Manifold)(%): 2.35294127 Fuel used (trip)(gal): 0 GPS vs OBD Speed difference(mph): 0.35807136 Transmission Temperature(Method 3)(°F): 184.99999595 Acceleration Sensor(Total)(g): -0.01302952 Acceleration Sensor(X axis)(g): 0.00555366 Acceleration Sensor(Y axis)(g): -0.03887559 Acceleration Sensor(Z axis)(g): 0.01943775 Log #2: Post-CEL Time: 04-Apr-2012 09:03:56.093 Speed: 5.597mph Bearing: 2.0 G(calibrated): 0.06632715 Fuel Trim Bank 1 Short Term(%): -3.125 Fuel Trim Bank 2 Short Term(%): -7.8125 Fuel Trim Bank 1 Long Term(%): 0 Fuel Trim Bank 2 Long Term(%): -0.78125 Engine Coolant Temperature(°F): 197.59999561 Engine Load(%): 10.1960783 Engine RPM(rpm): 823.5 Mass Air Flow Rate(g/s): 9.75 Throttle Position(Manifold)(%): 14.11764717 Fuel used (trip)(gal): 0 GPS vs OBD Speed difference(mph): 0.62137121 Transmission Temperature(Method 3)(°F): 197.59999561 Acceleration Sensor(Total)(g): 0.03373463 Acceleration Sensor(X axis)(g): 0.17216341 Acceleration Sensor(Y axis)(g): -0.31378168 Acceleration Sensor(Z axis)(g): 0.13189937 Thanks for any help you all can provide!