Welcome to RennTech.org Community, Guest
There are many great features available to you once you register at RennTech.org
You are free to view posts here, but you must log in to reply to existing posts, or to start your own new topic. Like most online communities, there are costs involved to maintain a site like this - so we encourage our members to subscribe or donate. All subscriptions and donations go to the costs operating and maintaining this site. We prefer that guests take part in our community and we offer a lot in return to those willing to join our corner of the Porsche world. This site is 99 percent member supported (less than 1 percent comes from advertising) - so please consider an annual subscription or donation to keep this site running.
Here are some of the features available - once you subscribe RennTech.org
- View Classified Ads
- DIY Tutorials
- Porsche TSB Listings (limited)
- VIN Decoder
- Special Offers
- Paint Codes
- Registry
- Videos System
- View Reviews
- and get rid of this welcome message
It takes just a few minutes to register, and it's quality Porsche information at a low cost.
Contributing Members also get these additional benefits:
(you become a Contributing Member by subscribing or donating money to the operation of this site)
- No ads - advertisements are removed
- Access the Contributors Only Forum
- Contributing Members Only Downloads
- Send attachments with PMs
- All image/file storage limits are substantially increased for all Contributing Members
- Option Codes Lookup
- VIN Option Lookups (limited)

creekman
-
Posts
474 -
Joined
-
Last visited
-
Days Won
1
Content Type
Profiles
Events
Forums
External Paint Colors
Downloads
Tutorials
Links Directory
Collections
Classifieds
Store
Everything posted by creekman
-
I decided to remove the rear seats out of my 2003 C4S and eventually build a shelf with doors, i.e. the RS kit (?) that was sold at one time. I would sure like to get my hands on the doors shown in this pix. Anyway, the purpose of this "mod" is to utilize the tear drop opening where the shoulder strap of the seat belt was anchored. My first thought was to just install a piece of painted sheet metal behind the opening, then I came up with the idea to make the opening an interior light. A friend of mine gave me a 12" square of 1/8" white plexi. It turns out that the backside of the opening isn't flat so I had to first cut out the shape on the band saw with about 3/8" over lap on the bottom of the opening and a fitted edge to the top of the opening. Then I heated the plastic so I could warp the plexi piece for fitment to the backside of the opening. Not slam dunk, it's trial and error to get the shape to lay down on the back side of the plastic piece. Naturally if you had a mirrored shaped block of wood you could just heat the plexi and drape it over your fixture. Also remember there's a left and right so it would take two fixtures. So I just heated and bent the plastic to make a pretty good fit. Note you have to be careful not to dent the plastic when it's hot with pliers or a Crescent wrench. I used a ViseGrip with wide jaws that are covered in leather. I think if you had 1/16" plexi it would work better than my 1/8", I might add that I used a red Magic Marker to fine tune the fit. It seems to me that the black Magic Marker really gets into the material and it's hard to remove even with lacquer thinner. Once I had the fit, I sanded the shiny plexi with 1200 wet or dry sand paper to remove the gloss. Then used black RTV silicone and glued the lens to the back of the Porsche upholstery. I bought a strip of white LED's that has a self adhesive back. I just stuck the strips directly to the car body. I haven't wired the lights up yet, however I did light them up, I'm very pleased with the look and the light. I'm thinking I might wire the LED's into theinterior door lights so I don't have to worry about a separate switch and leaving the lights on. If you wanted to get weird you can buy LED's that can change colors. Remotes are available to rotate the color of preference if that's your thing. FYI: You can get these LED strips on-line from superbrightled.com - P/N NFLS-NW30X3-WHT - Natural White. These LED's run on 12 volts so you don't need power pack, just 12 Volts to the strips. The strips come 19" long with 2 leads, I cut the strips down to 6 LED's per side,then soldered + and - leads to the other strip. The strips are polarity sensitive, but they're well marked.
-
Custom Rear Seat and Seat Belt Delete
creekman posted a topic in DIY Articles - Carrera (996) - Mods
Custom Rear Seat and Seat Belt Delete I decided to remove the rear seats out of my 2003 C4S and eventually build a shelf with doors, i.e. the RS kit (?) that was sold at one time. I would sure like to get my hands on the doors shown in this pix. Anyway, the purpose of this "mod" is to utilize the tear drop opening where the shoulder strap of the seat belt was anchored. My first thought was to just install a piece of painted sheet metal behind the opening, then I came up with the idea to make the opening an interior light. A frie Author creekman Category Carrera (996) - Mods Submitted 10/03/2013 06:52 AM Updated 10/05/2013 09:20 PM -
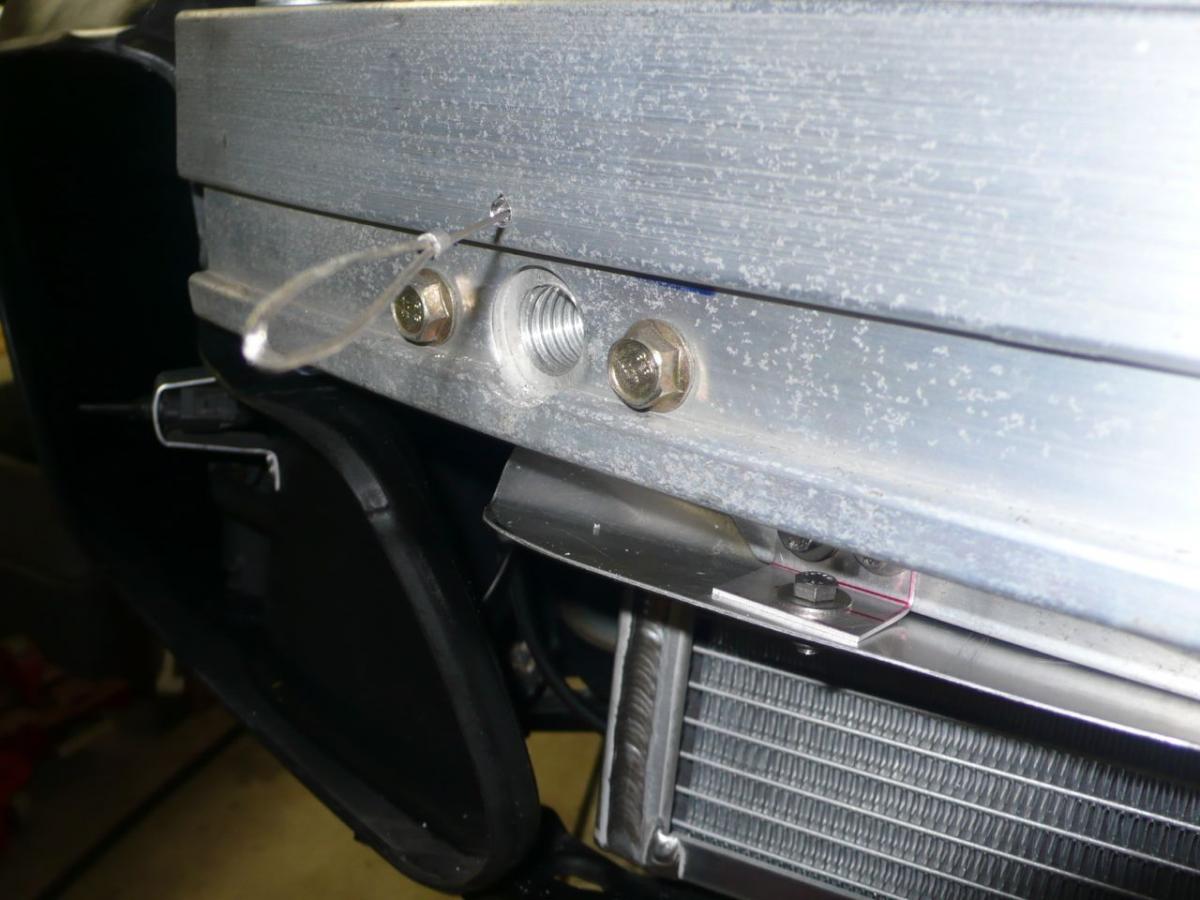
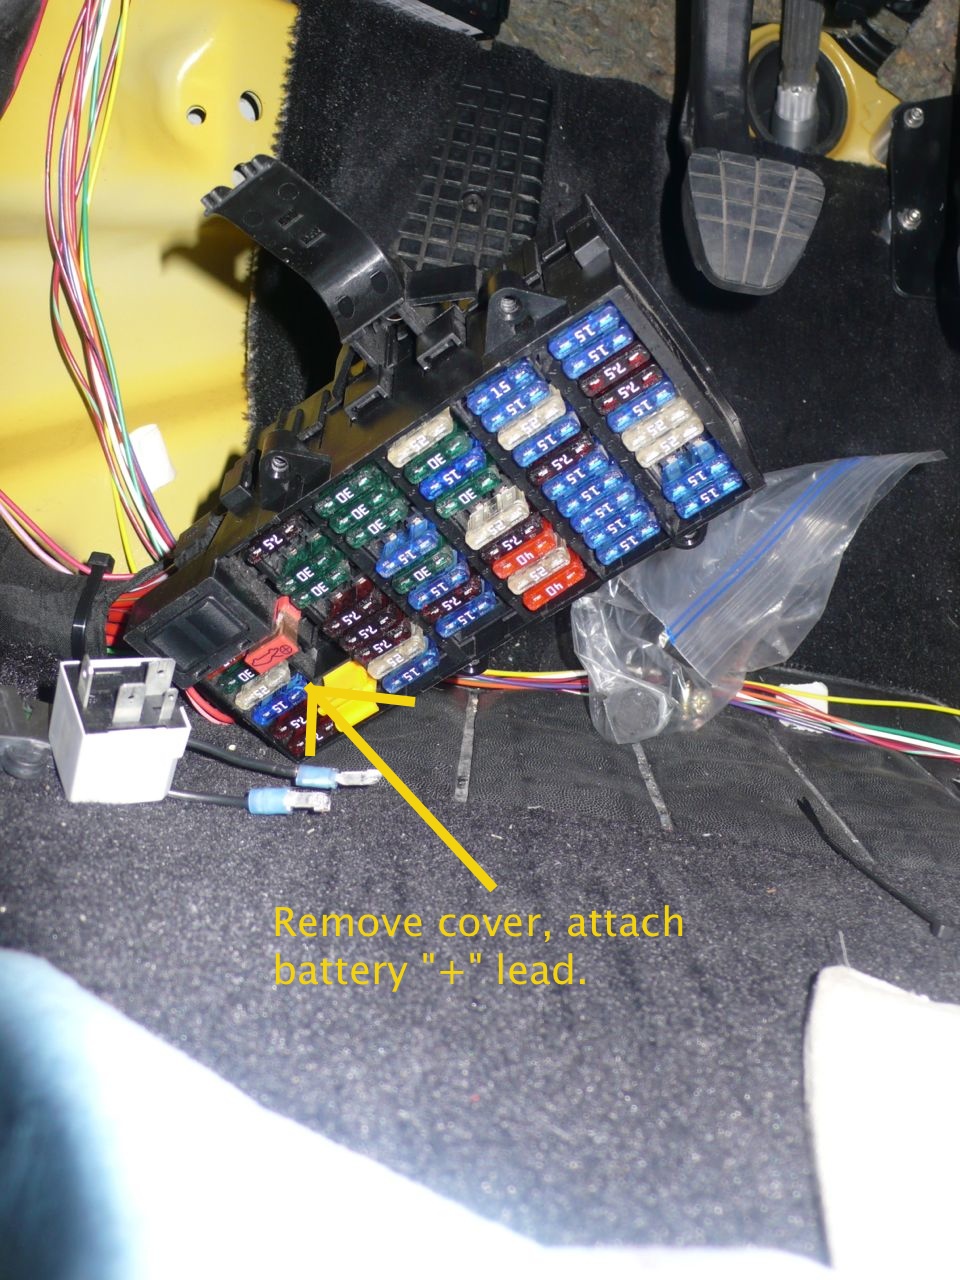
I had an e-mail chat with Loren to discuss where the end/loop of the Stainless Steel emergency trunk release cable was? Loren said it should be somewhere between the right front fender baffle and the bumper. However what he had done was to attach a fishing line to the loop and attach the line to the plastic bumper plug. I took it one step further and drilled a 3/16" hole directly above the tow eye threaded hole in the bumper. The S.S. loop will just fit through the 3/16" hole, then tied a fishing line to the loop and the other end to the plastic bumper plug. If you brought the S.S. cable through the tow eye threaded hole then you couldn't screw in the tow eye. There's a step on the back side of the bumper so you have to position your drilled hole to avoid the step... At least now I know where the emergency cable is, plus I don't have to remove the tire and maybe the fender baffle. Anyway, chalk one up for Loren. I'm sure everyone knows there's a second way to activate the hook latch. By hooking up a battery to a terminal post at the kick panel fuse/relay panel. See page 214 in your owner's guide for details. I might add if you get into relocating the cable you might clean your radiators and A/C condensers at the same time.

-
Trunk Emergency Lid Opening...
creekman replied to creekman's topic in 996 Series (Carrera, Carrera 4, Carrera 4S, Targa)
Thanks, good information... -
I had ask Loren where the Stainless Steel cable terminated for the emergency trunk lid latch. You probably already know that the cable loop hides around the right front fender baffle. Loren suggested tying fish line to the end of the cable for easier access. Either way it's probably a good idea to know where this emergency cable is before you need it. What I didn't know is that you can do a battery jump off of the fuse/relay panel on the left footwell. The information is in our Owner's Manual. My question is, can you also use a battery charger in lieu of the battery? I'm not sure what we would do without Loren, he takes some of the drama out of owning the 996... Thanks, See page 214 in your Owner's Manual... lid_open.pdf
-
Wide Body Tail Light Project...
creekman replied to creekman's topic in 996 Series (Carrera, Carrera 4, Carrera 4S, Targa)
Thank Thanks Road Session... at least I know what's not going to happen. I'd still like to find some used wide body tail lights, even if the mounting tabs are broken. -
I posted a request on the status of the LED wide body tail light project on 6Speedonline, but there were no replies. Does anyone here know if this is just a good idea that will never happen? Thanks,
-
Draining the Gas Tank...
creekman replied to creekman's topic in 996 Series (Carrera, Carrera 4, Carrera 4S, Targa)
I tried a 3/8" O.D. hose and wasn't able to get it any further down the fill pipe than the larger hose. I've showed a sample of the gas to several knowledgeable people and they both agreed the gas wasn't that bad. It's not good, but since the gas isn't coming out I guess I'll just run the gas out ASAP. -
Draining the Gas Tank...
creekman replied to creekman's topic in 996 Series (Carrera, Carrera 4, Carrera 4S, Targa)
Thanks Loren for your reply. I think you're saying that there's no way a siphon hose can get into the "saddle bags" of the tank. HOwever in my case the gas tank was full and I was only able to extract about 2 gallons. I'm going to try a smaller diameter hose to see if I can get further down into the tank. -
Draining the Gas Tank...
creekman replied to creekman's topic in 996 Series (Carrera, Carrera 4, Carrera 4S, Targa)
I took a 3/8" I.D. hose down the fill pipe, I was only able to siphon about 2 gallons of gas, then it started to suck air. The hose wouldn't go down any further... I can't believe there's no way to drain the tank short of removing it. I guess you could remove the battery and the top cover to the gas tank expose the fuel pump in the tank to get at the gas? Am I correct? Just seems like there should be an easier way... -
Draining the Gas Tank...
creekman replied to creekman's topic in 996 Series (Carrera, Carrera 4, Carrera 4S, Targa)
A siphon is about your only option, or some flame proof pumping system. Be careful with the siphon hose that is does not become caught on anything inside the tank or filler neck. The small amount of StaBil will not alter the color or smell of the gas, Thanks for the reply... You make a good point about getting the hose caught in the tank filler pipe. I had a Chevy Blazer with a custom 40 gallon tank so I could fill my airplane. However at the time I didn't realize that each time I dropped the hose into the tank and pulled it out that I was chaffing the rubber hose until one day the gas filter became so clogged that the engine quit. I think with your comment that the Sta-Bil doesn't change the color of the gas I better try and get the gas out. -
My car been sitting for 7 months and the gas is smelling a little stinky. After about 5 months I filled the remainder of the gas tank with new gas and added Sta-Bil to the gas. The gas doesn't smell real bad, but definitely has an odor and a yellowish color. I don't know if the yellow color is because the gas is stale or from the Sta-Bil? Would you drain the gas tank, if so what is the easiest way to do that? Can you syphon most of the gas through the gas tank fill opening? Thanks,
-
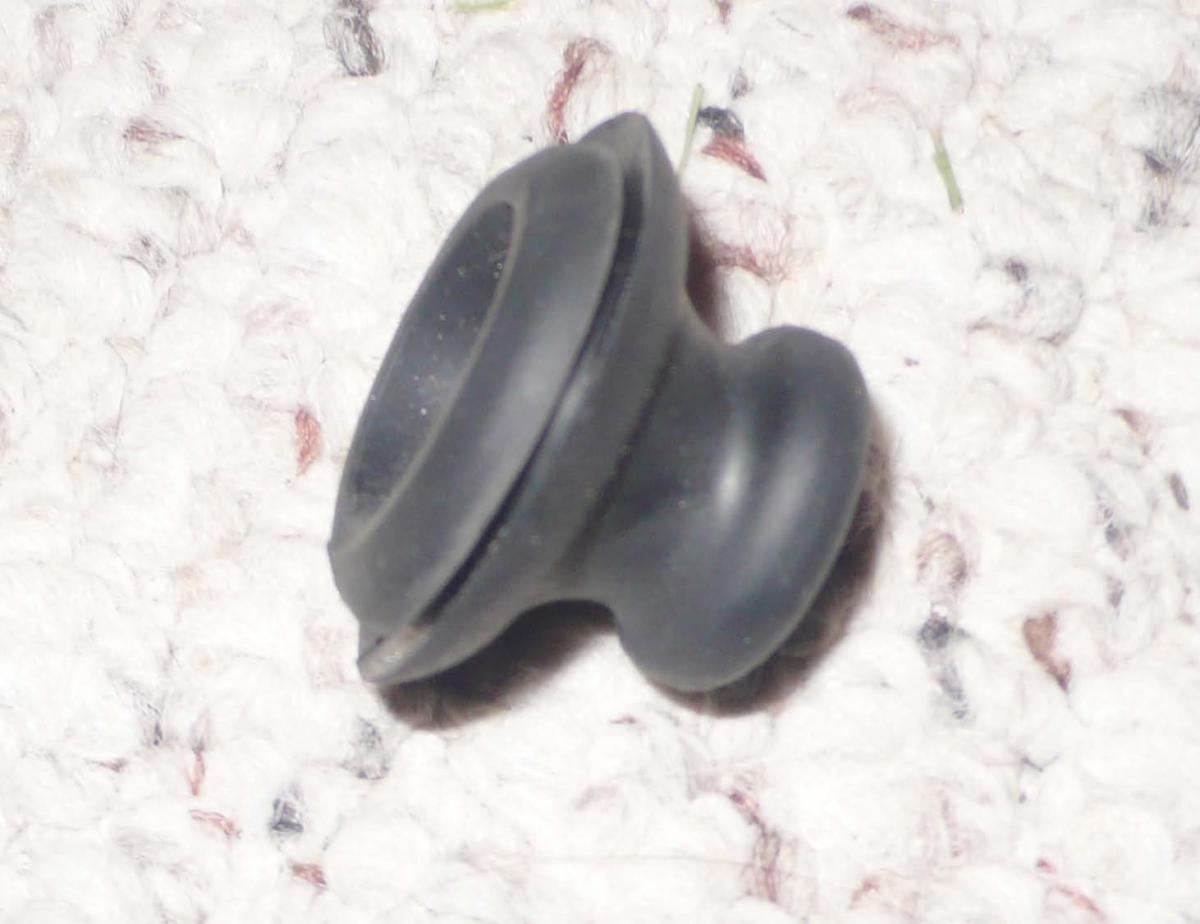
What Is This Please...
creekman replied to creekman's topic in 996 Series (Carrera, Carrera 4, Carrera 4S, Targa)
Thanks Richard... -
What Is This Please...
creekman posted a topic in 996 Series (Carrera, Carrera 4, Carrera 4S, Targa)
I was vacuuming my trunk, found this next to the spare tire. Anyone know where this rubber plug goes? Thanks,
-
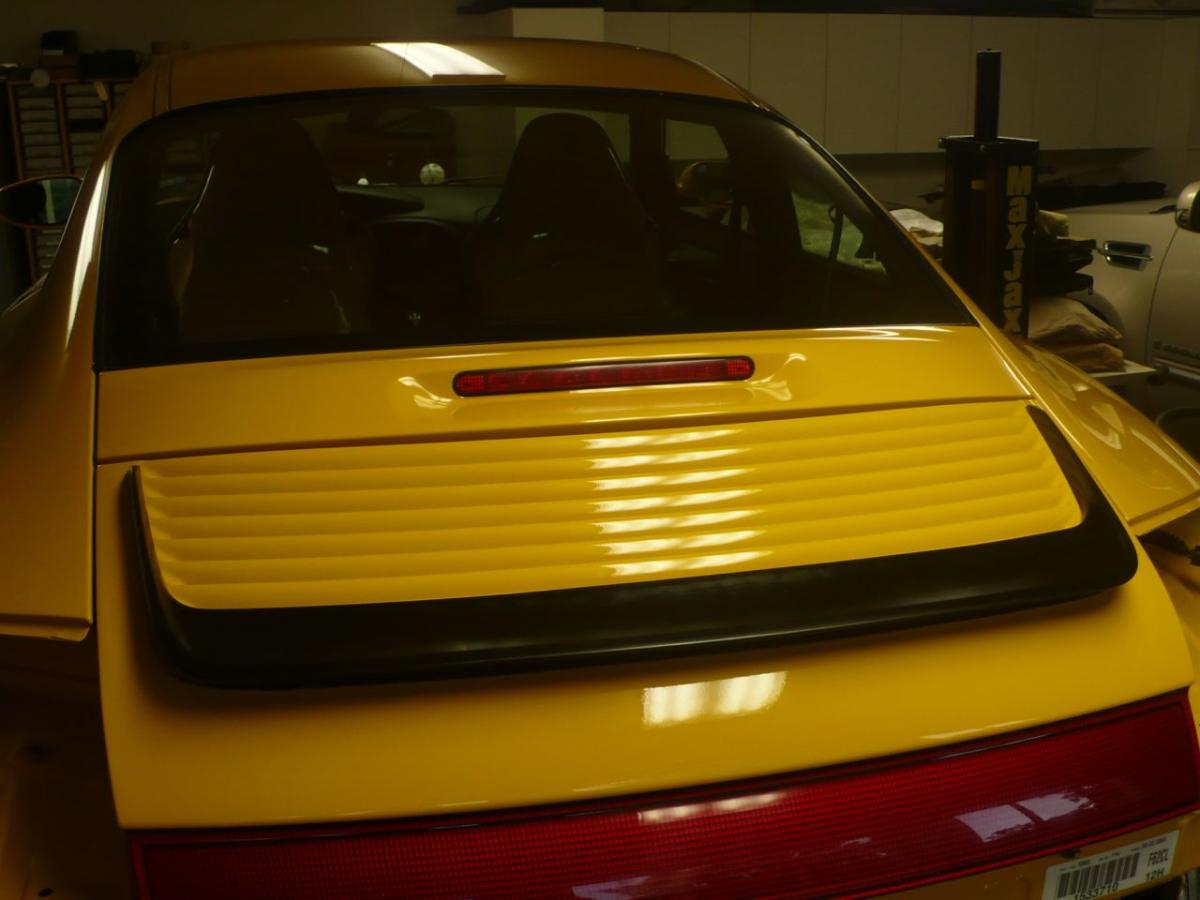
Personally while the spoiler has a definite function, I never thought it was attractive look when it is in the raised position, it spoils the nice lines of the car... I had other reasons for removing it. I blended the grill to the deck lid and added the small spoiler. If anyone needs the articulating parts for the spoiler please contact me.
-
Air conditioning ?
creekman replied to Wausau 911's topic in 996 Series (Carrera, Carrera 4, Carrera 4S, Targa)
Wausau, cooling is a relative thing, however I'm guessing that your A/C system is not giving you it's best... I would first get a cheap digital thermometer and place it in your center vent. Also you should know the outside ambient temp so you can converse with some accuracy what your A/C system is doing. Depending on the results, I would go to a good air conditioning shop and have them put the gauges on your car to determine if you have freon. I would also remove your front bumper and clean the 2 A/C condensers. When I cleaned mine I got at least a cup full of debris that was trapped between the radiator and the condenser. Do a search on this site for a great video that gives you step by step on how to complete the cleaning of the condensers. -
Porsche 996 Tail Light LED
creekman replied to jose's topic in 996 Series (Carrera, Carrera 4, Carrera 4S, Targa)
Dittos... -
Rear Seats Delete...
creekman replied to creekman's topic in 996 Series (Carrera, Carrera 4, Carrera 4S, Targa)
Loren, Thanks for the reply. I've entered "rear seat delete" and "rear storage shelf" w/o any hits. What other search words would you recommend? I saw on the Pelican 911 site the RS storage shelf and access doors that are convexed, very nice... I imagine that it's a true DIY project which I'll end up doing. Thanks, -
Just wondering if anyone has deleted the rear seats and built a shelf with storage? I know on the 911 Pelican Parts forum that has been done. Thanks,
-
I've often wonder why they put the rear seats in the car in the first place. They have no practical use, is it just a marketing ploy or?
-
Bleeding the Clutch
creekman replied to rpastir's topic in 996 Series (Carrera, Carrera 4, Carrera 4S, Targa)
Thanks Loren... What would we do without you! -
Bleeding the Clutch
creekman replied to rpastir's topic in 996 Series (Carrera, Carrera 4, Carrera 4S, Targa)
Another thought, my "84" had a small overflow hose coming off the master cylinder. When using the pressure pot to bleed the brakes I sometimes would forget to pinch off/closed the hose, big mess on the floor. Does the 996 have an overflow hose from the master cylinder that you would need to pinch off? -
Bleeding the Clutch
creekman replied to rpastir's topic in 996 Series (Carrera, Carrera 4, Carrera 4S, Targa)
Logray, Great article... I wouldn't have know to depress the brake pedal to bleed the slave cylinder. I'll have to go back to my Bentley's to see if I had missed that. Thanks, -
Bleeding the Clutch
creekman replied to rpastir's topic in 996 Series (Carrera, Carrera 4, Carrera 4S, Targa)
Loren, I was going to read up on this since I need to bleed both the brakes and slave... Great question and answer, thanks... -
+1 for Loren, plus there's a torque setting for those bolts that can be found in Bentley's. Also I would use blue Locktite on the bolt. I had the tensioner pulley bolt back out on my car and it bent the bolt and destroyed the pulley so proper torque and installation procedures are important. Or you could end up spending a night in Winslow, AZ...