Welcome to RennTech.org Community, Guest
There are many great features available to you once you register at RennTech.org
You are free to view posts here, but you must log in to reply to existing posts, or to start your own new topic. Like most online communities, there are costs involved to maintain a site like this - so we encourage our members to donate. All donations go to the costs operating and maintaining this site. We prefer that guests take part in our community and we offer a lot in return to those willing to join our corner of the Porsche world. This site is 99 percent member supported (less than 1 percent comes from advertising) - so please consider an annual donation to keep this site running.
Here are some of the features available - once you register at RennTech.org
- View Classified Ads
- DIY Tutorials
- Porsche TSB Listings (limited)
- VIN Decoder
- Special Offers
-
OBD II P-Codes - Paint Codes
- Registry
- Videos System
- View Reviews
- and get rid of this welcome message
It takes just a few minutes to register, and it's FREE
Contributing Members also get these additional benefits:
(you become a Contributing Member by donating money to the operation of this site)
- No ads - advertisements are removed
- Access the Contributors Only Forum
- Contributing Members Only Downloads
- Send attachments with PMs
- All image/file storage limits are substantially increased for all Contributing Members
- Option Codes Lookup
- VIN Option Lookups (limited)


Hilux2400
-
Posts
458 -
Joined
-
Last visited
-
Days Won
1
Content Type
Profiles
Events
Forums
External Paint Colors
Downloads
Tutorials
Links Directory
Collections
Store
Everything posted by Hilux2400
-
Coolant leak help
Hilux2400 replied to royp4's topic in 996 Series (Carrera, Carrera 4, Carrera 4S, Targa)
The coolant only works properly if it does not vaporise. The coolant system on a vehicle is sealed so that it cannot vaporise. As a result when the coolant becomes hot the system becomes pressurised and it cannot "boil". When the system is hot, if you were to open the coolant cap you would release this pressure the coolant would boil. The car normally runs at about 80 deg C (176 degF). Normally at this temperature coolant vaporises, but as it held under pressure it does not. If you have a leak the coolant cannot be pressurised. Therefore, where there are hot spots in the engine there will be vapour spots where the coolant will not work effectively as it cannot dissipate engine heat. Eventually, these hot spots will result in engine damage as in these locations the temperature of the engine will exceed its design tolerances. In a Porsche the cooling system is complex and the coolant is required to travel long distances to get to locations where it can be cooled. With vapour in the system this will not happen. The advice you have had is sound. You need to get it fixed and it were mine I don't think I would drive it. -
Same here on my 2003 996 plus an air con leak.

-
Many of the fixing are screws. Some have posi-drive heads and others torq recesses. The only poppers are the ones that fix the wheel arches shrouds. For these use a wide wedge to move the central expansion pin and then remove the outer plastic rivet. The side flashers need to come out, but they just pop out to give access to a screw. Also take out the headlight pods. If you do break the plastic rivets they are easy to replace. You will be surprised by what an easy job it is. Just take your time and set the screws aside so you remember where they came from.
-
No hum with mine - 2003 996
-
It's an easy job and there's plenty of guidance about. When you take it off it helps to have two people and have a rug ready on which to out it down. It also helps to have two when putting it back. It's not that it's heavy but it is a bit clumsy as it flexes.
-
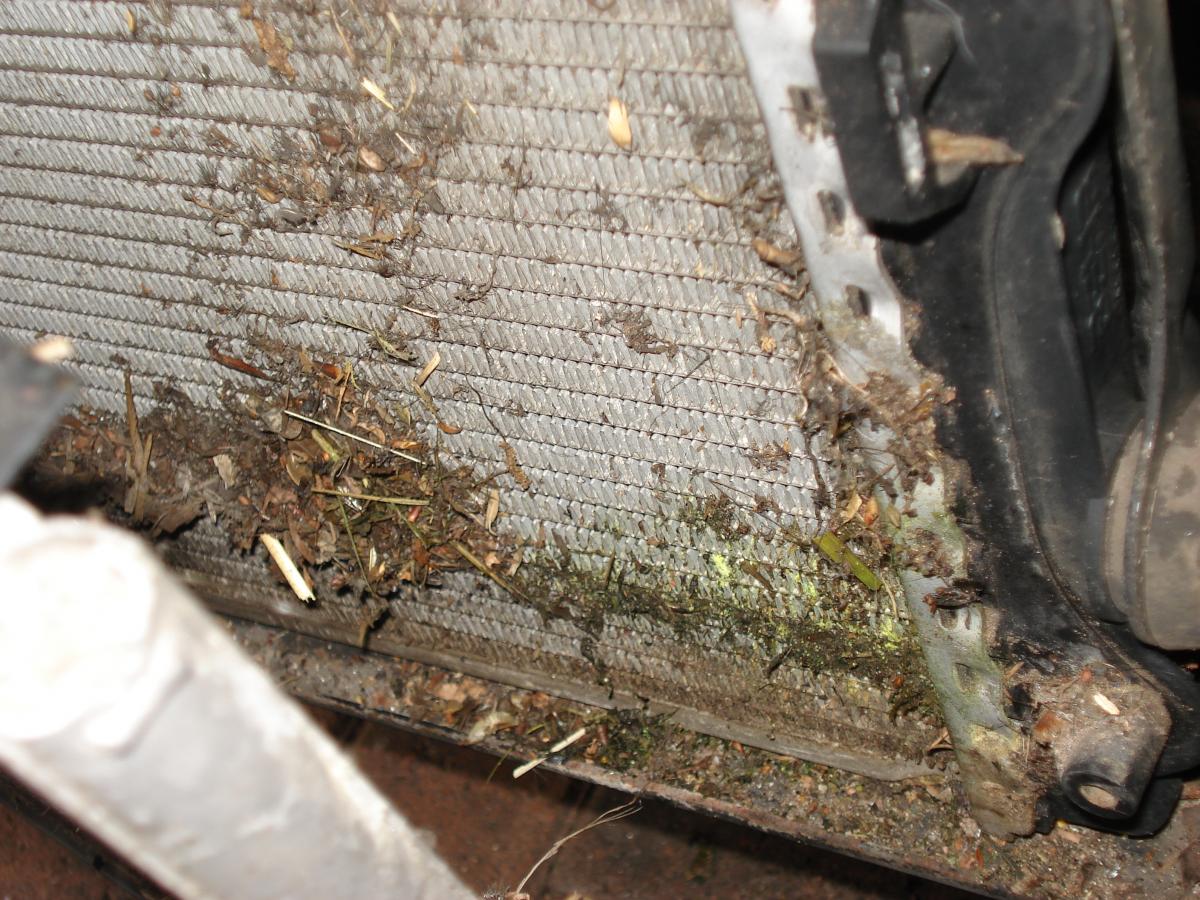
In three years I have had the front apron off twice. The first time was soon after I bought the car when there was an unbelievable amount of junk caught between the rads and the condensers. The second time was to repair an air con leak. On this occasion there was very little muck to clean out and it could have been cleaned with a vacuum cleaner from the front. If you have not had the car very long its probably worth taking the apron off just to make sure the space between the rads and the condensers is clear. When I wash the car I inspect the intake area with a torch, especially the far corners where leaves accumulate. If needed I clean them out. Sometimes I have to use a long screwdriver to loosen things up. If you have to do this, take care not to damage the rad fins and cause a leak.
-
I have not tried what you suggest, but I have tried fitting Bi-Xenon bulbs with the ballast resistors to a 2003 996. It was not too difficult. The actual bulb is easy to replace and the control unit I fitted outside the pod and secured it to the side of the rails with double sided foam mounting tape. I had to drill the pod at the back - there is a flat area - where I inserted a rubber grommet for the control wires. The light was fantastic and much better than the standard fitting. Now for the hard part. When I used the headlight flasher occasionally warning lights would come one. One day the oil warning light came on when I flashed the headlights. It went off again after I stopped and re-stared the engine. On another occasion I had a different warning light. There was nothing wrong with the vehicle. I had no problems before fitting the bulbs and no problems after removing them. I have heard that these non-standard fitting do give similar problems. The manufacturer's blurb did say that these non OEM parts would be compatible, but I was not prepared to continue with these occasional apparent false warning signals which I related to the Bi Xenons. Having said that, you might be OK.
-
Have you pulled the other plugs?
-
Getting rear of 996 on stands
Hilux2400 replied to singhmrp's topic in 996 Series (Carrera, Carrera 4, Carrera 4S, Targa)
You can jack up at the defined body points, put the axle stands under the suspension mounting points and lower the car onto the stands. You could jack up under the suspension points and lower the car onto the defined body points. Either way would do what you want. -
Getting rear of 996 on stands
Hilux2400 replied to singhmrp's topic in 996 Series (Carrera, Carrera 4, Carrera 4S, Targa)
Thank you that's useful. My car port has a blocked floor so I would have to dig these out and put in a slab. However, it might be worth doing this as I am finding low level maintenance a bit painful these days. -
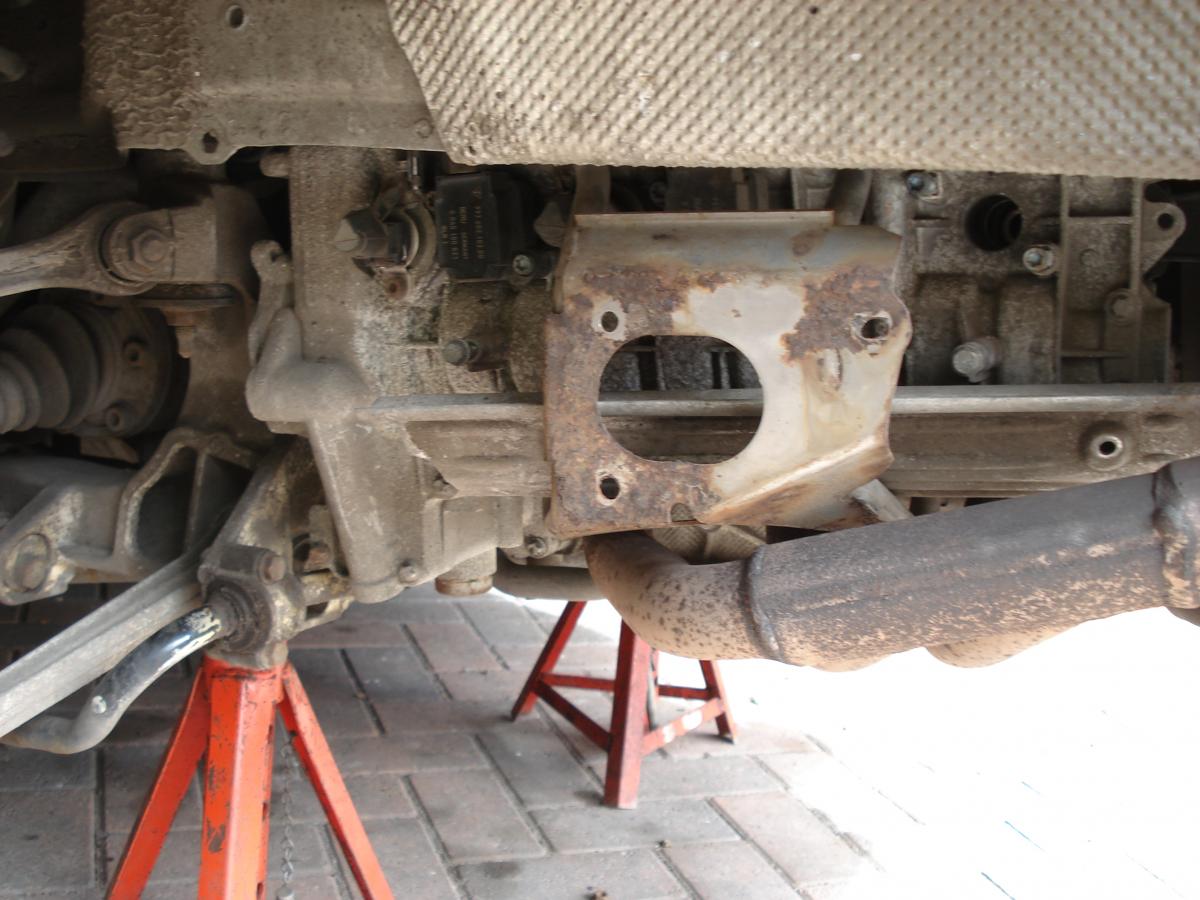
You're right it is a13mm spanner, but when I put the mounting plate on the box was not in place so I had quite a bit of room. When I took it apart I had to do it with the box in place, which was pretty tight. I think I used a socket wrench to get the nuts off that's how I was able to shear off the very rusty ones. As you have now put it all back together you will not be able to insert a bolt as the flat head of the old bolt will still be in place. You might have to take the box off again to get it right. But it should be easy the second time.
-
This happened to me on my 996. I drilled out the sheared studs and replaced them with a short stainless steel bolts, washers and Aerotight stainless steel lock nuts. There just enough room to get a spanner in to tigthten them up. I don't think I would want to run with just two bolts for too long. The exhaust box is heavy and it will vibrate as it is subject to opposing movement (up and down) as the engine rocks on its mountings. This will also place stress on the joint between the cat and the box and header pipe and the box. Watch out from the rear to make sure your tail pipe end is not drooping as this could be an early sign that you need that extra bolt. The other thing I did was to insert the long mounting bolts from the bottom and not the top, once again locked with Aerotight nuts. This means that the next time I need to take off the box I will only need to drop out the long bolts and leave the mounting in place.
-
Getting rear of 996 on stands
Hilux2400 replied to singhmrp's topic in 996 Series (Carrera, Carrera 4, Carrera 4S, Targa)
I have thought about getting one of these as I have enough headroom in my car port. What about floor fixing. Is it permanently bolted down? -
Getting rear of 996 on stands
Hilux2400 replied to singhmrp's topic in 996 Series (Carrera, Carrera 4, Carrera 4S, Targa)
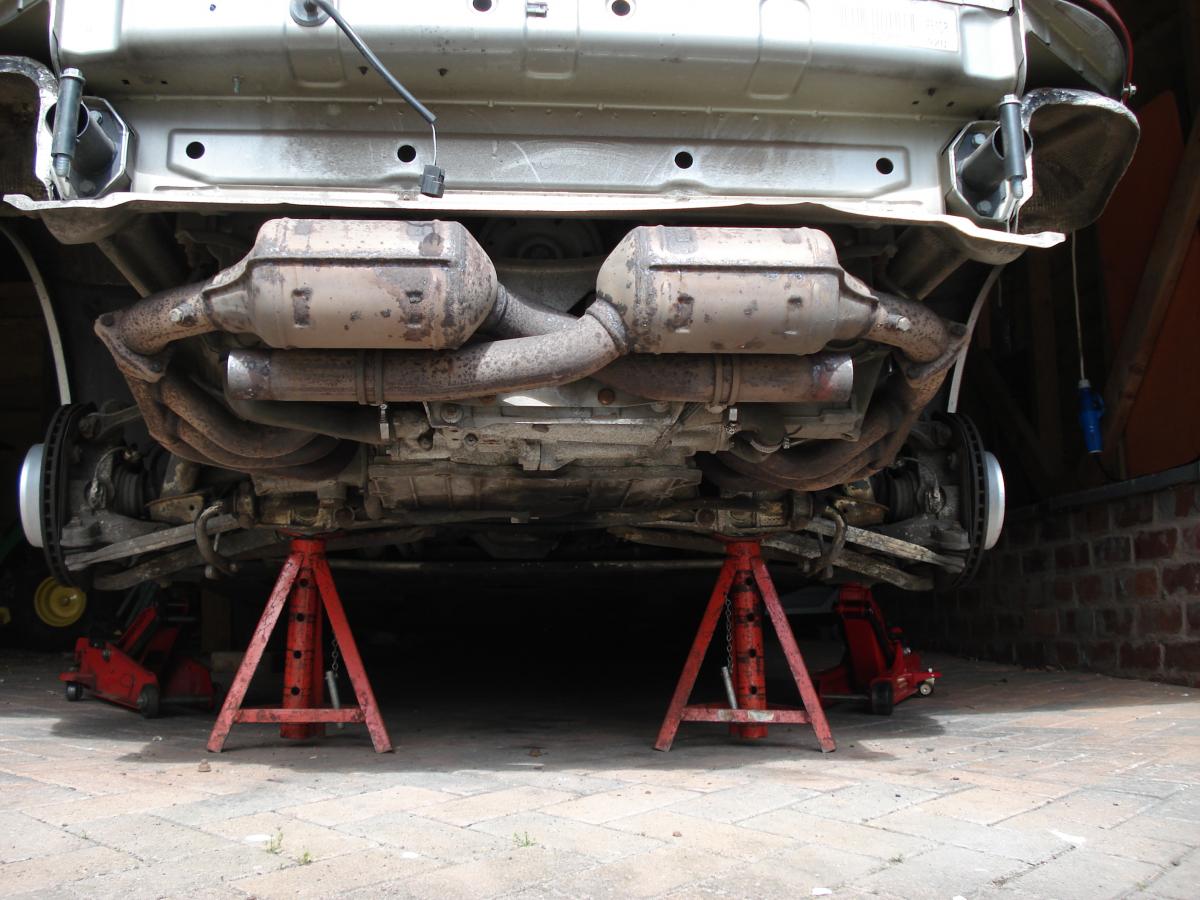
There are four defined jacking points. If you lift only one at the back eventually the front will also lift on the same side. If you lift both sides evenly at the back the front wheels will remain on the ground. If you want to get under the back safely you need to lift it off the ground by jacking evenly at both sides at the back jacking points. Get the car on a reasonably level surface. Put trolley jacks, one each side at he back, and jack each side about 75mm at a time. The front wheels will stay on the ground and only the back will lift. When it's up to full height place the stands underneath and lower the car onto the stands. Chock both front wheels. Keep some slight pressure on both jacks as a safety measure. When you have everything in place make sure the car is firm and rigid before you go underneath. Also remember that if you are using a wrench under a car that is off its wheels it is possible to shift it sideways and in extreme cases pull it off the stands. This can be dangerous.
-
Getting rear of 996 on stands
Hilux2400 replied to singhmrp's topic in 996 Series (Carrera, Carrera 4, Carrera 4S, Targa)
There are four defined jacking points. If you lift only one at the back eventually the front will also lift on the same side. If you lift both sides evenly at the back the front wheels will remain on the ground. If you want to get under the back safely you need to lift it off the ground by jacking evenly at both sides at the back jacking points. Get the car on a reasonably level surface. Put trolley jacks, one each side at he back, and jack each side about 75mm at a time. The front wheels will stay on the ground and only the back will lift. When it's up to full height place the stands underneath and lower the car onto the stands. Chock both front wheels. Keep some slight pressure on both jacks as a safety measure. When you have everything in place make sure the car is firm and rigid before you go underneath. Also remember that if you are using a wrench under a car that is off its wheels it is possible to shift it sideways and in extreme cases pull it off the stands. This can be dangerous. -
Getting rear of 996 on stands
Hilux2400 replied to singhmrp's topic in 996 Series (Carrera, Carrera 4, Carrera 4S, Targa)
I normally use two trolley jacks on the jacking points on opposite sides at the back. I jack up the car evenly so that it does not tilt and fall off the jack and so that it only lifts at the back, keeping the front wheels on the ground. When it's high enough I place even height axle stands under the suspension pivots and lower the car onto these. I keep the jacks in place, under very light pressure. -
Boxster S (-00) Engine number
Hilux2400 replied to felixliter's topic in 986 Boxster Convertible Top Issues and Solutions
Does the AT refer to: Austausche or exchange motor so it's a later motor by Porsche? -
Rear brakes help
Hilux2400 replied to 8202632's topic in 9PA, 9PA1 (Cayenne, Cayenne S, Cayenne Turbo, Cayenne Turbo S)
Did you reverse the pads when you put them back? I am assuming they are the same shape. -
996 C2 front drop links
Hilux2400 replied to rattles's topic in 996 Series (Carrera, Carrera 4, Carrera 4S, Targa)
When I did my front drop links it was an easy job on one side as the part where the through bolt that clamps the shock absorber into the hub assembly turned and came out easily. However, on the other side it would not move. It took me quite a long time to get it to turn. I cut off the ball joint on the end of the drop link so that I could place a socket wrench on the end of the pinch bolt. I then used a heat gun and penetrating oil. About a week before you start this job I would start spraying the ends and mid point of the through bolt with penetrating oil. Also, when you put the new through bolt back in put some anti seize on the shaft. You should also take care that when you clamp it up the shock absorber is in the same place as when you started. Before you start mark the point at which the shock absorber is clamped. You can do this with tape or a dab of spray paint. It can't move far as the locating tab on the shock absorber/strut aligns with the hole where the clamp bolt goes through. But there is enough room for slight movement which could alter your camber angle. -
Replacing Rigid Brake Lines
Hilux2400 replied to 0586slb's topic in 986 Boxster Suspension, Brakes, and Wheels
I would be cautious about using non-steel tubing on modern braking systems. Cooper used to be fine on older braking systems, which operated at much lower pressures than modern systems with anti-lock and stability management systems. While easy to work with, they could be soft enough to cause the flares to fail under pressure at the exact moment you need them most. That's an interesting point. I use piping made from a copper- nickel alloy, which apparently has the same burst pressure as steel tubing of about 19,000 psi. I have used it successfully on older vehicles, but not on any car currently less than 15 years old. On the 15 year old vehicle (not a Porsche), which I still own it is performing well. I used it to replace a corroded steel brake line that burst under severe braking when the vehicle was less than 8 years old. This is the second time I have had brake failure on this model of vehicle. On both occasions the corroded steel pipe failed at a point above the fuel tank where road debris accumulates. The cupro-nickel pipe in this location does not corrode and I consider it to be a better option if it does not corrode and sustains the correct pressure. I notice that two of my local garages also uses cupro-nickel pipe for replacement. If what you say is right about its inadequacy to sustain pressure, I need to investigate this further. Is there any guidance I could refer to on this topic? You would need to find two data points about the cooper tubing you are using: burst pressure and tensile strength, and then compare them to the steel alloy used in the factory lines. Burst pressure is obvious, but less obvious is how well the cooper would stand up under tensile loads (basically stretching). Because the flare process can actually thin the metal at the flare, it ability to stand up to tensile loads becomes important at these higher line pressure, particularly when automated pulse pressure systems (ABS, PSM, etc.,) come into play. Corrosion of the mild steel lines has always haunted these cars, which is why there is an aftermarket using stainless steel. Thanks JFP, I'll see what I can find out. -
Replacing Rigid Brake Lines
Hilux2400 replied to 0586slb's topic in 986 Boxster Suspension, Brakes, and Wheels
I would be cautious about using non-steel tubing on modern braking systems. Cooper used to be fine on older braking systems, which operated at much lower pressures than modern systems with anti-lock and stability management systems. While easy to work with, they could be soft enough to cause the flares to fail under pressure at the exact moment you need them most. That's an interesting point. I use piping made from a copper- nickel alloy, which apparently has the same burst pressure as steel tubing of about 19,000 psi. I have used it successfully on older vehicles, but not on any car currently less than 15 years old. On the 15 year old vehicle (not a Porsche), which I still own it is performing well. I used it to replace a corroded steel brake line that burst under severe braking when the vehicle was less than 8 years old. This is the second time I have had brake failure on this model of vehicle. On both occasions the corroded steel pipe failed at a point above the fuel tank where road debris accumulates. The cupro-nickel pipe in this location does not corrode and I consider it to be a better option if it does not corrode and sustains the correct pressure. I notice that two of my local garages also uses cupro-nickel pipe for replacement. If what you say is right about its inadequacy to sustain pressure, I need to investigate this further. Is there any guidance I could refer to on this topic? -
Replacing Rigid Brake Lines
Hilux2400 replied to 0586slb's topic in 986 Boxster Suspension, Brakes, and Wheels
For some years I have made up my own brake lines with a flaring tool and using non-steel tubing. I have not yet made any for my 996, but I have done for other and older cars. It works well and it's easy. I also have a pipe bender for small dia pipe and a selection of nipples, which must be fitted before flaring takes place. There are also mid run joints that can be made up when it's only necessary to re-make a flare near a fitting. The pipe that I used is copper based and very malleable so quite tight bends are possible without kinks occurring. -
1999 911 Loses Power
Hilux2400 replied to jrbodyluck's topic in 996 Series (Carrera, Carrera 4, Carrera 4S, Targa)
Has this got anything to do with height above sea level. For example a journey that starts at sea level and then climbs to maybe 5,000 feet. The reason I ask is that a car loses power in relation to both air temperature and altitude. -
I would also not wish the CVT on anyone. While simple, lightweight, and supposedly "superior" (at least according the OEM's that uses them), they also have had a terrible response from owners of new cars equipped with them (noise and poor driving resposne), very limited service access, and as the direct result are getting a very bad reputation. Nissan has gone to using only CVT's on all of their automatic trans equipped cars (except for the GT-R, which uses a sequential dual clutch gear box like the PDK) and it has been a customer relations nightmare for them. The only available parts are fluid, a drain plug and its sealing ring; period. If something goes wrong 5 min. out of warranty, you need to buy either a new or factory reaman CVT, which start at $2,600 dealer cost for the reman unit, which is just plain nuts. This problem is so bad with Nissan's CVT that even transmission repair shops have to buy them from dealers, nobody can work on them as it requires speicalized tooling and fixtures that the factory will not sell, and there is absoultely no technical information available either. CVT is not the answer That's an interesting reply and I knew nothing of those matters with cars. Of course the essence of a CVT is a sealed system where the actual drive point relies on the solidification of a microscopic lubrication film at the critical moment. I just think that its inherent simplicity in bound to win out in the end when the mechanisms are perfected for automotive use. Its use on bicycle has been a light bulb moment for me, but then I am using something with far less torque transmission.
-
It has surprised me that Porsche and ZF went down this route to develop the 7 speed auto when there are other options such as the Nuvinci CVT which does not use gears. I have just bought a German Kalkhoff bike with a Nuvinci rear hub. There is no specific change like a conventional box but just a seamless alteration which responds to to torque which delivers the right gear. I think this type of CVT will be the future for all cars. It certainly has fewer moving parts and control mechanisms.