Welcome to RennTech.org Community, Guest
There are many great features available to you once you register at RennTech.org
You are free to view posts here, but you must log in to reply to existing posts, or to start your own new topic. Like most online communities, there are costs involved to maintain a site like this - so we encourage our members to subscribe or donate. All subscriptions and donations go to the costs operating and maintaining this site. We prefer that guests take part in our community and we offer a lot in return to those willing to join our corner of the Porsche world. This site is 99 percent member supported (less than 1 percent comes from advertising) - so please consider an annual subscription or donation to keep this site running.
Here are some of the features available - once you subscribe RennTech.org
- View Classified Ads
- DIY Tutorials
- Porsche TSB Listings (limited)
- VIN Decoder
- Special Offers
- Paint Codes
- Registry
- Videos System
- View Reviews
- and get rid of this welcome message
It takes just a few minutes to register, and it's quality Porsche information at a low cost.
Contributing Members also get these additional benefits:
(you become a Contributing Member by subscribing or donating money to the operation of this site)
- No ads - advertisements are removed
- Access the Contributors Only Forum
- Contributing Members Only Downloads
- Send attachments with PMs
- All image/file storage limits are substantially increased for all Contributing Members
- Option Codes Lookup
- VIN Option Lookups (limited)


siddharth
-
Posts
120 -
Joined
-
Last visited
-
Days Won
2
Content Type
Profiles
Events
Forums
External Paint Colors
Downloads
Tutorials
Links Directory
Collections
Classifieds
Store
Everything posted by siddharth
-
Oil leak
siddharth replied to Philip1972's topic in 996 Series (Carrera, Carrera 4, Carrera 4S, Targa)
Thanks for that.. I had the O/S cam cover mended last Nov at the dealer so perhaps they did a bad job...I will take it back. If they replaced/resealed the camcover and didn't check the oil tubes shame on them. There are new o-rings for the early MY99 Carrera's that have almost eliminated all oil tube leaks. Loren, I'll be changing my spark plugs tomorrow. How can I verify the above (o-rings, oil tubes etc) to see if they are fine? I've a MY99 carrera so I thought I might as well inspect if its in the vicinity. Thanks ! Sid -
The images are showing up fine. Perhaps you need to try a different browser or try printing to an Adobe pdf document and then print that document off. Saved a local copy of the HTML page and it pictures ... My DIY is slightly different but will utilize the same set of wires ... Thanks guys Sid
-
Orient, the images aren't loading from your post. Could you correct that ? I just got the parts and was really looking forward to doing this DIY myself ... until I noticed my printout was missing pictures ! Thanks ! Sid
-
CEL : P0410 + P1411
siddharth replied to siddharth's topic in 996 Series (Carrera, Carrera 4, Carrera 4S, Targa)
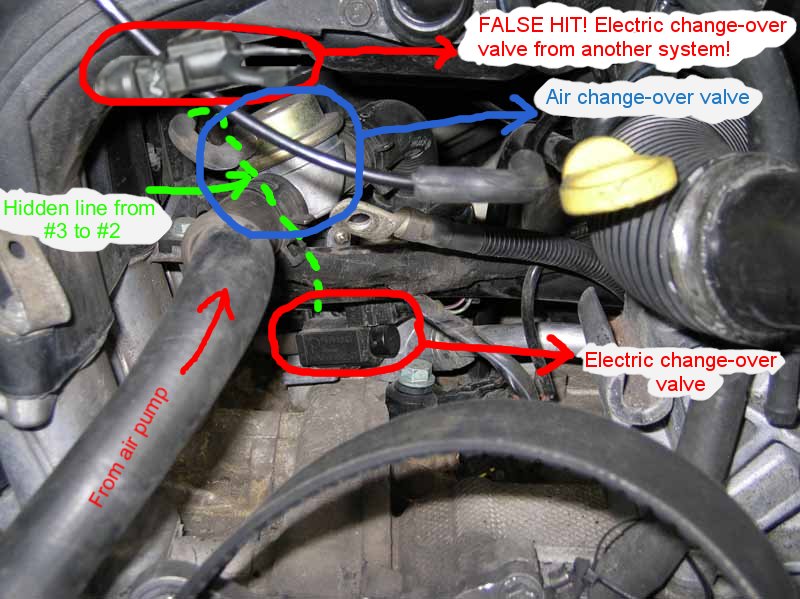
Whew ! Thanks Loren, I picked up replacement parts for this and finished the job. the problem was a bad air change-over valve. But I also changed the electric change over valve since its just $20 but its deep inside. I did a post-mortem of the problem by editting the 1st post in this thread. Will post a DIY article on getting the generator out when I get another lazy day ! Cheers !! Sid -
Changing the Polyrib Belt
siddharth replied to Loren's topic in DIY Articles - Carrera (996) - Maintenance
I just did this and would REALLY recommend the 24mm socket instead of the wrench. The socket stays on the head and allows you to exert force without worries. The wrench sometimes slips off (the 24mm nut head is narrow) and you could hurt your fingers or "round off" the 24mm nut head edges. -
CEL : P0410 + P1411
siddharth replied to siddharth's topic in 996 Series (Carrera, Carrera 4, Carrera 4S, Targa)
Thanks guys !! So I rigged up a 12 volt source with a (9v + 2x1.5v) batteries. Then I tested both the electrical air-over valves (the #3 in the diagram above as well the one above the alternator). Both seem to actuate properly and I can blow thru them when activated. When not actuated, the pipe seems blocked - just as expected. Then I tested the air change over valve by applying some suction force on the small pipe and then having a hair dryer try to blow thru the same pipe as the air pump. Nothing seems to come out from the other side, so I'm assuming that the air-over valves are bad !! I'm glad to at least find what's bad. Loren, the air change over valve I pulled out is 993-* and PET shows a part 993-* as well as 996* for the same part (air change over valve). Which one should I buy as the replacement ? Mine is a 99 996 C2. I plan on ordering the replacement part via Sunset Porsche. Actually I'm planning on also replacing the 2x electic change-over valves ... since I've dig up so deep and they are ~ $20 a piece. Also, based on my findings of a faulty air-over valve, do the 3 OBD2 codes add up fine ?? Especially the 3rd one (P1125)? Cheers !! -
Forgive me for stating the obvious, but why not simply jump start the car or have AAA attach their "jump start battery" ? That means you will have a "battery" connected and your key should come out (if its stuck because of a dead battery).
-
CEL : P0410 + P1411
siddharth replied to siddharth's topic in 996 Series (Carrera, Carrera 4, Carrera 4S, Targa)
No responses :( ... should I just bring it in to the local indie porsche mechanic ? -
CEL : P0410 + P1411
siddharth replied to siddharth's topic in 996 Series (Carrera, Carrera 4, Carrera 4S, Targa)
I switched the resonance valve changeover valve (above alternator) with the Electric change-over valve (#3 in the figure below). I now get the same codes i.e. - P0410 - P1411 - P1125 (new code) 1) The same codes as before means that my original #3 may not/may be faulty but also that :- a.) The "replacement" resonance valve also died when I swapped it to its new position with earlier #3. b.) The Air-change over valve (#2) is also dead c.) The non-return valve (#5) is also dead Question: To isolate the issue from the above possibilities (?), how can I test if air is blowing out from #5 or #2 ? Problem: I'm able to access #5/#2 (to feel air blow on my hand) only when I've ripped out the air-box, alternator, tension belt ... I'd hate to reassemble -> disassemble -> reassemble the whole setup between different tests to isolate which part is bad (between a,b,c above). If there is no other way, too bad for me, but if there is please enlighten ! Recollect that I've tested the air pump to be working ! 2) I'm thinking that the new code (P1125) might be because I've now put a faulty(unconfirmed since the old codes are still around) valve in the resonance valve's place. Question: Does the above sentence make sense to you guys ? Or is that a new thing altogether ? I'm trying to bulletize ideas to avoid confusion :( ... hope its working ! cheers guys - and thanks in advance ! Sid -
I checked the TSB's section ... they don't exist :( ! Anyone with copies of the following TSBs ? Please let me know ! 11/01 4470 Brake Booster Seal at Firewall, Changed Mar 8, 2002 11a/01 4470 Brake Booster Seal at Firewall, Corrected Page Aug 1, 2002 Thanks Sid
-
alternator removal
siddharth replied to boxstermao's topic in 996 Series (Carrera, Carrera 4, Carrera 4S, Targa)
Thanks guys !! It's done !! The alternator was out, I accessed the tubes behind it. I had to use a ton of WD40, a few cuts & bruises on my hands, a jammed finger, a ton of pushing, shoving, pulling, mallet hits, using screw drivers as levels etc to get the generator out. Nasty one - but done with no damage to the precious alternator (or around). At some point I felt the right side was probably welded in my case !! I'm going to write a little DIY soon - taken snaps just for that. -
alternator removal
siddharth replied to boxstermao's topic in 996 Series (Carrera, Carrera 4, Carrera 4S, Targa)
That's true and I believe the generator must be rotated clockwise "in-place". But my problem is that the left side seems to want to rotate but the right side seems jammed - not allowing the right side to clockwise - even with the screw and roller out. Is there some trick to loosen the left side ? I'm worried about damage to the generator housing if I force it too much/bang it with a hammer ... Thanks Sid -
alternator removal
siddharth replied to boxstermao's topic in 996 Series (Carrera, Carrera 4, Carrera 4S, Targa)
Sorry for bumping this up. I'm looking for some tips on getting the generator out. As explained above, I've taken out the holding screws, but theright side seems tighyly wedged. I tried loosening the threaded bushing on the right side (rear of the screw marked green) as explained in the manual, but it doesn't seem to loosen up. What did you guys do when trying to get it off ?? Thanks again, Sid -
alternator removal
siddharth replied to boxstermao's topic in 996 Series (Carrera, Carrera 4, Carrera 4S, Targa)
Ok guys, 1) Now I removed both the left as well as right screwes (red and green in the "borrowed" picture below). On the left side (red) the generator swings upwards but it doesn't seem to budge on the right side (green). How do I release the green side ? Unlike the photo, I've completely removed the roller as well as the "green" screw. The alternator/generator doesn't seem to wanna turn clockwise ... tips greatly appreciated ! Yes, I have the little pdf explaining the generator removal, but its quite terse. Tips are welcome ! cheers ! Sid PS: Direction for easy belt removal are in this post
-
alternator removal
siddharth replied to boxstermao's topic in 996 Series (Carrera, Carrera 4, Carrera 4S, Targa)
Understood and well taken Izzy. I'll try to take pictures with a write up if I can wrap this up quickly. Thanks Sid -
alternator removal
siddharth replied to boxstermao's topic in 996 Series (Carrera, Carrera 4, Carrera 4S, Targa)
I need this information too. Mine is a 1999 C2. Could we also have this information put in the DIY section ? I can put it there if need be once I have the goods. Thanks ! Sid -
CEL : P0410 + P1411
siddharth replied to siddharth's topic in 996 Series (Carrera, Carrera 4, Carrera 4S, Targa)
Ok ... man, that really clears a lot of confusion. I get what you're saying. I'm at work right now, so I can't access the car. Any TSB's / factory manual chapter/page where they have instructions for safely removing the alternator from a 1999 996 C2 6-speed manual ? UPDATE: The CEL turned OFF my drive back home ?! WTH ?? Is this normal / ok ? I'm thinking I'll still look into this once I get some direction on getting the alternator off. UPDATE2: The CEL came back on last evening. I guess I will have to dive deeper. Anyone with a guide on removing the alternator ?? -
CEL : P0410 + P1411
siddharth replied to siddharth's topic in 996 Series (Carrera, Carrera 4, Carrera 4S, Targa)
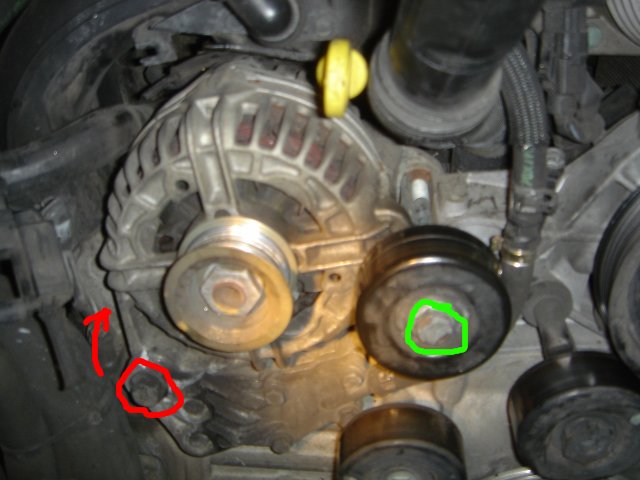
Well, a picture is worth a 1000 words, so I used my camera phone to get this ... So the part which I've circled in RED is the "right" part (i.e. #3 in your diagram or the electric air change over valve) ? This is the part which I tested and appears to have failed. I'm planning on replacing that part today if you guys can confirm that is the part labelled as #3 in Loren's diagram. Sorry for the confusion but I used to think the part circled in red was the alternator and Jim mentioned that the "other valve" was above the alternator ... that's why I got confused. Thanks Sid
-
CEL : P0410 + P1411
siddharth replied to siddharth's topic in 996 Series (Carrera, Carrera 4, Carrera 4S, Targa)
uh oh. If that's where the "other" value is located then I think I was testing the "other part". The part I tested was just above the alternator, on the left side of the engine bay, behind the plastic air ducts (airbox intake) So was I testing the "resonance valve changeover valve" instead of the electric change over valve ? How do I locate the electric changeover valve ? Loren's diagram shows the connection very clearly but doesn't indicate where in the engine compartment the part is at. Part #2 and #4 are deep inside the engine bay, so I cannot follow the pipes to locate the part in question (#2). **** ... I thought I had nailed this down ... -
CEL : P0410 + P1411
siddharth replied to siddharth's topic in 996 Series (Carrera, Carrera 4, Carrera 4S, Targa)
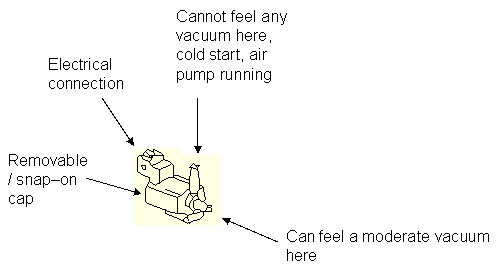
Loren and Jim - Thank you, both of you. Jim, you remind me of my engineering professor. Explaining the system, then the purpose of the system ! I really liked it. So I just checked the part #3, the Electric change-over valve. It was a good idea to hit the simplest target first since I think its broken ! I've attached an image of the part with some comments. A) So it appears like the part needs to be replaced, right ? PET shows the part as 996-605-123-01 but the actual part in my car is 996-605-123-00. The last digits are usually just revisions right ? So the **-01 should work just right as my **-00's replacement ? B.) Should I replace this part or is it servicable ? I think I should just replace it but out of curiosity I thought I'd ask you guys the next question ... that part has a removable cap at one end (see pic above) and I tried looking inside it. I couldn't make much out (thin and dark hole + didn't have a flash light around). I put a wire inside to 'feel' it, it feels spongy. Should I pry it open and get rid of the spongy stuff ? C) Till I replace the faulty electric change-over valve, is it safe to drive the car ? I believe that this is only for cleaner emissions, supplying additional air to the exhausts to completely burn out residual wastes in the catalytic convertor. So while I might have mother earth cross with me for the next few days, I should be ok otherwise, right ? I'll plant a few more plants this week to soothe my conscience ! Also, no other P-codes other than the two listed .... Finally, You guys rock ! I'm sure you've heard it before, but I really mean it. It's so satisfying to learn about and then fix your own car issues. Sincere thank you. cheers ! Sid
-
CEL : P0410 + P1411
siddharth replied to siddharth's topic in 996 Series (Carrera, Carrera 4, Carrera 4S, Targa)
Hi Loren, Well, I took a shot at that just some time back. Lost the battle :( A) I was able to verify that the pump works - apart from the sound it was blowing air with quite some force. I simply disconnected the hose and started the car cold and touched the pump outlet to feel the air. So the pump appears to be good. Then I tried to find the air change-over valve but found it deep in the engine bay. B.) How do I access the air change-over valve and how should I verify that it works ok ? C) Next I tried #3 in your diagram, the Electric change-over valve. I was lucky to notice this just to the left of the throttle body (and verified the part # on the part with the drawing and part # in PET). So reaching this part wasn't an issue. I wasn't sure how to test if the part works or not. This part has two small male connectors (for tubes) and a small dime sized removable cap on its body. I blew air into one end of the small connector but couldn't feel it come out from the other end. Also, do I do something with that removable cap ? Basically, how can I test if that part is ok or not ? This one is very accessible so I'd love to check this first - just in case ! D) Most of the other components seem quite inaccessible (I had removed the air pump, air box/filter, throttle body). Is there a chapter or TSB/document which describes how to service this system ? I really want to give this one more shot but feel I don't have the know-how :( ... yet ! help is greatly appreciated !! cheers ! Sid -
Harman Kardon Ipod intergration
siddharth replied to Hoppy's topic in 996 Series (Carrera, Carrera 4, Carrera 4S, Targa)
ipod, shmypod ... please give us some more pics of the photo in your signature ;) ! Any interesting story that real spoiler has to tell us :D !? anyway, nice ipod installation, now we're waiting for .. ahem ... some extraneous details ! cheers ! Sid -
CEL : P0410 + P1411
siddharth replied to siddharth's topic in 996 Series (Carrera, Carrera 4, Carrera 4S, Targa)
Hi Loren, Thanks for the response. I did check the air pump (its in the left side of the engine bay, just in front of the coolant tank, right ?) this morning and it seems to be up and running. It maked a mini-vacuum like sound and also hums/vibrates when touched (to confirm the source of the noise). Should I open the pump or see if something at the hose intake is blocked ? What next my faithful guru ! Thanks ! Sid -
Ok guys, now that this seems sorted out. In my case the problem was a faulty air change-over valve. Since I was at it I also changed the electric change-over valve. I thought I'd post an entire post-mortem on the whole incident. This way future reader can get all the info in one spot. In short, no horror stories but a lot learnt. A Huge thanks to Loren, 1999Porsche911 and tholyoak for helping me thru this. Guys, I'm going to be quoting you in the writeup below, hope you guys don't mind. If people want to read the original message and the whole thread, its below. Background ============= I got the P0410 ("Secondary Air Injection Malfunction") and P1411 ("Manufacturer Control Auxillary Emission Control") along with a Check Engine Light (CEL). What is means =============== During a cold start the catalytic convertors don't work very efficiently because they are cold. To compensate for this there is an air pump which adds air to the exhaust gases so the cat's behaviour can be somewhat compensated for. If you get this error that additional air isin't being mixed with the exhaust gases. No vehicular damage (CEL shouldn't be blinking!) but your emissions care higher during every cold start. What to do next (if you plan on fixing it yourself) ================================ 1) Observe the connection below 1 - Secondary air injection pump 2 - Air change-over valve 3 - Electric change-over valve 4 - Non-return valve 5 - To the cylinder heads 6 - Vacuum reservoir 7 - To the intake air system Basically 1 pumps the air thru 2->4->5 and reaches the exhaust gases. The computer controls when to start the blower and also when to connect the air link by controlling #3. When #3 is "ON", the vacuum line is connected to #2 which turns #2 "ON". Then #2 will connect the air blowing from one pipe thru to the other pipe. You should check every component in that chain starting from the easiest to check to the most difficult. 1. Check Air injection pump (#1, ~$430) ============================ - Do a cold start, the secondary air pump should run at least 30 sec (or more). - Sounds like a small vacuum cleaner/touch it to feelt it hum/pull off the larger hose to feel it blow air - If the pump "fails", here are the reasons : A.) "Check the electrical connections and fuse (40A fuse on the relay board next to the DME), and the relay (position 10 on the same board)." - Loren. B.) If the fuse seems ok its possible the pump is dead (you did test this with the car cold - cold start , right ?). TIP: Before buying a new pump ($$$) you could take it to a porsche dealership and have him quickly/freely verify this for you. If your air pump works, then you need to check #2 and #3. Both of these are deep inside the engine bay. You MUST remove the alternator before proceeding. Please read that thread on alternator removal - you will save several hours of frustration and sore fingers if you read before you work ! Once you remove the alternator (aka generator) you should see this ... its basically the same system shown in the black/white diagram above but this is how it looks in real life. NOTE-1 : Please note the existing connections on the tubes before you rip everything out. A camera/camera phone comes handy. NOTE-2: For the steps below, make sure you DON'T let the tubes/pipes slide away into the inaccessible areas of the engine bay - they are a HUGE pain to bring back if they slip away (unlikely-but you're warned!) NOTE-3: Finally, if you've opened the whole thing till here, I'd suggest you test both #2 and #3 to be sure you catch every failed part in that system. I simply replaced both with new parts even thought only #2 was bad in my case - #3 was just another $20 ! 2. Air change-over valve (~$80) ====================== - Note existing connections - Use nose pliers and slide the ring-clamps away from the valve onto the respective rubber hoses. - Take the little pipe off - Remove the valve piece out of the engine bay -> clean it with some alcohol wipe (don't drench it in any weird clearer/liquid - you're just sanitizing this for the next step). - Wash and clean your hands (Yes!) - Suck air out of the little pipe and quickly put your finger on it (to maintain its low pressure). If this is tough, ask your significant other (chances are they'll go "eeeeks"). - If you find you cannot maintain a low pressure on the little pipe (i.e. it feels 'open' when you suck out the air) then your valve is bad. - This low pressure should open the valve and you should be able to blow from one pipe (coming from the air blower) thru to the other. - If you cannot blow thru and are sure the low pressure is maintained, you again have a bad valve. 3. Check the Electric change-over valve (~$20) ================================= These are triggered off a 12 V supply. The valve has (+) and (-) markings for polarity of the electric connector. I quickly rigged up a 12 V supply by cascading a 9V battery with 2x 1.5 v batteries, some duct tape and some wiretags/wires. If your physics is rusty, this is the connection figure. (-A)---(-)[9 volts](+)--(-)[1.5volts](+)--(-)[1.5volts](+)--(B+) Between (-A) and (B+) you have 12 volts ! - make a note of existing connections - remove the valve from the engine bay - Connect the wires coming out from A and B to the electric change over valve's connection - If you've got a working valve, you will hear a click sound when the valve triggers. - Now, also blow from one pipe (after wiping it with an alcohol wipe!). - you will be able to blow thru/NOT blow thru as the valve opens/closes as you connect/disconnect the 12v supply wires. TIP: Check #2 also and if ONLY your electric valve(#3) is faulty, you could test the "FALSE HIT - valve from another system" valve similarly. If this "FALSE HIT..." valve works, you could swap it with #3, reassemble the car and drive ! The benefit ? The "FALSE HIT..." valve is accessible without _ANY_ disassembly and you can replace it some other day under 5 minutes when your replacement valve arrives. Also, no harm if the car is driven for the time being with that valve being faulty. Hope this helps ! Cheers! Sid -----<original post below> -------------------- Well, I got a CEL last night. So I stopped by Autozone and borrowed their OBD2 and got the following ... 1) P0410 : "Secondary Air Injection Malfunction" 2) P1411 : "Manufacturer Control. Auxillary Emission Control" My car = MY99 996 C2, North America. I saw some other posts on P0410 and today morning checked the air pump on the left side/driver side of the engine compartment near the tail lights. It seems to be working in that I could hear it buzz like a mini-vac. Not sure exactly part was making that sound, I also touched it to feel it vibrate (just like an electric motor should). I quickly glanced to see if the rubber hose on the pumps lower-back-right end was still connected and visually it looked ok. I'll have another closer look later (was behind schedule this morning!). Do you guys have any good pointers on what next I should do ? FYI, I have modified my stock exhausts with a regular bypass pipe, fabricated along the lines of the PSE version2. It sounds great and there hasn't been a change in the exhaust note since then till now/CEL coming on. I don't think its related but I thought I'd mention anything exhaust in this post. Thanks in advance guys ! Sid PS: I just got my customised plate .... SIDS 911 :D ... (actually SID5 911)
-
squeeking in dash by passenger
siddharth replied to djantlive's topic in 996 Series (Carrera, Carrera 4, Carrera 4S, Targa)
deleted. I already have the info. doh !