Welcome to RennTech.org Community, Guest
There are many great features available to you once you register at RennTech.org
You are free to view posts here, but you must log in to reply to existing posts, or to start your own new topic. Like most online communities, there are costs involved to maintain a site like this - so we encourage our members to subscribe or donate. All subscriptions and donations go to the costs operating and maintaining this site. We prefer that guests take part in our community and we offer a lot in return to those willing to join our corner of the Porsche world. This site is 99 percent member supported (less than 1 percent comes from advertising) - so please consider an annual subscription or donation to keep this site running.
Here are some of the features available - once you subscribe RennTech.org
- View Classified Ads
- DIY Tutorials
- Porsche TSB Listings (limited)
- VIN Decoder
- Special Offers
- Paint Codes
- Registry
- Videos System
- View Reviews
- and get rid of this welcome message
It takes just a few minutes to register, and it's quality Porsche information at a low cost.
Contributing Members also get these additional benefits:
(you become a Contributing Member by subscribing or donating money to the operation of this site)
- No ads - advertisements are removed
- Access the Contributors Only Forum
- Contributing Members Only Downloads
- Send attachments with PMs
- All image/file storage limits are substantially increased for all Contributing Members
- Option Codes Lookup
- VIN Option Lookups (limited)


pongobaz
-
Posts
27 -
Joined
-
Last visited
About pongobaz

Recent Profile Visitors


pongobaz's Achievements
Member (1/1)
2
Reputation
-
Porsche classic radio PCCM Plus
pongobaz replied to moosey's topic in 996 Series (Carrera, Carrera 4, Carrera 4S, Targa)
No you cannot. -
Porsche classic radio PCCM Plus
pongobaz replied to moosey's topic in 996 Series (Carrera, Carrera 4, Carrera 4S, Targa)
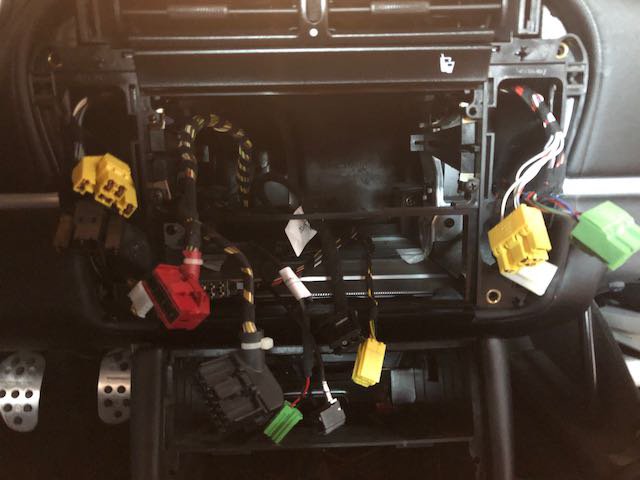
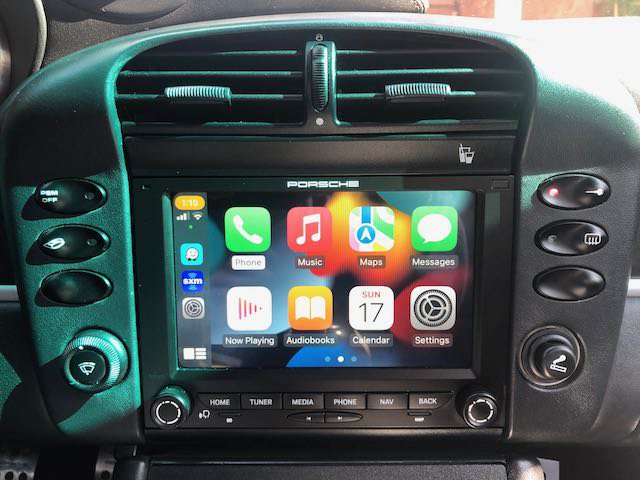
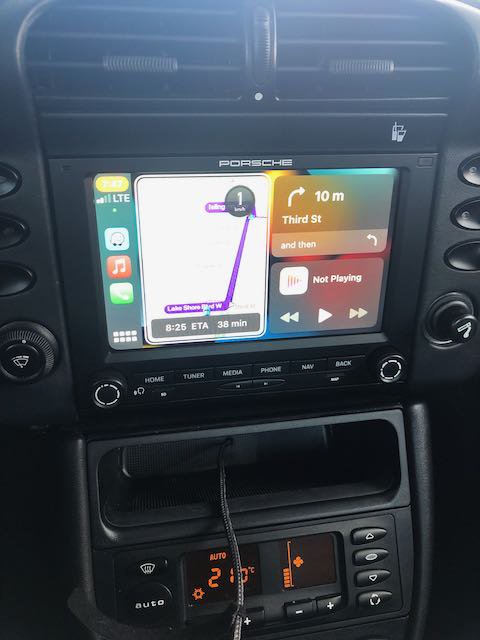
Super easy to install on a MOST equipped car. Sound is so much better than the CDR-23 and finally the BOSE system sounds proper. I'll have my Porsche Centre enable the turn by turn with PIWIS in the spring, even if I prefer using Waze than the Porsche maps. Hopefully they'll have figured out where to get the software update to get rid of the mildly annoying glitch with the trip odometer randomly resetting. Here's a complete list of parts needed to convert to double DIN and install the PCCM+: - PCCM+ (for 2003 996 C4S, Bose CDR-23 MOST) 996-642-591-00c -Navigation Maps 996-642-502-00C - Retaining bar 996-552-653-04 - Front support frame 996-552-231-1201C -Front A/C panel frame 996-552-339-0001C -Two screws PAF008933 -Upper storage tray 996 552 253 01 01C -SiriusXM SXV300 Connect Vehicle Tuner for Satellite Radio
-
Hood Releases Automatically
pongobaz replied to smokeman909's topic in 996 Series (Carrera, Carrera 4, Carrera 4S, Targa)
Vacuum around the switches. Sand and grit gets trapped in there and when it rolls around it causes the hood to pop. Ask me how I know :rolleyes:. Try that first before breaking out the tools. -
Got mine from Eric at bumperplugs.com
-
snow tires for carrera 4s
pongobaz replied to 01vdpsc's topic in 996 Series (Carrera, Carrera 4, Carrera 4S, Targa)
Nope, you're fine and your dealer did the right thing; the wider front make the rolling diameter of the fronts and rears the same since the winter rears have a slightly higher profile (35 vs 30). This keeps your PSM and ABS system happy. I've been using the same size tires for the past 3 winters with no problems. Just replaced the worn rear last month with the same thing once again and now I'm ready for it's fourth winter (if it ever snows). -
Clutch Pedal Squeaking sound
pongobaz replied to Nehmaiz's topic in 996 Series (Carrera, Carrera 4, Carrera 4S, Targa)
A quick spray of white lithium grease solved my squeaky pedal 3.5 years ago. -
Mine was starting to develop cracks at 80,000Kms. I changed it myself in about 30 mins...very easy and cheap DIY.
-
Just to follow up on my suggestion to vacuum first, here's a couple of old threads on rennlist where guys had the same problem (and solution): http://forums.rennlist.com/rennforums/996-...id-opening.html http://forums.rennlist.com/rennforums/996-...-and-a-fix.html
-
Mine was doing that last summer; it cropped up suddenly one day and was driving me nuts. I did a search and everything from faulty latch to misaligned hood came up. The solution: there was a little bit of grit under the release switch on the driver's door sill; that area gets a lot of dirt dragged on it as your feet rub past getting in and out of the car. Every time I would accelerate, some that sand/grit would roll under the switch just enough to activate it. I took my vacuum and cleaned the area and voila! Fixed. I spoke to a tech at the dealership later and he confirmed that this is pretty common. Try that first before you start spending money on parts & service.
-
For bugs, use Stoner's Bug and Tar remover. For all plastic lenses, I use Plexus cleaner with a microfibre towel to clean and polish. NEVER use paper towels; they scratch.
-
this is a very easy install to do. The instructions are pretty clear, but I thought that some of you would appreciate more photos of what's involved. The kit comes with all the hardware and a few spare mounting bolts and nuts. You must provide your own extinguisher (which should come with it's own mounting plate). I really like this kit which like the Brey Kraus unit, mounts to the seat and not to the floor. The unit is compact enough that it doesn't interfere with leg room and it moves along with the seat as well. I prefer to leave it permanently in the car as an added safety feature. 1. get all you parts organized (fire extinguisher is still mounted on old bracket in the photo). You'll need: an allen key set, a 9 mm open wrench and small socket, a 10mm and 11mm wrench, a flat blade screw driver, and a Torx socket set (for seat bolts). 2.move the seat back as far as possible and remove floor mat. 3.remove seat rail covers by slightly lifting tabs with a flat blade screwdriver 4. unbolt the seat rails at all four corners using an E12 Torx socket. front: move the seat forward and remove the back bolts: 5. Tilt seat back forward and then lean the whole seat assembly back towards the rear seat. 6. attach the center brace using the supplied shoulder screw and 1/4 20 nut. Don't fully tighten anything yet. 7. Install the bracket to the brace. Again don't tighten anything down until everything line up. 8. Attach the fire extinguisher mounting bracket using the 6 supplied bolts and nuts. And tighten everything up. 9. Bolt the seat back down and attach your extinguisher. You're done and ready for your next trackday!
-
Rennline Fire Extinguisher seat mount this is a very easy install to do. The instructions are pretty clear, but I thought that some of you would appreciate more photos of what's involved. The kit comes with all the hardware and a few spare mounting bolts and nuts. You must provide your own extinguisher (which should come with it's own mounting plate). I really like this kit which like the Brey Kraus unit, mounts to the seat and not to the floor. The unit is compact enough that it doesn't interfere with leg room and it moves alo Author pongobaz Category Carrera (996) - Accessories Submitted 04/24/2008 05:30 AM
-
Looks cool sitting on the bench maybe, but you can't even see it once it's installed. Instead spend the $1000 on some interior cosmetic upgrades (shifter, ebrake, etc...) that you can see and enjoy.
-
What brand of gas do you use?
pongobaz replied to jsoto's topic in 996 Series (Carrera, Carrera 4, Carrera 4S, Targa)
Also in Toronto. I use Shell 91 instead of the Sunoco 94. Sunoco achieves the 94 rating by adding up to 10% ethanol. When I used it in the past, my tailpipes had lots of sooty buildup. Shell does not put any ethanol in their 91 and its recognized as a Top Tier gasoline.