Welcome to RennTech.org Community, Guest
There are many great features available to you once you register at RennTech.org
You are free to view posts here, but you must log in to reply to existing posts, or to start your own new topic. Like most online communities, there are costs involved to maintain a site like this - so we encourage our members to subscribe or donate. All subscriptions and donations go to the costs operating and maintaining this site. We prefer that guests take part in our community and we offer a lot in return to those willing to join our corner of the Porsche world. This site is 99 percent member supported (less than 1 percent comes from advertising) - so please consider an annual subscription or donation to keep this site running.
Here are some of the features available - once you subscribe RennTech.org
- View Classified Ads
- DIY Tutorials
- Porsche TSB Listings (limited)
- VIN Decoder
- Special Offers
- Paint Codes
- Registry
- Videos System
- View Reviews
- and get rid of this welcome message
It takes just a few minutes to register, and it's quality Porsche information at a low cost.
Contributing Members also get these additional benefits:
(you become a Contributing Member by subscribing or donating money to the operation of this site)
- No ads - advertisements are removed
- Access the Contributors Only Forum
- Contributing Members Only Downloads
- Send attachments with PMs
- All image/file storage limits are substantially increased for all Contributing Members
- Option Codes Lookup
- VIN Option Lookups (limited)


5thlilpiggy
-
Posts
54 -
Joined
-
Last visited
Content Type
Profiles
Events
Forums
External Paint Colors
Downloads
Tutorials
Links Directory
Collections
Classifieds
Store
Everything posted by 5thlilpiggy
-
So, when I detached the valve, this happened... I think that'll cause a slight vacuum leak :thumbup: I had to get to a job interview in 2 hours, so I needed a pronto Macguyver fix. Luckily, Super33+ tape seemed to do the job: Cleared the codes (had popped for both banks this time...P2187 and P2189) and took a short drive with no CEL recurrence. LiveData shows STFT = 25 on both banks at idle after the tape job. Will report back after more drive time.
-
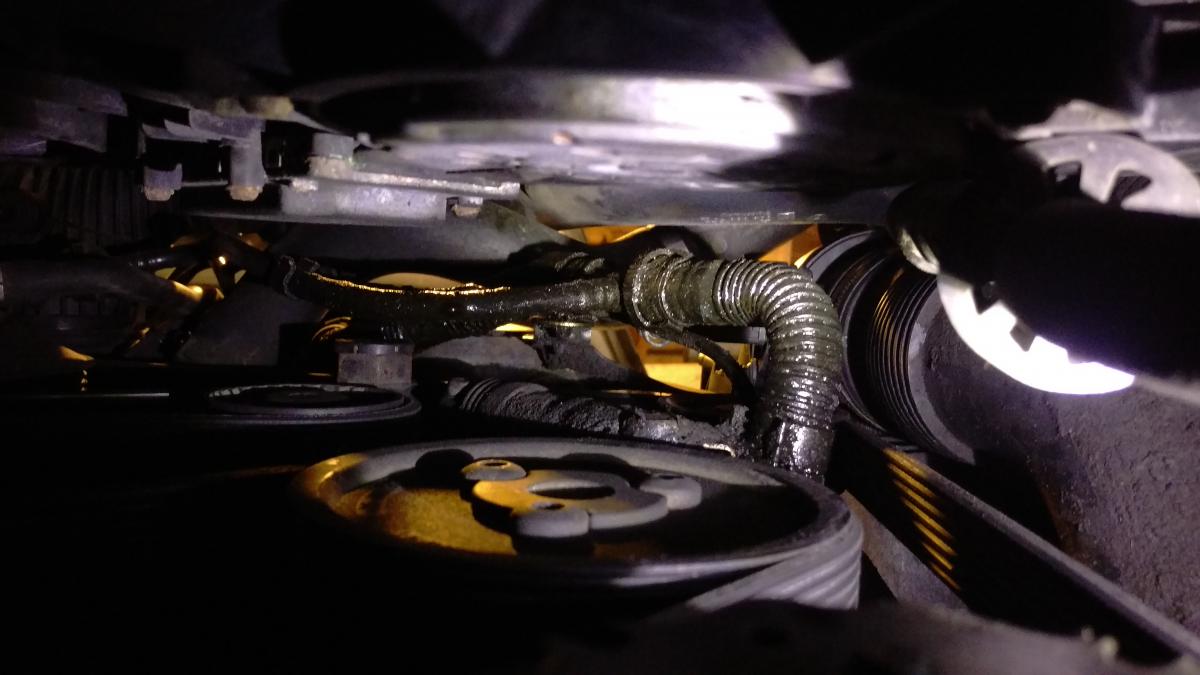
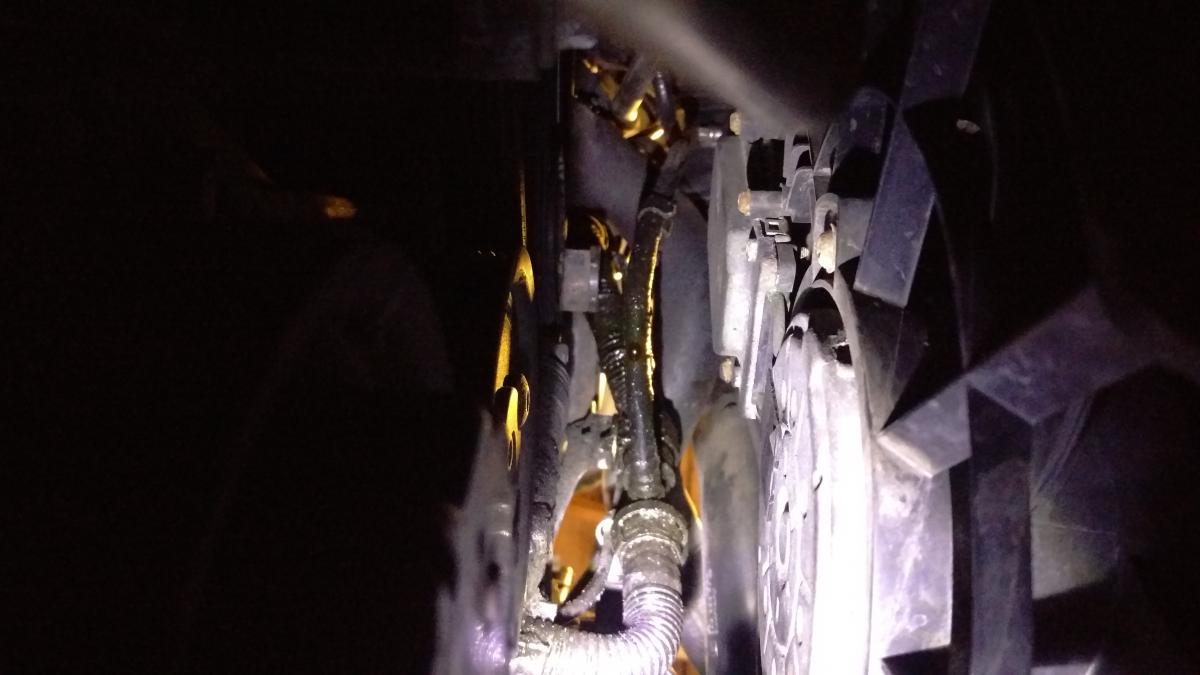
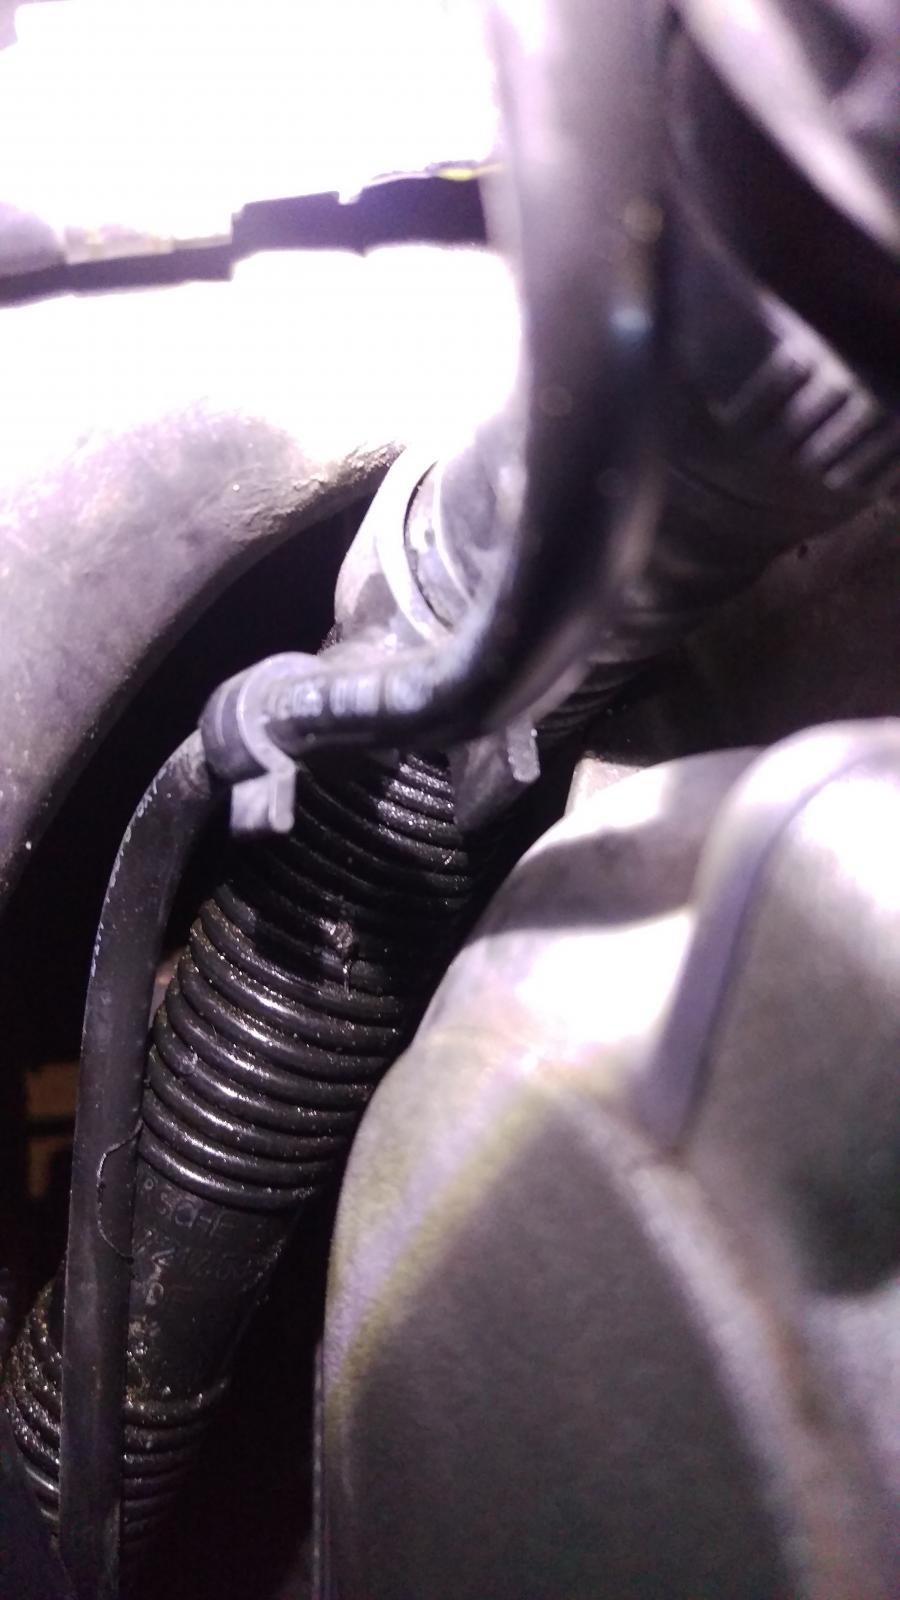
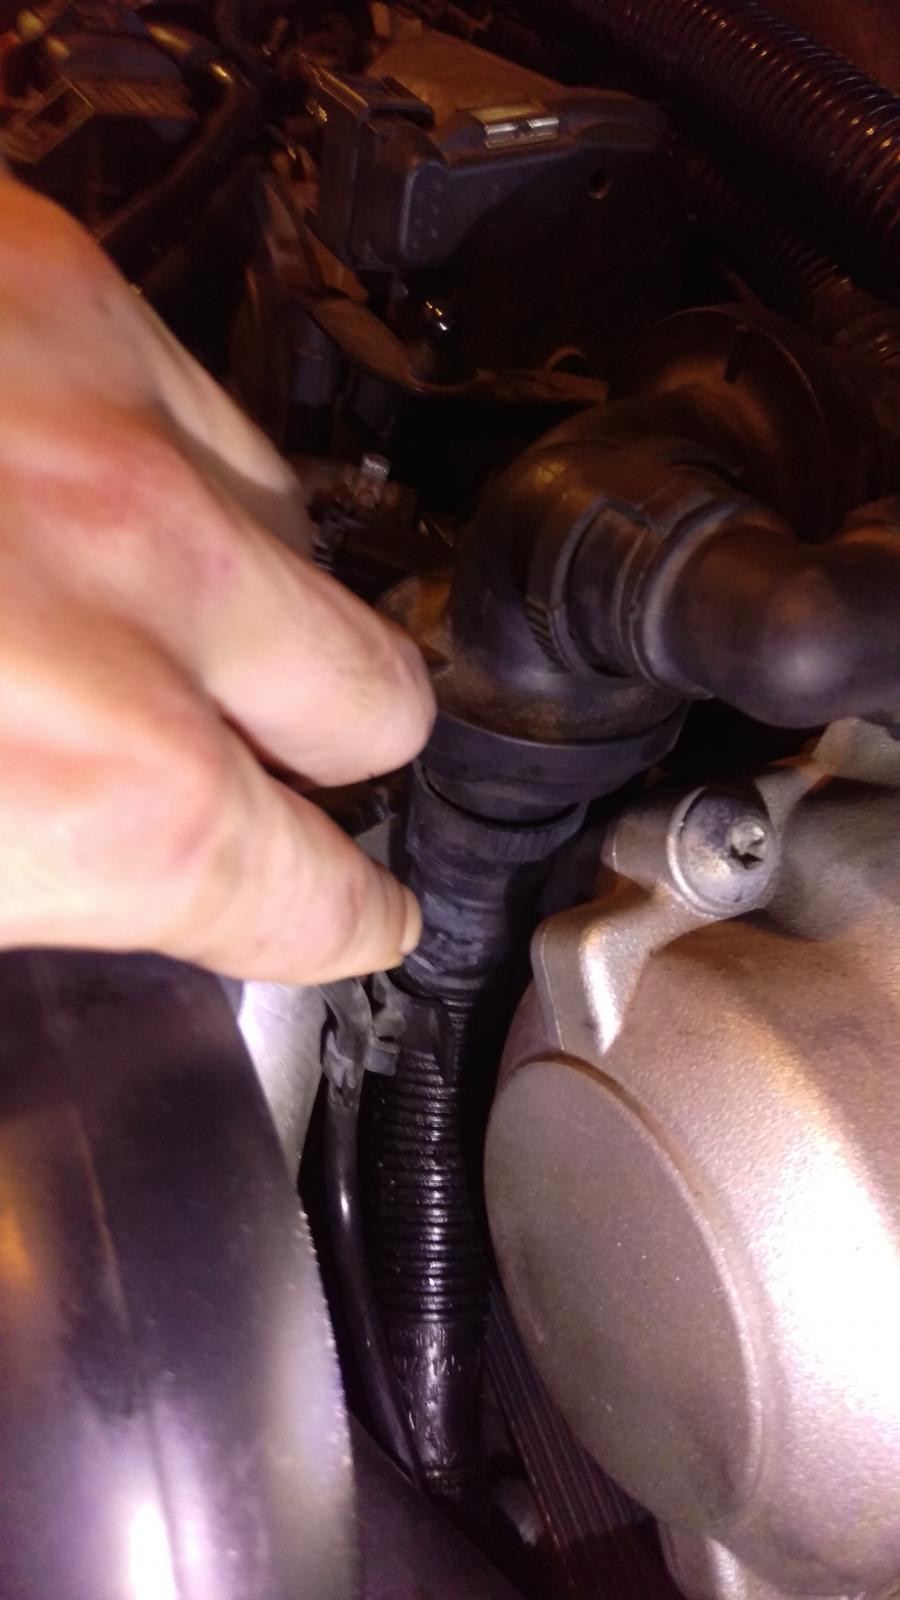
Apologies as I have not checked the fuel trims yet. I did however notice something when I was changing the oil today...pics attached. The first two show the two PCV hoses covered with oil from underneath. Notice those are essentially the only things with oil on them. The last two attempt to show what looks to be the source of the oil with the last pic being my finger trying to point it out. If you can tell, it looks like the section above the clip that holds the small hose is dry while below it is full of residue. Am I correct that if there is a hole in the PCV hose that oil will leak out?

-
Ok, there was definitely no crud in there, just light deposits/staining. Fuel pressure on both pumps was ~60 psi. Though P2189 is a drivers side code (I think?) I tested on the much more accessible passenger side port. It looked like the two sides of the rail were just forked off the same stream, so I assume this was fine? I have not cleaned the MAF yet...getting it out of the lower tube is such a PITA, and you didnt think that was the culprit anyway, so Im waiting on that attempt. Can I test for vaccum leaks by spraying electrical cleaner (since it is plastic safe) on all the PCV/evap hoses and looking for jumps in idle? Yes, you can use cleaner for this, but be careful as it is flammable. I would also check the voltages on the O2 sensors, just be sure the sensor is functioning properly. Ok, I doused the PCV valve and every hose around the front/top of the engine with electrical cleaner twice. The first time it was just me listening to the engine bay. I didnt notice anything. The second time I had my wife watching the tach. She said it didnt move the entire time...just sits at a little under 600. I will check 02 voltages tomorrow.
-
Ok, there was definitely no crud in there, just light deposits/staining. Fuel pressure on both pumps was ~60 psi. Though P2189 is a drivers side code (I think?) I tested on the much more accessible passenger side port. It looked like the two sides of the rail were just forked off the same stream, so I assume this was fine? I have not cleaned the MAF yet...getting it out of the lower tube is such a PITA, and you didnt think that was the culprit anyway, so Im waiting on that attempt. Can I test for vaccum leaks by spraying electrical cleaner (since it is plastic safe) on all the PCV/evap hoses and looking for jumps in idle?
-
Sounds good. Ill check/clean those and report back. R.e. the PCV valve. If it isnt hissing and the diaphragm did not have any tears that is not the problem right?
-
Go back to my #2 post above and go down the list, all the possibles are there. Sorry, that was pretty obvious I suppose :) From what I can find, fuel pressure should be 4 BAR (58 psi)? Incorrect main charge signal = MAF? Should I give it and its connector a cleaning?
-
Light is back...what should I check next?
-
Was hard to find an OEM gasket in stock, so I just got the whole oil cap. Cleared the code (P2189 again) yesterday. Will see what happens.
-
Agreed. I just did it in this case cause the crack is only stressed during removal or install and not during "use". Also, the replacement cap is like $130. I used JBWeld Plastic Bonder FWIW . Ill get a new oil cap gasket, clear the code, and report back.
-
The diaphragm seems fine, but I cracked the PCV cover along the vertical nub when I was removing it. Im gonna fix it with some high temp epoxy unless thats a bad idea?
-
Possibly, reset the code and see if it returns. Light came back yesterday. Assuming it is the same code, I will check the PCV diaphragm.
-
Would not tightening the clamp enough just after the MAF cause this? Since the MAF body is plastic, I didnt want to go too tight, but when I went in today it was barely a half turn from being pretty loose.
-
Thanks for the reply! The PCV valve is the hockey-puck-like thing on the front of the drivers valve cover? Just FYI, the EVAP purge valve shouldnt be it as I replaced it not long ago to cure hard starts after gassing up.
-
Hi guys About a month ago I changed the serpentine belt on our 2004 CTT. A couple of days afterwards, I got codes P0234 and P2189. I went back in, and realized I didnt connect the 2 evap hoses (shown in image) tight enough, and they had popped loose. After I reconnected properly, the CEL went away after a couple of days. Last week (about 2 weeks later) the same 2 codes came back. I cleared them, and CEL light came on again a day later. Because there was no noticeable loss in performance (no weird idle and still got over 0,6 bar when punching it) we kept driving it until I had a chance to delve in more. Today I went in. The 2 hoses are still firmly connected. Scanning now revealed only the P2189. Is there something else I could have missed on reassembly or is this unrelated entirely? Thanks!
-
Ive had Nitto 420s for about 8k miles. No issues so far. Of course, my wife DDs the piggy and doesnt push it too hard. Unless you drive like a maniac, any XL load rating with proper PSI is probably fine.
-
I used Amsoil ATF.
-
I had some rough shifting as well as an occasional "bang" going from 5-6 when letting off the gas after hard acceleration. I did a filter and fluid change (used Amsoil syn ATF...NAPA had it in a 10 quart jug, so figured what the heck). R.e the fill procedure... I too was worried about getting this just right. - First try, I was only able to get 6-7 liters in. I cycled the gears, tried the "fill in neutral" trick, and still could not get more in. I was using an IR thermometer gun, and also realized different parts of the pan can vary by 10*F. For reference, the highest part of the pan (towards the front of the car) has the hottest temp, so I would use that. At this time the hottest point was at 106*F, so I buttoned it up and let it cool. - Next day, second try, I made sure to temp the right part or the pan. Turned car on, shifted through all gears a couple times (including the manual 1-2), put it in neutral, and tried to put more in starting with the pan a little over 90*. Start pumping and a few sec later (temp ~95*) the fluid comes pouring out again. Frustrated, I put the fill plug back in and decided to take it for a short drive around the neighborhood. Everything seemed fine and smooth, so I went on a little 2-exit interstate jaunt. Shifting was much improved in all situations. I was planning on a 3rd attempt at a top-off, but the tranny performs so much better that Im not sure if it is worthwhile. Long story short, dont sweat it too much :D
-
I just did it this weekend. The starter CAN come out with the 3 pipes in place. There is one caveat however. If you have the metal pipes installed, the clamps on the large lower hose must be in proper position. You need to make sure the one towards the front of the engine has the screw section above, below, or on the drivers side. If it is on the passenger side, it will interfere with the rotation required to finagle the starter out. The good news is, a small box wrench can get in there to loosen and adjust the clamp without taking anything else apart. If this doesnt make sense, I can post a sh!tty MS paint explanation :thumbup:
-
Just wanted to chime in here... Ive had a CEL (P0455 IIRC) on for a couple months. Getting a new gas cap didnt help. I had the intake off this weekend to replace the starter. Before buttoning everything back up, I sprayed a bunch of electrical cleaner into the end of the valve (Pic #11 in Ciakas link). Put a paper towel underneath and spray till it overflows out. Check engine has been gone for 2 days now. Essentially, this cleans the gook out of the valve which was preventing it from opening and closing properly. Ive previously done this "repair" on my old rover D2, and that has been EVAP code free for about 4 months.
-
Here are the hoses: http://www.ecstuning.com/Porsche-2004-Cayenne-955-Turbo-Sport_Utility-V8_4.5L/Braking/Master_Cylinder/Brake_Booster/ This one has the pressure sensor: http://www.ecstuning.com/Porsche-2004-Cayenne-955-Turbo-Sport_Utility-V8_4.5L/Braking/Master_Cylinder/Brake_Booster/ES1446344/
-
http://www.suncoastparts.com/product/955PCM04490361.html?Category_Code=955tt_Elec http://www.suncoastparts.com/product/SKU955PCM30UPD.html?Category_Code=9552tt_elecnew
-
Yeah, sorry I didnt see the part about the V6.
-
Just did mine this weekend. Im not the strongest guy around and was still able to do it by hand :king:
-
Craigslist is a good place to check as well.
-
I havent done it, but I have to do the "2 part start" deal, so I have researched it a little...intake is 7.5 then 11 ftlbs http://www.pelicanparts.com//techarticles/Porsche-Cayenne/28-ENGINE-Intake_Manifold_Removal/28-ENGINE-Intake_Manifold_Removal.htm http://www.pelicanparts.com//techarticles/Porsche-Cayenne/31-ENGINE-Starter_Replacement/31-ENGINE-Starter_Replacement.htm