Welcome to RennTech.org Community, Guest
There are many great features available to you once you register at RennTech.org
You are free to view posts here, but you must log in to reply to existing posts, or to start your own new topic. Like most online communities, there are costs involved to maintain a site like this - so we encourage our members to donate. All donations go to the costs operating and maintaining this site. We prefer that guests take part in our community and we offer a lot in return to those willing to join our corner of the Porsche world. This site is 99 percent member supported (less than 1 percent comes from advertising) - so please consider an annual donation to keep this site running.
Here are some of the features available - once you register at RennTech.org
- View Classified Ads
- DIY Tutorials
- Porsche TSB Listings (limited)
- VIN Decoder
- Special Offers
-
OBD II P-Codes - Paint Codes
- Registry
- Videos System
- View Reviews
- and get rid of this welcome message
It takes just a few minutes to register, and it's FREE
Contributing Members also get these additional benefits:
(you become a Contributing Member by donating money to the operation of this site)
- No ads - advertisements are removed
- Access the Contributors Only Forum
- Contributing Members Only Downloads
- Send attachments with PMs
- All image/file storage limits are substantially increased for all Contributing Members
- Option Codes Lookup
- VIN Option Lookups (limited)
All Activity
- Today
-
Coolant hoses and radiator
crwarren11 replied to crwarren11's topic in 95B (Macan) - DIY Tutorials - Discussion
Ugh….but thank you. - Yesterday
-
 Philip Joy joined the community
 -
Just found your other post @Loren, and answered my own question : Can you give me a code for my PCM? These units are manufactured jointly by Siemens and Becker, and the only place where you can get the codes required is from the dealer/OPC. The PCM’s require two codes, the ICS/Siemens code, and a Becker code. The ICS is the first code requested. Sorry, the only place you can get a PCM code is from a dealer/OPC. Thank you anyway! This place is amazing to see!!
-
Hello hello, I just purchased a 911 Millennium edition with PCM nav and radio. Any chance you can help out on how to get the serial code displayed? Or how I would go about getting the code for that system? Thank you and any help is much appreciated. Angelo
-

08 Boxster P00010 code.
vza replied to vza's topic in 987-1 Boxster Convertible Top Issues and Solutions
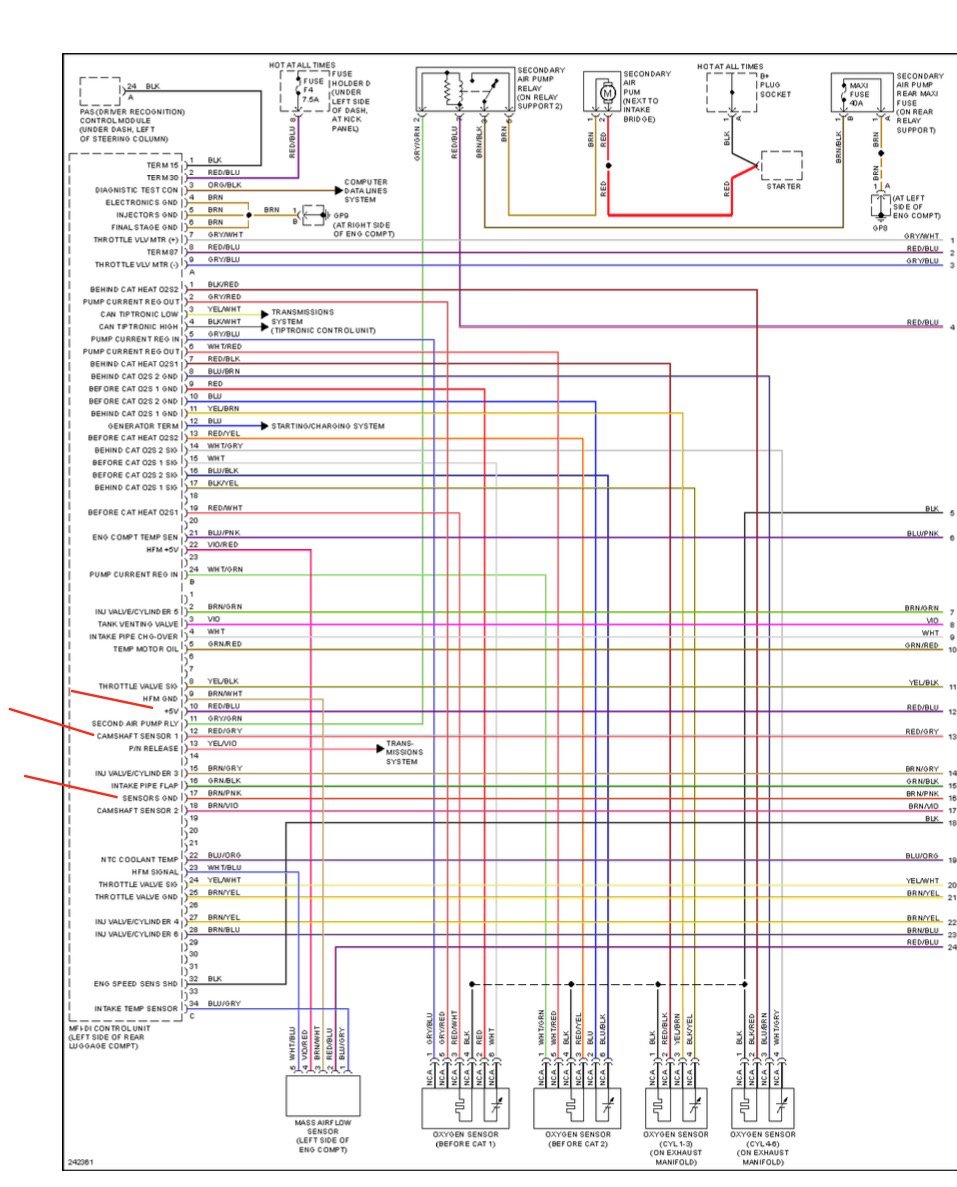
OK....Silly question...the diagram circled and posted shows from L to R....Red/Blu Red/Gry Brwn/Pink If I'm looking at my connecter plugged in from L to R its opposite.. I have Brwn/Pink Red/Gry Red/Blu. It is a used a car and evidence of peeps being in there already....I think.
-
08 Boxster P00010 code.
vza replied to vza's topic in 987-1 Boxster Convertible Top Issues and Solutions
My diagrams different unless I'm not understanding correctly. Ill post the one im looking at.Im troubleshooting wires #10 #12 and #17 from DME. I am seeing a fluctuating 5-8v on pin 12 with engine running. I see 12v on same pin with only key energized. Im backprobing + wire on multimeter to whatever pin on sensor plug im testing at the time(pin 10 or 12) and (-) going to common ground on engine block. I might add I saw 12v STILL on pin10 red/blue with the plug unplugged at the DME with key energized ..this led me to believe the power was coming from a different source other than DME(It was unplugged) Maybe I'm on a completely incorrect diagram?
-

08 Boxster P00010 code.
JFP in PA replied to vza's topic in 987-1 Boxster Convertible Top Issues and Solutions
Pin 53 is power, common for most sensors Pin 21 is the signal (incoming to the DME) Pin 34 is ground, common tor most sensors It concerns me that you are not seeing a 5 volt reference signal between pins 1 and 3 when back probing the sensor connector. -
08 Boxster P00010 code.
vza replied to vza's topic in 987-1 Boxster Convertible Top Issues and Solutions
Im back!! So I figured let me go backwards one step at a time. I left the red/gry splice in and returned the red/blu back using original loom wire. Car started and ran no problem with exception of the same CEL p0010 triggered almost immediately. Cleared it and now getting pending p0010. Tested voltage: Ignition on. Red/blu 12v Red/gry 12v Engine Running. Red/blu 12v Red/gry 5-8v(fluctuating) Totally boggled,does this mean red/gry is the signal wire being the voltage is changed when running( from 12v to 5v)? Diagram shows red/blu at 5v. Brn/pink is ground. What next ? -
 jerome deve joined the community
 -
Coolant hoses and radiator
JFP in PA replied to crwarren11's topic in 95B (Macan) - DIY Tutorials - Discussion
Questionable. Lot of people have tried various "fixes" for similar damage, only to find their efforts resulted in only a temporary repair that ultimately failed again. -
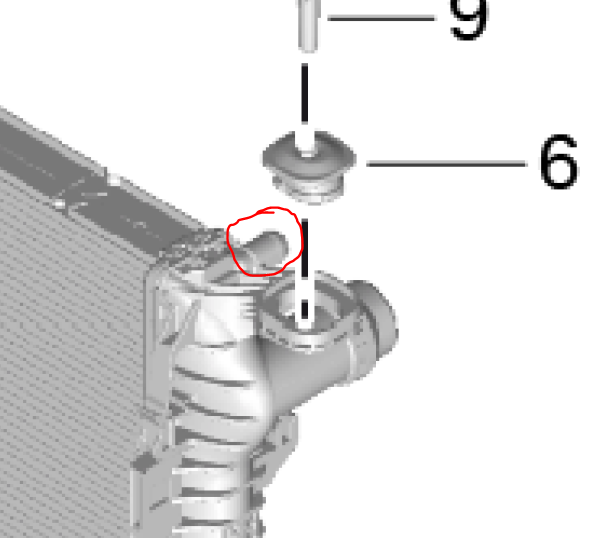
Hi all, 2015 Turbo, 75k mi. I have been battling some coolant leaks and replaced the following components (#8, #5, #9, and #11 with the Radhaus solution): While replacing #8, the connector broke off and I had to dig it off of the radiator nozzle. In doing so I think I have scored or cut it slightly. This is the nozzle from another diagram: After reconnecting everything, refilling, and running the vehicle up to operating temperature, there is a pretty steady flow of coolant leaking from hose #8 at the radiator nozzle which is what leads me to believe that the nozzle is damaged. All other fittings and hoses are not leaking any longer. So...is there anything I can do to "repair" the nozzle (i.e. plastic weld, RTV silicone, PTFE tape, etc.) that does not involve replacing the entire radiator? This is a very difficult area to access, so getting fingers and tools in is difficult but doable to a certain degree. Any guidance is greatly appreciated!
-
 Ohmygawd joined the community
 -
 GT1DNA joined the community
 -
 MercedesAMG joined the community
 -
 Tigran S joined the community
 -
 Ed Morales joined the community
 -
 Onlooker joined the community
 - Last week
-
 Scot99 joined the community
 -
 Patrick Payne joined the community
 -
 I hope it's OK to ask this in this forum. I also searched and couldn't find an answer to this or even someone having a similar issue. I recently changed the lithium battery on my 2019 Cayenne for an AGM one and I now need to register it so that I can get rid of the battery warning every time I start the car as well as the start/stop warning every time I stop while driving. I first tried with my Foxwell NT530 and, even though I was able to get rid of all other codes, I couldn't get rid of the battery-related ones. The tool even has a screen where I can set the new parameters: Capacity: 90 mA, instead of the original 60 mA Technology: AGM, instead of the original Lithium Manufacturer: VAR (code for Varta batteries, even though the new battery is an EverStart Platinum from Walmart), instead of the original LG6 (for LG Chem) Serial Number: 1234567890, instead of the original 10-char number However, once I enter them and hit Save, I get an error saying something like "error writing codes" without more details. My next attempt was PIWIS III on a laptop. I am using a virtual machine image with version 41.500 of the tool. I am able to detect and connect to the car just fine, even clear faults, but again, none of the screens that I found that let me change these 4 parameters (through Diagnostics > Gateway and several other menus that read "Battery" or "Batterie" in German) and they all give me a similar error. I can provide screenshots of that helps in case someone is able to assist me. Am I out of luck trying to do this on my own, meaning I will need to take it into a local shop? Which, by the way, I also attempted and two shops I talked to swore that they had a PIWIS and had me come in only because they were sure their Autel would do this, only to give up and give me my the car back, defeated. Thank you in advance! UPDATE: Everything I've read and experienced seems to indicate this needs hardware for the 9YA and software isn't enough, something like this conversion kit. In fact, I called a local shop that's supposed to be one of the best Porsche shops around and they confirmed this. Not this specific kit (I didn't ask), just that you need "a cable." UPDATE # 2: I just found this rennlist post searching by the website in link above. More proof: https://rennlist.com/forums/cayenne-...on-to-agm.html
 -
 Firedrake changed their profile photo
 -
 Update on door harness fix 2025 Hi Guys, I had to deal with this issue again in 2025 on both doors of my 1997 and got everything fixed using these pins male / female from Amazon . The male pin doesn’t go in far enough because of the shoulder diameter, so you have to drill the hole a little bigger to clear the shoulder. Good luck
-
Thanks very much, Loren ! The code worked like a charm.
-
I'd start with that new plenum installation.
-
 Thanks, there are no codes and it seems to be running fine, I just never noticed it before this past weekend. I had the car about a year and have driven it ~4k miles. I had wondered if maybe it was normal. I installed the IDP plenum about 2k miles ago.
 -
 Jim Viner changed their profile photo
 -
Try 5381
-
-0001-0001.thumb.png.17f5bb25bf8ec261a17c21e6321c8492.png) You can check it with a scanner for a vacuum leak - but what you might be hearing is the intake suction.
You can check it with a scanner for a vacuum leak - but what you might be hearing is the intake suction. -
Good evening, I just purchased a 2001 Boxster 986S, and the Becker CDR 220 needs the code to activate. Type: 4462 S/N: Y5046052 Any help is greatly appreciated. EA
-
The video is my 99 996 C2 Cab w/97k miles earlier today. Recently I noticed this “gasping” noise when I accelerate quickly. If I accelerate even a little slower no gasp. I’m guessing an intake or vacuum leak but cannot isolate. Overall it’s running well. Any ideas? IMG_9539.mov
-
 I purchased an 04 Cayenne with the ignition lock issue. I have pulled the entire interior out and found numerous corroded wires, to which i have repaired. long story short. I have used my Lunch x431 and a couple of other scanners and I get power to the DTC but no data. With ohm meter I get no signal from pins 6 and 14. pin 4 and 5 have good ground and 16 has good voltage . I have the tools to program new key, kessy, ecm etc. but with no data input I am dead in the water. HELP/ can I jump 6 and 14 to somewhere and get can high and low?
 -
08 Boxster P00010 code.
JFP in PA replied to vza's topic in 987-1 Boxster Convertible Top Issues and Solutions
Disconnecting the battery will clear codes and reset some modules to their default profiles (Disconnecting the battery will still erase the "adaptive" or "learned" driving style settings, but it will not fully reset the DME to factory defaults.) but does not reboot anything in the DME, the system is purposely designed that way. -
Try 4589
-
08 Boxster P00010 code.
vza replied to vza's topic in 987-1 Boxster Convertible Top Issues and Solutions
Any truth in disconnecting batt for an hr to hard boot the DME or is that an urban myth. -
08 Boxster P00010 code.
JFP in PA replied to vza's topic in 987-1 Boxster Convertible Top Issues and Solutions
Then I would say put the car back to the way it was, clear all the codes and see what happens. This is strange......... -
08 Boxster P00010 code.
vza replied to vza's topic in 987-1 Boxster Convertible Top Issues and Solutions
Hey John...thanks for getting back. Im sure about tracing wires to the harness pins 10 and 12 for the wires i spliced. Correct volages at cam sensor plug. I don't know if they pass thru another device ...from the looks of the diagram it dosent look like they do. Wires are still there i can revert if I have to. -
08 Boxster P00010 code.
JFP in PA replied to vza's topic in 987-1 Boxster Convertible Top Issues and Solutions
Sorry for the delay getting back to you, took a couple days off over the holiday. From the sound of it, you missed somewhere when you tried replacing the cam sensor wiring with jumpers. Are you absolutely sure you traced the correct harness wires for cam sensor #1? Did you check to see if the wires from the sensor pass thru something else (another device) on the way to the DME? Using the axiom to always go back to where you were before the problem, can you go back to the original wires or were they cut away?