Welcome to RennTech.org Community, Guest
There are many great features available to you once you register at RennTech.org
You are free to view posts here, but you must log in to reply to existing posts, or to start your own new topic. Like most online communities, there are costs involved to maintain a site like this - so we encourage our members to donate. All donations go to the costs operating and maintaining this site. We prefer that guests take part in our community and we offer a lot in return to those willing to join our corner of the Porsche world. This site is 99 percent member supported (less than 1 percent comes from advertising) - so please consider an annual donation to keep this site running.
Here are some of the features available - once you register at RennTech.org
- View Classified Ads
- DIY Tutorials
- Porsche TSB Listings (limited)
- VIN Decoder
- Special Offers
-
OBD II P-Codes - Paint Codes
- Registry
- Videos System
- View Reviews
- and get rid of this welcome message
It takes just a few minutes to register, and it's FREE
Contributing Members also get these additional benefits:
(you become a Contributing Member by donating money to the operation of this site)
- No ads - advertisements are removed
- Access the Contributors Only Forum
- Contributing Members Only Downloads
- Send attachments with PMs
- All image/file storage limits are substantially increased for all Contributing Members
- Option Codes Lookup
- VIN Option Lookups (limited)
Leaderboard

Popular Content
Showing content with the highest reputation on 09/26/2021 in all areas
-
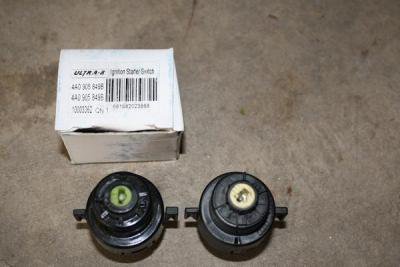 First off - thanks to everyone who has been down this road before me for providing tips and suggestions and troubleshooting regarding this common problem. I have been dealing with a key that would stay all the way to the right upon starting meaning that the A/C, heated seats and some other items would not function. My solution had been to simply start the car and then just move the key back one notch to the left and everything worked fine. So if others have that issue, my original solution will work but obviously the problem remains and at some point you may end up stranded if the ignition switch completely fails. I stumbled upon some of the other threads and found that this needed fixing and I opted to replace just the switch as opposed to upgrading to the new complete unit that Porsche has moved to. This procedure is not new to the board, but I thought a step by step with pictures may be useful to those looking for an inexpensive solution. It cost me $12.11 including tax. If your ignition mechanism has been changed to the newer revised unit the ignition switch is a different part number but I assume the steps would be the same. The part for just the switch - no longer available through Porsche since they are only selling the entire $150 unit - is 4A0905849B. The switch alone is available mail order through Pelican for $10, Autohausaz.com was +/- $8.75, Ebay has them all over the map from $15-30. All of these options will work but require shipping charges and delivery time. I was hoping for a local option since I had the time to do it today. Here is what I found in Houston - a local Audi dealer had one in stock for $35, while VW had to order it (for more than $35 believe it or not). Doing a search online at parts stores using my Porsche got me nowhere so I opted to use an older Audi - in my case a 1997 Audi A8 since the part is the same. I found Autozone had one for >$40, OReilly came up blank but I did not call to check, a specialty imports place had one for $27 and then I found it in stock at NAPA for $11.19 + tax. Since NAPA seems to have stores all over the place I suggest looking there first if you don't feel like mail order. The complete part number at NAPA was ATM 4A0905849B using the 1997 Audi A8 as the vehicle. Here is a picture of the NAPA part (left) alongside the original part which I removed from my 996 cab - note the AUDI rings on the old part. Equipment needed: Small flat screwdriver - eyeglass or electronics size Philips screwdriver Torx driver 10mm wrench rubber pry tool Cold beer to celebrate 1) Disconnect the battery - I just undid the negative with a 10mm wrench 2) OPTIONAL but makes the job easier than the shop manual in my opinion. Remove the side air vent by pulling the headlight switch towards you and inserting a small blade screwdriver up from the six o'clock position. You should notice a spring like resistance which will release the knob and allow it to pull towards you. Here is a picture of the back of the knob showing the release mechanism Once the knob is off remove the three torx screws – one in the headlight control recess and two on the side After the screws are out take a rubber pry tool (or be careful with a flat screwdriver) and remove the vent housing - it will pull towards you with a little effort but not much. Once off I pulled it out far enough to gain access but left the headlight control connected because I was lazy and saw no need to unhook it. I forgot to take a picture of this part but it should be self explanatory. You will now see a philips screw directly in the back of the air vent - remove. 3) Crawl under the dash and remove the center piece (A) of the air vent - there is not much room and you will not miss it. The piece can be nudged towards the side to release on one end and then the other. Since you removed the screw from above you should be able to remove the middle and side piece now out the bottom. 4) Unplug switch by pulling directly off the back - do not unhook the purple tabs just pull the entire unit back. Make sure to pull this off BEFORE unscrewing and removing the switch as the screws holding the switch in make this much easier than trying to get a hand in there - believe me I jumped ahead and then resorted to screwing it back in. 5) Unscrew two set screws - one on the bottom on one on the opposite side. The screws are coated with red paint that may need to be chipped through with your screwdriver before you can get the screw to grab. I unscrewed the bottom screw while under the dash and then from the seat I reached under and could view the top screw through the side vent area and unscrewed it. Do not remove the screws just undo them far enough to remove the ignition switch. Bottom screw noted in this picture Top screw as viewed from side vent opening - this can also be done from underneath but the small space and clutch pedal against my head led me to look for easier access 6) Now that the screws are loose you should be able to pull the ignition switch out and replace it with the new one. Screw in the set screws, hook the harness back to it and get ready for a cold beer - not quite but almost 7) Slide out from under the foot well, hook up the battery and see if all is well. You may as well check before reattaching the rest. If the car starts as it should you will notice a nice smooth ignition with the slight spring back to the left just after ignition. Hook up the air vents, screw everything back together and push the headlight knob back in place 😎 Crack open a cold beer and smile - you just saved a lot of money. This is one of the simplest "repair" DIY out there - it took me probably less than 20 minutes including removing the side vent and I took my time since I had never done it before. If I need to replace it again - which is likely - it will be even quicker. You can always replace the entire ignition module with the new and improved unit at around $150 I think - and alot more effort - but for $12 and 20 minutes I am hoping I can get some decent life out of this switch and then just replace it again in a few years if I need to. Like I said before - this is not a new DIY but I am hopeful that these pictures will be helpful. Thanks again to all of those who provided the prior posts.1 point