Welcome to RennTech.org Community, Guest
There are many great features available to you once you register at RennTech.org
You are free to view posts here, but you must log in to reply to existing posts, or to start your own new topic. Like most online communities, there are costs involved to maintain a site like this - so we encourage our members to subscribe or donate. All subscriptions and donations go to the costs operating and maintaining this site. We prefer that guests take part in our community and we offer a lot in return to those willing to join our corner of the Porsche world. This site is 99 percent member supported (less than 1 percent comes from advertising) - so please consider an annual subscription or donation to keep this site running.
Here are some of the features available - once you subscribe RennTech.org
- View Classified Ads
- DIY Tutorials
- Porsche TSB Listings (limited)
- VIN Decoder
- Special Offers
- Paint Codes
- Registry
- Videos System
- View Reviews
- and get rid of this welcome message
It takes just a few minutes to register, and it's quality Porsche information at a low cost.
Contributing Members also get these additional benefits:
(you become a Contributing Member by subscribing or donating money to the operation of this site)
- No ads - advertisements are removed
- Access the Contributors Only Forum
- Contributing Members Only Downloads
- Send attachments with PMs
- All image/file storage limits are substantially increased for all Contributing Members
- Option Codes Lookup
- VIN Option Lookups (limited)

-0001-0001.png.112c13ee97acfad0cb1e70d195cc9a0e.png)
Loren
-
Posts
37,855 -
Joined
-
Days Won
638
Content Type
Profiles
Events
Forums
External Paint Colors
Downloads
Tutorials
Links Directory
Collections
Classifieds
Store
Everything posted by Loren
-
-0001-0001.thumb.png.17f5bb25bf8ec261a17c21e6321c8492.png)
Driver side Mirror
Loren replied to Lee Quave's topic in 996 Series (Carrera, Carrera 4, Carrera 4S, Targa)
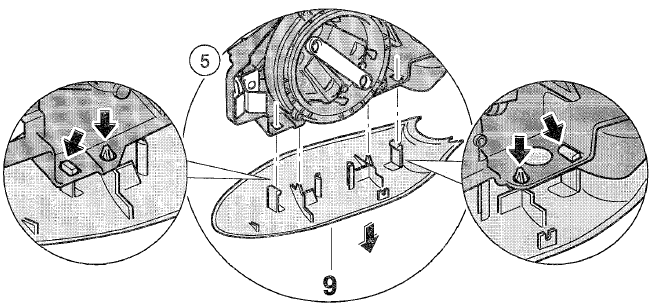
Carefully pull the mirror glass out of the metal clips. Disconnect the electrical plug connection. Press lugs (arrows) of the lower cover and remove it. Install is the reverse.
-
I do not see a different tip for the GT3 (standard) vs. GT3 RS in the parts list. I think the 987 tip is a single inlet that is held on with a clamp (and it just looks like it is a dual outlet). On the GT3 (997) there are actually two outlets in the muffler and the tip is held on with two hex nuts.
-
One-touch window operation
Loren replied to Mercurial's topic in 996 Series (Carrera, Carrera 4, Carrera 4S, Targa)
Go to advanced search and click on the link "Advanced Usage Help". (i.e. +apple -juice --find posts with 'apple' but not 'juice'; "Some Words" --Find posts with the phrase 'some words of wisdom', 'some words' but not 'some noise words') This + and - as well as the quotes procedure is used by Google and most all the major search engines. -
Uh... did you check page 298 of your owners Manual?
-
What you want does not exist. There are diagrams for the emissions side and their are diagrams for the turbocharger side - plus there are still more vacuum lines for some controls. This is should help some... (all the turbocharger connections)
-
Maf confusion again
Loren replied to alexbartman's topic in 996 Series (Carrera, Carrera 4, Carrera 4S, Targa)
You can try it but I don't think it will work on a 3.4. You would need to custom program the DME. -
Wheel Spacers
Loren replied to gixxer1127's topic in 9PA, 9PA1 (Cayenne, Cayenne S, Cayenne Turbo, Cayenne Turbo S)
Do you have the part numbers so I can check the list? -
Armrest Replace?
Loren replied to Cayenne17's topic in 9PA, 9PA1 (Cayenne, Cayenne S, Cayenne Turbo, Cayenne Turbo S)
-
One-touch window operation
Loren replied to Mercurial's topic in 996 Series (Carrera, Carrera 4, Carrera 4S, Targa)
Try doing a search here next time - this has been covered many times. Hold the button to lower the window and then continue holding it another 10 seconds. Do the same for the window up again holding it for 10 seconds after it is all the way up. You one-touch operation should then be restored. -
It is pretty much the same as the Carrera DIY - just different part numbers.
-
Wheel Spacers
Loren replied to gixxer1127's topic in 9PA, 9PA1 (Cayenne, Cayenne S, Cayenne Turbo, Cayenne Turbo S)
Porsche only specs for "their" wheels so you would need to try them. And, make sure you have appropriate clearances on the brake rotors, struts, brake hoses/cables, fenders, etc. -
Per TSB 4/06 1359 Crankshaft Seal On Flywheel Side Leaking -- dated Nov 6, 2006 New crankshaft seal on flywheel side: May 17, 2005 as of engine numbers M96/ 25 615 0851 9 (2.7 liter) M96/ 26 625 07322 (3.2 liter)
-
Wheel Spacers
Loren replied to gixxer1127's topic in 9PA, 9PA1 (Cayenne, Cayenne S, Cayenne Turbo, Cayenne Turbo S)
Porsche only recommends 17mm spacers for certain wheels. They only go on the rear wheels. The 17 mm spacers put a bolt on ring on your rear hubs and then you use the new nuts that come with the kit (955.0446.00.23 17mm Spacer Ring, set). -
Help Dead Battery
Loren replied to Sauber_f1's topic in 996 Series (Carrera, Carrera 4, Carrera 4S, Targa)
Sorry, no. You will need to find the cable under the right front wheel well. Do a search here - this has been covered many times. -
Crank Sensor Information
Loren replied to shalco's topic in 996 Series (Carrera, Carrera 4, Carrera 4S, Targa)
The crankshaft pulse generator position reads the gap (two missing teeth) in the flywheel ring gear. The gap produced by 2 missing teeth serves as the reference mark and lies 84° before the TDC of the 1st and 4th cylinder. -
Side Mirror Smashed
Loren replied to CabC2's topic in 996 Series (Carrera, Carrera 4, Carrera 4S, Targa)
Try the folks at Sunset Imports (Porsche Parts at Dealer Cost - link at the top of any page). -
Have them check the engine operating hours vs. the airbag operating hours using a PST2 or PIWIS.
-
3 spoke Vinyl Airbag for the steering wheel. Next question is why did they replace it? Because it went off in an accident?
-
The build date is just month and year.
-
Need Pin-out schematic for CDR23
Loren replied to mffarrell's topic in 996 Series (Carrera, Carrera 4, Carrera 4S, Targa)
http://www.renntech.org/forums/index.php?a...mp;showfile=727 -
I don't think they sell parts for the ash tray - only the whole ashtray.
-
Another OBC questions for the masters....
Loren replied to mikes_box's topic in 986 Series (Boxster, Boxster S)
Yes, that is suggested here many places. -
996 Engine DME
Loren replied to Paul Grainger's topic in 996 Series (Carrera, Carrera 4, Carrera 4S, Targa)
Egas cars up to and including MY01. That is a DME 7.2. -
Full brake Upgrade?
Loren replied to Cayenne17's topic in 9PA, 9PA1 (Cayenne, Cayenne S, Cayenne Turbo, Cayenne Turbo S)
Please do not double post - you already posted this in the Cayenne DIY section. -
From the service manual...