Welcome to RennTech.org Community, Guest
There are many great features available to you once you register at RennTech.org
You are free to view posts here, but you must log in to reply to existing posts, or to start your own new topic. Like most online communities, there are costs involved to maintain a site like this - so we encourage our members to subscribe or donate. All subscriptions and donations go to the costs operating and maintaining this site. We prefer that guests take part in our community and we offer a lot in return to those willing to join our corner of the Porsche world. This site is 99 percent member supported (less than 1 percent comes from advertising) - so please consider an annual subscription or donation to keep this site running.
Here are some of the features available - once you subscribe RennTech.org
- View Classified Ads
- DIY Tutorials
- Porsche TSB Listings (limited)
- VIN Decoder
- Special Offers
- Paint Codes
- Registry
- Videos System
- View Reviews
- and get rid of this welcome message
It takes just a few minutes to register, and it's quality Porsche information at a low cost.
Contributing Members also get these additional benefits:
(you become a Contributing Member by subscribing or donating money to the operation of this site)
- No ads - advertisements are removed
- Access the Contributors Only Forum
- Contributing Members Only Downloads
- Send attachments with PMs
- All image/file storage limits are substantially increased for all Contributing Members
- Option Codes Lookup
- VIN Option Lookups (limited)

-0001-0001.png.112c13ee97acfad0cb1e70d195cc9a0e.png)
Loren
-
Posts
37,849 -
Joined
-
Days Won
638
Content Type
Profiles
Events
Forums
External Paint Colors
Downloads
Tutorials
Links Directory
Collections
Classifieds
Store
Everything posted by Loren
-
-0001-0001.thumb.png.17f5bb25bf8ec261a17c21e6321c8492.png)
Does an MSRP exist for OEM parts?
Loren replied to Silver911's topic in 996 Series (Carrera, Carrera 4, Carrera 4S, Targa)
According to the September 2005 US Retail Price List - Yes. You have the right part numbers now give the folks at Sunset Imports a call - as I said before I'm sure they have much better prices. -
Does an MSRP exist for OEM parts?
Loren replied to Silver911's topic in 996 Series (Carrera, Carrera 4, Carrera 4S, Targa)
No, you asked for just the GT3 bumper. If you want the complete bumper kit it is: 000 044 802 28 G2X Front Spoiler set - MSRP $1745.52 The side skirt kit is: 000 044 802 15 Sill Cover set - MSRP $889.39 BTW... both of these come unpainted so you will need a body shop to paint to match your car. -
All MY06 (available) Order Guides have been updated as of today - September 13, 2005.
-
Does an MSRP exist for OEM parts?
Loren replied to Silver911's topic in 996 Series (Carrera, Carrera 4, Carrera 4S, Targa)
996 505 980 06 G2X Front Embellisher MSRP: $1745.52 Do you need just one side skirt (if so which side) or the upgrade kit? -
Hi, Why is it that the earlier MY ('97-'02) are not available in the Archives? Isn't that what Archives are for? Happy Motoring!...Jim'99 Because we don't have a copy of those manuals? If you have a copy we will post them?
-
We added the following new/superseded TSBs today: Boxster (986) 1/05 1701 Engine Oils Approved by Porsche July 28, 2005 1/05 0335 On-Board Diagnostics (OBD) Manual Supplement July 7, 2005 Boxster (987) 1/05 1701 Engine Oils Approved by Porsche July 28, 2005 Carrera (996) 1/05 1701 Engine Oils Approved by Porsche July 28, 2005 1/05 9662 Design Key July 29, 2005 Carrera (997) 1/05 1701 Engine Oils Approved by Porsche July 28, 2005 Carrera GT 1/05 1701 Engine Oils Approved by Porsche July 28, 2005 Cayenne 1/05 1701 Engine Oils Approved by Porsche July 28, 2005 (V8 series only) 29/04 9110 BOSE Sound Package: Sound Failure July 5, 2005 26/04 9110 PCM2.1 & BOSE Amplifier Spare Parts Requirements July 5, 2005 TT/GT2 1/05 1701 Engine Oils Approved by Porsche July 28, 2005 1/05 9662 Design Key July 29, 2005 Only Contributing Members can view TSBs online.
-
Yeah, most of it should be very similar.
-
Did you know you can download a copy of the manual here
-
The side panel is covered in the post here. I will send you some other info in a PM.
-
Yup I wrote is backwards...
-
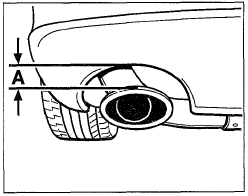
Mid PSE Install question
Loren replied to peter-pa31's topic in 996 Series (Carrera, Carrera 4, Carrera 4S, Targa)
As my instructions said - don't tighten anything down until you get the alignment right. On a MY02 and newer car measurement A should be 22 mm. The tip B should stick out about 7-10 mm. You may have to move the whole muffler a little (on the 3 -13 mm studs) to get proper alignment as well as the clamp on the exhaust tip itself.
-
A C4S has the reflector on the main body and the TT lid is longer because it does not have the reflector area.
-
Does an MSRP exist for OEM parts?
Loren replied to Silver911's topic in 996 Series (Carrera, Carrera 4, Carrera 4S, Targa)
Yes Porsche publishes a Manufacturer's Suggested Retail Price list. But as the name says it is "suggested". Give me the part numbers they quoted you and I'll look them up on the September 2005 list (which has a bunch of increases). Also, have you checked with Sunset Imports (Porsche Parts at Dealer Cost). I doubt you can beat their prices. -
Glad to present you my new Biturbo
Loren replied to Dr. Carrera's topic in 996 TT, 996 TT S, 996 GT2
Very nice! :thumbup: -
whine noise at startup
Loren replied to uimtiaz's topic in 996 Series (Carrera, Carrera 4, Carrera 4S, Targa)
If you disconnect it for any period of time you will get a CEL. The air pump is there for emissions. In California the state required smog test will actually test your air pump to make sure it hasn't been disconnected and is working. -
Flashing coolant light - already searched
Loren replied to Jinster's topic in 986 Series (Boxster, Boxster S)
Yes, my information is from the 996 manual (Group 1: Engine, Part 2 (as of Repair Group 15 - Engine - Cooling). Chances are that your Boxster manual does not have all the update supplements. This was added in a later supplement in the 996 manual so I suspect it was added to the Boxster manual too. -
Flashing coolant light - already searched
Loren replied to Jinster's topic in 986 Series (Boxster, Boxster S)
A flashing coolant light can mean more than air bubbles. So the light comes on without the engine running could mean several things. Here is the long explanation from the service manual on the flashing coolant light. "Four functions of the coolant warning light: 1. Engine coolant level too low -- light flashes slowly (0.5 Hz) 2. Engine compartment temperature too high -- light flashes slowly (0.5 Hz) (engine compartment blower might be faulty) 3. Engine coolant temperature too high -- light is lit; pointer on the right 4. Temperature sensor at water outlet faulty -- light flashes rapidly (1 Hz) ; pointer on the right Note: The temperature warning in point three is indicated if the conditions "engine coolant temperature too high" and "engine coolant level too low" are present simultaneously." -
Flashing coolant light - already searched
Loren replied to Jinster's topic in 986 Series (Boxster, Boxster S)
Sometimes it takes a couple of weeks of driving with the bleed valve open to clear trapped air in the system. It is fine to drive the car with the bleed valve open - Cupcars do it all the time. The only other choice is to use the Porsche recommended vacuum filling technique to refill the system. -
Faceoffs for CR22, CDR 22 etc.
Loren replied to Paul Fraser's topic in 996 Series Part Number Requests
Try Becker. http://www.becker.de -
Yes, for a MY99 - 00 coupe Carrera. A Cabriolet has a different part number as does the MY01 cars. And, of course in MY02 they went to the BOSE (MOST based) system. 996 645 312 00 Booster digital sound processing, MY99-00, Coupe M680
-
Yeah, if it's not a loose wire the dealer will likely replace the whole PCM1 head unit.
-
The openings in the C4S bumper are larger - so if you want to take advantage of that (for better cooling - and looks) you could use the C4S ducts. I think they will fit your radiators. The C4S actually uses different radiators and mounting brackets but several folks have just installed the C3S bumper and left everything else as is. If you want the complete parts list just PM me.
-
Keyless not working
Loren replied to Nazz's topic in 996 Series (Carrera, Carrera 4, Carrera 4S, Targa)
Doh! I guess I should have posted that here to. TSB 20/03 9662 Replacing The Key Remote Control Battery (dated 06-25-04) describes how changing the battery "incorrectly" can cause the processor to lock up and stop functioning. If this happens it instructs you to: -
There is no diference between a C2 and C4 front bumper. C4S yes - C2 and C4 no.
-
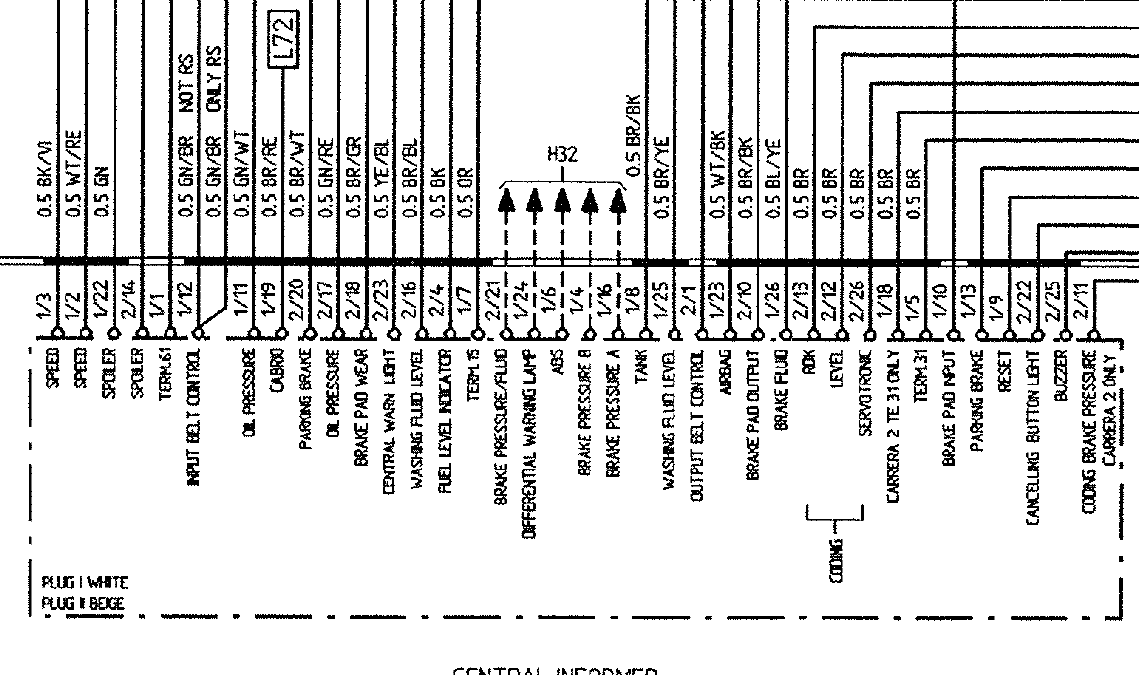
My mistake I thought you said under the driver seat. I believe that is the central informer (part of the instruments and senders circuit). See below: