Welcome to RennTech.org Community, Guest
There are many great features available to you once you register at RennTech.org
You are free to view posts here, but you must log in to reply to existing posts, or to start your own new topic. Like most online communities, there are costs involved to maintain a site like this - so we encourage our members to subscribe or donate. All subscriptions and donations go to the costs operating and maintaining this site. We prefer that guests take part in our community and we offer a lot in return to those willing to join our corner of the Porsche world. This site is 99 percent member supported (less than 1 percent comes from advertising) - so please consider an annual subscription or donation to keep this site running.
Here are some of the features available - once you subscribe RennTech.org
- View Classified Ads
- DIY Tutorials
- Porsche TSB Listings (limited)
- VIN Decoder
- Special Offers
- Paint Codes
- Registry
- Videos System
- View Reviews
- and get rid of this welcome message
It takes just a few minutes to register, and it's quality Porsche information at a low cost.
Contributing Members also get these additional benefits:
(you become a Contributing Member by subscribing or donating money to the operation of this site)
- No ads - advertisements are removed
- Access the Contributors Only Forum
- Contributing Members Only Downloads
- Send attachments with PMs
- All image/file storage limits are substantially increased for all Contributing Members
- Option Codes Lookup
- VIN Option Lookups (limited)

-0001-0001.png.112c13ee97acfad0cb1e70d195cc9a0e.png)
Loren
-
Posts
37,896 -
Joined
-
Days Won
648
Content Type
Profiles
Events
Forums
Exterior Paint Colors
Downloads
Tutorials
Links Directory
Collections
Classifieds
Store
Everything posted by Loren
-
997.571.219.00
-
-0001-0001.thumb.png.17f5bb25bf8ec261a17c21e6321c8492.png)
side marker blink
Loren replied to evil2219's topic in 996 Series (Carrera, Carrera 4, Carrera 4S, Targa)
Yes, but use Kirby's instructions as the late model cars use different color (trigger) wires. -
Not really - if you buy a used cluster and OBC is on then it is already done. If the used cluster has OBC off then it will have to be turned on.
-
When Porsche went to the newer (dot matrix) cluster you now have to turn OBC on in BOTH the cluster and DME. On older cars it is just in the cluster.
-
Any idea what this is?
Loren replied to stokj's topic in 996 Series (Carrera, Carrera 4, Carrera 4S, Targa)
Outside temperature sensor. -
Please do not double post.
-
As I recall you unscrew the locking button then it just pulls off (hard). When you install press on in the correct position until properly in contact. The twisting lock must engage with lock on shift lever.
-
It is easy to do with a PST2 or a PIWIS tester - this has been covered here many times (with pictures).
-
60K Maintenance
Loren replied to Davet18's topic in 996 Series (Carrera, Carrera 4, Carrera 4S, Targa)
Porsche Parts at Dealer Cost -
With a diagnostic tool like the Durametric Software or a PST2 or a PIWIS tester. These tools can read actual values of the MAF air flow as well as fuel trims.
-
Work Day on my 99 C2
Loren replied to viper501's topic in 996 Series (Carrera, Carrera 4, Carrera 4S, Targa)
:thumbup: -
Windshield repair
Loren replied to jordeau's topic in 9PA, 9PA1 (Cayenne, Cayenne S, Cayenne Turbo, Cayenne Turbo S)
Not as long as the chip is not right in front of the sensor. -
litronic headlights
Loren replied to jam996's topic in 996 Series (Carrera, Carrera 4, Carrera 4S, Targa)
Yes, if you just plug them in they will work. If you want the low beam to rotate up with the high beam (like the factory units) then you will need to splice in the control units. Search here for a link to the TSB describing the full install. -
Looks like that thing needs headers and a sport exhaust to me... :lol: :lol: :lol:
-
Help w/a part number?
Loren replied to auto-xr's topic in 996 Series (Carrera, Carrera 4, Carrera 4S, Targa)
Maybe a dealer will let you compare parts? -
Help w/a part number?
Loren replied to auto-xr's topic in 996 Series (Carrera, Carrera 4, Carrera 4S, Targa)
It comes up as "unknown part number" in the system. What is it or where did it come from? The first part of the under is consistent with a 993 coil spring (set). -
Rear brake lights are always on
Loren replied to dammad's topic in 996 Series (Carrera, Carrera 4, Carrera 4S, Targa)
The switch is on the brake pedal (under the dash). -
Durametric toll on a 2007 Boxster S
Loren replied to soetekouw's topic in 987-1 Series (Boxster, Boxster S)
Have you tried asking the Durametrric folks? They usually answer emails pretty fast. -
I wave or flash my headlights and about half the Porsche drivers look at me like "do I know you?" and don't reciprocate :lol: Oh well, I'll just continue to be the idiot that flashes and waves at other Porsche owners (my 30th year as Porsche owner and 29 years in PCA).
-
Start - stop, start - stop , start - stop.... different faults takes differing amounts of the drive cycles to clear. You can also clear them with the Durametric Software, or find a shop or dealer with a PST2 or PIWIS tester.
-
Durametric vs. Generic OBD2 scanner vs. PST2
Loren replied to jcorallo's topic in 986 Series (Boxster, Boxster S)
The Durametric Software is based on the exact same tests (and result codes) that are run with Porsche's proprietary PST2 and PIWIS systems. The general market scanners are intended for "all cars" and don't have the additional model specific information that the Durametric, PST2, and PIWIS have. -
Sorry, I had a typo in the part number. I see a retail price of $382.63 each - so Sunset's price should be good.
-
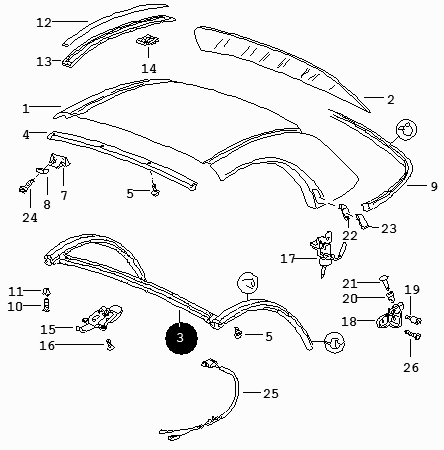
There is only one seal (gasket) that goes all the way around the front and the side windows for the hardtop.

-
Passenger side orange triangle reflector
Loren replied to telly808's topic in 986 Series Part Number Requests
996.631.036.00 reflector - right side (for car without headlight washers) 996.631.036.01 reflector - right side (for car with headlight washers) -
I assume the tool can be had from a dealer. Any idea what it costs? Or does anyone have one I can borrow? Jeff (Tool Pants) has one.