Welcome to RennTech.org Community, Guest
There are many great features available to you once you register at RennTech.org
You are free to view posts here, but you must log in to reply to existing posts, or to start your own new topic. Like most online communities, there are costs involved to maintain a site like this - so we encourage our members to subscribe or donate. All subscriptions and donations go to the costs operating and maintaining this site. We prefer that guests take part in our community and we offer a lot in return to those willing to join our corner of the Porsche world. This site is 99 percent member supported (less than 1 percent comes from advertising) - so please consider an annual subscription or donation to keep this site running.
Here are some of the features available - once you subscribe RennTech.org
- View Classified Ads
- DIY Tutorials
- Porsche TSB Listings (limited)
- VIN Decoder
- Special Offers
- Paint Codes
- Registry
- Videos System
- View Reviews
- and get rid of this welcome message
It takes just a few minutes to register, and it's quality Porsche information at a low cost.
Contributing Members also get these additional benefits:
(you become a Contributing Member by subscribing or donating money to the operation of this site)
- No ads - advertisements are removed
- Access the Contributors Only Forum
- Contributing Members Only Downloads
- Send attachments with PMs
- All image/file storage limits are substantially increased for all Contributing Members
- Option Codes Lookup
- VIN Option Lookups (limited)


Scouser
-
Posts
539 -
Joined
-
Last visited
-
Days Won
2
Content Type
Profiles
Events
Forums
Exterior Paint Colors
Downloads
Tutorials
Links Directory
Collections
Classifieds
Store
Everything posted by Scouser
-

Electrical problem. Need help.
Scouser replied to Wedge's topic in 996 Series (Carrera, Carrera 4, Carrera 4S, Targa)
Have a look at my 996 in-dash tail switch instructions in the DIY section. Specifically instruction #11. There are pictures showing you step by step instructions. -
Blinkers flashing, alarm problem?
Scouser replied to trauh's topic in 996 Series (Carrera, Carrera 4, Carrera 4S, Targa)
This intrigued me. Could the floating 9v and the resistance of the horn (assuming it is not O/C) be used to sense the horn. If so then it makes sense. A faulty horn would show up as a fault in the alarm circuit and the lights would flash. -
996 Long-Life Guarantee
Scouser replied to ickle_monster_au's topic in 996 Series (Carrera, Carrera 4, Carrera 4S, Targa)
I have a similar problem. But mine is on the pillar under, and at the very bottom of where the door latches on the latch plate. My OPC said to take it down to their spray shop and get a report then report back to them with it. Will have to wait a few weeks though. -
996 Instrument Panel blue backlite
Scouser replied to J9000's topic in 996 Series (Carrera, Carrera 4, Carrera 4S, Targa)
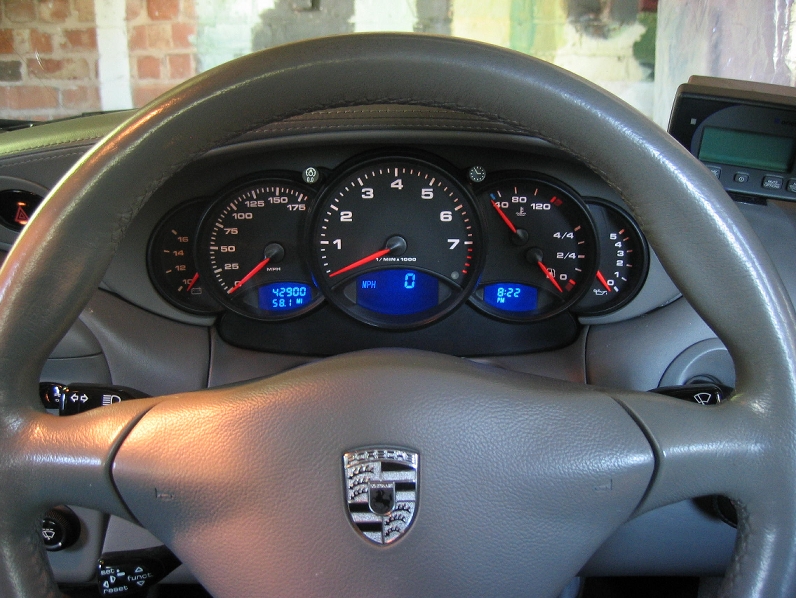
P.Viby has a good point. This is the place for tech stuff for sure. I am sure there are dash pod removal instructions elswhere on this site but here goes anyway (assumes a RHD car): The leds in the dash pod are standard fit. You can even get them in Halfords (in the UK this is sadly our nationwide car bits shop). I bought mine (6 of them) for £5.50 on ebay. I bought ones to fit a Vauxhall Corsa! To get the dash pod off is a 3 minutes max job (I say that cos I done it at least 10 times ). It should take you no longer than 10 mins. 1. get a large towel and a heavy duty (not flimsy) butter knife. 2. Adjust/pull your driving wheel fully out. 3. Place large towel over the driving wheel and over any exposed dash up to the dash pod as much as possible. This prevents scratches. Preventing scratches is the hardest part. Keep your eye on the left hand (right hand on LHD cars) underside of the dash pod at all times as you remove it. 4. Use the butter knife to prise off the microphone cover on the right of the pod. 5. Use the butter knife to prise off the out cover of the hazard switch. Leave the switch cover it will fall out with the outer cover. It takes some prizing. Again be carefull of scratches and denting the leather. Don't try to prise it off from the tops or bottom. Prise it off from the sides. You can safely stick your knif right in there. 6. Behind the hazard switch and microphone you will see 2 T20 Torque screws. Undo them and a big heave-ho and the dash pod lifts up off the dash. 7. There are three connectors behind the dash pod. Blue, Brown and White. They don;t pull out simply. You have to push the lever down from the connector tops. The lever is actually part of the connector at the lead side. Once the lever is down, the connector simply pulls off. 8. turn the dash pod over on it's back and place on the towel. May have to move the towel up a bit more. 9. You need to use a flat blade screw driver and place it between the center pin of the back of the white hazard switch and black connector. Be careful not to short the pins. Twist the blade of the screwdriver and the switch will pop off its connector. Slide the connector out and lift the dash pod out of the car. 10. The 3 leds you replace will be obvious to you. All LEDs are Light Emiting "DIODEs" so will conduct in one direction only thus they are polarity based. So you will have to put them in and connect the dash pod and try them. If they don't light up with ignition on then they need a 180 degree twist to correct the polarity. You can't do any harm by getting them in te wrong way since the LED's have sink resistors built-in. They just wont work if in the wrong way. Test again. If all is well then just reverese the removal procedure to put back. The pod sort of clicks back into place pushing it down from the top downwards with a small ammount of force. DO NOT HIT IT. Bingo. Blue lights......or whatever colour you choose of course. Before anyone asks, it's not possible to changethe aircon llights. They are built onto the circuit board and the facia has an amber filter. I guess Loren should move this to the DIY section. BTW: P.Viby, where does everyone get these art style signature avatars from. I want one :thumbup: -
996 Instrument Panel blue backlite
Scouser replied to J9000's topic in 996 Series (Carrera, Carrera 4, Carrera 4S, Targa)
The dash pod lights are standard fit. I bought a set off ebay for £5.50 off ebay. They fit a Vauxhall (General Motors for you Stateside folk). -
996 Instrument Panel blue backlite
Scouser replied to J9000's topic in 996 Series (Carrera, Carrera 4, Carrera 4S, Targa)
Yes I just did it. Have a look at this thread.... http://www.porsche-1.net/forums/index.php?showtopic=2868
-
:clapping: Good one Jeff. That's too funny.
-
Thanks guys. Woah, good job I asked. I was about to try to prise off the aibag cover thinking it just pulled off!
-
I seem to have developed an annoying squeak coming from my font passenger air bag cover on the dash. If I put hand pressure on it the squeak stops. Before I attempt to remove it and refit, is there any special trick or things I need to know about or be aware of?
-
Woah! Sorry to cause a rif. Just a simple question. I should have asked......is the Turbo tail a straight swap with my C2. The answre is obviously no way.
-
VIN sequence number
Scouser replied to de36band's topic in 996 Series (Carrera, Carrera 4, Carrera 4S, Targa)
The last four digits are indeed the sequence number but as Tool Pants points out it is fairly impossible to interpret. I have tried all avenues and get conflicting information. -
Gator996, I can't find this on 6speed, any chance you could post a link to it? Cheers
-
Of course, I mean the Turbo boot lid and engine cover as well as the raising tail. Anyone know if it will fit a C2?
-
Get a kick out of this....
Scouser replied to Scouser's topic in 996 Series (Carrera, Carrera 4, Carrera 4S, Targa)
Well, I am up and walking at least. My back never seems to fully get better nowadays :( Many thanks Loren anyway. Cheers -
0W-40W oil link to RMS leakages?
Scouser replied to geza's topic in 996 Series (Carrera, Carrera 4, Carrera 4S, Targa)
I am deperate (6 RMS replacements and 7 seals). But I have always used mobile0/40. I can pretty much guarantee that a RMS replaced on my engine will show signs of leaking at between 200 and 300 miles after the seal is replaced. The leak starts off slow and then max's out to about 4 drips per month. imho, the oil isn;t the issue. My theory on it is that the seal only leaks when the engine is hot and cooling down. So a car that is garaged may leak once when it was parked up (the engine hot) then never again until the car is driven again and parked up to go cold. As the engine coos, the block and seal contract/constrict whatever. Sometimes this leaves the engine block halves twisted ever so slightly. Sometimes they go back into shape. On my car, the bore hole was once measured out of tolerence, then in tolerance, then out of tolerance and so on. I have sen this measured myself in disbelief. If it's out of tolerance then it leaks oil. SImpe as that. The only real way to not have an RMS problem is leave the engine running :lol: -
Tittle says it all. I am guessing the turbo's wide body would mean it wont fit a narrow body C2. Am I right/wrong?
-
So, I have been having problems with my electrics. Situation was this: Lights off: when I put my foot on the break pedal the front left side light would light up as well as the stop lamps. Lights on: when I put my foot on the break pedal the ABS and PSM dash lights would come on and stay on until I restart the car. Rear break lights worked fine. Front left light did not light up. I have asked a few times for help here but still couldn;t find an answer. Then last week Loren kindly sent me the circuit diagram but it looked too complicated without legend info so I put it aside. But also my flipping back pulled out and I have been horizontal for nearly two weeks. So, I decided to put the car in to my OPC and have them fix it. They rang me to say it could cost serious money as they can;t find the problem with all diagnostics and would have to start ripping into my electrics to narrow down where the fault lies but they think it needs a new ABS unit. Oh no! I said....not more problems. While on my back in bed I decided to review/study the circuit diagram again. I noticed there was a possibility that if the rear left stop lamp had a failed earth within the bulb, it would be possible for current to pas through both elements in the bulb (stop and side lamps) and thus cause ABS/PSM faults. So I rang my OPC and said bring the car back. DOn't fix it. (in my mind I would rather pay an independent anyway). Today, my back now better, I decided to take the rear stop lamp out and check it. Low and behold it was indeed faulty even though it still worked! Yup, both side lamp and stop lamps work but the bulb is faulty. I replaced the faulty bulb and bingo! fault fixed. Loren just saved me a huge bill and all it was in the end was a bulb. ha ha. Cheers heaps Loren. :cheers:
-
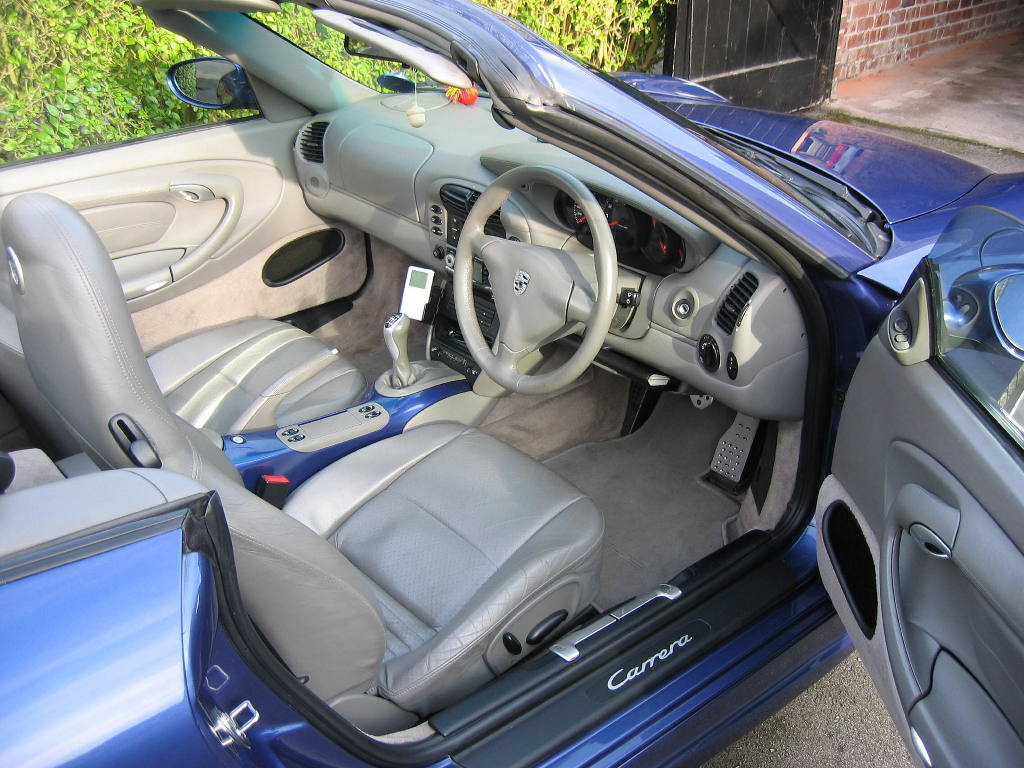
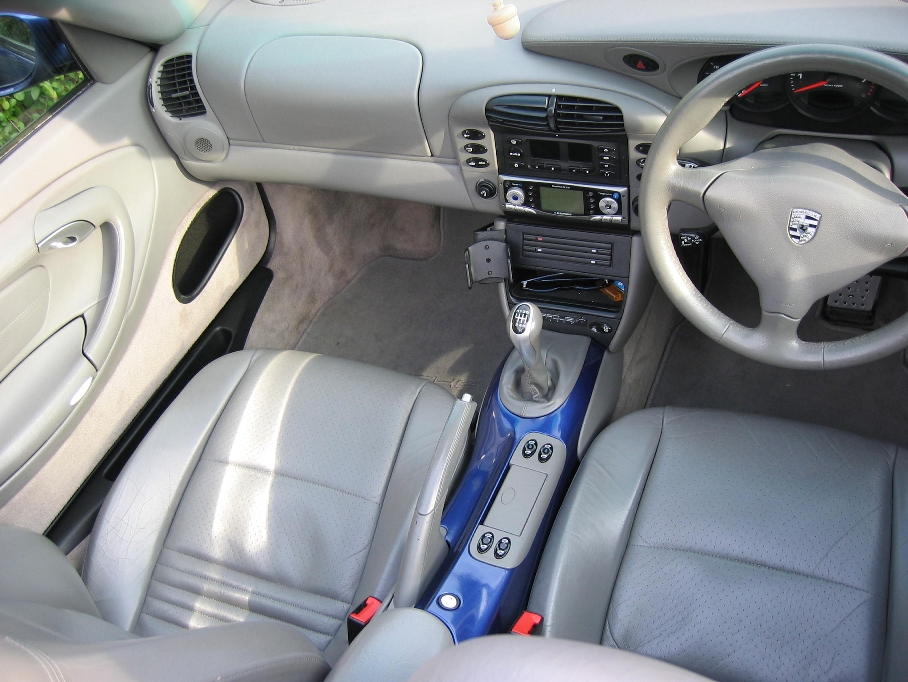
I hope I don't P1$$ Eric off here but....... Living in the UK doesn't make it easy or cheap to deal with the Plug Guy despite that fact that I would love to be in a position to do so. The fact is, with import duty, VAT etc it just isn't cost effective. So......for the small cost of buying a used black one on ebay and several cans of paint, primer and clearcoat.....and a very dust free room.....and a lot of patience......I painted my own console. I must say it is a very good job. Not one Porsche owner has yet said "Oh you painted that yourself then". In fact even my OPC say it's as good as the ones they supply. It has been on my car now for about 6 months and has no scratches or cracks appear and it seems to be very hardy. In any case, for the cost it was well worth the experiment and if for any reason it goes horrible on me in the future then I will just put the old one back on. Sand it down first and finish off with a light sanding. Needs to be very smooth and the old paint mostly removed but not necssarily all of it. Clean with white spirit and let fully dry. rub down one more time with very light sand paper. ENsure final surface is dry and dust free. No harm to go over it with another light wipe of white spirit but let fully dry. Use 2 coats of primer. Prime very lightly not heavily. Allow overnight between coats. Lightly rub down with sand papaer and wipe off excess dust with light spray of spirit. Then 3 coats of paint. Again very lightly between coats and let dry for at least 48 hours between coats. Use the finest grade sand paper and very lightly rub down the surface. Then a final coant of paint. Leave for a week! then 2 coats of clearcoat. Leave for a further week and bobs your uncle! Yes I know, why this and why that. Well I don't know but that's how I did it and it worked fine for me. BTW, my colour is difficult to work with as it is a pearlescent metalic Zenith Blue. If I can do it anyone can do it. But I have to admit that if I lived in the US, I would not even begin to attempt this since Eric is da auto paint guru.
-
ABS and PSM warning lights on AGAIN
Scouser replied to Scouser's topic in 996 Series (Carrera, Carrera 4, Carrera 4S, Targa)
Thanks for that detailed synopsis 0586slb. You said check the brown wire in the cluster to ground. Which cluster and where will I find it? Since your in the UK, would be good if we could chat on the phone ;) Cheers -
I can't comment on the 997 either except to say I didn't like it when it came out but have warmed more to its looks now. Let's put things into prespective. Porsche used to be a "sports car" manufacturer and catered for an exclusive market. They were never cheap but they produced the best cars. Through their dedication to both car and customer they developed a beatiful phenominon called "the Porsche Spirit". The flagship car has been the 911 but the Boxster saved their bacon. Nowadays, Porsche is the most successful car maker out their and they have shifted the goalposts to compete with the rest of the world's car manufacturers. Porsche is no longer an "exlcusive only club". They make SUV's, medium powered sports cars like the Boxster and soon a 4 door sedan let alone a new as yet unplaced Cayman. IMHO, the days of Porsche as we used to know it are finished, and so too is the long establsihed love of the 911. Looking back at what has occured with Porsche in the last decade says it all: they don't race them anymore, the air-cooled engine finished, the Boxster (read future Cayman) will take off from where the 911 went out, The 4 door family car will be next and so on. The 997 is a stop gap......Ferrari wins the battle!
-
RMS leak in rerplacement engine
Scouser replied to johnnys's topic in 996 Series (Carrera, Carrera 4, Carrera 4S, Targa)
Correct. The tool fits prefectly. Also had all the blue replaced with the blue ones. Also had the IMS done.....and also had a replacement gearbox to boot........still she leaks at RMS No. 7. I have to to live with the fact that my 996 will always be a bleader ;) -
The last time this hapened it corrected itself. Now it has become real strange. If I put my lights on, the ABS and PSM warning lights light up immediatly. If I leave the light switch in the off position, the front left headlamp lights up when I put my foot on the break light. This is annoying as it is winking at everyone every time I put my foot on the breaks. With the light switch in the off position the ABS and PSM lights don;t light up even though the fron headlamp lights with the footbreak. The rear break lamps are working fine though. Any ideas?
-
Cab Top Latch Malfunction
Scouser replied to chadchad10's topic in 996 Series (Carrera, Carrera 4, Carrera 4S, Targa)
Which end is it broken? If it's the opposite end to the hook end then just glue it. No need to spend a fortune for a 5 minute fix. -
Cab Top Latch Malfunction
Scouser replied to chadchad10's topic in 996 Series (Carrera, Carrera 4, Carrera 4S, Targa)
You need to clean the metal hook and its shaft with white spirits first. Then put a very fine layer of contact adhesive on the hoook sides (as far as you can) and top of the hook. Clean the inside of the hook with spirits and also smear a very thin layer of contact glue on the inside of the plastic hook cover. Let the glue touch dry then push them together. Job done. IMPORTANT: make sure the glue you use does not melt the plastic cover. Best to test a tiny area on the inside of the plastic hook first. -
Are you taliking about the rear window in the cab top? Just a hunch, it could be bad connection in the top locating pins. Try lifting the top and replacing it.