Welcome to RennTech.org Community, Guest
There are many great features available to you once you register at RennTech.org
You are free to view posts here, but you must log in to reply to existing posts, or to start your own new topic. Like most online communities, there are costs involved to maintain a site like this - so we encourage our members to donate. All donations go to the costs operating and maintaining this site. We prefer that guests take part in our community and we offer a lot in return to those willing to join our corner of the Porsche world. This site is 99 percent member supported (less than 1 percent comes from advertising) - so please consider an annual donation to keep this site running.
Here are some of the features available - once you register at RennTech.org
- View Classified Ads
- DIY Tutorials
- Porsche TSB Listings (limited)
- VIN Decoder
- Special Offers
-
OBD II P-Codes - Paint Codes
- Registry
- Videos System
- View Reviews
- and get rid of this welcome message
It takes just a few minutes to register, and it's FREE
Contributing Members also get these additional benefits:
(you become a Contributing Member by donating money to the operation of this site)
- No ads - advertisements are removed
- Access the Contributors Only Forum
- Contributing Members Only Downloads
- Send attachments with PMs
- All image/file storage limits are substantially increased for all Contributing Members
- Option Codes Lookup
- VIN Option Lookups (limited)


JFP in PA
-
Posts
8,600 -
Joined
-
Last visited
-
Days Won
190
Content Type
Profiles
Events
Forums
External Paint Colors
Downloads
Tutorials
Links Directory
Collections
Store
Posts posted by JFP in PA
-
-
To my knowledge, Flat Six (Jake Raby) keeps records on the cars they actually do. LN may have records of who they sold the bearings to, but without verification by the shop that actually installed it , anyone can claim to have the upgrade. We get requests for this from time to time and provide a written record of when it was done. And, no, there is no way to verify if a car has one without pulling the gearbox, clutch and flywheel out..................
-
Thanks Where can i purchase it? also how will i know what size insert
Most good auto parts shops carry them, and they can help you with the size. Shops like Fastental (all they sell is fasteners) are an excellent source as well, and the inserts are also available on line.
-
Considering the number of Rolex and Cup series cars that use ATE, I really have to wonder what the issue is here.................
-
You do realize that activating the ABS/PSM system during a brake flush is not necessary? It is only required if you have gotten air into the system controls or pump during service to the system, otherwise the system is simply flushed like any other vehicle………
-
Timesert is another source for this type of repair as well.
-
Some of the earlier years (like yours) developed a problem with the horn contact ring in the steering column, causing intermittent problems (sometimes the horn won’t blow, other times it blows all by itself) or even total failure of the horns. Problem can usually be fixed by cleaning the contact ring and the contact itself, but occasionally the parts need to be replaced. Fortunately, they are not very expensive.
-
Thanks JFP.
I found this spec in the WSM:

However i interpreted that as being the intake riser to head.
Perhaps that spec is for both the riser to the head and the plenum to the riser?
They are both the same torque specs.
-
What is annoying is the section in the fuel manual that covers the intake distributor lists the bolt just like it does in other parts of the manual. But under install notes there is not a torque value listed, just blank.
Perhaps I should just treat it like any other generic M6 fastener, and torque to 7.5 ft lbs. I don't want to damage the green o-rings.
Just to clarify, here is a picture of the bolt I'm trying to find specs for. Thanks again.
Correct torque is 9.7 Nm, or 7 Ft Lb.
-
Hi,
I need to remove about 1/2 liter of oil engine after overfilling.
After some reading, it seems that the recommended way is to remove the filter cover.
I assume I could only jack the car up on the left side, remove the wheel then remove the filter.
Is my understanding correct? (I'm concerned that the all 9 quarts will flush on the floor...)
So I would greatly prefer to remove oil from the filler in the trunk using vacuum.
Anybody ever done it?
What is the diameter & length of the pipe to use?
Thanks guys
Chris
Removing the filter housing will not cause you to lose all the oil, and the housing only holds about 1/2 quart or so. Be sure to install a new o-ring. And you will never get the oil out using a vacuum system from the filler.
-
 1
1
-
-
"This is our promotion vehicle."
Pehaps a little bit of "viral marketing" as well...............
-
More to the point, thermodynamics would predict that the energy required to separate hydrogen would be more than the energy released by then burning it. As this system adds both weight and complexity to the vehicle, plus generating nearly 20 amps is going to add to the alternator’s parasitic drag on the engine, this is starting to sound more like a perpetual motion device………..
-
Does anyone have any experience with any Ethanol conversion kit?
There are certain Ethanol E85 advantages such:
--less pollution
--better performance
--ethanol price
Thank you so much in advance,
Ted
I hate to let the wind out of your sails; however, I would not touch an aftermarket kit to convert any vehicle, much less a Porsche, to use ethanol.
First, true "E85" vehicles have an entirely different fuel system in them, in some cases including a different fuel tank. All mild steel and certain alloy components must be changed for stainless steel, including the fuel lines that run the length of the car. The fuel pump and injectors are different, and it runs an entirely different DME mapping. Most aftermarket conversion kits sell for hundreds of dollars, OEM parts to do a real conversion sell in the thousands, without labor. And all you need it to leave out one part that needs to be changed, and the car will strand you, or worse.
Ethanol has about one third less energy than gas, so to propel the vehicle in the same manner; you will need about one third more fuel. Fuel mileage? What fuel mileage? As for performance, I'd suggest you test drive an OEM E85 vehicle on gas and then E85, the performance sucks, which is why E85 has not caught on in the mainstream, and stations that sell it are few and far between here.
-
Logray is correct, it goes to the coolant tank; it is also very important as the oil cooler is the highest point in the cooling system, and any air remaining in the system will tend to collect in the oil cooler, considerably reducing its efficiency. Be sure it is connected.
-
I am wondering if you can order Porsche replacement IMS parts and save a little money by not purchasing the LN Engineering kit?
You are kidding, right? Last time I checked, and it was some time ago, all they were offering was the "final solution" large diameter IMS that will not fit thru the opening in the rear of the assembled cases; you have to remember that according to Porsche, the IMS bearing cannot be changed without disassembling the motor anyway, so why offer the ones they know have problems.
At that time, the OEM parts were between $750 and $1,000 for the bearing and new matching shaft (which has to be changed to use the larger bearing in an early M96), so this wasn't exactly the low cost approach. Pelican has been touting an "OEM Like" bearing kit, but has not released it the last time I checked.
Lastly, why would you want to use a part that is known to lead to catastrophic failures, when there is another design, which costs less than what Porsche is offering, and has no record of a failure? Most of the cost in doing an IMS upgrade is in getting to it, the bearing itself is cheap by comparison,,,,,,,,,,,,,,
-
If the cams are in, or very near time, the engine should rotate (clockwise looking at the lower pulley); if you encounter any resistance, I'd stop right there.
-
The outer race is out.
Plan is to put the new bearing in, reinstall the tensioners, then pull the plugs and turn the crankshaft, by hand, two revolutions.
Question: If there was interference would I be able to move through it by hand? (Plugs out....)
Yes, the “interference” may have already "clearanced" itself by bending the valves out of the way, which is why we (and others) always bore scope one of these before doing anything..................
-
I think i've found the problem, one of the new condensers is blocked.
How was it blocked?
-
I have to agree with Loren on this, a heavy amperage line run off the battery and switched with an inline relay that sees voltage when the engine is running would be the correct (and safe) way to go. You may also have to add a capacitor in the line to dampen the current draw spikes, which a lot of other electronics in the car will not like.....
I'd also suggest giving up smoking...........
-
An additional thought: When you replaced all the components, was the system fully evacuated and held under vacuum for a period of time? Reason I ask is that ambient moisture left in the system can freeze under certain conditions and cause the unit to over pressure................
-
Thanks, JFP I appreciate you taking the time to answer my questions. So, how "tall" are the teeth on the sprockets and how easy is it for them to jump? We are pretty sure timing was good when we started to disassemble, and other than the releasing of the tensioners there hasn't been any movement.
It's not my call, but my friend wants to install the new bearing. I will insist we check the marks on the cams before we fire it up. I deduce from what you say that if the timing is off there can/will be piston/valve contact.
One more question: Standing behind the car looking forward, which cylinder is #1?
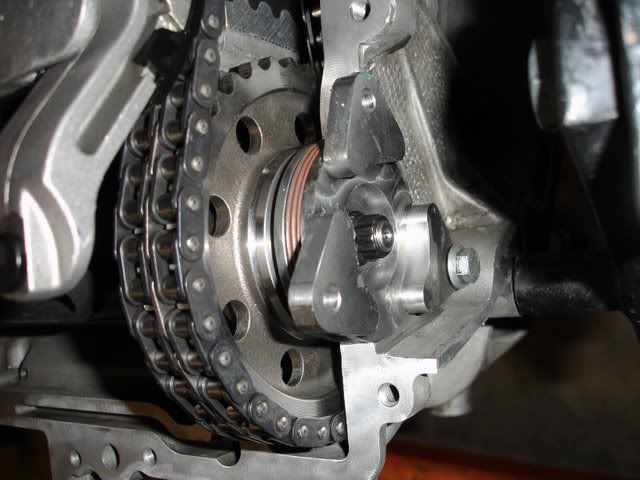
The M96/97 is an "interference motor", meaning the valves will contact the pistons if the cam timing is off. This is what you are dealing with at the IMS bearing sprocket:
This is the chain layout at the cams (five chain motor):
-
The teeth are about 3.5 mm tall. On three chain engines they can jump more easily. 5 chain engines it is much less likely. It is still worth removing the cam caps to verify the timing marks regardless.
Yes, if the timing is off, you can have piston/valve contact and possible meltdown.
Here is the cylinder designation for you:
Cool, how do I know how many chains I have? And, do you have a diagram showing where the caps are? I would have to manually pull the engine to TDC to get the cams lined up.... I guess I would feel it if it was locking up...
The caps are two bright green rubber plugs that are on one end of the cylinder heads. You will find one set on each end of the engine, they look like this:
I really need to caution you on attempting to rotate the engine with the IMS bearing out; you are tap dancing in a mine field by doing this. If the engine has not jumped time yet, it most likely will when you attempt to rotate it…………..
-
1
-
-
What high and low line pressures are you seeing when this happens?
The low pressure seems fine, 2-5 bar, the high pressure blows out at 5 bar.
The line pressures vary with ambient temps, but using 68F (20C) as a reference point, you should have 1.4 to 1.7 Bar on the low side; 9 to 15 Bar on the high side. Without the correct pressure differential, the system cannot operate correctly or cool properly. The vent valve on the compressor is designed to open if the system over pressures, so it may be the source of your issues. Unless the system is being overfilled, I'd have to say the compressor is the problem as I do not think the valve is available by itself.
A couple of additional thoughts: Are you sure that additional oil was not added to the replacement compressor? Reason I ask is that replacement units come pre-filled with oil from the factory; adding more oil will overfill the unit (common mistake). You are supposed to pull the oil plug and remove approximately 80 cc of oil from the unit to compensate for oil already in the remaining components (lines, expansion valve, fluid tank, etc.), assuming you are not changing them as well. Doing this will leave approximately 120 cc of oil in the compressor. Too much oil will cause the compressor vent to blow off to prevent the system from creating a hydraulic lock. If you are unsure of how much oil is in the system, it might be a good idea to empty the unit, measuring how much you get out, and then start over. The system is rated for 195 cc, +/- 15 cc for the entire system (you have to adjust for the oil that remains in the other components).
If you are sure the correct amount of oil is in the system, I would pull all the refrigerant out, and carefully recharge the unit to the correct pressure differential for the ambient temp; if the system still vents, you need a compressor.
-
"On a side note..... how involved is "re-allocation" ? I'm assuming it is done on the top end? "
Camshaft "allocation" is an overly complicated process on the M96/97. In a nutshell, it requires holding the four cams in a fixed position in relation to the crankshaft, and then installing the cam drives (the OEM service manual takes about 15 or so pages to describe how to do it and the fixtures and tooling required, depending upon the model year). Not for the faint of heart; and it requires some pretty specific tooling. It is hard enough on and engine stand, a nightmare with the engine in the car. If one or more of the chains was damaged when it jumped, or if the sprocket was damaged, you are far better off pulling the engine................
-
Yes, there are multiple places (sprockets) where this can happen, depending upon if it is a three or five chain motor.
I think you need to pull the cam plugs and look at where the cams are in relation to each other. One of the biggest issues you face is that the engine has only one position (TDC) where the slots in the cams line up, and with the IMS removed, you cannot rotate the engine. You may be forced to have to pull the cam covers, remove the cams (to unload the valves), and then try to get everything back to the TDC position, then start reassembling. But at this point, you do not know if it will even run (or for how long) in its current state.
At this juncture, I really think you need to stop, bore scope the engine to see if it shows signs for piston to valve contact, which is a common phenomenon when an IMS dies. If that is in fact the case, you need to pull this engine and take the heads off anyway, so going through the cam allocation set up would be a total waste of time as it will need to be done a second time when the engine is reassembled outside the car, if it can be reassembled........


Intermittant CEL
in 986 Series (Boxster, Boxster S)
Posted
The sensor has a test diagnostic (voltage should read between 100 and 800 mV, ohmmeter on pins 1 & 2 should read 1.8-2.5 ohm, pin 1 to sensor housing should read infinite ohms ), test it to see if it is good or not; if it checks out, you probably have a wiring issue elsewhere.