Welcome to RennTech.org Community, Guest
There are many great features available to you once you register at RennTech.org
You are free to view posts here, but you must log in to reply to existing posts, or to start your own new topic. Like most online communities, there are costs involved to maintain a site like this - so we encourage our members to donate. All donations go to the costs operating and maintaining this site. We prefer that guests take part in our community and we offer a lot in return to those willing to join our corner of the Porsche world. This site is 99 percent member supported (less than 1 percent comes from advertising) - so please consider an annual donation to keep this site running.
Here are some of the features available - once you register at RennTech.org
- View Classified Ads
- DIY Tutorials
- Porsche TSB Listings (limited)
- VIN Decoder
- Special Offers
-
OBD II P-Codes - Paint Codes
- Registry
- Videos System
- View Reviews
- and get rid of this welcome message
It takes just a few minutes to register, and it's FREE
Contributing Members also get these additional benefits:
(you become a Contributing Member by donating money to the operation of this site)
- No ads - advertisements are removed
- Access the Contributors Only Forum
- Contributing Members Only Downloads
- Send attachments with PMs
- All image/file storage limits are substantially increased for all Contributing Members
- Option Codes Lookup
- VIN Option Lookups (limited)


JFP in PA
-
Posts
8,588 -
Joined
-
Last visited
-
Days Won
190
Content Type
Profiles
Events
Forums
External Paint Colors
Downloads
Tutorials
Links Directory
Collections
Store
Posts posted by JFP in PA
-
-
No, it should not alter fuel pressure or driving behavior, just the fuel level accuracy and what the trip computer thinks is going on.
-
HI, Loren. I'm getting ready to work on the car but am hesitant to disconnect the battery as I don't have my radio code. Would you mind checking what mine would be? My CD-220 info is as follows:
type: 4362
serial number: Y5021118.
Thanks in advance!
Try 5438
-
Hi Loren,
Just picked up a 1999 Boxster. The battery was disconnected while theshop did an LN Engineering IMS update, Could you please look up myradio code?
Becker CDR-220
Type 4462
Serial # X5024191
Thanks Loren,
joe
Try 4856
-
Fuel
Great and thanks a lot.One question left please. What is going to happen if you dont do this procedure after full pump replacement? I had a replacement of all parts at the shop some weeks ago.Thank you
The fuel gauge will not read accurately, can also impact fuel usage calculations in the OBC system for that reason.
-
Loren would you please describe what means FUEL TANK RE CALIBRATION?Thank youSupposedly the fuel filter (inside the fuel tank) never needs changing unless there is damage or external contamination.Fuel tank re-calibration will be required.
You will need a PIWIS tester to calibrate it.1. Disconnect the battery and cover terminal or battery.2. Remove cap over the fuel level sensor system.3. Remove fuel level sensor. (attached to the fuel pump inside the tank).4. Using a fuel extractor, completely drain the fuel tank through the fuel level sensor opening.5. Make sure that the two recesses on the left and right−hand sides of the tank are emptied completely.6. Reinstall the fuel level sensor and, with "ignition off", fill the tank with 28 liters of fuel.7. Perform tank calibration with the Porsche System PIWIS Tester:· Select vehicle type (997TT)· Select control modules· Select instrument cluster· Select menu item "Tank calibration"· Confirm calibration8. The fuel level sensor system has now been calibrated.Be very careful when doing anything with the fuel system as there is danger of fire or explosion.
-
The Durametric system is the diagnostic backbone of my shop, and in use just about constantly. It is a very worthwhile investment, and one that also holds its resale value for those that leave the Porsche fold for whatever reasons.
A lot of diagnostic tool companies spend a lot more on their marketing than they do on their products, Durametric goes the other way about and says little, but let’s their products and customers speak volumes for them.
And, just in passing, we have had several customers try a multiple software systems on their Android or iPhones, with mediocre or inconsistent results at best when compared to even generic OBD II purpose built scanners. The phone may be “smart”, but sometimes just not smart enough……………
-
We get people coming into the shop all the time with "the next great Porsche diagnostic tool that will do everything for half the price of the Durametric system"; only problem is they usually end up only being able to half what the Durametric system does, or less. As Loren noted, the Durametric is hard to beat on either performance or price.
-
I would favor having someone like Gbox that specializes in these transmissions go through it, updating anything needed. Would also be a good time to consider a type of limited slip diff, and redo the IMS & RMS while the gear box is out if it has not been done already
-
As I mentioned is postings # 2 & 4 above, it is my understanding that the system has to be active and connected to the PIWIS to set the correct fluid levels for the clutch, while the gearbox is a simpler overflow system like a manual gearbox. At this time, I am not aware of an aftermarket alternative to the PIWIS, such as Durametric, being able to do this step. So the indy would need to have a PIWIS.
With enough of these systems on the street, I am sure someone will develop a "work around" to get it done, or that the aftermarket will develop diagnostic tools to help, but right now I know of none that will do the job.
-
Thanks for all the great info.
Relating to my 2008 Cayenne S, how much new fluid will I need for a complete flush, and is it unnecessary to bleed the ABS? Would the dealer bleed the ABS?
Many dealers do not even activate the ABS/PSM pumps during a standard flush unless there is a lot of air in the system or they are replacing major system components, so you should not need to either. You will need a bit over one liter of fluid.
-
The 5HP19 tiptronic in my 2000 Boxster was working fine until I did a fluid change and then it started slipping 400 miles after the change. It works fine manually up to 3rd gear and slips going into 4th. I checked the fluid level at the 30c and it was less than 1/2 quarts low. I topped in off and it still slips. I used ZF Safeguard 5 and a filter kit I purchase from Pelican. I did a double flush on the fluid. Should I try changing back to ATF LT71141? Also, I connected my Durmatic up and I am getting a communications failure to the tip, however I am able to communicate with the engine and see no fault code.
You need to be careful about two things: First, the Tip does not like the wrong type of fluid. Specs say that the car should use OEM 999-917-545-00, Esso LT 71141, or Pentosin ATF-1.
Secondly, the lack of communication between the Durametric and the Tip controller is a concern. If the Tip’s controller is out, that needs to be addressed as you need to communicate with it to correctly service the Tip.
-
-
-
Removing and installing rear center panel
1.Removing rear roof trim panel. Grasp underneath the roof trim panel 1 at the side and, pulling in direction of arrow, carefully remove it from the cable clamps 2.
2. Remove sound absorbent film.3. Unscrew fastening nut 1 and remove seal 2.
4. Extend rear spoiler manually. Unscrew fastening screws 1 and remove rear centre panel 2 upwards until the electric plug connection can be released.
 center panel.png
5. Insert a screwdriver from the side and release the locking tab Arrow A and pull off the connector.
Removing auxiliary brake light in rear center panel1. Raise rear center panel away from the vehicle, release the electric connector using a small screwdriver A and unplug it.2. Turn the rear center panel over and set it down on a suitable protective base.
3. The auxiliary brake light is clipped into the rear center panel six times in total. Starting from the outside, put your finger through the openings in the rear center panel and release the clips from behind A. At the same time, release the clips from the front using the screwdriver B and pull the ends of the auxiliary brake light carefully out of the rear center panel.
4. Push the two locking mechanisms for the auxiliary brake light (center) together with a screwdriver and pull the brake light out of the rear center panel.
Installation is the reverse.
You sometimes have to wonder if they could possibly make it any more complicated............................. :eek:
-
Very few aftermarket exhaust systems actually add anything but noise, some to the point of distraction. Some even reduce the engine's power output, so don't put a lot of weight on performance improvement claims. Quality, fit, and installation complexity are all over the map. Do some "due diligence" before buying, talk to actual owners, and if possible actually get to hear what you are buying on a car like your own before spending a lot of money on something you may not like long term.
-
Strange electrical issues (things not working when they should, or working when they shouldn't) are often related to a failing ignition switch. The switch is a cheap and easily replaced item.
-
I appreciate the reply and links. However, I am still trying to make sure that the Guibo is the culprit. Can you tell me how to access the Guibo for inspection.
Do you think I am on the right track?
Not overly complicated; remove the plastic underbody shields, support the transmission and remove the trans mount support bolts. Remove the trans support metal brace. At this point you should be able to see the driveshaft flex disc, remove the bolts in the disc and pull the driveshaft out while putting something under the front diff to catch any oil that may drip.
This procedure, by-the-by, is fully covered in the Bentley 996 service manual with photos and complete diagrams of the components.
-
Glad to be of help...................
-
Get rid of the gear oil and refill with the OEM product; it is a unique full synthetic gear lube produced for only for Porsche. We get cars in regularly with gearbox noise issues that are traced back to using the wrong lube.
-
+1 on what perryinva said. For the hoses, they feel like they're GLUED to the metal flanges. You need to break loose the surface between the hose and the metal. You can use a pick or something similar. Be careful not to mar the metal or cut into the hose with the pick though. Just insert the pick and try to go around the hose perimeter to break the surface, then just twist and pull, it should come off. I only disconnected three hoses for complete coolant drain and water pump and thermostat replacement. Each hose took me only a few minutes.
Today's tool-tip: Spend about $9 and get yourself a hose removal tool (this one is by OTC and sold by Amazon):
Slide it into the hose end, and a quick slide around the fitting circumference, the hose is loose and undamaged. Works on any rubber hose held on by a clamp.
-
 1
1
-
-
Yes, that's obvious and I never stated that I am using the RossTech with my Porsche.
"VCDS cannot activate or even access many fucntions on a Porsche that the Durametric system can". Allegedly can. Most coding function on my car did either not work or made the PCs (two different ones) crash during the same coding attempt.
We use the Durametric system every day in the shop, and find it works very well on a broad cross section of Porsche models and years. A lot of other shops also use it. I have also found that the folks at Durametric are both quick and helpful in sorting out any problems with the install of the system or any bugs or quirks that pop up from time to time, most of which are fairly simple to resolve. No, it will not do everything that a PIWIS does (yet), but is by far the best alternative I have seen to date to a nearly $20K annual lease for the OEM system.
-
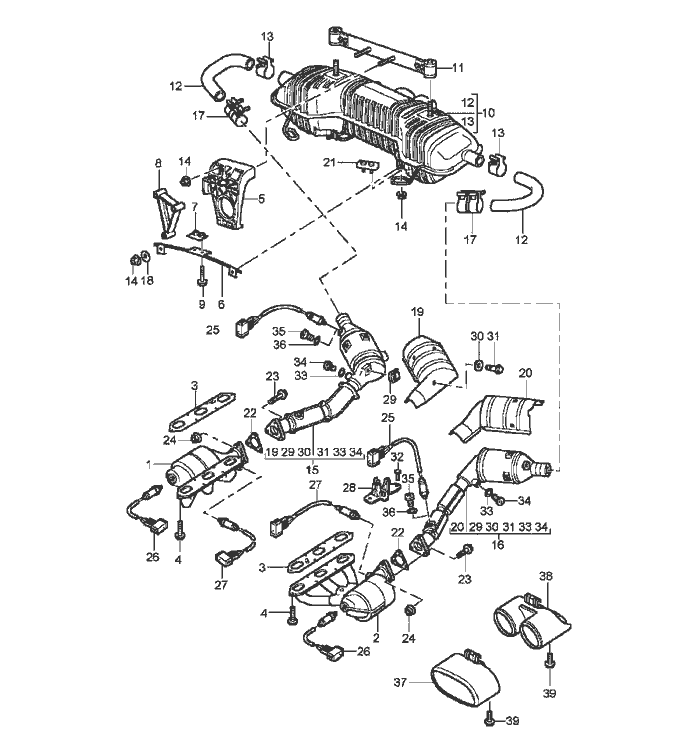
Ummmm............you are aware that a P0420 code is indicative of a problem with the three way catalytic converter, and not the pre-cat on the OEM header?
-
That is going to significantly impact the car's braking at a minimum and could casue other problems (ABS, PSM, line pressure, pressure balance, etc.); why do you want to do this?
-
Kind of the wrong end of the motor for that, plus on some 996 models changing the water pump requires getting some things out of the way that could be problematic with no trans holding the other end up. I'd leave the pump for another time.


Lost Radio Code - post your request here
in Lost Radio Codes
Posted
Try 9243