Welcome to RennTech.org Community, Guest
There are many great features available to you once you register at RennTech.org
You are free to view posts here, but you must log in to reply to existing posts, or to start your own new topic. Like most online communities, there are costs involved to maintain a site like this - so we encourage our members to donate. All donations go to the costs operating and maintaining this site. We prefer that guests take part in our community and we offer a lot in return to those willing to join our corner of the Porsche world. This site is 99 percent member supported (less than 1 percent comes from advertising) - so please consider an annual donation to keep this site running.
Here are some of the features available - once you register at RennTech.org
- View Classified Ads
- DIY Tutorials
- Porsche TSB Listings (limited)
- VIN Decoder
- Special Offers
-
OBD II P-Codes - Paint Codes
- Registry
- Videos System
- View Reviews
- and get rid of this welcome message
It takes just a few minutes to register, and it's FREE
Contributing Members also get these additional benefits:
(you become a Contributing Member by donating money to the operation of this site)
- No ads - advertisements are removed
- Access the Contributors Only Forum
- Contributing Members Only Downloads
- Send attachments with PMs
- All image/file storage limits are substantially increased for all Contributing Members
- Option Codes Lookup
- VIN Option Lookups (limited)


Paul Fraser
-
Posts
292 -
Joined
-
Last visited
Content Type
Profiles
Events
Forums
External Paint Colors
Downloads
Tutorials
Links Directory
Collections
Store
Everything posted by Paul Fraser
-
Adding Cruise Control to a MY98
Paul Fraser replied to doughep's topic in 986 Series (Boxster, Boxster S)
Enough interest...? I'm sitting on the edge of my seat! -
Adding Cruise Control to a MY98
Paul Fraser replied to doughep's topic in 986 Series (Boxster, Boxster S)
Great to hear you are doing a DIY with photos. Some of the above rings a bell from the time I spent looking at the wiring diagrams but I'd have to look at it again for it to make any sense. -
Adding Cruise Control to a MY98
Paul Fraser replied to doughep's topic in 986 Series (Boxster, Boxster S)
Well done. Photos of the wiring harness would have been nice but too late now, I guess. Can you describe it? Which connectors can't you get? Is it the one that attaches to the cc unit? Not the one at the stalk, I presume as this is used in the egas upgrade. How does it connect to the Obd computer? Again, well done. -
If you think that the system has lost all its pressure and has been open to atmosphere I wouldn't use the self-refill kits. My aircon guy says they contain sealant that solidifies on contact with water and knows of two drivers who have 1. wrecked their compressor and 2. blocked their expansion valve. Both required costly replacement.
-
It's probably a job you can do yourself. What have they said the problem is? Usually it is the condensers as leaves and dirt get into the corners and then cause corrosion, but I doubt it gets that wet in Texas...
-
Mass Air Flow Sensor
Paul Fraser replied to DoubleNutz's topic in 996 Series (Carrera, Carrera 4, Carrera 4S, Targa)
Thanks for that. I had a look at the TSB which covers egas cars I presume. I take it 123 can be used on MY98 Carreras as well as MY99? (mine is Dec '97, one of the first). -
Mass Air Flow Sensor
Paul Fraser replied to DoubleNutz's topic in 996 Series (Carrera, Carrera 4, Carrera 4S, Targa)
So if you are replacing the 123.00 (non egas) with the 124.00 (egas/superceded) or the 125.01 (egas), that is non egas MAF with egas MAF you need a DME update...? Or is the DME update only for egas cars going from 124.00 to 125.01? -
Mass Air Flow Sensor
Paul Fraser replied to DoubleNutz's topic in 996 Series (Carrera, Carrera 4, Carrera 4S, Targa)
Hi Loren, did you ever find out why the Boxster needs the DME update (doesnt affect me, '97 Boxster and just got a spare 123.00 MAF off of Ebay, just curious)? -
Hi, a few questions if I may. I have the four output amp in my Boxster for the dash and door speakers. I have recently fitted the rear parcel shelf (although you can't actually order it for the '97 it seems to fit ok) and am thinking about buying the rear speaker kit from Harvey. I have recently bought a M490 amp off of Ebay (from a 2001> cab if my PET homework is correct 996.645.323.00 996 CABRIO M490) and would like to use this to replace the Boxster amplifier so I can run the dash, door and rear speakers off of it. How do I connect the rear speakers into the amp? I assume it is just a case of sloting the rear speaker wires into holes 6, 16, 5, 15? I assume Harvey supplies the Molex pins if you ask? Further: Rather than cutting the plastic connector I intend buying the correct one for the 6X40W amp and swapping the pins over from the current Boxster connector -- anyone else done this? Did anyone ever find out what the difference between the cabrio and couple amps was? Thanks. PS Have scoured the internet for a Molex pin remover of the correct size as the Sir Tools one seems to have been discontinued. All I have found is this guy: http://cgi.ebay.co.uk/ws/eBayISAPI.dll?Vie...A%3AIT&rd=1
-
Cruize Control
Paul Fraser replied to SPR's topic in 996 Series (Carrera, Carrera 4, Carrera 4S, Targa)
Any chance of some pics Lena? -
FYI, you can get replacment inserts from the UK that don't have airbag stickers on them if you can't be bothered with this. Although it looks like a perfect job for a Sunday...
-
Plastic Grills in Front Bumper
Paul Fraser replied to akpud's topic in 986 Series Part Number Requests
Just ordered these myself for a '97: 986 505 553 01C 986 505 554 01C both in satin black. -
Loren, any thoughts on A/C not cooling anymore
Paul Fraser replied to BigBadBen's topic in 996 TT, 996 TT S, 996 GT2
Postscript to the self regassing above: the aircon guy came around today and said that there have been problems with the sealant in the cans as it solidifies on contact with mositure and one guy he knew (Merc) lost a compressor. So if you think you have a leak and the system has been open to atmosphere take care, or at least fit a new dessciant first. Will find out what has happened to my 996 in a month when he comes back.... -
Loren, any thoughts on A/C not cooling anymore
Paul Fraser replied to BigBadBen's topic in 996 TT, 996 TT S, 996 GT2
Oh well, as long as the only problem now is that we are all baffled! -
Loren, any thoughts on A/C not cooling anymore
Paul Fraser replied to BigBadBen's topic in 996 TT, 996 TT S, 996 GT2
Yeah, glad you got it fixed but how do you explain the change in engine revs, which you thought was associated with compressor load? Just curious now, :) -
Loren, any thoughts on A/C not cooling anymore
Paul Fraser replied to BigBadBen's topic in 996 TT, 996 TT S, 996 GT2
http://www.boxa.net/forum/index.php?showtopic=22137&hl= You should be able to get a self regas kit with gauge by mail order. If your car doesn't maintain pressure, then what I would suggest doing is removing the front bumper and vacuum testing the condensers. This presumes that you don't have a compressor hose leak... http://www.realtime.net/~rentner/Porsche/R...r/Radiator.html However, a decent aircon shop should be able to pressure test the car aircon system and do leak detection. My leak on the Boxster was actually in the inlet line running down the underside of the car, although I suspect one of the radiators had started leaking before that. How old is your car, and I assume it gets wet quite often where you are? PS If it is the condensor(s) make sure you get the right part no. I ended up with a C4S one that is different from the 986/996 one. I see the 996TT condensor has a different part number too. -
Have a feel at the bottom of the door next time it happens. If this is wet it is a door membrane problem -- I've had a couple, and, obviously, if your car is parked on a slope the water will pool at one end or the other, if it finds its way into the car (which is a lateral slope function).
-
Rear Storage Box for 996 Coupe
Paul Fraser replied to Richard Hamilton's topic in DIY Articles - Carrera (996) - Mods
Thanks, Richard, another job to add to my (already way too long) list. -
Rear Storage Box for 996 Coupe
Paul Fraser replied to Richard Hamilton's topic in DIY Articles - Carrera (996) - Mods
Nice mod: when are you going to start selling them on Ebay? (Black, please :) ) PS More seriously, where did your brother get his alcantara from? -
I wonder why they went for a different system for fitting it to the hardtop in the first place, when it also connected to the car. Doesn't really make any sense...
-
Which begs several questions... Are there two types of RTS system? What happens if you have a 99 hardtop on a 97 car?
-
Aircon pipe replacement
Paul Fraser replied to Paul Fraser's topic in 986 Series (Boxster, Boxster S)
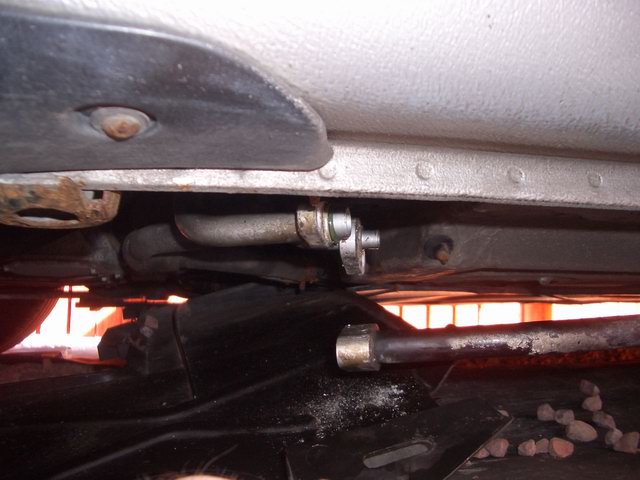
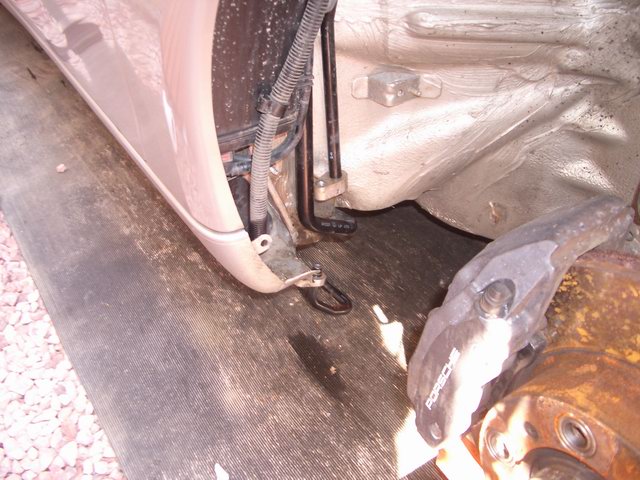
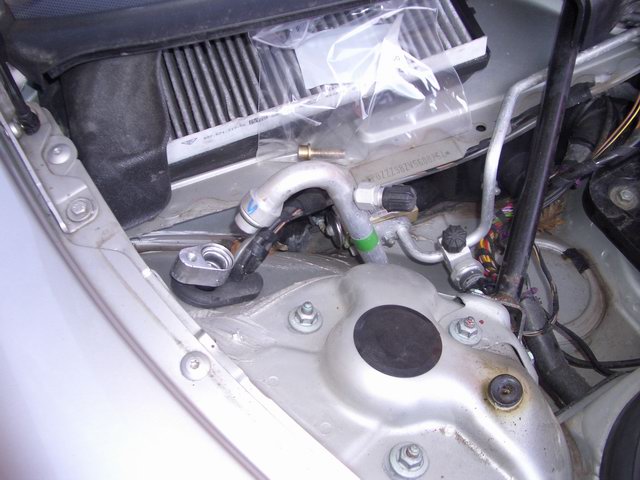
Thanks for that. When I removed the canister and disconnected the filler pipe I managed to get the intake pipe out. Bit of a struggle to get it out through all the piping in there but doable. The hole was so small in the inlet pipe I couldn't see it or any water leak after I filled the pipe up with water. After five minutes though, I saw a small pool of water underneath. I think that a lot of cars will begin to have this kind of problem as there was some evidence of bubbling/corrosion on the pipe. Some photos for the next poor sod that has to do this. This one shows the rear of the two pipes, they are just forward of the rear wheel. The pressure pipe is farthest inboard. The one you can see hanging is the inlet pipe (still attached at the front when I took this). I found it very difficult to unscrew the hex bolt on the pressure pipe, you need more height than I have here to get good access. I will be painting my rusty jacking point. :) This one shows the front wheel well: the front of the pressure pipe joins the rest of the system here. An easy removal once you get the wheel liner out. The left hand pipe is the inlet one and runs all the way up and behind the canister and fuel filler pipe. Note the Zimmerman discs, the unpainted hubs have become rusted and unsightly: I now wish I had painted them before puting them on the car. Another job to do. Finally, under the boot for the front of the inlet pipe. I had to remove the carbon canister in the wheel well (only one screw holds it but it took a tug or two to remove -- remember and undo the tubes going to the canister) and move the fuel filler pipe to the front a little (after taking unbolting it, removing the earth wire and the rubber liner). I see that the top of the air filter box is missing. :( Thank goodness I have a full OPC service history on the car otherwise the whole thing might not be there.... Once I get the pipes on Saturday I'll put it back together and then move on to changing the front aircon radiators (both have the tell tale oil marks on the corner). Then, hopefully, all I will have to do is fit a new dessicator and find an aircon regas company to call. Please God, don't let it leak....
-
Aircon pipe replacement
Paul Fraser replied to Paul Fraser's topic in 986 Series (Boxster, Boxster S)
OK, I Think I have found out what the black unit is: it is the carbon canister, and it is on PET 201-20, so I assume this is a fuel filter of sorts? Just out of curiosity what does this do? And what are the two weird options for the shut off valve -- OBD2 and ORVR? -
I had my aircon pressure tested a couple of months ago and a hissing noise was heard beside the cable holder for the intake and pressure lines that run down the right hand underside of the car (just underneath the sills). I presumed the problem was the pressure line and today removed the front wing liner, rear under trim rhs and then the pressure line. However, it did not lose vacuum when I tested it so I disconnected both ends of the intake pipe (one is just in front of the rear wheel, the other is beside the nozzle beside the battery). It did not hold vacuum (although I had difficulty finding something to plug both ends with), and as the pressure line is ok I presume this is the faulty component. The problem is that it will not be easily removed as it runs behind the fuel filler pipe and a black container below it. Questions: Anyone replaced this pipe before? Anyone had it repaired (the aircon guy mentioned a 'space shuttle' repair). How is the fuel filler pipe removed? Can access be got under the battery as per the fuel pump? What is the black plastic unit under the fuel filler pipe (is this the carbon canister, and, if so, what does it do?) and how is it removed? I have a horrible feeling that to replace the intake pipe I will have to take off the wing, fuel filler pipe and the black canister below the fuel filler pipe...
-
That's really useful Loren. I've been caught out by the four letter requirement on a number of occasions (very shallow learning curve!)