Welcome to RennTech.org Community, Guest
There are many great features available to you once you register at RennTech.org
You are free to view posts here, but you must log in to reply to existing posts, or to start your own new topic. Like most online communities, there are costs involved to maintain a site like this - so we encourage our members to donate. All donations go to the costs operating and maintaining this site. We prefer that guests take part in our community and we offer a lot in return to those willing to join our corner of the Porsche world. This site is 99 percent member supported (less than 1 percent comes from advertising) - so please consider an annual donation to keep this site running.
Here are some of the features available - once you register at RennTech.org
- View Classified Ads
- DIY Tutorials
- Porsche TSB Listings (limited)
- VIN Decoder
- Special Offers
-
OBD II P-Codes - Paint Codes
- Registry
- Videos System
- View Reviews
- and get rid of this welcome message
It takes just a few minutes to register, and it's FREE
Contributing Members also get these additional benefits:
(you become a Contributing Member by donating money to the operation of this site)
- No ads - advertisements are removed
- Access the Contributors Only Forum
- Contributing Members Only Downloads
- Send attachments with PMs
- All image/file storage limits are substantially increased for all Contributing Members
- Option Codes Lookup
- VIN Option Lookups (limited)


03BoxsterS
-
Posts
49 -
Joined
-
Last visited
Content Type
Profiles
Events
Forums
External Paint Colors
Downloads
Tutorials
Links Directory
Collections
Store
Everything posted by 03BoxsterS
-
IMS failure 2005 Boxster 44,352 miles
03BoxsterS replied to Peterthegreat's topic in 986 Series (Boxster, Boxster S)
Sorry for your loss. :o I've got an '03 Boxster S with about 23,000 miles; everything fine so far, but I'll be watching this thread. I know another fellow that had a failure around 40k miles......Keep us posted. What can you tell us about how the car was driven or maintained? -
Scotch Guard vs Porsche sealant on the top?
03BoxsterS replied to martialmedia's topic in 986 Series (Boxster, Boxster S)
303 High Tech Fabric Guard is some of the best stuff on the market. I use the 303 cleaner every couple of months, and the fabric guard once or twice a year. -
Andy_M, this is an absolutely great writeup - thanks for doing this. And thanks to EddyH for asking a question, which made this thread show up in the "New Posts" area, allowing me to view it. I had done some searches on Boxster stereo mods, but hadn't found this one. I have a 2003 Boxster S, CDR23, upgraded Bose system with amp in the boot, dash speakers, door speakers, and rear speakers. My major complaint is the bass is unfocused, muddy, fuzzy, boomy, etc. You get the idea. Andy, I have a question. I have asked multiple installers about modifying my stereo system. All of them tell me, because of the MOST system, I have to replace EVERYTHING - head unit, amp, speakers - I can't do incremental or gradual upgrades. Can you comment on this? It appears you have made a major improvement just by replacing the speakers - are you still happy with the result, or have you since upgraded your head unit and amp? Thanks again, great writeup.
-
I have an 03 Boxster S as well, recently purchased the Hawk Performance HB290F.583 (rear) and HB550.634 (front) pads. Mine's a daily driver plus about 7 track events per year. I have not put them on my Boxster yet, but did put a set on my Infiniti G35, and really like the performance. Low dust, no noise, good performance. But won't test them on the track until next spring. I've never had ceramic but they might be a bit extreme for everyday driving.
-
Self-dimming rear view mirrors availability
03BoxsterS replied to psng's topic in 986 Series (Boxster, Boxster S)
I have one in my 2003 Toyota 4Runner that works great and I love it. The one in my wife's 2005 Infiniti G35x is a piece of crap, works terrible. So I conclude that it is completely dependent on the quality of the manufacturer. My Boxster has the old style manual mirror, which can't be beat in terms of price and reliability. I wouldn't buy an auto-dimming mirror unless I had tested it myself in a previous vehicle. -
That looks absolutely great, don't be a chicken next time someone rams your car into a light pole. I've always thought if I got a hardtop for my boxster, I would paint it flat black - to match the fabric top. Check out the RUF CTR3 in flat matte gray in the Dec 2008 issue of Excellence if you don't think flat paint looks good - it will change your mind. Kevin
-
I've got an '03 Boxster S and went thru the same thing, thinking when I removed the battery for storage my radio code would be lost. Talked to the dealer about it while picking up some parts, and they actually spent 30 minutes messing around with it (it was a slow day for them I guess) before they figured out there was no code. The radio has a way of recognizing what car it's in, so doesn't need a code.
-
Importing boxster into Canada? Think again.
03BoxsterS replied to zedex's topic in 987-1 Series (Boxster, Boxster S)
I've imported 4 cars from the US to Canada, including my Boxster S in April 2006, never had a problem with any of them. It's a fairly simple process, just have to fill out a few forms and get out the wallet. There is a much wider selection of good used cars in the states, at lower prices. And if you get the right customs agent, sometimes you can avoid the import duty as I did on my wife's Infiniti. They asked where it was manufactured, and I replied I wasn't sure. The agent went out to the car, couldn't find any stickers indicating country of manufacture, decided it was built in North America and didn't charge duty. They didn't realize you could determine the country of origin from the VIN number, or they were to lazy to look it up. Good for you for bringing up the car, Zedex, and shame on those dealers. Enjoy the new car. -
I have a V1 and I think it's a great little unit, like the arrows as well. The major complaint I have is the number of false alarms. If I were to replace this one, I would try the Escort, as I hear the gps technology works well to eliminate the false alarms.
-
Replaced top-trouble with closing
03BoxsterS replied to Hookoo3's topic in 986 Boxster Convertible Top Issues and Solutions
Two turns on the white plastic ball cup did it, Maurice. Thanks very much for your detailed directions and also adding a lot of "why this works" explanations. The top can now be latched with one hand as per the design. There is still a little gap on the drivers side, so I may eventually mess around with the tension rope, but at this point it is splitting hairs. Thanks again, 03BoxsterS -
Replaced top-trouble with closing
03BoxsterS replied to Hookoo3's topic in 986 Boxster Convertible Top Issues and Solutions
Hi Maurice I have the same issue with one side of my top, and I've lengthened the pushrod as far as it will go. Still have 1/2" to 3/4" gap on drivers side, just enough that I have to hold the roof down with one hand while latching with the other. So I want to lengthen the tension rope on the drivers side......I can find it in the parts drawing, but can't find it on the car. Do I need to remove the inside liner to access the tension rope? What position should the top be in to get best access? Thanks 03BoxsterS -
Go get your money back, pronto. Since they outright lied to you, you've got a pretty good case. But you're gonna need replacements, so you'll have to think this through. One possibility - call them and tell them you are returning the tires because they misrepresented the age. Once they agree to take them back, go to a reputable tire dealer and get new tires. Deliver the old ones to the crook- ...uh... I mean creative tire dealer, and get your money back. Good luck.
-
Welcome to Renntech and good luck with your trip. Word to the wise, don't expect AAA to bail you out if you have trouble; they basically work within your city limits. I tried to use them once on a cross country trip and found out the hard way they offered absolutely zero outside my city limits. You should call them and confirm what services they will provide, and where. The other thing I would do is take a list of PCA contact lists for the zones you will be driving through (assuming you are a member). PCA members can be a real lifeline when looking for repair shops or assistance in unfamiliar areas. Best of luck.
-
Just to follow up.......I have discussed this with multiple intelligent people that understand clutches and flywheels, and concluded that I most likely did not need the flywheel. Positives are I have a new clutch and flywheel that work great, as well as a used flywheel that can be put back in another car at some point.:clapping: Negatives are I paid about twice what I should have.:censored: How did this happen? I think it boils down to how the mechanics working in the shops are compensated. I think more independent shops, at least in my area, are compensating their mechanics via commissions, which accounts for the aggressive behavior I encountered when looking for help. I would be interested in comments from other members regarding if they are seeing the same thing, and how to deal with it. I'm not in a position to work on my car myself every time I need work done, which means I will need to continue to take it somewhere. Comments? 03BoxsterS
-
Excellent looking workmanship, thanks for sharing. Nice to see something useful done with that worthless cd-holder space :cheers:
-
1st time into the black hole :)
03BoxsterS replied to mcmike27's topic in 986 Series (Boxster, Boxster S)
It really is that easy - they just pop off by hand. Kinda hard to break anything as far as I can tell. -
Went to the track this morning, and happy to report I like the short shifter better than the original at the track. After a few laps it definitely loosened up a little. I had absolutely no issues shifting. There was a bit of rain and it's not a big track, so I gave gears 1-3 a pretty good workout, didn't use 4.
-
My reaction was quite similar. I went thru "This feels great" to "Maybe this is just a little to tight" to "Ok, it's feeling more natural now". I think a big part of it is just getting used to it. I do not think this speeds up shifting, but it does feel like a sports car should in my opinion. While I was researching this, I went to the boxster spec racing web page to look at their lists of equipment/changes. I was initially surprised when their list said short shifters were not recommended. After using a short shifter, now I can understand - my old shifter was like a hot knife thru butter, and the new one is much stiffer, and could cause missed shifts if you are not careful. I'm going to the track tomorrow for the first time with the short shifter, we'll see if my opinion changes.
-
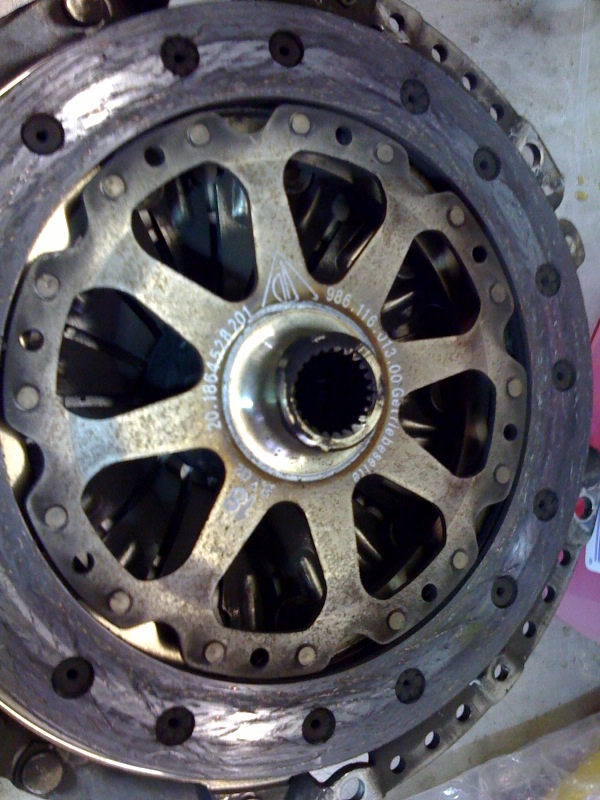
Bill, thanks for your reply and questions. I'll answer them as best I can, but this is the first used clutch I've ever seen, and I don't know much about them. For all I know, I'm a poster child for how not to do this. 1. I bought a Sachs clutch kit including: 996 116 027 06 Pressure Plate, 986 116 013 00 Clutch Disc, 996 116 080 04 Release Bearing. So if it was a pressure plate I should be in good shape now. The mechanic never mentioned the pressure plate, so I didn't pay much attention to it. Based on your comments, I will call him and ask about this. If it was the pressure plate, you still have to rip everything apart to get to it, so I'm ok with replacing the clutch and throwout bearing at the same time. 2. The clutch certainly wasn't worn down to the rivets, but it had some marks and grooves on it, some are visible in the picture. What does this mean? Dunno. 3. See #1 above. 4. First, you have to realize these are Canadian prices, except for the clutch kit. I'm sure you are familiar with the US slogan "Land of the Free". Well in Canada you can remove one letter and get "Land of the Fee", and it is a very good description of how consumers are treated up here. I will share these costs but just so you know I am not happy with the total. I'm sure you can do much better in the US, unless you go to the dealer. a. Sachs Clutch Kit $318 US plus shipping b. 6 hours labor $650 Can c. LUK flywheel $1050 Can. I would have ordered this from the US also, but it was basically a decision you have to make on the fly as the work is being done. I didn't think I would need one, but the mechanic said it was absolutely necessary. So I agreed to have it replaced. Yes, I'm having second thoughts about this. I figure in the end the damage was about $1850 US or $2050 Can, for which I got a clutch kit, flywheel, and 6 hours labor. Not rock bottom prices, but not to bad if I really needed the flywheel. 5. Most likely you do a lot of freeway driving in SoCal. In my daily driving in Calgary, it is mostly stop and go, as there really are no freeways here. But congrats on getting the most from your car (ok, I am gritting my teeth a little here :D ).
-
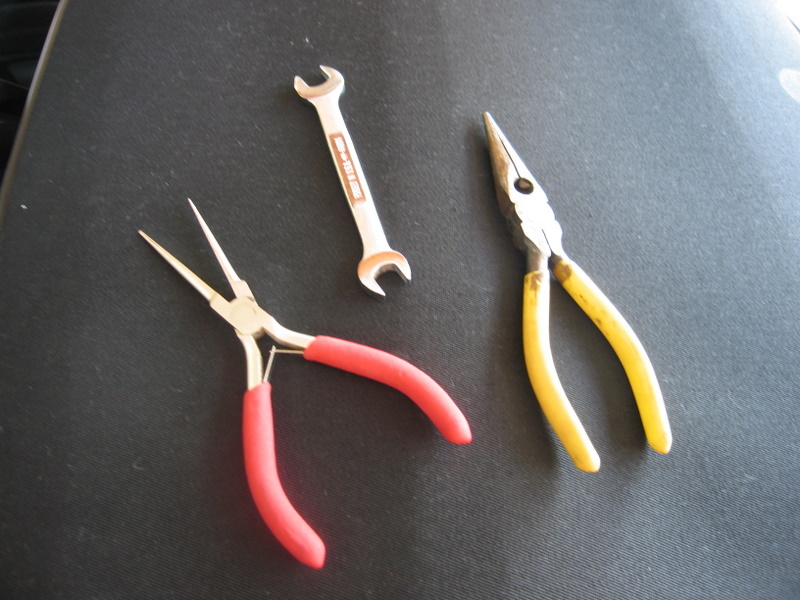
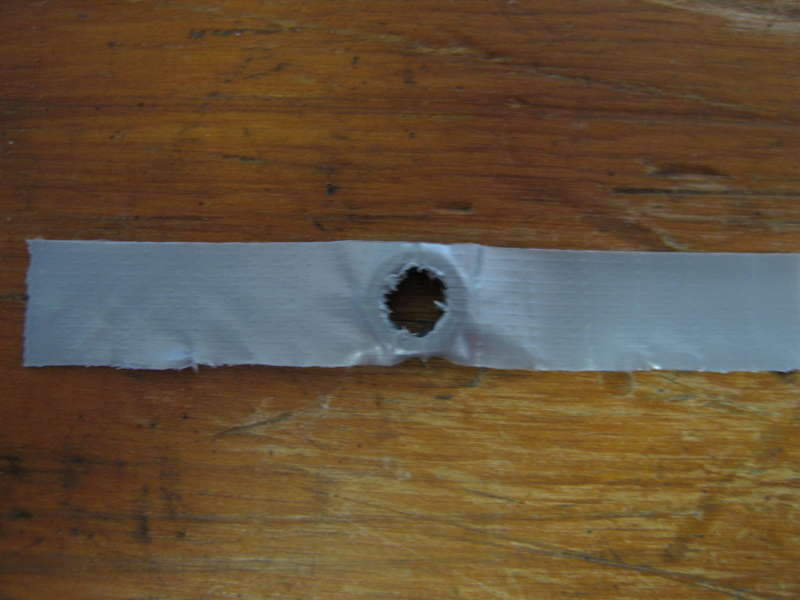
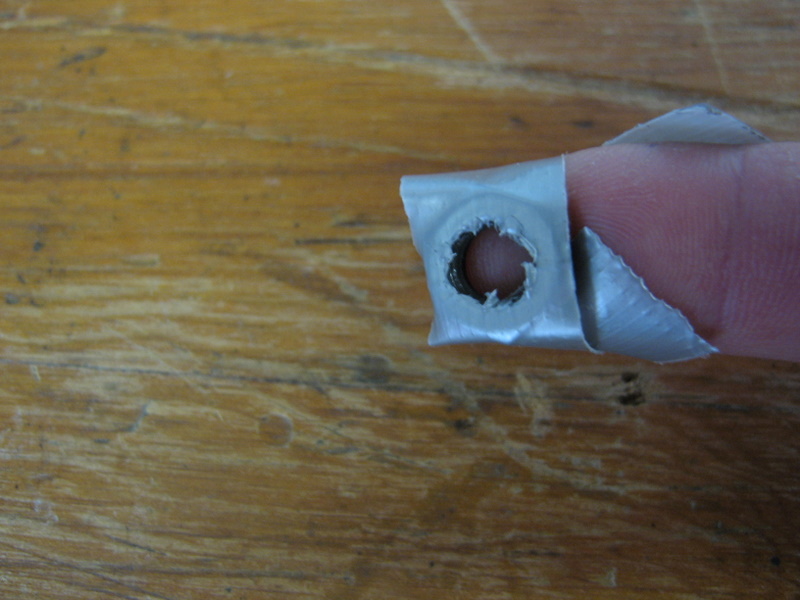
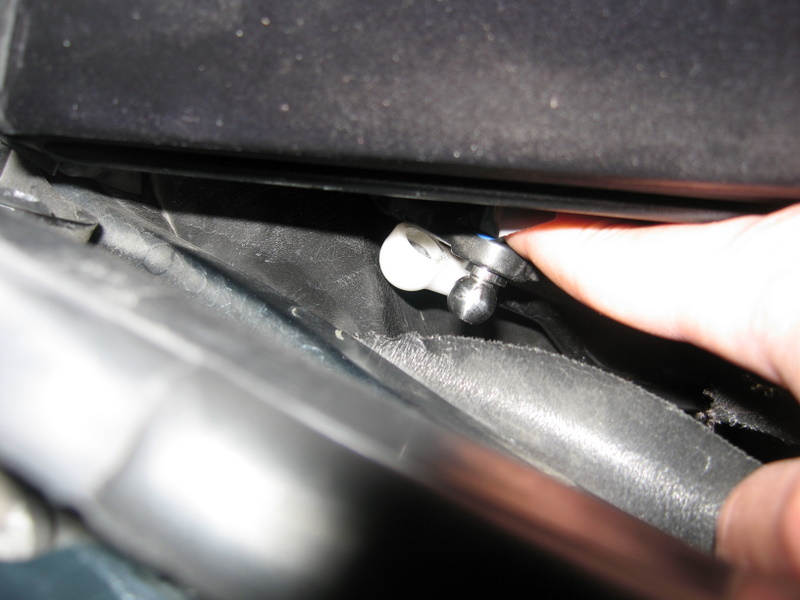
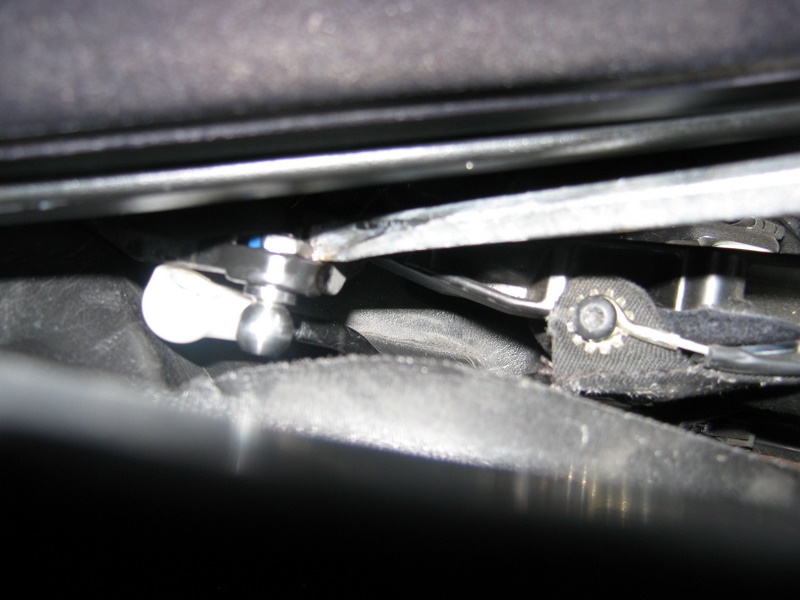
Thanks to Maurice and Mike for the excellent help throughout all this.....and guess what - IT'S FIXED!! I read through the directions on removing the top, which didn't seem to bad, then went to the top replacement directions; now that looked like work and I am quite lazy. So I decided to torture my hands and fingers and try it one more time before I dove into top removal. Below is a pictorial on how I attacked it: Tools used, plus duct tape of course (how did I manage to leave the duct tape out of the picture? It was the key ingredient!) The first step was to attach duct tape to the nut, as below. Make sure you clean all the tape out of the thread area - push or cut the tape well away from the threads, not as I show it in the picture. Step two was to duct tape the nut to the fingertip. You could also tape it to a stick, but I wanted to be able to feel when the threads started. Step three - insert the pin into the bracket with needlenose pliers, here is the pin in place: Step four - place your fingertip, with the nut taped to it, on the back side of the bracket, see below. Take the needlenose pliers and grasp the ball side of the pin and patiently start screwing it in. It's hard to move it much more than 1/8 turn or so at a time. It took me several tries, but within 10 minutes I had it started. In this picture the threads are engaged and the pin side is snugged up against the bracket. Once it's in place, yank your finger loose and pull the duct tape off. At this stage it's not tight so most of the duct tape should come off. Then add some loctite and tighten it up. You can also add loctite before you start, but it would get messy. You're supposed to use blue on this size stuff but I had red handy, so that's what went on. I placed a screwdriver between the nut and the bracket to back up the nut while tightening the pin with needlenose and finishing up with an 11mm spanner. DO NOT OVERTIGHTEN or you risk breaking the bracket, which I've heard is crazy expensive. I got it handy tight and then went about a quarter turn.

-
I tried the methods mentioned in this post Access to ball pin area, but I'm having problems.....you see, my fingers won't bend backwards for some reason. Anyway, mikes_box mentioned pulling the entire top off, said it was easy to do and took an hour. I'm thinking that might be a good option; can someone point me to directions that show how to do this? Thanks, Kevin
-
Never mind, found the answer to this question here Access to ball pin area Looks like it might be a bit of a challenge, might consider taking off the top. By the way, thanks to the contributors to this link that warned about overtightening, which could lead to broken parts and huge $$$$ repair bills....
-
Part's arrived, see picture below. The silver pin is the part I ordered, and the nut is what I dug out of the top of the drainhole area. Quarter included for perspective. I checked this area again, and there is not a black rubber washer, so I have all the parts I need to do this. So now the question is: How do I access this area? I've looked in the Bentley manual, but they don't discuss much in the way of dis-assembly. It's in a tough area to get to, so if anyone has any hints about how to get at it, I'm all ears.
-
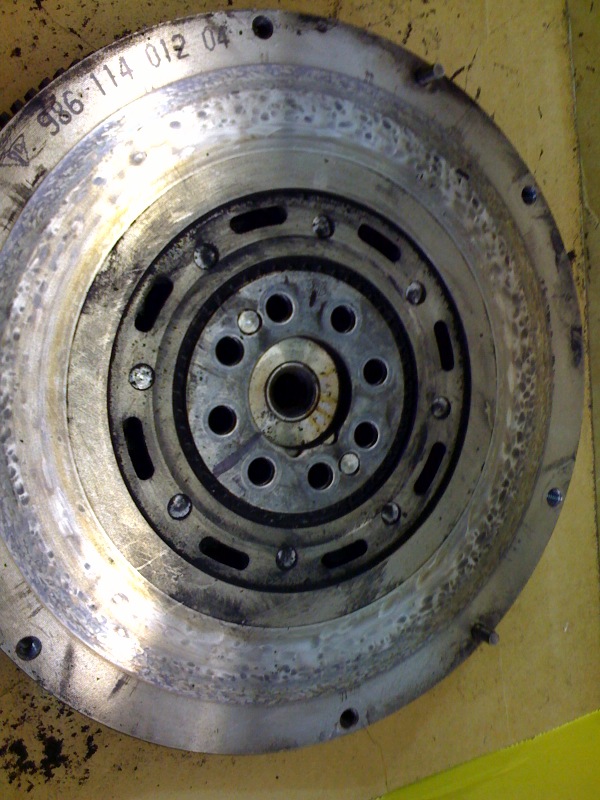
Well, the deed was done today. Clutch and flywheel replaced, as the mechanic said the flywheel had "hot spots" and a small groove in it. I could see the mottled, darker areas he called hot spots, but had a hard time seeing the groove. I've attached some pictures, I'm interested in any comments on the condition of the flywheel, since this is the first Boxster flywheel I've seen (also first one I've ever had to replace in a car). Also thought other folks could have a look and see what a clutch/flywheel with 22,000 miles looks like, maybe learn something from it. The new clutch and flywheel feel great, I just about put the clutch pedal through the floorboards when I pushed on it the first time. Gives you an indication of how hard the old one was. The guys in the shop seemed to know what they were doing, and the mechanic seemed on top of things. There is this nagging pain in my wallet that hopefully time and several paychecks will make better. Have a look at these pictures and let me know what you think. Thanks
-
Tire pressure gauge
03BoxsterS replied to rattles's topic in 996 Series (Carrera, Carrera 4, Carrera 4S, Targa)
For a third-party alternative, I like the Accu-Gauges, got one from Get A Gauge. I use the H series and really like it, they make quality instruments. They will also sell you a pencil gauge if you want one, but don't know why anyone would.