Welcome to RennTech.org Community, Guest
There are many great features available to you once you register at RennTech.org
You are free to view posts here, but you must log in to reply to existing posts, or to start your own new topic. Like most online communities, there are costs involved to maintain a site like this - so we encourage our members to donate. All donations go to the costs operating and maintaining this site. We prefer that guests take part in our community and we offer a lot in return to those willing to join our corner of the Porsche world. This site is 99 percent member supported (less than 1 percent comes from advertising) - so please consider an annual donation to keep this site running.
Here are some of the features available - once you register at RennTech.org
- View Classified Ads
- DIY Tutorials
- Porsche TSB Listings (limited)
- VIN Decoder
- Special Offers
-
OBD II P-Codes - Paint Codes
- Registry
- Videos System
- View Reviews
- and get rid of this welcome message
It takes just a few minutes to register, and it's FREE
Contributing Members also get these additional benefits:
(you become a Contributing Member by donating money to the operation of this site)
- No ads - advertisements are removed
- Access the Contributors Only Forum
- Contributing Members Only Downloads
- Send attachments with PMs
- All image/file storage limits are substantially increased for all Contributing Members
- Option Codes Lookup
- VIN Option Lookups (limited)


Kim
-
Posts
382 -
Joined
-
Last visited
Content Type
Profiles
Events
Forums
External Paint Colors
Downloads
Tutorials
Links Directory
Collections
Classifieds
Store
Everything posted by Kim
-
How Much To Replace Aos?
Kim replied to ultramens's topic in 996 Series (Carrera, Carrera 4, Carrera 4S, Targa)
Just had the AOS replaced in my 2000 996 Tip. On the tip cars, the engine must be removed for this task. My indie mech charged $1300, parts and labor. -
High mile role call
Kim replied to violaGT3's topic in 996 Series (Carrera, Carrera 4, Carrera 4S, Targa)
2000 Cab - daily driver in Atlanta suburban traffic. 107,000 miles. Other than replacing of the coolant tank myself, have just experienced the first engine related repair .... failed air / oil separator. -
996 key lost memory
Kim replied to Ethan's topic in 996 Series (Carrera, Carrera 4, Carrera 4S, Targa)
I think you will find that it is the security computer in the car that goes to sleep after 5 days for so .... not the key. The key does not know how long its been since it was used to unlock the car. -
2000 996 Cab Tip / 105,000 miles: Several weeks ago, my car began a loud squeal coming from the engine compartment almost every time I lifted my foot from the accelerator and slowed through about 30 mph. If I took pains to stop gently, it would continue at idle. If I stopped with a sudden stab of the brake pedal, it would cease. If I goosed the accelerator, it would cease. After becoming silent at idle, I could restart the squeal by slowing increasing RPM to 1700 or so, then easing off the accelerator. Only happened after the car was warmed up. Shortly after this started occurring, I noticed that the oil pressure would dive down in relation to how hard I was braking to a stop. If I coasted to a stop, the oil pressure settled at about 1/2 bar. If I braked firmly all the way to a stop, the oil pressure needle bounced off zero, momentarily triggering the oil warning light. Took it to my friend / indy tech, who was quite puzzled at first. He used a stethoscope to eliminate, in his view, all the pulleys and the alternator as sources of the squeal. After I drove away, he did some research and phoned to ask me to return. With the engine running, he attempted to remove the oil filler cap. When he could not, he announced that he suspected the air / oil separator. It had failed, and was producing a stronger than normal negative pressure within the system. He offered that it could probably explain the oil pressure problems, also. After I left the car, he called again to explain he had discovered that replacing the AOS in a Tiptronic car would be considerably more labor than he had estimated. While doing the work, he found oil fouling in the intakes to confirm his diagnosis. Picked up the car this past weekend, and all is good. Squeal is gone, and oil pressure behaves normally, never diving with the brakes, and settling at 1.5 bar at idle. One remaining problem: my oil quantity indicator on the dash has shown the crankcase to be empty for some time now. While under there, he replaced the oil quantity sender .... but the problem remains. Indicator does not appear to have failed .... still lights up prior to start, but shows zero oil. Any thoughts? Kim
-
Any info would be appreciated: 1. For several months, my electronic oil quantity (in dash cluster) has gone through its normal timing cycle then indicated ZERO oil in the car .... on about 9 out of 10 starts. A while back, Loren suggested I check the connection at the sending unit, and my mechanic just did that during the latest 30K mile check up. It appears to be fine. Any other ideas? Can the oil quantity portion of the instrument cluster be replaced independently of the rest of the panel? Before anyone says it .... I know I can check my oil the old fashioned way. Its just that something not working every time I start the car is like the proverbial pea under the mattress. 2. 3 years ago, I replaced my OEM third brake light with a smoked LED one from Sharkwerks. Looked great, and worked fine. Now it has quit cold. Other brake lights work. Power and ground are present in the units plug when brake pedal is pushed. Any ideas? Do these things just quit cold like that after a few years. Thanks for any insight,
-
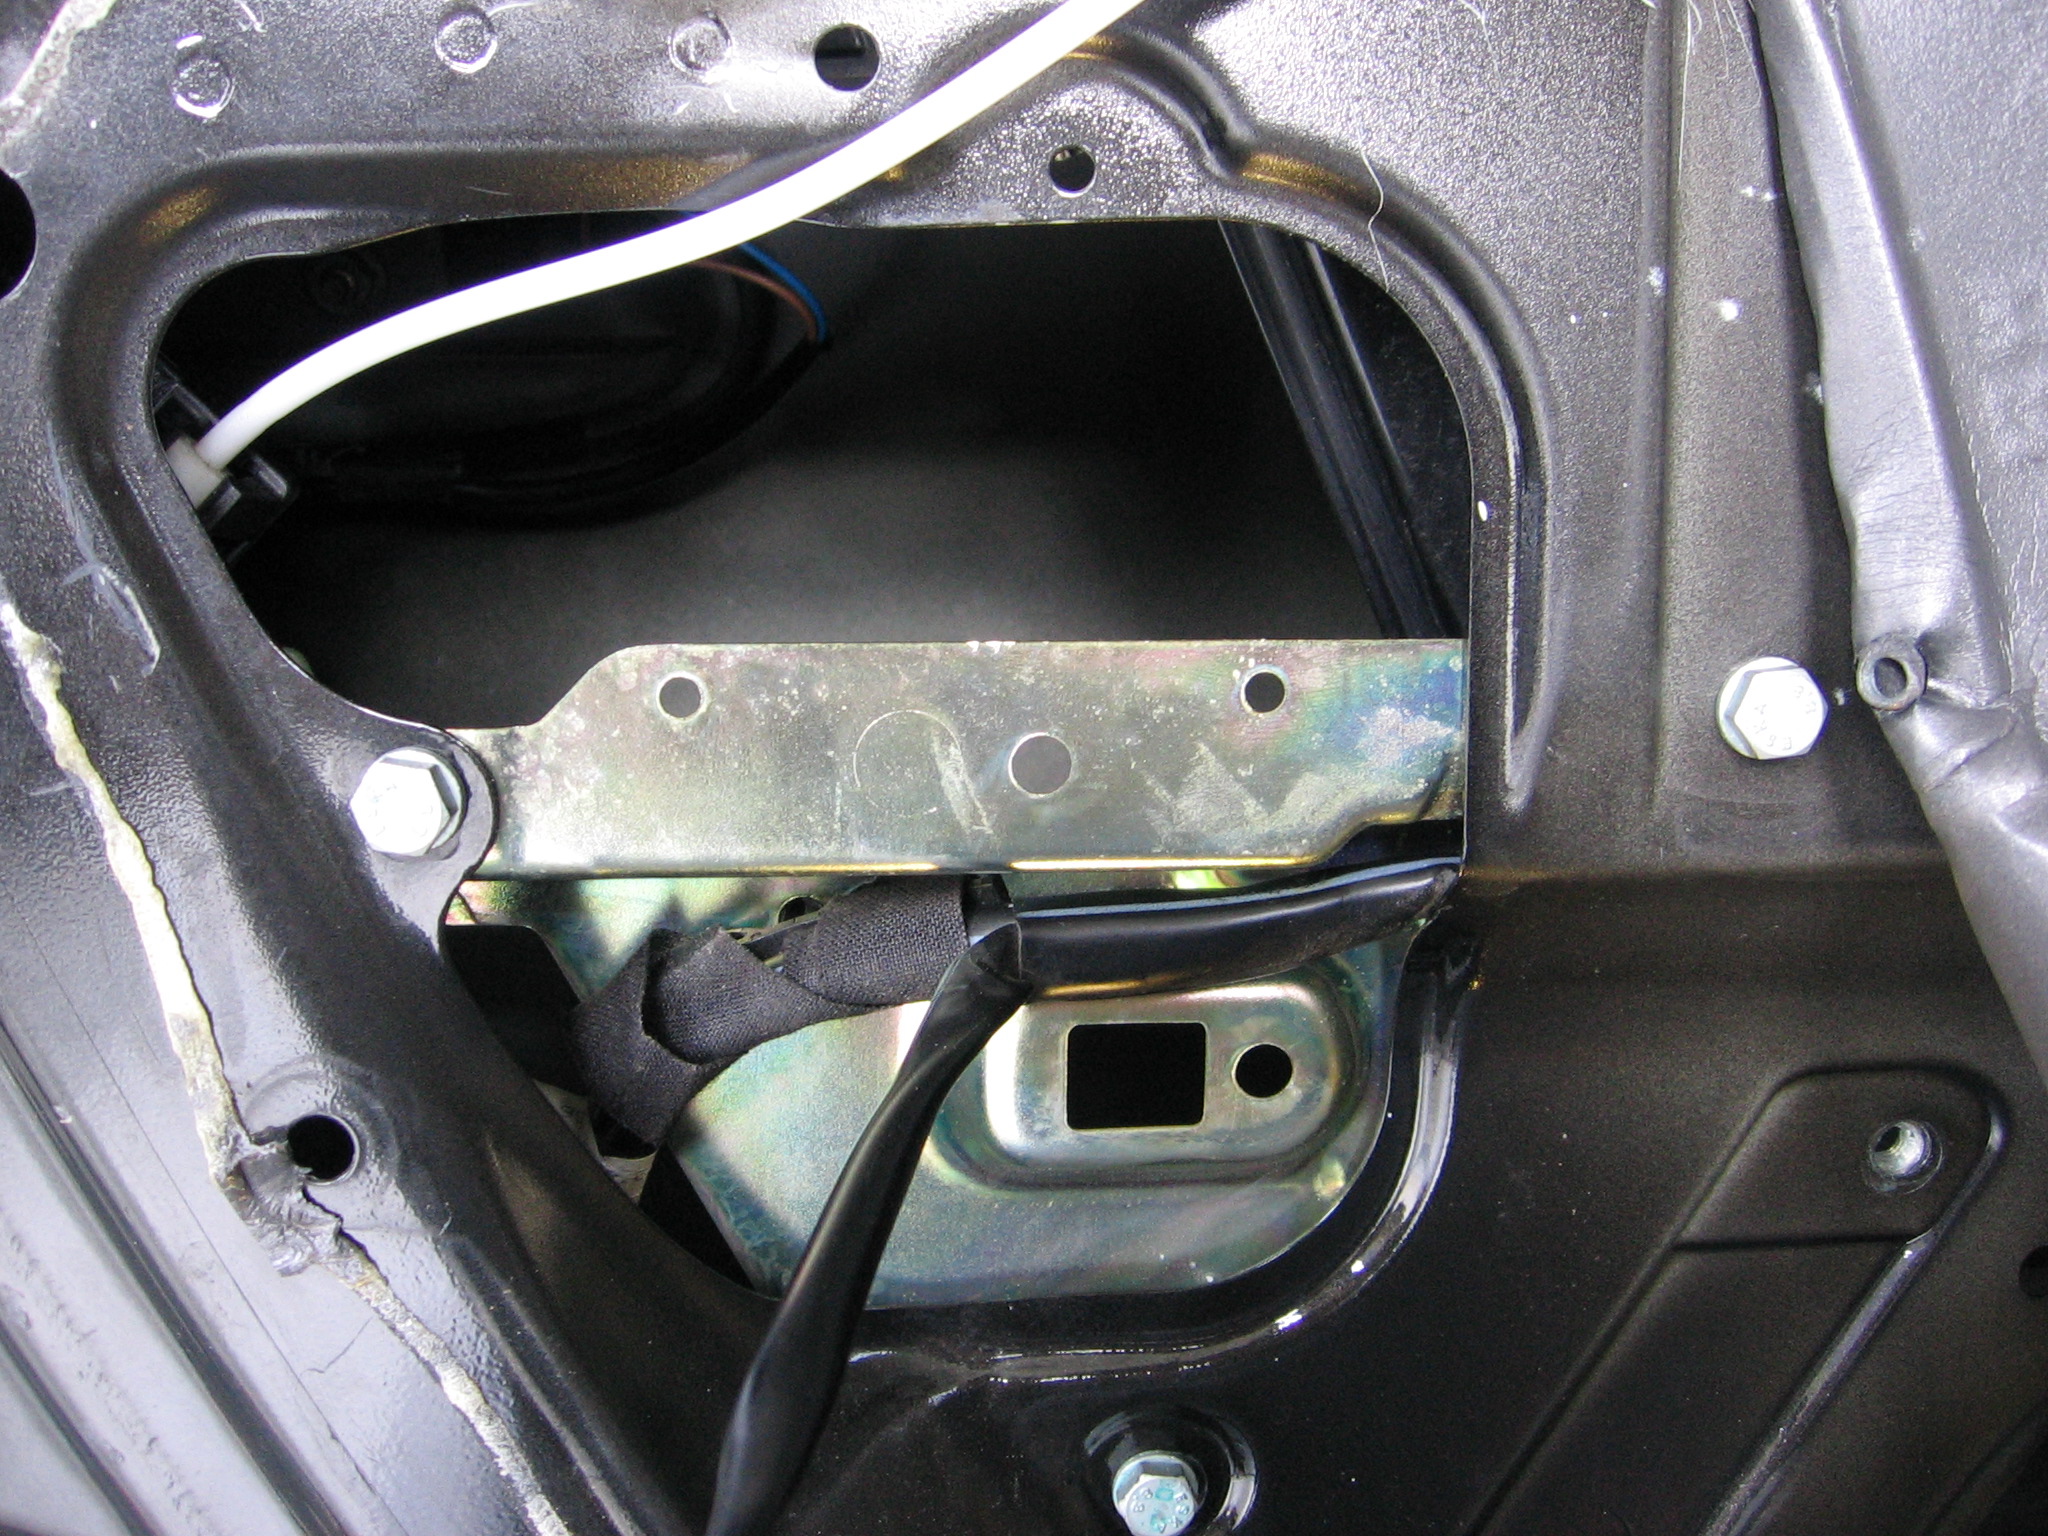
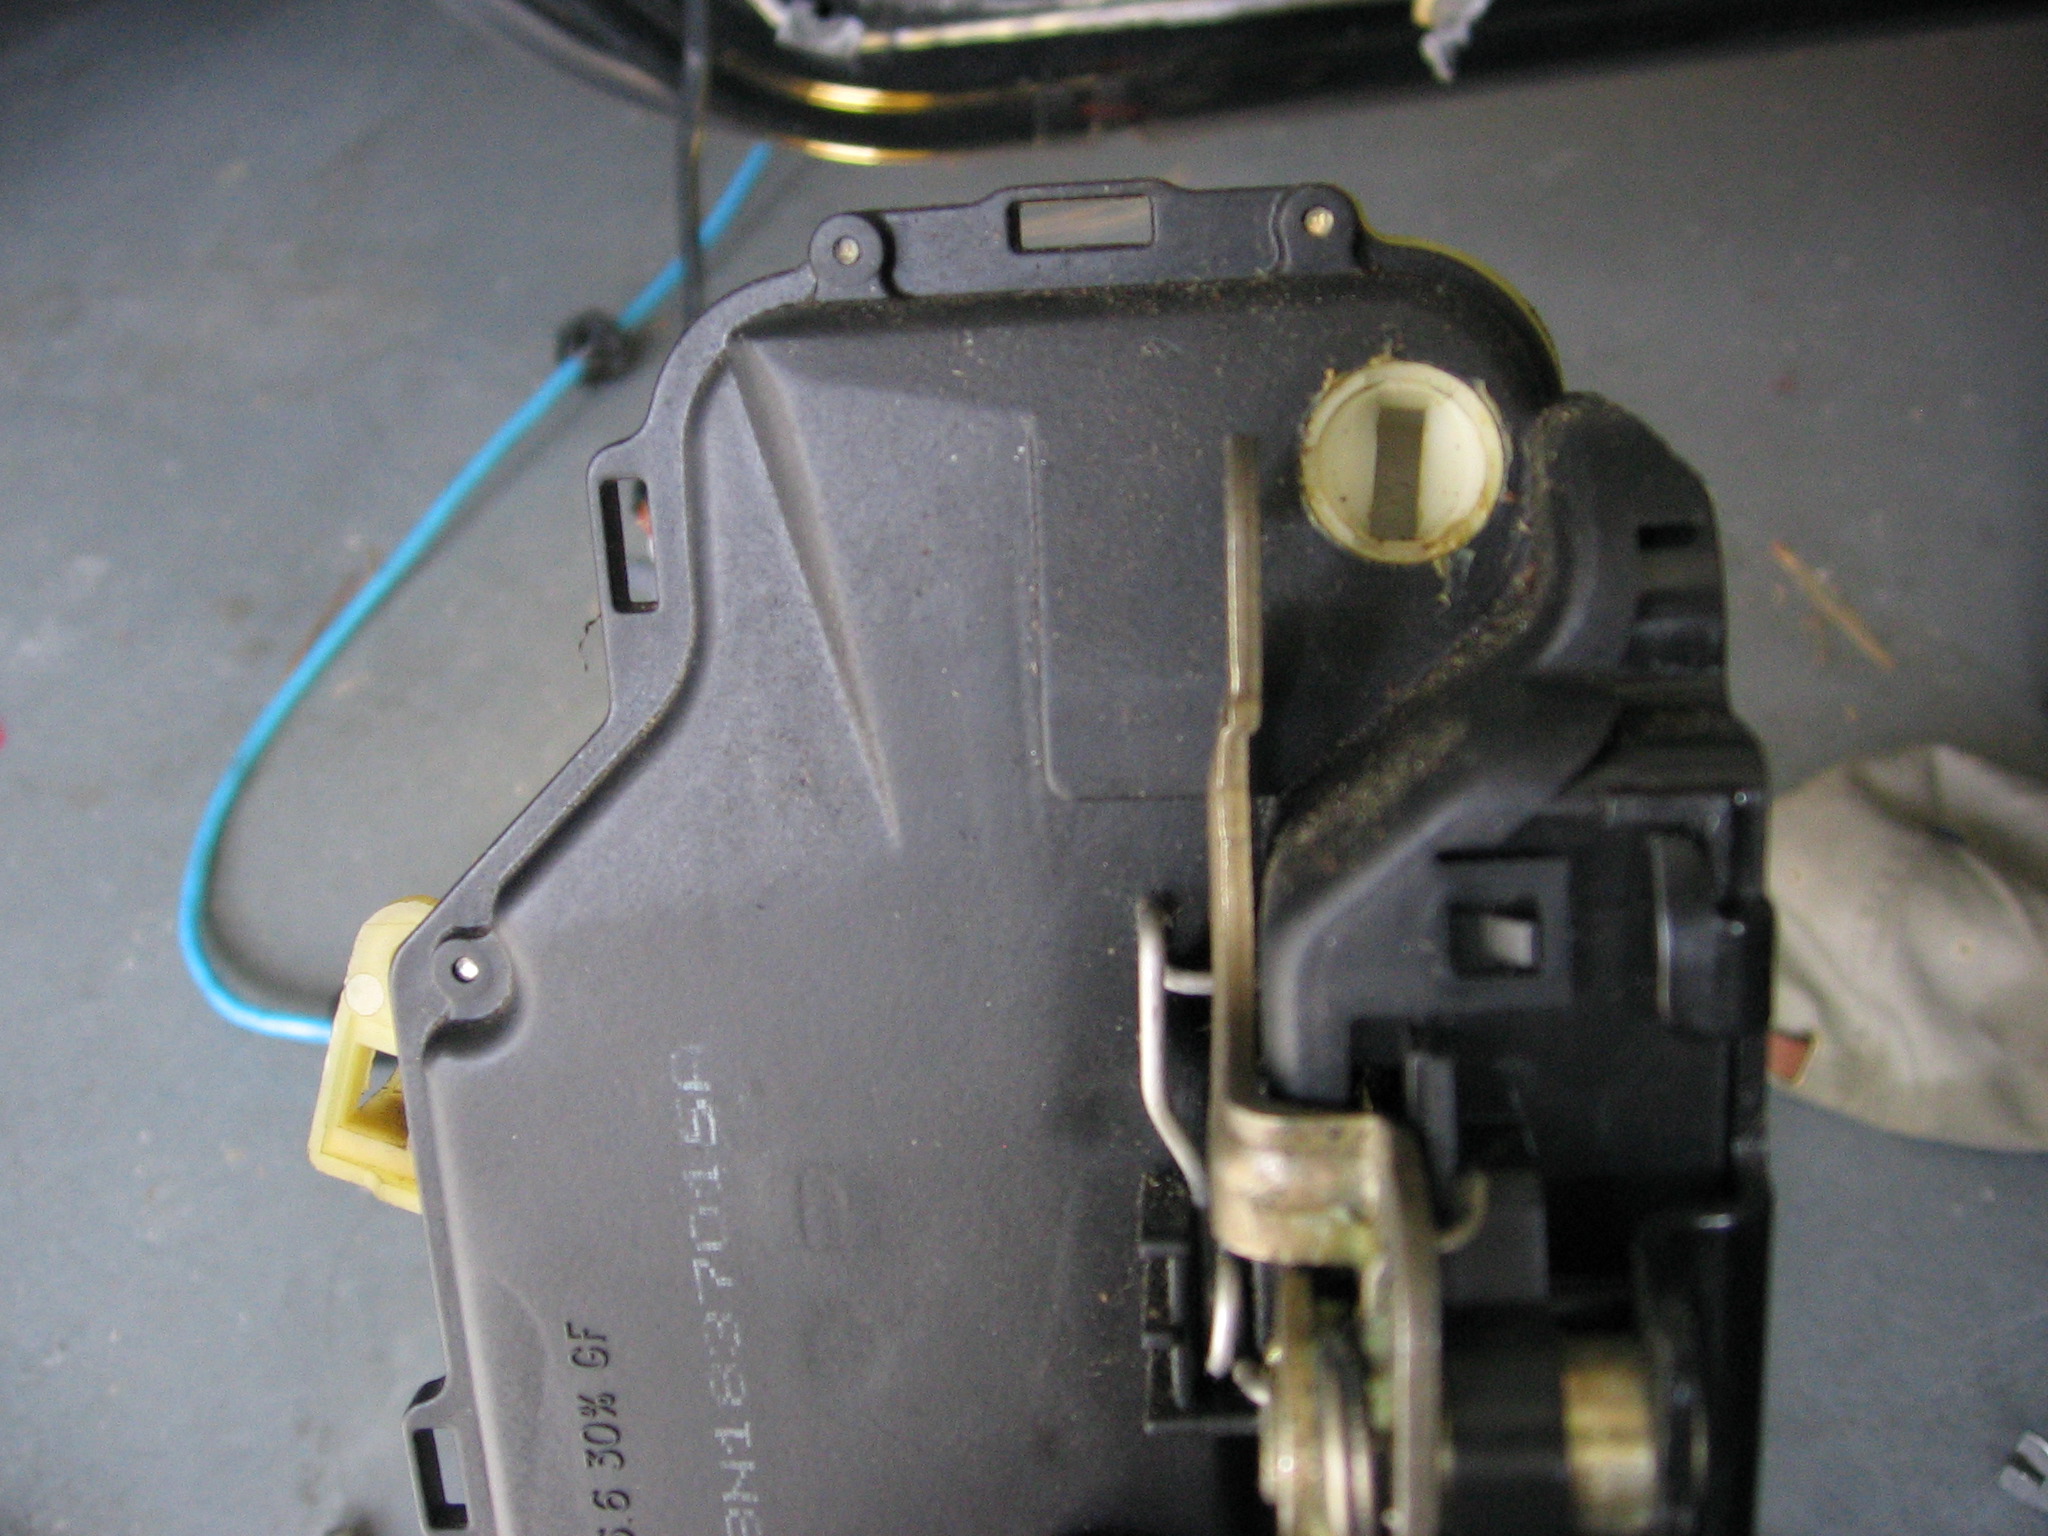
I have seen many discussions here of various window-not-drooping-properly issues with 996 Cabs. My specific issue was not one I had seen, so a while back I posted a query to get some help with trouble shooting. When opening the driver's door from the inside, the window droop worked as advertised: drooped 1/2" & stayed down until door was closed. When opening the driver's door from the outside, the window drooped .... but popped right back up as soon as I released the outside door handle. Thus it was not in a position to allow the door to close. Further experimentation showed that it drooped right back to "door open" position if I very lightly touched the door latch in the rear facing edge of the door. By "lightly", I mean I barely touched the small piece in the bottom of the latch receiver. Then, when I closed the door, the window would pop up as expected. Reading on RennTech, I skipped over the discussions of the microswitch associated with the inside door handle. Mine worked fine. That left 2 associated with opening the door from the outside: 996-613-125-00 - the microswitch triggered by the outside handle: $20.55 from Sunset 8N1-837-015-C - the entire door latch with microswitch built in: $116.20 from Sunset I was sure it was the door latch's internal microswitch, but .... with the other microswitch relatively cheap, it made no sense to go to all the trouble to expose the door interior without changing them both. I started with Loren's excellent DIY for removing the door panel. Here are a few addenda taking that all the way to door latch replacement: Comments on Door panel removal: * first, raise the driver's window before you disconnect the battery. 1. screws under the door handle that Loren mentions in step 1. are Torx 27. 2. don't miss the small phillips screw exposed only by pulling on the inside door handle. Hex under Airbag plate is 4mm. 3. I had to remove the plastic friction fastener in the middle of my door pocket before going further 4. I found it easier to lift off the door panel after I removed the triangular trim piece just inboard of the mirror. 5. I found a long razor knife very handy for breaking the sticky seal of the foam door liner without damaging the liner. 6. for this job, you need loosen only about a third of the door liner, then tape it out of the way. 7. finish Loren's DIY, then proceed. ********* Now for the door latch removal: 1. you must remove the bright metal plate that blocks the only access hole to the latch: 4 10mm bolts 2. reach in and remove the large electrical plug on the lower, forward corner of the latch assy. 3. screws in rear door edge holding latch are 8mm Triple Square (looks like many pointed torx) 4. gradually work latch out of hole, then remove bowden cable at latch end. Note how it attaches so you can place it properly on new latch unit. Also, remove the black plastic receiver on the exterior side of the old latch. Note how it attaches to the latch mechanism. 5 what you did not see as you removed the latch assy were the two connections between the exterior door handle / lock and the exterior side of the latch assy. 6. look through the hole and remove the 2 10mm nuts on the back side of the exterior handle 7. pull the metal retainer plate back out through the access hole in the door 8. release the 2 plastic catches on the bottom of the ext. handle assy and remove it to the outside of the car. 9. remove the microswitch on for forward side of the ext handle if you're going to replace it. Disconnect it inside the door, also. 10. attach the bowden cable, black plastic receiver (step 4) & electrical plug to the new latch unit, and wiggle the latch into position 11. insert the 2 Triple Square screws in the rear door edge .... as loosely as possible 12. attached to the metal retainer plate (step 7), you will see the exterior key lock and a short, flat bladed, semi flexible blade. This blade must to into a female slot on the outside surface of the latch 13. with the exterior door handle assy out of the way, work the retainer plate into position while watching from the outside through the hole left by removing the handle .... and reaching around the door to the inside access hole to maneuver the retainer plate. Guide the lock cylinder blade into the female slot on the latch. 14. while still holding the retainer plate in approx. position, reinsert the exterior door handle after attaching new microswitch. 15. continue to hold the retainer plate in place while you come back to the inside of the door and replace the 2 10mm nuts that fasten the retainer plate to the screws on the inside of the door handle assy. 16. plug in the loose end of the new microswitch to the car harness in the bottom of the door. Route with clips just as the old one was. 17. tighten the 2 Triple Square screws in the rear door edge to secure new latch. One more hard part to go 18. There is a short threaded shaft that is attached to the back side of the exterior door handle assy. This shaft will snap into the black plastic receiver attached to the new latch in step 10. The plastic receiver (mounted right next to the vertical slot in the picture in step 12, but not present in that picture) is open on the bottom side of its tube. The threaded rod from the exterior door handle simply snaps into this open slot (aligned lengthwise) with finger pressure. This is how the exterior handle opens the door. 19. only trick remaining .... while following Loren's reassembly instructions .... is to leave one of the mounting holes for the bright metal plate (step 1) empty .... as an airbag screw will go there. You can see in the picture in step 1 that I messed up and placed a screw in the upper-right hole. Should have left that one for the airbag and moved my screw down and slightly right. Don't wait until you've resealed the door liner to find that out.

-
Time to replace window lowering switch
Kim replied to Kim's topic in 996 Series (Carrera, Carrera 4, Carrera 4S, Targa)
Loren, I would have thought it was the part of the latch that is circled in this picture. It is that small protrusion on the door latch that I only have to gently nudge .... to have the window drop down to its "door open" position. Sorry the encircling mark is also black .... I don't know how to make it a brighter color. Kim
-
Well, its finally time to replace the auto window droop switch on driver's door. It droops to open, but pops right back up when I take my hand off the exterior door handle. My thumb is becoming permanently greasy from nudging the switch to droop the window again before closing my door. (When opened with the inside handle, it works just fine.) Its clearly the switch that is paired with the door strike receiver in the trailing edge of the driver's door. (I understand that it is all one part .... latch and switch). I would dearly like to have the part on hand when I disassemble the door panel the first time .... so if Loren or anyone could supply a part number for my MY00 Cab, I would very much appreciate it.
-
Anyone using RemoteTop and Smarttop
Kim replied to Mz3bo's topic in 996 Series (Carrera, Carrera 4, Carrera 4S, Targa)
In my experience, it is very unusual for these guys not to respond quickly and satisfactorily. I would check the email address, and try again. -
I also have a 2000 C2 Tip .... and I also run the Goodyear F1 (GS D3), which I selected after an exhaustive search for the best daily driver tire for my situation. I love the great all weather grip and the low noise factor. Unlike you, I get about 18,000 miles on the rear tires. Can't say on the fronts because the first set is still good and in place.
-
value of pre-purchace inspection
Kim replied to 930chef's topic in 996 Series (Carrera, Carrera 4, Carrera 4S, Targa)
When I bought my car used, 4 years ago, the PPI was done by Park Place Porsche in Dallas. It cost $430, and was paid for by the seller with the report delivered to me. They used, in addition to their own checklist, the Porsche factory "Pre-Owned Inspection Checklist". It was two pages long, and very thorough .... including a road test and many mechanical checks. I just looked at the form, and it includes an item for "clutch action". The mechanic checked "yes", "no", or N/A for every single item. If any Porsche dealers are, indeed, doing "cursory" or "look but don't touch" checks and calling that PPI, then they are either not using the Porsche form .... or they are lying and cheating whomever pays for the inspection. At least at this dealer, at that time, the PPI was a very thorough and complete inspection and gave me a great deal of confidence in my purchase. I've had no reason to doubt that in the intervening 4 years & 50,000 miles. -
New 996 owner
Kim replied to jrslyrics's topic in 996 Series (Carrera, Carrera 4, Carrera 4S, Targa)
Unless the owner's manual changed between 2000 and 2002, Porsche calls for you to change the oil every 15,000 miles. After being on this board for several years, I would say not many here wait that long. Have you checked your manual? Oil consumption, again from haunting this board, seems to be all over the place. Mine never uses oil between changes (I change at 7,500). Others report differently. You should be aware that your electronic oil level sensor is sensitive to many factors .... level floor .... how long since you last shut down ... etc. Check your manual for the proper method to take readings, and that might put your mind at ease. -
Oil Quantity Indicator
Kim replied to Kim's topic in 996 Series (Carrera, Carrera 4, Carrera 4S, Targa)
Thanks, Loren. Can you direct me to the sensor? -
OK .... Yes, I did a search first. Changed my oil last week, and all was normal immediately following: dipstick showed just below max, and dash indicator showed one tick down from top. 2 days later, dash indicator shows absolutely empty, and flashes on and off for a while after starting the car. Dipstick still shows between the marks, and pressure / temps are normal. Any suggestions on where to go from here?
-
Spoiler instrument light bulb
Kim replied to bolobar's topic in 996 Series (Carrera, Carrera 4, Carrera 4S, Targa)
There have been several spoiler switch mods posted over the years. Have you searched?. I installed one a couple of years ago that uses an OEM spoiler switch and allows one to run the spoiler up or down, independently of the automatic, speed-dependent activation. -
Hennessy Porsche in north Atlanta confirmed the diagnosis of bad immobilizer computer .... officially known as the Theft Control Unit. One little catch .... when that is replaced, none of the existing keys are mated to it, and, of course, I no longer have the bar code tags that came with my 2 alarm keys. I never had the one that came with my pre-owned car. Result: the valet key could be re-mated, as it does not interface with the alarm system & has no bar code, but I had to buy a new key head for my every day key. ( I settled for one key that would work the alarm, instead of the two I had before). For those who have contributed tales of dealer rip offs in selling / mating keys, Hennessy charged a retail of 174.38 (PCA discounted to 157) for the key head, but that INCLUDED programming the car to accept it. Bottom line is that its not that much more than the $75 I paid 3+ years ago for a key head on eBay combined with $50 for Hennessy to program it.
-
Water in the back seat of 1999 C4 Cab
Kim replied to Boston996's topic in 996 Series (Carrera, Carrera 4, Carrera 4S, Targa)
When you read through the link that Loren supplied, read carefully. There are two related, but distinctly separate causes of the rear cab drain system leaks. 1. The simplest: a clogged drain valve located behind the forward wall of the rear wheel well cover. Clean it out, and you're done. 2. A problem behind the rear seat side wall panel, where the upper cab drain tray drains into the lower cab drain tray (from which the tube runs to the wheel well). In my case, there was a leaking connection on the hose between the two. I have also seen a crack in the upper tray nipple that leads into the tube to the lower tray. I have also seen the tube to the lower tray displaced, so that it drains free into the car behind the side panel. Any of these problems can cause the floor carpet and carpet under the rear seat cushion to be soaked following a car wash or rain. If you have the tray related problems, you can search for my thread in the Feb, 05 vicinity. In it, I detail how to remove the rear seat back (unusual tool required) and how to get into the tray area itself. -
No starter operation
Kim replied to Kim's topic in 996 Series (Carrera, Carrera 4, Carrera 4S, Targa)
See my most recent post. My problem started out with just "every now and then" and developed into "always". Might by your immobilizer computer as it is for me. -
As I forgot to include my previous post, I have a brand new ignition switch (electrical portion). It is the black unit, Audi part # 4A0 905 849B. It is the switch mentioned in the 996 DIY as the replacement to be used in that task. It was not the correct switch for my car for some reason. PM me if you would like it, but make sure its the one you need. I'll charge for UPS and round that up for my trip to ship it: $10.00 total. I paid $26.41 including shipping. I also have a slightly used white unit, Audi part # 4B0 905 849. It turned out not to be the problem. Since the new one cost me $90 this morning, I will let this one go for $25, including shipping.
-
Some of you may have seen my recent hair-pulling thread, in which my car intermittently would not start (no starter motor operation), and then finally came to the point of not starting at all unless the battery had been disconnected & reconnected since the previous shutdown. I followed what seemed to be the best bet and ordered a new ignition switch electrical portion: 4A0 905 849 B, as well documented in the DIY for this job. Luckily, the eBay shipment arrived on Thursday, so I crawled under the dash yesterday, armed with my very short screwdriver. Upon removing my old switch, it was obvious they were different. I rechecked the new switch number. Yep, its different from the old one, but I expected a superceded part .... and it fit. Problem is, in the installed, key off position, this switch is electrically ON .... something one does not notice until all buttoned up, out of the car, and reconnecting the battery. A trip to the local Audi dealer this morning confirmed that 4A0 905 849 B (black in color) is not electrically compatible with my car (ON when it should be OFF). It also yielded an exact replacement for my old switch, 4B0 905 849 (white in color) .... at $85. Well, it would be worth it, of course, to get the car fixed. This time I was savvy enough to leave the air duct off until I checked things out. Reconnected the battery, car started right up, wife came out to celebrate. I then turned the car off, and attempted a restart. No go. Same exact symptoms. Finally, I give up and take the car to my Indy shop. After hearing the symptoms, he had an immediate diagnosis: bad immobilizer computer. I tend to give him credence, since he knows he cannot do the repair (and, because I've known him for years). New computer will have to be installed at dealer since all keys will have to be re-mated to it after installation. Monday, I guess I will pay the price for all those posts in which I have pointed out that my car has required no unscheduled maintenance at the dealer in the 4 years / 50K miles I have operated it. So, I'm bummed, but still very much in love and not at all dissatisfied with my 996.
-
PSE with cold engine
Kim replied to thormann's topic in 996 Series (Carrera, Carrera 4, Carrera 4S, Targa)
OK, now I have done a more definitive test. Parked car on June 12 and went on vacation. Started it up again for the first time on June 29. Before starting, switched the PSE to quiet, and there was plenty of vacuum to do the job. -
No starter operation
Kim replied to Kim's topic in 996 Series (Carrera, Carrera 4, Carrera 4S, Targa)
Update: After my last post, I left the car in the garage went out of town for a couple of weeks. Upon return, car started both at home, and in the grocery store lot. 2 days later, would not start. In a revelation, I pulled the new (month old) battery, and reinstalled the old one that had been sitting in my garage. Car started right up. Problem solved .... bad new battery. Next morning, car would not start. Would not jump. An external voltmeter showed 12.4 volts before, and during the start attempt. No drop in voltage. I put the new battery back in. Car started and I drove to airport. At end of the day, car would not start, would not jump. In yet another revelation, I decided it was the act of switching batteries .... not the different battery .... that made the difference. So I simply disconnected the positive terminal, then reconnected. Car started. Disconnecting the battery is allowing something to reset. I have no idea what. The only other symptom: when I turn on the ignition and watch the oil quantity reading: if it completes the count down and then shows ZERO oil quantity, then the car is not going to start. If it completes the count down and then shows true oil quantity, then the car is going to start. Weird? I guess. My new (old style Audi part) came in the mail today. I'll swap it out this weekend and cross my fingers. -
My wife washed my key
Kim replied to whs's topic in 996 Series (Carrera, Carrera 4, Carrera 4S, Targa)
Actually, Porsche refers to it as the "spare key". For those of us with older, first generation 996's, there is no glove box or trunk lid opening with any key. The spare key head contains the same transponder as the primary key, and works the door locks (the old fashioned way) and ignition switch just fine. Car operates normally when using it. -
My wife washed my key
Kim replied to whs's topic in 996 Series (Carrera, Carrera 4, Carrera 4S, Targa)
At the risk of sounding like a broken record, it pays to shop around. I don't have my records with me right now, but I'm quite sure the valet key, precut for my VIN, was less than $100 from Sunset. On the electronic mating of key to car, I would certainly check around the bay area if I were you. With a number of dealers, it would be surprising if at least one is not smart enough to offer a reasonable price. Here in ATL, one quoted me $100, and the other did 2 keys for under $50 and in less than a 10 minute wait. A little competition goes a long way. I learned a long time ago that I could afford much less in the way of mods and accessories if I simply called one local dealer for a price. -
PSE with cold engine
Kim replied to thormann's topic in 996 Series (Carrera, Carrera 4, Carrera 4S, Targa)
Loren, While I have done no definitive testing (and am on vacation now, so I cannot) .... it is routine for me to use the dash switch to quiet the PSE first thing in the morning .... when my car has been sitting in the garage for at least 2 days, maybe more. As I said, no testing of this precise premise .... but I've never had it NOT work that way with retained vacuum.