Welcome to RennTech.org Community, Guest
There are many great features available to you once you register at RennTech.org
You are free to view posts here, but you must log in to reply to existing posts, or to start your own new topic. Like most online communities, there are costs involved to maintain a site like this - so we encourage our members to subscribe or donate. All subscriptions and donations go to the costs operating and maintaining this site. We prefer that guests take part in our community and we offer a lot in return to those willing to join our corner of the Porsche world. This site is 99 percent member supported (less than 1 percent comes from advertising) - so please consider an annual subscription or donation to keep this site running.
Here are some of the features available - once you subscribe RennTech.org
- View Classified Ads
- DIY Tutorials
- Porsche TSB Listings (limited)
- VIN Decoder
- Special Offers
- Paint Codes
- Registry
- Videos System
- View Reviews
- and get rid of this welcome message
It takes just a few minutes to register, and it's quality Porsche information at a low cost.
Contributing Members also get these additional benefits:
(you become a Contributing Member by subscribing or donating money to the operation of this site)
- No ads - advertisements are removed
- Access the Contributors Only Forum
- Contributing Members Only Downloads
- Send attachments with PMs
- All image/file storage limits are substantially increased for all Contributing Members
- Option Codes Lookup
- VIN Option Lookups (limited)


Izzy
-
Posts
740 -
Joined
-
Last visited
-
Days Won
6
Content Type
Profiles
Events
Forums
Exterior Paint Colors
Downloads
Tutorials
Links Directory
Collections
Classifieds
Store
Everything posted by Izzy
-
Cabrio Top Hydraulic Fluid Step by Step There have a been a few occurances of the cabrio top not fully completing the cycle, or simply refusing to open or close. If the hand brake light is on, very likely it is a low hydraulic fluid condition. The work below shows step by step how to add the fluid to the system. Tools needed: 5 mm allen wrench Flat screwdriver Children medicine syringe with small hose 1 Bottle of hydraulic fluid. Porsche is the recommended, I have used John Deere below with no problems after 4 weeks of fi Author Izzy Category Carrera (996) - Maintenance Submitted 11/05/2005 10:44 AM
-
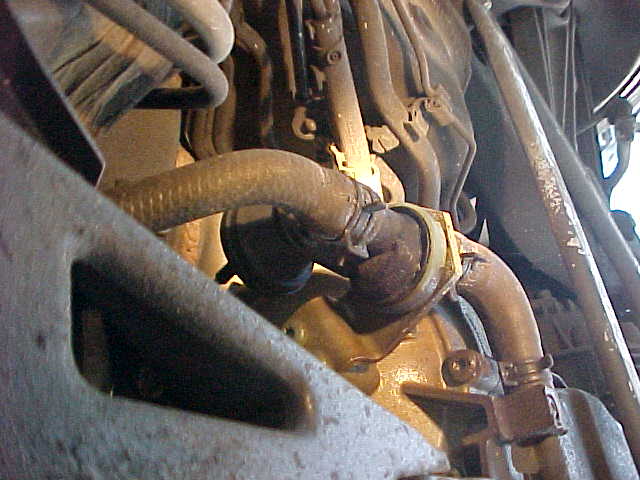
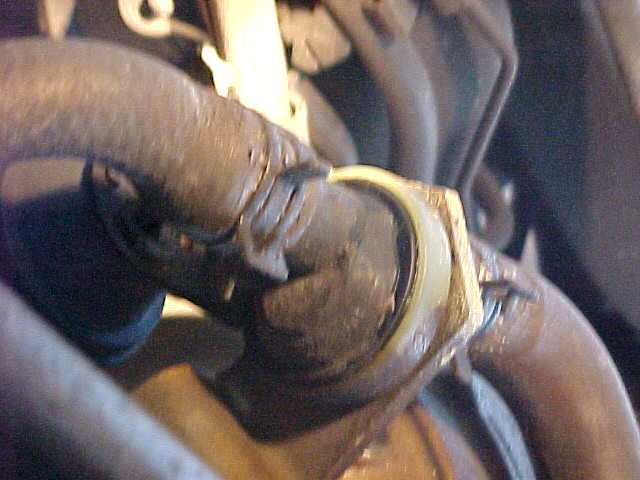
Today I was doing the fuel filter and oil change on my 99 996 Cabrio. When I removed the rear cover under the car to remove the fuel filter, found this part that seem to be wet. When I squeezed it, saw coolant bubbles coming out of it. Can anyone identify it? I could not find it in my manuals. I have added a cup of coolant about 3 weeks ago, so not a big leak. But like any big leak, will get bigger is I don't fix it. Pictures below: Thank you Izzy

-
Changing Mufflers and Tips
Izzy replied to muranomike's topic in 996 Series (Carrera, Carrera 4, Carrera 4S, Targa)
The first time I did it, having the wheels off and the car on jacks helped to see where everything was, and to let my fat hands get to the nuts. Second time, wheels stayed on, no problem getting to the nuts after you figure out best angle of attack for your arms/tools. -
Leaking fuel line...HELP!
Izzy replied to TRIATHLETE's topic in 996 Series (Carrera, Carrera 4, Carrera 4S, Targa)
I was holding from replacing my fuel filter (I am at 50K miles) until I read the outcome of your dilemma. It looks like it was painful, but I thank you for sticking with it and posting the results as many of us can benefit and learn. Thanks again, I will be doing this weekend. Was the check valve replaced or just had to be unstuck? -
Tom, That is exactly what I experienced, to the letter. The fix I described worked perfectly so far. I may have to add a little more hydraulic, as it hesitates once in 20 cycles. But nothing like it used to, which again is exactly as you described. The John Deer fluid seems to be working fine so far, and the Children's medicine syringe with the little hose trick made it easy to fill the reservoir. It was a pain to get the screw back in, otherwise, and easy fix. I will take some pics this weekend if I top off the reservoir. Izzy
-
Battery dies with key in ignition
Izzy replied to Sky_King's topic in 996 Series (Carrera, Carrera 4, Carrera 4S, Targa)
Hey, that is a unique plate, never seen it done that way, great imagination. I also see the reflection on the bumper of the truck with the big ole tires. Doing some muddin' I take? I noticed my 996 dashboard "comes alive" with the key just inserted. It is all black or "off" when the key is off. So with the key in, it is drawing some amperage. Don't know how much, but it can be enough to drain the battery. I had a similar problem with the Honda Odyssey, and they key in or one reading light left on. In 2-3 hours the battery would be dead. I replaced the original battery (485 CCA) with a new 1000 CCA and the problem has been solved for a couple of years. The kids still leave a light on and it doesn't bother the battery. The original battery was a year old when replaced. Honda wouldn't do a thing to fix it since it was a common problem with all Odysseys. -
-
Battery dies with key in ignition
Izzy replied to Sky_King's topic in 996 Series (Carrera, Carrera 4, Carrera 4S, Targa)
So, where is this nice 911 with the key in the ignition? Just kidding, but I always think of the explanation to the cops or the insurance company "well, I left the key in the ignition....." Even though I live in a nice low crime area, my car is garaged and alarmed for both house and garage doors, won't leave the keys there. Growing up in Miami, you see...... -
Tire choice for a C2 1999
Izzy replied to Hroussard's topic in 996 Series (Carrera, Carrera 4, Carrera 4S, Targa)
I have had Hankooks K104 front and back on 18 in rims. 5 track days so far this year, and 15K miles on the the tires. The Rears where gone, the front are still excellent. The fronts performance are very good, great traction and turning on track days, great handling in the wet too. The rears I just changed to Kumhos Ecta Supra 712, to see if they last longer than the Hankook in the back. So far (500 miles) I have been inpressed with the dry traction of the Kumho. Not bad on the wallet either. Tire Rack has them, but NTB got the same price without worring about shipping and install. Same tire and rating. You will find many opinions here. another place to look is in: www.epinions.com Izzy -
Replace plastic window with glass?
Izzy replied to tx996cab's topic in 996 Series (Carrera, Carrera 4, Carrera 4S, Targa)
Sorry, my miss. I am not sure, but did a quick search at the PCA website and found this. Someone else was trying it. Seems doable, but you may need other parts (shims, harness, etc) listed here to make the change. Another option, ask the dealer and see if you can talk to one of the techs, and if they can tell you what parts are needed for the change. Hope this helps http://www.pca.org/tech/tech_qa_question.a...6-FE28063B2FE2} -
Replace plastic window with glass?
Izzy replied to tx996cab's topic in 996 Series (Carrera, Carrera 4, Carrera 4S, Targa)
I have also read that it is a bolt on. One place who may know for sure is the LA Dismantler. They also sell the units, may save you a few bucks. Let us know how you make out. Izzy -
I did it about a month ago, and the Schnell cold air intake. Not sure if more HP, but the throttle response did change. Significant enough that I spun out a couple of times at the track, didn't have the new timing right.
-
The convertible top starting acting up again, intermittently not coming up or not completing the closing operation. Same symptoms I had before and have seen others describe as well. So I follow another link describing the hydraulic fluid reservoir location: http://www.renntech.org/forums/index.php?s...&hl=convertible Removed the 5 mm Allen bolt and used a syringe (from drugstore, used for measuring children's medicine) and a short hose. I added hydraulic fluid. If you do it at night, place a powerfull flashlight on the driver side of the translucent pump reservoir. The fluid is golden color, and you can see how high it is. I added 2.5 teaspoons of, here is the heretic comment, so stop reading if you are a purist, John Deer Transmission and hydraulic fluid, HY Gard, used in JD low viscocity hydraulic systems. After putting everything back together, I open and close the top several times (about 10), the previous hesitation is gone. It is perfectly operational now. I know it is not the pure Porsche fluid, but I got tire of going to the dealer for the same thing. My background is mechanical engineering, postgraduate work in particle pinning mechanics. Not rheology or chemistry. But I did a lot of work in fluid dynamics, a lot of viscous system calculations both theoretical and application based. I had to try this, I can't imagine the JD oil "attacking" the Porsche fittings and seals in revenge, causing major hemorrage of the top system. We'll see soon enough. If this works, and the $2.99 quart of JD hydro fluid is as good as the $25 Porsche, will let you know. Otherwise, back to the dealer with the "I don't know what happened" face.
-
How do i tell what color my car is?
Izzy replied to DeAd-EyE's topic in 996 Series (Carrera, Carrera 4, Carrera 4S, Targa)
Your hood sticker should look something like this: untitled.bmp the large bolded L3AZ corresponds to the paint color location. The paint is the 3AZ number for mine. Once you get it, look in the Carrera Paint Colors link above and you will get it. Izzy -
Mechanic Pricing Help
Izzy replied to 1999C4CO's topic in 996 Series (Carrera, Carrera 4, Carrera 4S, Targa)
You should try buying the parts yourself from Sunset Auto, link is on the top. The parts do sound overpriced, but then again I only buy from Sunset and they are typically 60% what the local dealer charges. -
Fabspeed Mufflers
Izzy replied to Izzy's topic in 996 Series (Carrera, Carrera 4, Carrera 4S, Targa)
I got some new information on the Fabspeed mufflers. Friday was track day, a generous track day at CMP in South Carolina. Some wet tracking, some dry tracking. Most of the time running 2-3 gear at over 5-7K rpm continuously. Odometer read about 135 miles total track - and most high rev. With the helmet on, you can't hear much anyway. But the interesting information came after the track. Went out for dinner to a friends house, and it WAS a noticeable reduction in the sound. My wife and friend who were not in the track noticed first, then I noticed. I do remember the strong smell of "new car muffler" burning after every track time, so the hypothesis of "burning them in" may have some validity. Even with the top down, listening to the radio is fine now, almost as good as stock. But when you stomp on the gas, you get the sweet snarly sound that says "I am all business back here". Still have not found a dB meter, but do have at least one data point here, when brand new and torqued to Porsche specs, the radio was useless and sounded like the cheap rice burner boy racer. Now torqued down tight and after some tracking work, it is generally normal (meaning stock-like) sounding around town. I can get used to this...... -
Bad Engine compartment blower fan?
Izzy replied to TRIATHLETE's topic in 996 Series (Carrera, Carrera 4, Carrera 4S, Targa)
I just had the very similar issue with the temp light this morning. It was flashing after a fast acceleration run, when I stopped at the end of a highway ramp. The outside temp was around 65F, the temp needle between the 8 and the 0, normal conditions. No coolant leaks, the tank is the latest model. Coolant level is just above min. The fan check above: "For info: If you want to test the operation of the engine compartment fan, unplug the 2 wire connector from the engine compartment temp sensor located on Bank 2 just recessed on the top of the engine rightside between the intake ducts. The fan should immediately turn on. You can do this just with the ignition key on and engine not running." Did this check and the fan did not turn on at all. Is this a real check or not? I plan on getting some coolant tomorrow from Porsche and fill to MAX line, but before I order a new fan if that is the culprit, wanted to know if anyone has tried the verification above, or any other tricks. Thank you Icy -
Fabspeed Mufflers
Izzy replied to Izzy's topic in 996 Series (Carrera, Carrera 4, Carrera 4S, Targa)
I will keep you in mind, Sean. Did torque the cat sleeves to about 55 ft lbs (from 34 ft lbs in manual), and tighten all other bolts as hard as I dared without causing a break. Vibration is gone, and it did improve the "harshness" of the sound some. It is raining today, so may not be able to really tell how they are with top down. May keep them another couple of weeks and decide. If they "mellow out" the sound would be actually good. Still looking for one of our techs with a sound meter and get some readings new and after 1000 miles. See if we can disprove the theories. -
Fabspeed Mufflers
Izzy replied to Izzy's topic in 996 Series (Carrera, Carrera 4, Carrera 4S, Targa)
I may keep them longer, nut sure yet. Surgeon, can you articulate the relative difference between GHL and Fabspeed? My reference point has only been PSE's. They sound to me about 2/3's the resonance of the Fabspeed, more "discreet", and deeper ie lower octave sounding. The Fabspeed website sound is almost close to the PSE's I heard. The Fabspeed I have are more like the "ridiculous Honda with the coffee can on the muffler" sound. If I keep them longer and start loosing my hearing, might not be able to hear my wife complaining..... No, wait, that's bad, isn't? I am going to Carolina Motorsport Park (Kershaw) on Friday to track (or "a round of golf", like I tell the boss), will let you all know if the sound did mellow-out afterwards. Thank you all Izzy -
Fabspeed Mufflers
Izzy replied to Izzy's topic in 996 Series (Carrera, Carrera 4, Carrera 4S, Targa)
Thank you Bob and Don. I will be checking all the bolts, and re-torquing further to make sure they are tight. Worse case, it is too loud for a Cabrio, and I will order PSE's and sell the Fabspeeds on E-bay. I will see if I can borrow a decibel meter and post results. -
Fabspeed Mufflers
Izzy replied to Izzy's topic in 996 Series (Carrera, Carrera 4, Carrera 4S, Targa)
Don, I torque the bolts to 22 ftlbs and the cat sleeves to 34 ftlbs. Do you recollect if you had to go further than that? The ears that hold the mounting bracket where a little odd, the short bolt one was very snug to the bracket, the long one was about an inch long. When I torque that one down I could see the ears bend a bit. Did send an e-mail to Joe yesterday, waiting to hear back from him hopefully today. Thanks for your input. Izzy -
Fabspeed Mufflers
Izzy replied to Izzy's topic in 996 Series (Carrera, Carrera 4, Carrera 4S, Targa)
Okay, after a few days of running withe mufflers, they are loud. Not always pleasant loud, but raw. Not sure if they are correct. Also, there is a lot more vibration in the car, vibration you can feel under acceleration. For those who have put in Fabspeed before, is this normal? How loud should they be? -
Loren, I 've found that licking the hub before mounting the tire also adds adhesion. Just leaves a funky after taste. Kidding aside, the real friction comes from the normal force (pressure) the bolts exert on the hub. That is what keeps the wheel in place, Coulumb friction. There is more to the story with microasperities in the friction equation through Amonton's principle. But PLEASE, use the bolts and torque to the 94 ftlbs.
-
Fabspeed Mufflers
Izzy replied to Izzy's topic in 996 Series (Carrera, Carrera 4, Carrera 4S, Targa)
They where $895 plus shipping. I reused the tips. With tips would have been $995. If I thought I could have sold my tips for $125 or so on Ebay, I would have gotten them. But didn't look like they where worth that much and they are in pretty decent shape. I recommend you call around for pricing to Fabspeed dealers. They can give you pricing. For example, direct from Fabspeed without tips are $995. So $100 better. I may be checking out the Schnell from VertexAuto, and compare quality, etc. At a glance, the Schnells seem to have a lot of surface carburation on the welds. When welding stainless on a non-oxigen purged environment, you can get the high carbon to come up to the surface, an rust can ensue like any other steel without protection. Fabspeed welds are clean, and seemed like manually cleaned (some cleaning paste still on the welds) with a power tool. Regardless, the sound is cool. Maybe to loud for long trips, will let you know when I drive to VIR for a track day in November. Izzy -
Just finished installing Fabspeed mufflers in the 1999 C2 Cabrio. Started last night to "prep" around 9 pm, lifting the car, getting wheels off, etc. Next started to see how difficult it would be.... tinkering with removing the nuts. Before I knew it, had the first muffler off and the the new one on, so figured just did the second one too. All done in less than 2 hours!! Pretty easy to do. Car was ready for my 6:30 am Starbucks run (aka empty highway on a Saturday). Sweet sound. The sound is fantastic. Now I have the airbox mods done and the muffler with higher output, must have gained about 350 HP, right? But the sound is great, and the torque faster to respond, noticeable. I also noticed the tips stick out further with the Fabspeed, about an inch more. Followed Lorens instructions for removal and install of the mufflers, easy as pie. Got the mufflers from PowerTech in NJ, lowest price I can find and a real dealer for Fabspeed (I checked with Fabspeed). Izzy