Welcome to RennTech.org Community, Guest
There are many great features available to you once you register at RennTech.org
You are free to view posts here, but you must log in to reply to existing posts, or to start your own new topic. Like most online communities, there are costs involved to maintain a site like this - so we encourage our members to subscribe or donate. All subscriptions and donations go to the costs operating and maintaining this site. We prefer that guests take part in our community and we offer a lot in return to those willing to join our corner of the Porsche world. This site is 99 percent member supported (less than 1 percent comes from advertising) - so please consider an annual subscription or donation to keep this site running.
Here are some of the features available - once you subscribe RennTech.org
- View Classified Ads
- DIY Tutorials
- Porsche TSB Listings (limited)
- VIN Decoder
- Special Offers
- Paint Codes
- Registry
- Videos System
- View Reviews
- and get rid of this welcome message
It takes just a few minutes to register, and it's quality Porsche information at a low cost.
Contributing Members also get these additional benefits:
(you become a Contributing Member by subscribing or donating money to the operation of this site)
- No ads - advertisements are removed
- Access the Contributors Only Forum
- Contributing Members Only Downloads
- Send attachments with PMs
- All image/file storage limits are substantially increased for all Contributing Members
- Option Codes Lookup
- VIN Option Lookups (limited)


0586slb
-
Posts
234 -
Joined
-
Last visited
Content Type
Profiles
Events
Forums
Exterior Paint Colors
Downloads
Tutorials
Links Directory
Collections
Classifieds
Store
Everything posted by 0586slb
-
Not when it is Countach shaped... :rolleyes: I say shaped, because even from the blurred photograph, I can see it is not a 'real' one. The real ones have curved side windows, that all but the very best replicas fail to reproduce. Its just easier and cheaper to use flat toughened glass and 'nobody will notice'. In the late 80s, there were about eight or nine companies doing Countach replicas (based on a Ford Granada chassis) and only one did curved side windows.
-
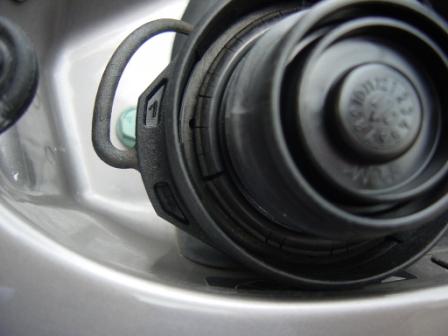
Following replacement of the petrol tank cap seal, I've not smelt anymore fuel - so this has done the trick.
-
Picked Up Hard Top Last Night - Questions
0586slb replied to KevinH90's topic in 986 Series (Boxster, Boxster S)
1. It depends on what is a lot of money to you. Part number 986.563.551.00+colour code - under $8.00 2. I'd advise you adjust the Hardtop, as no matter how hard the Germans or Finns tried, all cars will have flexed and 'settled' differently. If you have no leaks past the window seals when the soft top is up, use this as your datum and don't touch the windows at all. a) Take off the plastic covers from each side of the hardtop and loosen the five alen bolts each side so you can just move the spinlocks in both planes. b ) Open both doors and fully lower the windows, get your assistant to offer up the hardtop, clip in at the screen, make sure the spinlocks drop in, latch the top at the screen then make sure the top is sitting squarely on the car. c) Give each spinlock a 45° turn, then carefully using a 5mm drill as a spacer, have your assistant gently press down on the top to provide a 5mm gap between the metal of the top and the bodywork on both sides, tightening the alen bolts each side. The remaining 45° turn on the spinlocks will make the top 'snug'. d) Now have a look at the side window seals. On one side, gently pull the seal out of the aluminium channel - revealing the channel retaining screws. Loosen the screws enough to give some lateral movement of the channel. You will notice there is still a small strip of rubber on the outside of the channel - this forms the seal to the window. Now close the door and close the window, taking care that you and your assistant guide it into the slot with the small strip of rubber providing even pressure to the window. It doesn't require much, just even. e) Hold the channel in this position, reopen the window and tighten the screws, then start at one end of the rubber seal and push back into the alumium channel in small increments. Repeat for the other side window and your hardtop will be fitting and sealing perfectly. -
:eek: :blink: C'mon guys, It's about one of the worst kit 'conversions' I've seen. Just look at the door seals and how squared off the door apeture is towards the front. The centre console and handbrake is instantly recognisable as 986/996. Other than that, you can't tell wether all that glass fibre was epoxied on to a boxster or a 911...
-
AC not working
0586slb replied to victor's topic in 996 Series (Carrera, Carrera 4, Carrera 4S, Targa)
Like a lot of faulting, try to nail one problem at a time. It does sound like there could be two separate faults here. In answer to your query, just search for 'Ignition Switch' - the problems with it have been covered in depth on the forum. You'll find one of my replies with the Audi part number of the switch. Because in various positions of the switch different circuits are energised, this may be causing your AC controls to be dead. The switch provides the following feeds for the various positions: S - live when key is in ignition. 15- live when 'ignition' on and in start position X - load reduction - live when 'ignition on' but not when in start position. 50 - live in start position only. When the switch fails, the above just gets screwed up and you can get any combinations of switch position and contacts made/broken. The cabin fan for the AC is on the X contact. Fix your switch first and come back if the AC is still playing up. -
I found out the hard way that I can only reverse my Boxster S on to the drive and drive out. If I drive in, when I reverse out it scrapes and catches every time. At service, the OPC replaced a 'spoiler' which is the small plastic piece that looks as though it extends the inner wheel well cover in front of the wheel - if you know what I mean..! :wacko:
-
FrontCrankshaft Seal (pulley side)
0586slb replied to renos's topic in 986 Series (Boxster, Boxster S)
The 'special' tools for doing an oil seal, are a device that first screws on to the pully bolt hole then another larger piece screws into the oil seal and pulls it out squarely. The age old method of srewing a self tapping screw in and pulling with pliers seems to work for most. Getting the new seal in is where the other part of the special tool comes to its own. Its unbelieveably simple to position the new seal perfectly square and to the correct depth with it. Without, you need enough space to drive it as squarely as possible with a socket or something. In either case, be sure to be very gentle when popping the lip of the seal over the end of the shaft and keep things very clean. -
I'm unaware if there have been any recalls in England, nothing has ever been mentioned at service. I think this is the culprit: You can see the seal is severely cracked and perished. The part number (once again, a VW part) was coming back as 191 201 557, so I've ordered it from VW and it arrives on Tuesday. Price in England is £5.46 :blink: I'll let you know if this cures the petrol smell.

-
A picture would help here Ron. :) Do you think it may have been crimped to make bending the tube easier without it collapsing? I'm guessing because I don't really know what you're talking about.
-
PCM on a bench
0586slb replied to beefy's topic in 997-1 Series (Carrera, Carrera 4, Carrera 2S, Carrera 4S)
:eek: This is going to be quite a project, I think if you are self financing it, things may get expensive. To bear in mind, the PCM units are unlocked by reading the code from the instrument cluster. This is done over the CAN bus. When you start getting to protocol level, although you can find a fair ammount of information of the hardware implementation of CAN, the communication protocols are propriety. I can't imagine Porsche, Becker or Harman will provide any technical reference literature to the protocols - even at a high cost. This will apply to the MOST bus too. Setting up you workbench, you will have to buy the connector shells from Porsche, but you can't buy the pins individually. If available, they come as a repair pack, where there is a pin already crimped to each end of a yellow wire. You would probably be better off spending your cash on getting a touchscreen VGA integrated so it looks factory and just run stuff on the car PC. -
If the plug shells are blue, yellow & green and the whole connector is 20way, it is plugged into some radios for CD multi, audio in/out or in dash display.
-
Bill, If you have time before your smog test, just go for a few drives. In normal driving, you will provide all of the necessary 'test parameters' for readiness within a couple of days.
-
There's also a fan on in the right hand side air intake, that draws air in to cool the engine compartment. This one probably is more audible. Its more noticeable for us from England in the RHD cars. :)
-
Nick, No, I have not had chance to look at it yet - busy at work and all. There must be a hose off or perished, as it is a strong 'neat' petrol smell as you say, not just a waft. Would anyone enlighten us on the best way to access the tank and hoses?
-
Are you using the tool from the toolkit? If so, when you remove your headlamp, its best to place the tool so the bar is horizontal and move through 180°. Keep the bar in position, pull the lamp unit foward and let the removal tool bar drop back 90°. When re-inserting, be careful to see the protruding bars go in the runners correctly and squarely, keep the locking tool bar in the 90° position and gently but firmly push the unit home. Maintain your firm presure and move the lock tool to click and lock. If this doesn't work, surely your 60 mile trip will be a pleasant drive on an afternoon? :D
-
Ignition/ Trunk release failure
0586slb replied to coasttocoaster's topic in 986 Series (Boxster, Boxster S)
You may need to operate the dash mounted central locking switch either way a couple of times. You need to get the central locking so all doors are open, this then releases the switch interlocking. You will still have an emergency release cable for the front lock. -
I was right, its a HFS-12 from the Nokia car kits, most likely the CARK-91.
-
Loren, any thoughts on A/C not cooling anymore
0586slb replied to BigBadBen's topic in 996 TT, 996 TT S, 996 GT2
The engine revs will go up when the AC is switched on but compressor not activating. The AC control unit tells the DME its on and the DME in turn alters the torque of the engine to compensate for the extra load of the compressor. By doing this, you shouldn't notice a difference when the compressor engages. However, in your situation, the AC was trying to switch on the compressor (but couldn't because of the loose connection) and the DME increased torque for a load that wasn't there. -
Did you renew both the washer and the nut? The washers are formed to lock, and sometimes the nuts have a spot of threadlock on them. If you renewed the fixings, did you torque them to the required setting?
-
You should try looking for the cap that has '12V Outlet' on it. If Porsche can't help, as usual the VW/Audi cigarette lighters are exactly the same, so one of those will fit.
-
Any fuel vapour expands and vents into the carbon canister, the canister is then purged under DME control when the engine is running. It just stops the fuel vapour venting to fresh air.
-
My guess is that someone has removed a car telephone kit - and forgotten that speaker!
-
As said above, an M14 bolt is a big bolt, where the 14 is the thread diameter in millimeters. Typically, an M6 uses a 10mm socket, an M8 a 13mm and an M10 either 17mm or 19mm. The extra ¼ turn actually stretches the bolt. Virtually all torque to yeild bolts are single use as when they stretch, they exhibit plastic deformation and will snap if torqued again. Be sure to do the ¼ turn without stopping - there are also protractor discs that slip over your socket drive so you can accurately measure the turn.
-
Nothing weird about it at all. Its what happens when there is a bad earth connection somewhere. The bad earth will be in the front cluster and the symptoms happen because; the high beam is a high wattage bulb (60W), therefore low resistance compared with the indicator (21W). All the grounds of all the lamps in the front headlight cluster are joined together and one wire actually connects to the ground of the car. So the current flows through the high beam, to the ground busbar in the headlight cluster (can't flow to ground here) backflows through the indicator lamp through the harness to the rear indicator lamp of that side, through the rear indicator lamp and to ground there. You will see both front and back indicators dimmly lit. So look for a bad ground connection in the front cluster. The wire will be a solid brown.
-
I can second that a UK 2002 986S has the infra-red motion sensors armed when the top is down.