Welcome to RennTech.org Community, Guest
There are many great features available to you once you register at RennTech.org
You are free to view posts here, but you must log in to reply to existing posts, or to start your own new topic. Like most online communities, there are costs involved to maintain a site like this - so we encourage our members to subscribe or donate. All subscriptions and donations go to the costs operating and maintaining this site. We prefer that guests take part in our community and we offer a lot in return to those willing to join our corner of the Porsche world. This site is 99 percent member supported (less than 1 percent comes from advertising) - so please consider an annual subscription or donation to keep this site running.
Here are some of the features available - once you subscribe RennTech.org
- View Classified Ads
- DIY Tutorials
- Porsche TSB Listings (limited)
- VIN Decoder
- Special Offers
- Paint Codes
- Registry
- Videos System
- View Reviews
- and get rid of this welcome message
It takes just a few minutes to register, and it's quality Porsche information at a low cost.
Contributing Members also get these additional benefits:
(you become a Contributing Member by subscribing or donating money to the operation of this site)
- No ads - advertisements are removed
- Access the Contributors Only Forum
- Contributing Members Only Downloads
- Send attachments with PMs
- All image/file storage limits are substantially increased for all Contributing Members
- Option Codes Lookup
- VIN Option Lookups (limited)


mcmike27
-
Posts
121 -
Joined
-
Last visited
Content Type
Profiles
Events
Forums
Exterior Paint Colors
Downloads
Tutorials
Links Directory
Collections
Classifieds
Store
Everything posted by mcmike27
-
JFP, quick question we have a 98 986 that had it's poly belt serviced at 60k miles it just turned 90k and I have noticed on cold start (PA here as well) that the belt or one of the pulleys has a little 'slip' 'squeak' noise until it warms up then the noise vanishes. I'll be interested to see as the air temp increase if this condition goes away as the temp rises. Or would it be prudent to just swap it now and check all of the pulleys and housings for wear...also the water pump and thermostat are original. Upon inspection with the belt loose if there is any play in the WP pulley I might as well do that service to avoid bigger isssues down the road. Your thoughts? Regards, m2 A thought to keep in mind about the poly rib belt: It is one of the cheapest parts on the car (~$25 for the OEM unit), and it can be changed in about 20 min. by a total novice with simple hand tools. It also can both strand you and do a lot of damage to your engine if it fails. Change it regularly, and keep the old one in the car as a spare, just in case (they are not the easiest thing to find in a hurry)……….
-
Clutch replacement
mcmike27 replied to jrthe1's topic in 996 Series (Carrera, Carrera 4, Carrera 4S, Targa)
J, it's a great idea to have the clutch serviced with the RMS since they have to drop the trans assem to get at the RMS bearing. Couple of questions...are you having any of the unfortunate tell tale signs of a RMS failure i.e. CEL, oil drips from the area, engine power issues etc etc? If not then other than for piece of mind would you opt for this service. Our 98 986 has 90k everyday miles on it with the original RMS and clutch and it runs and drives as it should. The clutch engages now about mid point and like yours shifts and drives perfectly. At 23k miles if they are original to the clutch I would think (if it's driven normally and not like a race car) that the clutch should be ok. Double check the RMS and the clutch suggestion before you spend allot of $$$. If indeed you do have the RMS going then it would be prudent to at least make sure that the clutch needs to be serviced since it will all be apart anyway. I hope neither is the case for your car. Best of luck m2 -
I had the same problem but in reverse (front trunk microswitch)...it ended up being the microswitch. Easily fixed....more time taking the internals off to get at it then actually replacing it. The rear is a bit easier. If after checking the fuse and you find it to be good (hopefully) then the switches are rather inexpensive. Good luck... m2
-
1998 Boxster Window Sticker?
mcmike27 replied to darkhorsemotorcars's topic in 986 Series (Boxster, Boxster S)
darkhorsemotorcars, I have our factory original sticker in good condition that I can scan for you. Ours is a 98 986 STOCK silver, balck cab top, leather interior. Just drop me a line with your email please. Regards, m2 -
laalves, the driver side fog lamps come on to 'mark' the LEFT side of the car in foggy driving conditions. In Germany under difficult foggy conditions the driver should be in a slowed safe speed in the right hand lane and the LEFT REAR FOG lamp lets anyone approaching from the rear know where the LEFT and RIGHT sides are. All of the 'P' cars come this way at least the older models do. My 98 986 inculded. :)
-
What color should I paint grilles and side vents?
mcmike27 replied to suburban99's topic in 986 Series (Boxster, Boxster S)
suburban99, we have a 98 986 that I recently had some paint work done on and the body shop and I had the same question....silver or flat black...they did a mock up with each color and the black won out...no question it was the right choice...it sets off the front grill and breaks up the silver on the sides...have an extra coat of clear coat added to the front bumper and grill as you know these low slung cars are 'rock eaters'... I hope this helps. -
To all, I have seen ads and an actual demo of this product. I have a 98 986 with 89k miles and for my spring spurce up when the weather breaks here in frigid Pa I am considering using this product. Has anyone used this and if so was it as 'easy' as the demo was that I saw.... Thanks m2
-
G, the fix is easy and just a bit tedious to repair. You will need the following: 1. Porsche part 996-521-551-01 drivers side seat frame double check the PET for the passenger side if necessary I think they are both the same. $9.95 each 2. Long nose needle nose pliers: you will need this to take off the metal pointed hooks that attach the plastic frame to the seat body. You'll see these when you flip the seat center back cushion forward to do the repair. Do NOT try and save these.... simple black cable ties will be used here to reattach the frame to the seat back. 3. Wire snips (dykes) to cut the old metal pointed hooks if you cant wiggle them out. 4. Black cable zip ties approx 20 to 30: see above....it's very easy to see where they attach when you take the old piece out. 5. About 1.5 hours of patience :) Once attached just slide the 3 plastic hard hooks above the hard metal 'U' shaped bar attached to the seat back and hook all 3 plastic tabs and your set. Be patient here it took me 3 tries to get all 3 hooked. Once hooked you are good to go. Mine has been perfect ever since I did the repair in the fall....and the dealer wanted close to $300.00 to do the repair. It's all labor and it's a snap to fix. Your fingers will be sore as those darn metal spiked hooks that hold the old seat back frame to the seat are a bugger...but once you sort it out and do 2 or 3 you'll see they come out pretty easily. If you need any additional help let me know m2
-
I'm getting ready to yank and replace the factory original water pump and thermostat in our 98 986 which has 90k miles on it. I have read quite a bit about the positives on putting in the L&N Eng 160 thermostat. Only positives so far are there any 'gotchas' with not going with the factory part at 180 deg? Please advise my trusted more knowing group. Regards, M2
-
Mattau, wait until 60k. If you are having ignition issues then I would look at the coil packs then pull a plug to inspect it if necessary. I have a 98 986 that has 90k miles on it and they were serviced at 60k and I just did them at 90k and except for a small split in one of the tubes that attaches to the coil all were found to be in good condition. Dont spend the money unless your having issues. Regards, m2
-
I hope this helps and I hope it's what is causing the nosie your describing. I had a almost sureal similar experience last week. Drove our 98 986 to work all was great. Went out for lunch and heard a 'clunk' from the left rear wheel area....didnt hear it again until the put the window down and heard a low rotating noise like you described and I thought as you did...oh crap a wheel bearing. I took it 'gingerly' over to the dealer. The next morning they called 1 st thing and found the following. On the left half shaft there are bolts on the half shaft face transition plate that had worked their way lose and were not tight. Once found and retorqued 'pfffft' the noise and vibration were gone. I picked up the car and test drove it agressively and problem solved. I hope this is what you are experiencing and not a wheel bearing. Good luck!
-
Looks great...we are going to be in the process of repainting our 98 986 in the next year and I have always thought about a 'flat' paint with a satin clear coat. I thinks it sets the car apart. I am thinking about a hybrid of sliver/gun metal as the original color is Artic Silver Met. with the top being black with a black leather interior. It would be easy to maintain not show allot of road dirt and be completely different from every other 986 of that vintage. :)
-
Straight pipes w/ out engine light ?
mcmike27 replied to msediqi's topic in 986 Series (Boxster, Boxster S)
Here's a solution my wifes Uncle had done on his 98 986. The local Porsche dealership took off the stock muffler cut the top open and removed the resonater in the muffler assem. They then rewelded the top back on and it sounds nice and runs perfectly. The only 'issue' we have with the car is between 2300 rpm and 2900 rpm when the engine is cold it is a bit 'growly'. Once the engine warms up and the timing adjusts to the warm engine it sounds nice. Lets just say you 'hear' the car a bit before you see the car. Our local Porsche dealership loves the way it sounds and comments each time we take in for the annual service that it sets it apart from the stock whooooshhh sound the stock muffler makes. Just a suggestion if you dont want to spend additional monies on a muffler. Have fun m2 -
Spark plug socket boot slight crack on last cylinder
mcmike27 replied to mcmike27's topic in 986 Series (Boxster, Boxster S)
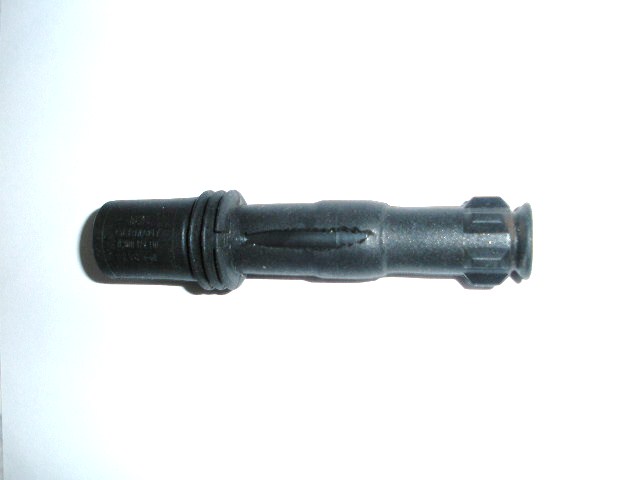
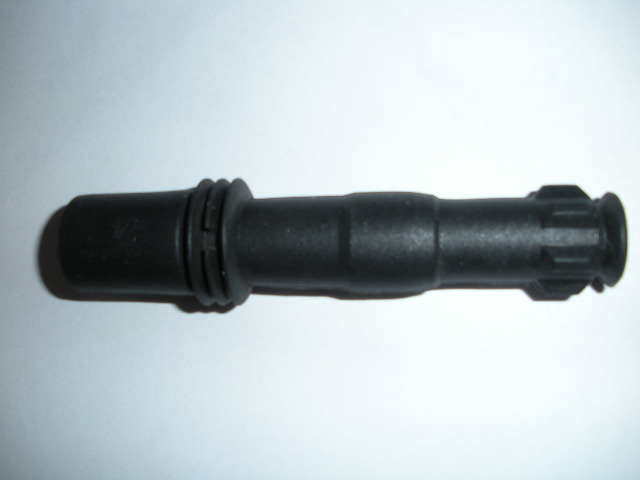
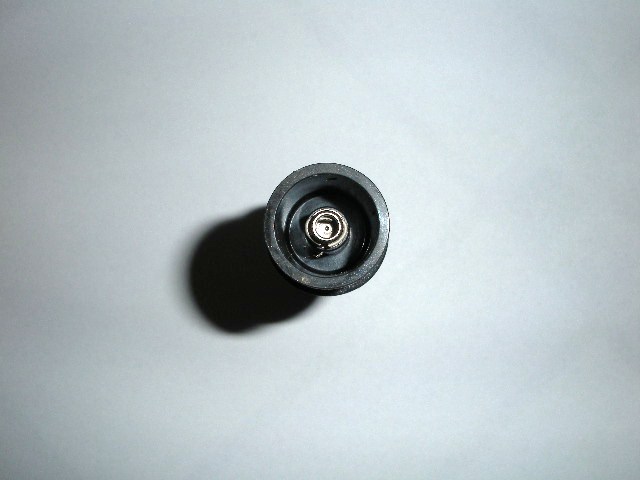
Loren, upon inspection of the new spark plug sleeve it looks like the top actually has a small 1 turn locking thread that holds it onto the coil pack. When I remove the defective sleeve tomorrow I will try and take a digital pic to show anyone else that might encounter this how the actual sleeve twists off and then twists on. With a tiny bit if a product I use called Microlon (anti friction for engines) dropped between the old sleeve and coil body this will break free any potential binding from heat and allow me to twist off the old and reinstall the new sleeve. Just an FYI for the forum and I'll post before and after pics for future reference. See pics attached for the old and new spark plug sleeve and the twist lock at the top. It installed in under 5 mins once the car was jacked up, the wheel was removed and the coil pack taken off. Just a wiggle, twist and an audible disengement then back on the same way. Coil bolts tightened...coil connector cliped and tire on, lowered...wheel bolts replaced and IGNITION....ran even better. I believe there was a small almost not noticed miss fire from that cylinder as the insulation was cracked and some level of spark was not completely directed to the spark plug crown. The dealer suggested that since the other 5 were in perfect condition it made sense to correct this defect. For under $20.00 it was well worth the extra effort to fix this. First pic is of the 'split' spark plug boot. The second is the new one. The 3rd is the pic of the 'twist' locking part that connects to the coil body. Thanks again M2
-
Spark plug socket boot slight crack on last cylinder
mcmike27 replied to mcmike27's topic in 986 Series (Boxster, Boxster S)
Loren, thanks I have the boot now in my hands...here's the question how do you take the old boot off of the coil pack. It looks like it just sildes dwon from the coil pack where it transitions from the square to the round. There is clearly a transition point from the coil pack to the rubber boot sleeve. Does it just pull of and then slide back on. At this point I dont want to YANK and then damage the coil as it's in good working order. Tks... m2 -
Spark plug socket boot slight crack on last cylinder
mcmike27 replied to mcmike27's topic in 986 Series (Boxster, Boxster S)
Loren, thank you...yes the coil is perfect and in good working condition. I only need the bottom boot piece. Such a shame to have to jack it up again take off the tire and take out the coil pack for this rubber tube. But it's a harsh environment...better to replace then to start having misfires. Thanks again... m2 -
Spark plug socket boot slight crack on last cylinder
mcmike27 replied to mcmike27's topic in 986 Series (Boxster, Boxster S)
The spark plug tubes are new as of last Jan. The part I am referring to in the LONG rubber tube that extendes down from the ignition coil body. Only the outer rubber insulation is split 3/4 inch. The hard plastic underneath is intact and it runs perfectly. I was concerned going forward if this might cause a misfire but it seems to be ok as is. All of the coils upon inspection were in excellent condition and were cleaned of grime and reinstalled and slipped perfectly into the new spark plug tubes? So do I leave as is or replace the whole coil assembly? :) -
thinking of taking a long trip in '03 Boxster
mcmike27 replied to triguy46's topic in 986 Series (Boxster, Boxster S)
We take our 98 986 w 88k miles on long trips and have had no issues. I do make a good check list before hand to inspect ALL of the fluids and pressure in the tires. I also take along 1 qrt of oil and a small tool kit (better to be safe than sorry) Other than that except for the the cramped qtrs it's a great experience. We recently upgraded the OEM radio to a new Pioneer head unit w/SIRRUS and it makes a world of difference when we are crusing on longer trips. When you do find some open hwy or a nice road with some twists it's allot of fun to enjoy the performance. Have a great trip. m2 -
1st thaks to all on this forum for the support and replies on my questions to date. This past weekend I replaced the spark plugs on our 98 986. It was easily accomplished as I followed all of the threads from this forum to complete the work in a little under 2 hours. That being said I ran into a little issue on the very last plug. Upon pulling the ignition coil and spark plug socket boot out of the cylinder I noticed a 3/4 crack slit in the plastic insulation that surrounds the hard plastic inner spark plug socket. The car runs like a top with no codes or misfires. It is approcaching the 90k service interval so I changed the plugs and when I did I found this defect. Since I did not have a spare spark plug socket or coil assem I swaped out the plug and put it back as I had with the other 5. Lowered the car and vrooommm no issues or misfires. My question is this part avail as just the spark plug socket 996 602 103 01 , 996 602 105 00 or do I need to buy a complete coil assembly. The PET exploded view is a bit confusing. Loren you are the go to guy along with Toolpants on these types of issues do I leave as is or replace. Thanks in advance m2
-
90k service interval coming up and I will be doing the spark plugs and have the poly rib belt in my garage ready for install. 2 questions. 1. Must I crack open the top engine cover or can I just remove the belt cover to swap out the poly belt? 2. In checking the service records it appears that the original water pump is still in the car would it make sense to also replace this when the belt is being changed. To date no sign of any issues with the cooling system. Please advise pro or con as to what would be the best course of action. Thank you all in advance. m2
-
Replacing spark plugs need correct p/n's for 98 986
mcmike27 replied to mcmike27's topic in 986 Series (Boxster, Boxster S)
Thank you Loren. :) -
Hopefully easy one here guy's. I am going to do the spark plugs this fall (now) on our 98 986 since the dealer wants far to much for this (90K) service due this fall. Can anyone please point me in the right direction as to which mfg were original with the car and what brand and p/n should I repalce these with now. I have the service records for the 30k change but the p/n is not on the service record it just lists the 30k serivce and included in that is the spark plug change. As always your help is greatly appreciated. P.S. I will be also doing the rib belt myself as this forum has given me the DIY to do that on my own. I will leave the fuel filter to the dealer as I'm not a big fan of getting all the way under this car even on jack stands with the jack as a 'monitor' back up. It's just too close for comfort and with the fuel filter on the center line of the car and me being under there pulling and tugging it gives me the shakes thining about it. Thanks again...
-
T, the 2 holes are the best way to remove the center hub crest cover. A simple bent coat hanger will do the trick to remove them. Do you have the nicer enamel metal crests or the plain black and silver plastic ones? The metal enamel ones are a bit pricy. I have the simple black and silver ones which I have removed and painted with acrylic model paint to look exactly like the hand painted metal enamel ones from Porsche. Here is my DIY thread http://www.renntech.org/forums/index.php?showtopic=28796 If you have any questions drop me a line here. M
-
Matt, I have recently replaced the driver seat center plastic back frame as the top 3 'hook's fractured from the top leaving the seat center cushion to fall out on occasion. That center section COMPLETE from Porsche is almost $1000.00. The plastic back frame was $9.00 and it took me 1.5 hours to complete the swap. Having done that their is the extended piece of leather that goes under the seat and attaches to the seat back frame. You will have to for ease of access take out the seat to get to the underside and see where that piece of leather attaches. It most likely like the center section of leather that transitions to cloth and hooks to that plastic backshell attaches the same way. Once located you should be able to 'unhook' it from the seat back and use the same center section on the drivers side. That center section is comprised of 4 distinct pieces, the outer leather wrap, the underlayment, the 1st soft foam layer, the second firm foam layer, the hard backing and finally the outer plastic frame that binds it all together. If you have any questions drop me a line here. You should also look at just having that center section serviced by your local auto upholstery shop. Once removed from the car they can easily match the leather and it will be easy for them attach it for you to the center seat back frame. Good luck...
-
Here is a great DIY from Mike Folke that I am doing this weekend (weather permitting). http://mike.focke.googlepages.com/paintingyourcalipers It shows you exactly the steps and the products to use. Have fun...