Welcome to RennTech.org Community, Guest
There are many great features available to you once you register at RennTech.org
You are free to view posts here, but you must log in to reply to existing posts, or to start your own new topic. Like most online communities, there are costs involved to maintain a site like this - so we encourage our members to donate. All donations go to the costs operating and maintaining this site. We prefer that guests take part in our community and we offer a lot in return to those willing to join our corner of the Porsche world. This site is 99 percent member supported (less than 1 percent comes from advertising) - so please consider an annual donation to keep this site running.
Here are some of the features available - once you register at RennTech.org
- View Classified Ads
- DIY Tutorials
- Porsche TSB Listings (limited)
- VIN Decoder
- Special Offers
-
OBD II P-Codes - Paint Codes
- Registry
- Videos System
- View Reviews
- and get rid of this welcome message
It takes just a few minutes to register, and it's FREE
Contributing Members also get these additional benefits:
(you become a Contributing Member by donating money to the operation of this site)
- No ads - advertisements are removed
- Access the Contributors Only Forum
- Contributing Members Only Downloads
- Send attachments with PMs
- All image/file storage limits are substantially increased for all Contributing Members
- Option Codes Lookup
- VIN Option Lookups (limited)


1schoir
-
Posts
2,739 -
Joined
-
Last visited
-
Days Won
6
Content Type
Profiles
Events
Forums
External Paint Colors
Downloads
Tutorials
Links Directory
Collections
Store
Everything posted by 1schoir
-
Dead Battery-What Now?
1schoir replied to raloise's topic in 996 Series (Carrera, Carrera 4, Carrera 4S, Targa)
Raloise: Just post your radio model number, type, and serial # on the following thread : http://www.renntech.org/forums/index.php?s...c=14539&hl= Regards, Maurice. -
EZ: The EVAP (carbon) Canister, along with its related valves, are located in the passenger's (right) side front fender, under the fender lining. There are vacuum lines and a harness connector attached to the canister. Check to make sure that the vacuum lines are securely connected and that there is no vacuum leak from those lines. Regards, Maurice.
-
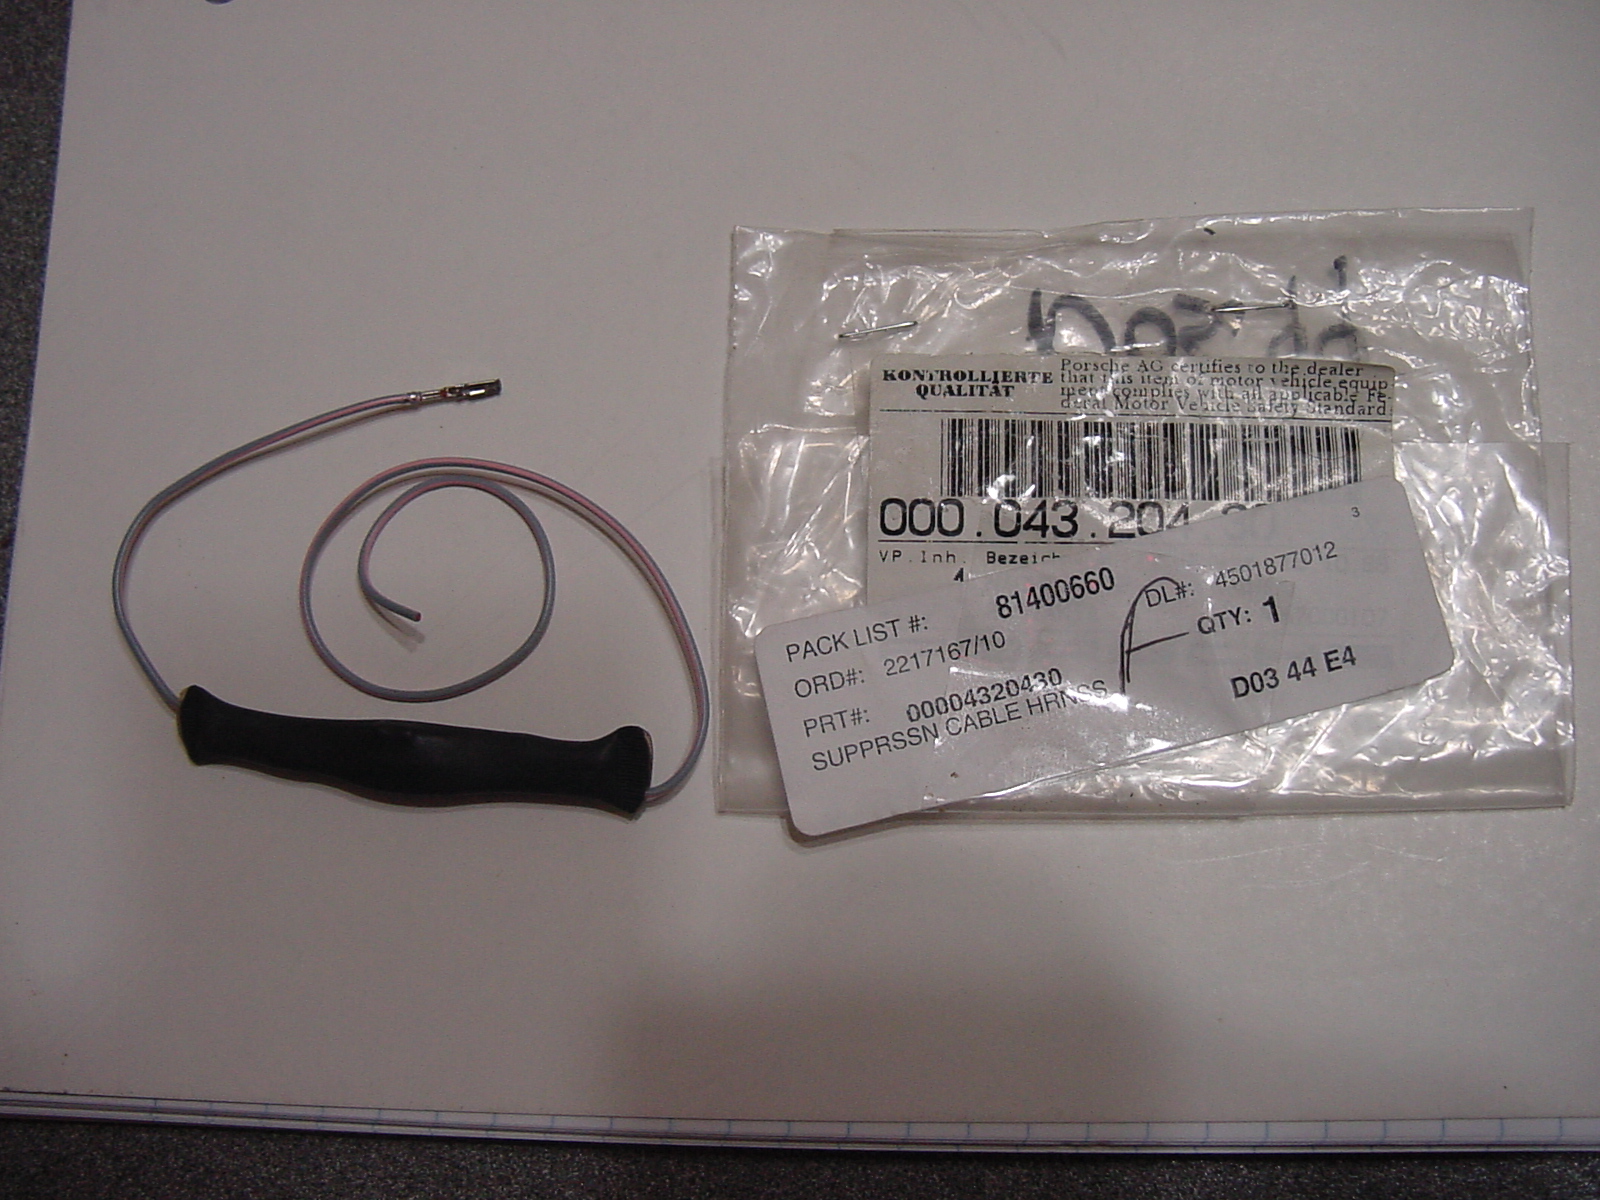
Does anyone know how to wire in this part, called a "suppression cable harness", part number 000 043 204 30, pictured here: I had read that there was a TSB on this, to correct AM radio static caused by interference and the brake sensors, but I have been unable to find this topic on the TSB's. The silver connector looks like it plugs into some receptacle in the back of the radio, but I'm not familiar with this. Since both wires that come out of the suppressor are gray with a pink stripe, I am assuming that it gets connected in line, but where? Car is 1997 Boxster with a CD-210 radio and I get loads of static, even though I have done the A-pillar ground connection fix (made it a little better, but did not "cure" it). Regards, Maurice.

-
Newbie with lighter and remote issues
1schoir replied to momo187's topic in 986 Series (Boxster, Boxster S)
I couldn't agree more with the comments made by Shawn. Cigarette Lighter fuse is at position D5 (4th row from top, 5th fuse from left). Fuse C3 is for the Alarm control module, but also for the interior lights and power windows, so you should be able to narrow that down. Check for moisture/water near/on/ or in the alarm control module, which is located under the drivers' seat (left side). These units often get wet from water leaking into the cabin, sometimes when the convertible top drains get clogged (2 in the front trunk on either side of the battery, and 2 below the clamshell, below the V-levers that operate the top mechanism). Since you just bought the car, it's a good idea to check and clear those out. If you search this site, Loren or Tool Pants has posted diagrams of where these are located. Congratulations on your new purchase. Drive it in good health! Regards, Maurice. -
Dead Battery-What Now?
1schoir replied to raloise's topic in 996 Series (Carrera, Carrera 4, Carrera 4S, Targa)
As posted above, you will need the radio code, but you will also probably have to "reset" the windows (simple matter of pressing the window button continuously for an additional 5 seconds after it reaches it highest point). The engine may run rough for a short while, as the DME resets the fuel trims, etc., but that will happen automatically. Regards, Maurice. -
Wind noise on drivers window
1schoir replied to Rolla's topic in 996 Series (Carrera, Carrera 4, Carrera 4S, Targa)
Joel: Any progress? Did you run into any glitches? Regards, Maurice. -
To fix a bad ground, you first have to identify the ground wire in question, then test it end to end with an ohmeter to be sure there is no (internal or external) break in the wire. Following that, you must clean (emery cloth or sandpaper) the pin, eye, or cable lug on each end of the ground wire and, finally clean the point where the ground wire attaches to the body by removing any paint or corrosion. To help determine whether you have a bad ground, just substitute a new length of wire from the point where the old wire end connects to the motor or switch and then connect the other end to a known good ground. Regards, Maurice.
-
Wind noise on drivers window
1schoir replied to Rolla's topic in 996 Series (Carrera, Carrera 4, Carrera 4S, Targa)
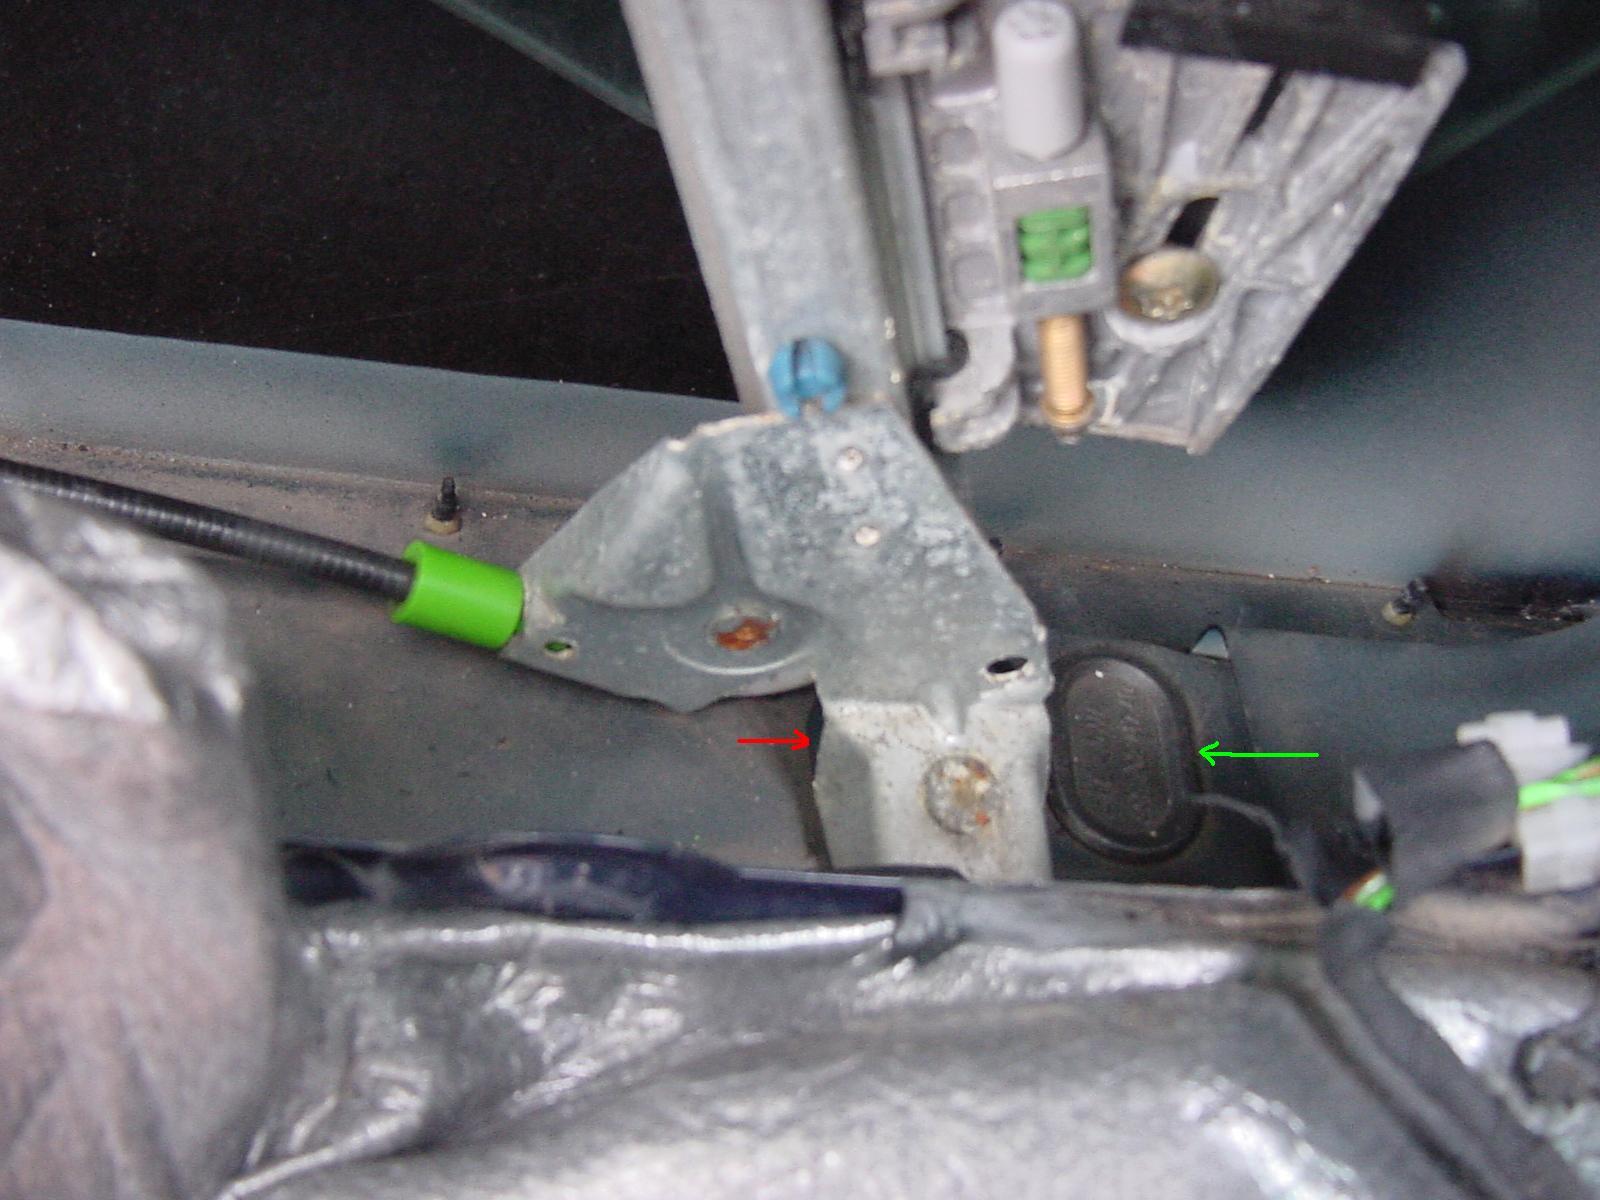
Rolla: There are four rubber plugs located on the door bottom surface. To adjust the height of where the window stops, you must first remove (pop out) the two OUTBOARD plugs. Then, reach through the holes with an E6 Torx driver and turn the screws, one at a time until you achieve the desired adjusmtent. To keep track of how much you have adjusted, mark the top of the window with masking tape or, preferably with a wax pencil, tracing the top surface of the window where it meets the seal at the top. There is a little more than 1/2 inch of adjustment through this method. Note that the Torx adjustment screws are on an angle, raked back at an angle similar to the rear edge of the door. Here's a photo that should help you get oriented: Note: The green arrow shows the outboard plug that must be removed, at the forward part of the driver's door. The red arrow shows the very edge of the inboard plug (which should only be used to adjust the inboard/outbard angle of the window by means of loosening and then shifting each leg of the window regulator). With a little patience, you should be able to minimize or eliminate the wind noise. Regards, Maurice.
-
Endaar: There's a guy over on PPBB.COM named "Abe Evrens" who has been doing some heavy duty looking at 2006 and 2007 Boxsters and "S" models over the last few weeks. Here are some of the comments he posted about what he found: "Three choices but leaning toward one: 06S Boxster – 6,800 miles, with CPO, fully fully loaded, $46,000 USD 07S boxster- new, well equipped at $64k MSRP (GT Silver paint $3450-nice but I wouldn’t have paid) - $57k 07 Boxster base- new, fairly well equipped, no xenons at: $48,1k I am leaning toward the 06S- with all the toys and the CPO! Any thoughts... ....... I have now a hold on an 07 S boxster and an 06S Boxster both with CPO and identical miles at 6k each. Now there are a few issues i am trying to grapple with and need your help given that I have never owned a Boxster only the forum would know better than I. 07S- Price $50,500 xenons 19 inch carrera s rims Leather sport seats heated front seats windstop Mats sport shifter Porsche crest on head rest Question: Does auto climate come standard on an 07S? Does not have auto dim mirrors and rain sensors 06 Boxster S Premium pack plus windstop sport shifter electric seat package* not sure whether this has sport seats ......... By the way, he is in Canada, but he has been looking to buy at U.S. dealers only. So, from what he has found, I agree that the car you are looking at is a tad high, especially in view of the mileage. I also agree that Boxster prices drop by a few thousand around here when there is snow on the ground or approaching. Also, you might want to look at Mike Focke's Boxster Pages, as he has a great article on buying a Boxster, with some very good insights. Here's the link: http://mike.focke.googlepages.com/mikespor...boxsterwebpages Regards, Maurice.
-
Boxsterred: An easy way to identify the ground wire on most German cars is by its brown color. Take a look at the wires coming from the wire harness side of the connector plug to the motor, and see if any of those wires are brown. Then, try to match up which pin on the motor side connector goes to the brown wire on the harness side and you will have your ground. Also, once you have identified the ground on the harness side of the plug, you might be able to use that corresponding pin to orient yourself as to which pin is which by using the wiring diagram. If you look closely at the wiring diagram, you will also see the identification of the color of the wires, such as br/wh (brown w/ white stripe), br/re (brown w/ red stripe), br/bk (brown w/ black stripe), etc. Then follow the wires to the numbered terminals and that should help you identify them. I've always used the ground terminal of the 12V battery as the ground when I am testing a small electrical motor or switch in the car, so you can't go wrong doing it that way. Regards, Maurice.
-
Window has a mind of it's own
1schoir replied to 2Fast996's topic in 996 Series (Carrera, Carrera 4, Carrera 4S, Targa)
Doug: If you disconnect the battery, the regulator loses its reference point for the closed position. You have to "reset" the windows whenever power to the window motors is interrupted. In order to reset, with the convertible top fully closed, press the button to raise the window to its highest position, then keep the power window switch pressed down for a further 5 to 10 seconds. If necessary, repeat with the window all the way down, but I believe it's only necessary to do it with the window all the way up. Regards, Maurice. -
Do I have a leak?
1schoir replied to porschenut's topic in 996 Series (Carrera, Carrera 4, Carrera 4S, Targa)
The area that is shown in detail in the second ("now") photo looks like it has not changed since the first photo. Judging from the RMS repairs discussed on this board and others, and the fact that there appears to be no such thing as a "permanent" RMS repair, I would be careful to avoid having this done unless they can show you some more definite signs of a problem. Regards, Maurice. -
Ron: There is a good supplier of the Dension units called Bumperplugs.com, run by a nice, helpful guy named Eric Sklut "Eric the plug guy". His e-mail address is: eric@bumperplugs.com According to his company, they are the primary distributor for Porsche Units of the Dension Gateway 500. Phone number is : (704) 841-0911, located in Charlotte, NC. Regards, Maurice.
-
CEL Came On
1schoir replied to Lee Quave's topic in 996 Series (Carrera, Carrera 4, Carrera 4S, Targa)
Lee: For your MY99 996, the Bosch Part numbers are as follows: 13564 Oxygen Sensor - OE Type BEFORE Catalyst Two required 13723 Oxygen Sensor - OE Type AFTER Catalyst Two required You can double check the part numbers on the Bosch Parts website at : http://www.boschautoparts.com If you want to buy them locally (where you are), put your zip code in to the box supplied and they will give you a local retailer. If you want to get them online, here are two sites: http://www.oxygensensorwholesale.com (about $146 each, free shipping) http://www.autohausaz.com (about $136 each, well known supplier). You could also try board sponsor Sunset Imports, but I don't know if they supply the Bosch as opposed to the Porsche part. Also, there seems to be an issue with getting the "universal type" which requires you to splice the connector from your old sensor onto the new universal one, because you apparently cannot solder it on, etc... Perhaps someone else here can explain that in more scientific detail. If you get the "OEM-type" sensors by Bosch, you will avoid those issues. The prices above are for the OEM type ones, which will just plug in. I would replace the ones BEFORE the catalytic converters first, as Loren has pointed out. Regards, Maurice. -
Colonel: Once you see how easy it is to remove the grab handle, you will lose any remaining confidence that you may have had in that body shop. First, the door panel does NOT have to be removed in order to remove the grab bar. There are two large (#30, IIRC) torx screws that must be accessed and removed in order to remove the grab bar. The first one is located under the plastic cover that surrounds the door pull. This is the only piece that is a little tricky to remove without breaking off a tab that helps to hold it in place. Looking from underneath the plastic cover, you'll notice a small indentation in the center, towards the rear of that piece. You can work a small flathead screwdriver in there at the appropriate time, and, at that time, you can gently just separate it slightly from its contact surface with the door panel. First, though, put some significant pressure on the top (horizontal) rearmost surface of that plastic piece. Then, work the small flathead screwdriver in the indentation from underneath to separate it and then grab the whole plastic piece and rotate it upwards, pulling the bottom towards you and up, WHILE KEEPING THE DOWNWARD PRESSURE ON THE TOP REARMOST HORIZONTAL SURFACE OF THE PIECE. Note that the pressing down while rotating the piece is what keeps the small tab that is under that section from breaking. From what I have read, they break 50% of the time, but if you do it this way, they will not break. Once that plastic cover is off, unscrew the #30 long torx screw located there. To access the other screw, you must remove the small vinyl/plastic semi-circular ring that is located at the forwardmost point of the cubby. Just slip in a small PLASTIC blade under the left side(as you are facing the inside of the drivers' side door) near its uppermost portion (just below that left corner) and then rotate the top of the part towards you with some friction. That semi-circular ring is flexible and has an "up" position that is indicated with an arrow on its underside, so you can't put it back wrong. Now unscrew the #30 long torx screw located under the ring. Once you have both large torx screws removed, just grab a hold of the grab bar and pull it towards the front of the door and it will slide right off. (This is the part that will find you disappointed in the body shop's abilities). To re-install, you will see it has two hooked tabs on the bottom rearmost surface of the grab bar that fits into two slots on the top of the door pocket. EDIT: Sorry Colonel, I didn't realize yours was a 997, so this write-up will probably not help you. I should have read the header more carefully. Maybe I will re-post it in the appropriate forum so it doesn't go to waste. Regards, Maurice.
-
CEL Came On
1schoir replied to Lee Quave's topic in 996 Series (Carrera, Carrera 4, Carrera 4S, Targa)
Lee: If you have to get the 02 sensors, don't spend the extra money for the "Porsche" part with the Porsche Part number. Get the equivalent Bosch part. Same part, but no Porsche box or part number stamped on it. Porsche does not manufacture 02 sensors, Bosch does. The Bosch part is exactly the same, and has the correct connector. The O2 sensors do age, and replacement is generally recommended between 60 and 100K miles. Take a look at Mike Focke's Boxster Pages for a good overview of O2 Sensors, at the following link: http://mike.focke.googlepages.com/oxygensensors Regards, Maurice. -
Engine knocking due to Clutch Bearings?
1schoir replied to por986's topic in 986 Series (Boxster, Boxster S)
With your friends' shop, you have certainly found the ideal way to "get to know the car better." Unless you track your car, I don't know that the "21 percent increase in clamping force" would be of any use to you. I'll let others with more experience in that arena comment on that aspect. You might search on some other forums that have more emphasis on the racing scene for Boxsters to see what you can learn about high performance clutch setups, etc... After you finish the job, along with the tremendous feeling of satisfaction that you will experience, take the $700 to $800 savings and buy something nice for you and your Boxster. Regards, Maurice. -
Carlos: That's good news. When you get the car back and put the lights in, make sure you update your car's photo at the bottom of your messages. LOL. Regards, Maurice.
-
Painting brake calipers
1schoir replied to Fluke996's topic in 996 Series (Carrera, Carrera 4, Carrera 4S, Targa)
-
Engine knocking due to Clutch Bearings?
1schoir replied to por986's topic in 986 Series (Boxster, Boxster S)
... Did you look a the jporter thread? If you can't find it, let me know and I will hunt it down and post the link. Regards, Maurice. If it is the post regarding the oil leaks (http://www.renntech.org/forums/index.php?showtopic=15683&hl=jporter+transmission), yes. Thank you. Being a novice, it looks all foreign to me, but I am excited to 'potentially' do this - if it turns out to be cost effective. I am going to a shop today to see what they will charge, but I suspect I will be on the better doing it myself. Not to mention I have ALWAYS wanted to delve in mechanics, but have simply been scared due to the unkown. With support like what I have found here on Renntech, it makes it seem very doable. If it turns out to be something that I tackle, I really do intend to document all the steps from a beginnner's POV. It might help someone else out there who is on the fence like me. That's the correct post. Since you have never done this before, in order not to get overwhelmed by the "unknown", just keep in mind what it is you will actually be doing when you tackle the job. You are essentially unbolting the transmission from the engine, then unbolting the pressure plate from the back of the transmission, replacing the clutch disc, throwout bearing and pressure plate, and then re-attaching the transmission to the engine. Not very complicated, really, but it does require patience, a decent workspace and the right tools to make the job easier. My experience is also, that if you are not under pressure to get the car back on the road (i.e., you have other transportation), it always makes the job much more relaxed and enjoyable. Curious to hear what the shop wants to charge, but I think you have the right attitude. Documenting it with lots of photos will not only help others in the future, but it will help you keep track of what goes where and to get help if you get hung up on something. Regards, Maurice. -
Engine knocking due to Clutch Bearings?
1schoir replied to por986's topic in 986 Series (Boxster, Boxster S)
The Bentley Manual has a chapter devoted to removing and reinstalling manual transmissions (5 and 6 speed), which is reasonably detailed. They do not give you a list of the tools needed, but there is good information contained there regarding the torque values of the various fasteners for re-installation. From my experience, I can tell you that you shouldn't do this without a torque wrench. They mention a special Porsche tool (or equivalent) for suspending/supporting the engine while removing the transmission, but, again, "jporter" used a 2X4 to accomplish the same task. IIRC, he wasn't too happy with the 2X4 setup, but it worked. You will also need some kind of a jack to support and lower the transmission with some control. Did you look a the jporter thread? If you can't find it, let me know and I will hunt it down and post the link. Regards, Maurice. -
Franz: Do you have the same problem with both seats? If the passenger seat does get hot enough, you might try swapping out the heater control relays which are located under the seats. Not sure if it's the same on a 2006 Boxster, but on the 986' the part number is 996 618 521 00 and it's relatively easy to pull out and swap. You don't have to pull the seats out, just unbolt them and lean them back. The relays (again on a 986) are held in place on the seat frame by a plastic rivet (that has a center pin that can just be pressed out and re-used) and connected with a connector plug. Regards, Maurice.
-
Engine knocking due to Clutch Bearings?
1schoir replied to por986's topic in 986 Series (Boxster, Boxster S)
Don't be sad. Take a look at a recent post by "jporter" (use the "search" link at the top right of the page and put in the name "jporter" in the correct box). That thread will give you an idea, along with some helpful photos, as to what it takes to remove and reinstall the transmission, which is what you must do to replace the clutch components. "jporter" wrote the procedure regarding his experiences with the oil leaks in his Boxster, but the same procedure applies. While you are at it, you will have a good opportunity to inspect the RMS. I agree that with enough help from this board, even a novice ( a determined novice) can replace a clutch on a Boxster. Regards, Maurice. -
Painting brake calipers
1schoir replied to Fluke996's topic in 996 Series (Carrera, Carrera 4, Carrera 4S, Targa)
Doug: Brake cleaner has a similar composition to the auto paint pre-cleaners, so you should be fine. If there was any oil or fingerprint residue on the calipers before you clear-coated them, you would have seen "reactions" when you sprayed on the clear coat. Any before and after pics? Regards, Maurice. -
Painting brake calipers
1schoir replied to Fluke996's topic in 996 Series (Carrera, Carrera 4, Carrera 4S, Targa)
Doug: If you can, when you have finished wetsanding, use a paint product called "Prep-sol" or "Pre-Kleano" to clean up all residue of oil, brake fluid, grease, fingerprints, etc. before you spray on the clearcoat. They are available at any auto paint store and do a great job of providing a clean surface so as to not get "fish eyes" or other paint failures. As a last resort, you can use the original Formula 409 as a pre-cleaner. It's an old body shop trick because that particular cleaner does not leave any residue before painting. Regards, Maurice.